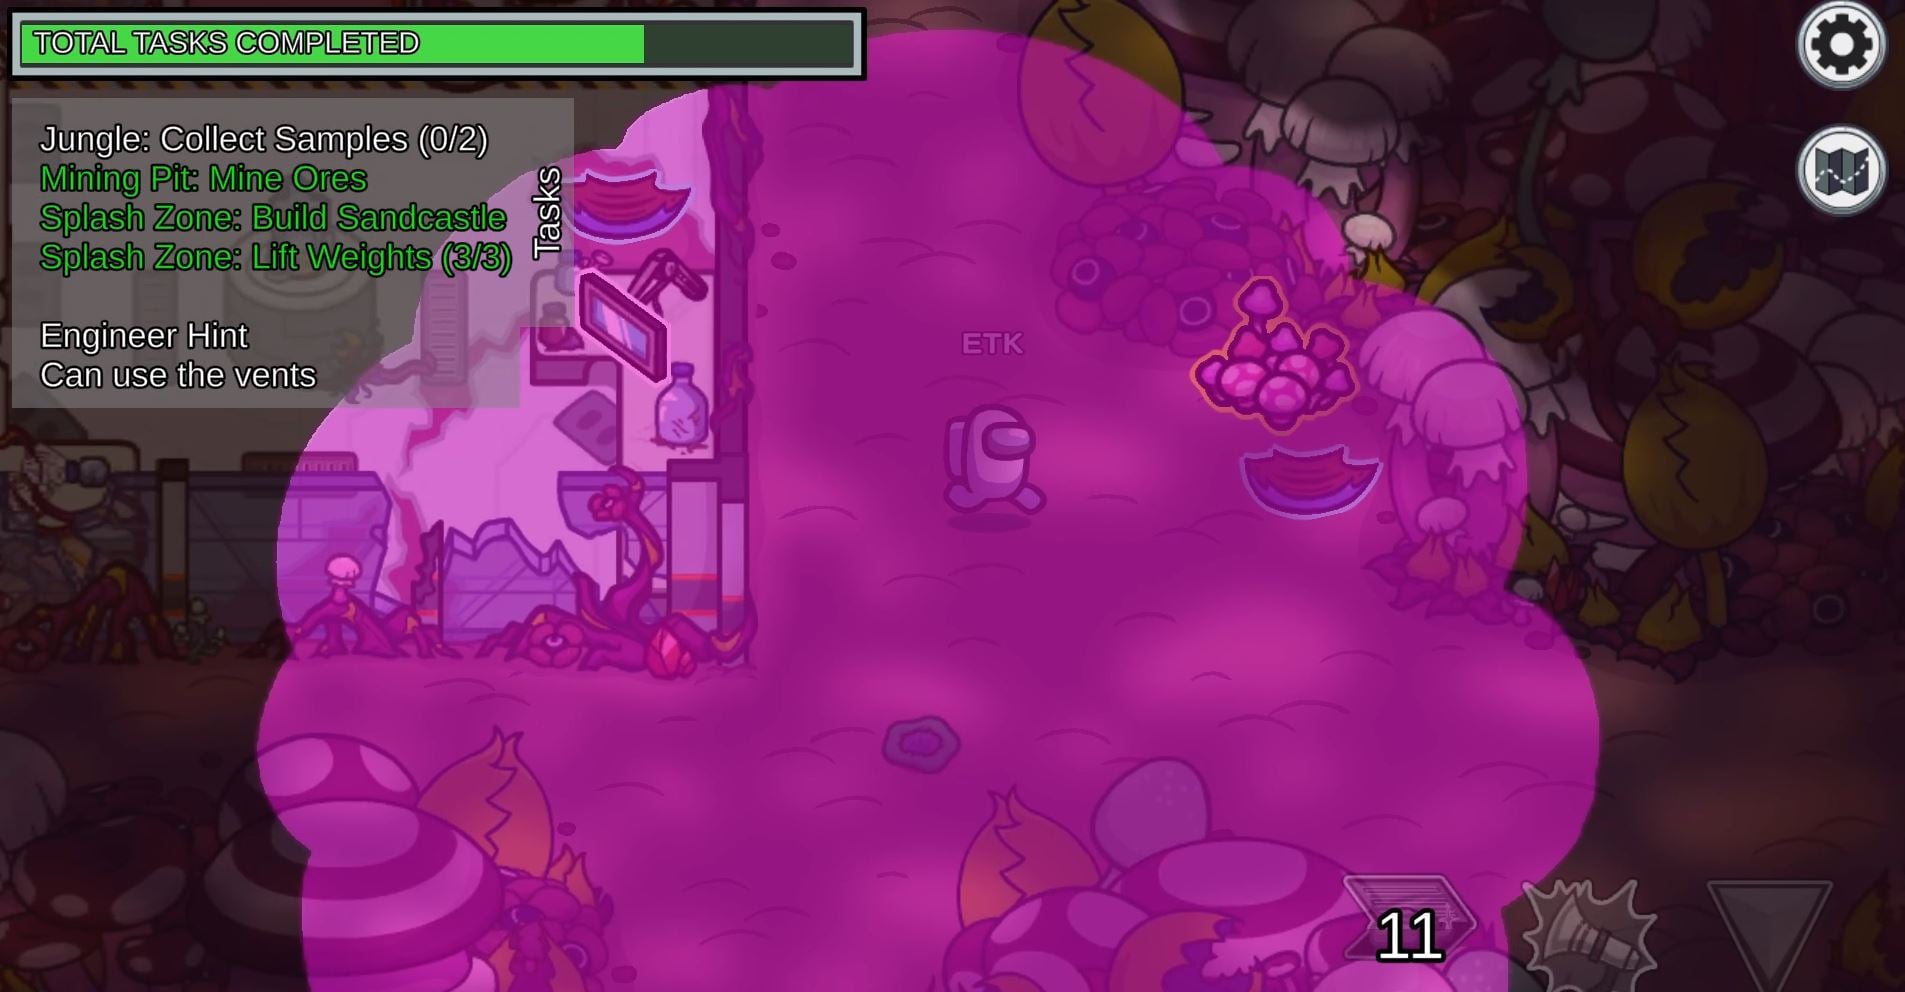
On Oct. 24, Innersloth released The Fungle, the fifth and newest map in Among Us. This mushroom-infested jungle is filled with tricks and secrets, so it’s best to go in prepared to get the best experience.
Here is a list of all the tasks, vents, and sabotages in The Fungle, so you don’t get caught off-guard when you hop into this bizarre map for the first time.
What you need to know to play on The Fungle in Among Us
The Fungle Tasks

First off, it’s important to know that there are no visual tasks on The Fungle in Among Us. Even if you play with visual tasks, you’ll never be able to clear someone for doing a task the way you would on other maps like Skeld.
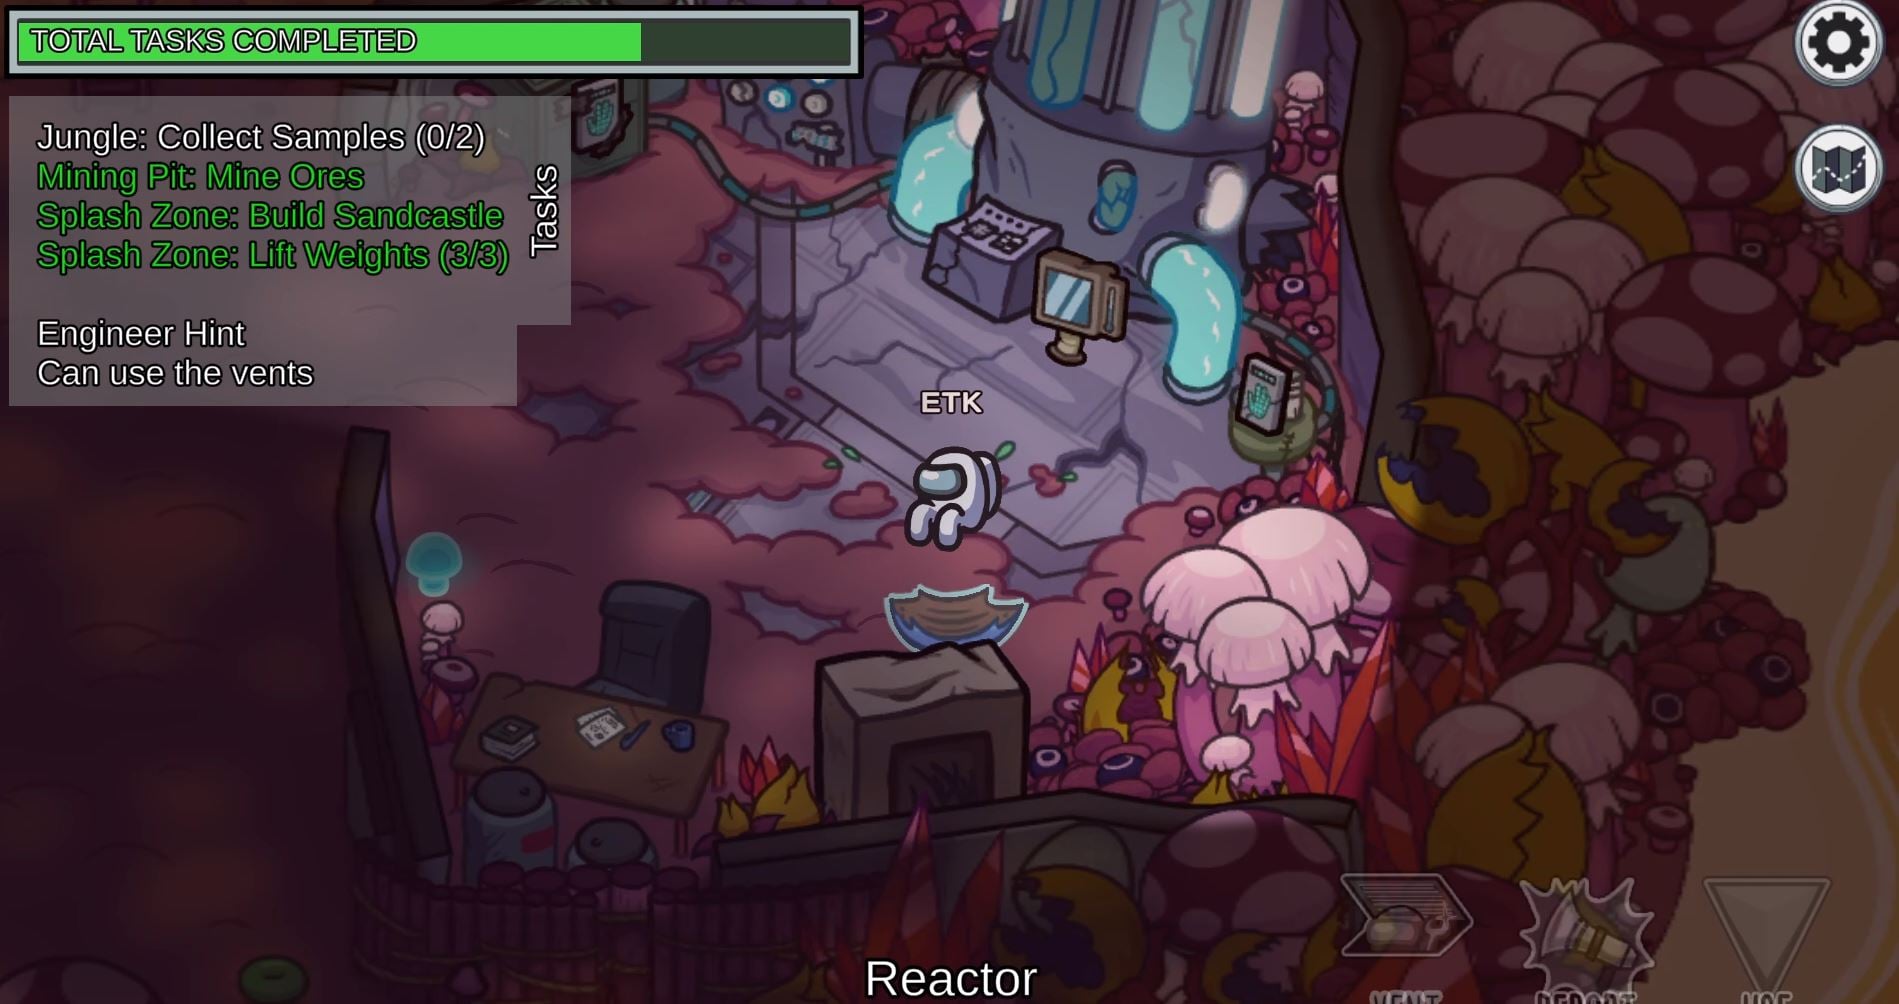
Common Tasks
Collect Samples (Jungle to Laboratory): Collect all of the gems and mushrooms that the map wants you to collect, then head over to the Laboratory to sort them out. Click and drag the samples into separate jars based on whether they’re gems or mushrooms.
Enter ID Code (Lookout): Pull the ID Card out of your wallet and enter the code into the machine. This is identical to the task in Polus.
Replace Parts (Reactor to Communications): Go to the toolbox and collect the three parts. Now, go to Communications and drag the old parts to the trash icon. Finally, replace them with the parts that you collected from the toolbox to complete the task.
Coast Marshmallow (Beach): Get a stick on the upper left side of Beach, then head over to the campfire. There, you will pick up a marshmallow and roast it over the fire. Once yellow stars start twinkling over your treat, click on it to complete the task. If you take too long, the marshmallow will get burnt and you’ll have to roast a new marshmallow.
Short Tasks
Assemble Artifact (Laboratory): Drag the gems to the middle of the screen in order from the bottom piece to the top. For reference, the first piece will have a tip on the bottom.
Build Sandcastle (Splash Zone): Drag the bucket off of the sandcastle to finish the structure.
Collect Shells (Beach): Drag your finger or mouse across the screen to move the sand and reveal the shells. Tap on the shells once they are revealed to collect them.
Crank Generator (Communications or Kitchen): There are two different locations where this task might be assigned to you. Rotate the lever by clicking and holding it until the generator is fully charged.
Empty Garbage (Cafeteria or Splash Zone): There are two different locations where this task might be assigned to you. Hoist the bag up quickly by flicking upwards, then move it to the side to get it out of the garbage can.
Find Signal (Communications): Slowly move the dial until the frequency waves match. This is very similar to fixing Communications sabotage.
Fix Antenna (Communications): Click and hold until the meter enters the red to swing a hammer at the antenna to get it standing up straight again.
Fix Wiring (Communications or Dropship): There are two different locations where this task might be assigned to you. Match up the colors of the wires by clicking and dragging them. Unlike in other maps, this task is only one part as opposed to three.
Lift Weights (Splash Zone): Click and hold to lift the dumbbell, then let go when the bar enters the green. Do this for three reps to complete the task.
Monitor Mushroom (Jungle): Drag each of the four bars to the appropriate levels indicated by the horizontal white lines.
Play Video Game (Dorm): Tap on the asteroids as they fly across the screen until you destroy 20 of them. This is exactly the same as the task on Skeld. If you need to put down the task or if a body gets called while you’re doing it, don’t fret–the game remembers how many asteroids you destroyed, so you won’t have to start all over.
Record Temperature (Greenhouse, Laboratory, or Reactor): There are three different locations where this task might be assigned to you. Adjust the number on the left side to match the temperature on the right. You can do this by either tapping the arrows repeatedly or holding them to go faster.
Throw Frisbee (Splash Zone): Tap on the frisbee to pick it up, then flick upwards to throw it.
Long Tasks
Catch Fish (Dock to Kitchen): Catch three fish by tapping their shadows when they swim directly underneath the bait. Once you caught three, head over to the kitchen and cook them. Tap on the outlines to place them, then wait 10 seconds. Now tap again to flip them over. Wait an additional 10 seconds, then tap the three cooked fish to collect them and complete the task.
Collect Vegetables (Greenhouse to Kitchen): Pull each vegetable out by clicking and holding onto them. Once they are all collected, move to the kitchen to prep them. Tap on a vegetable to put it on the cutting board, then click on the cutting board repeatedly to chop it up. Repeat this until all of the vegetables are cut properly to complete the task.
Extract Fuel (Upper Engine to Storage): Hold down the button to collect the fuel in Upper Engine. Then, go to Storage and hold down the button again to transfer the fuel.
Help Critter (Jungle to Laboratory): Tap on the leaves to move them and reveal the egg. Once you collect the egg by tapping on it, move to the Laboratory and place it in the incubator. You have to wait for 30 seconds, at which point you have to click on the empty plate and water bottle to give it food and water.
Hoist Supplies (Jungle): Pull the rope down to move the supplies upwards. Now climb up the ladder and repeat the process to get the supplies to the top. You can’t grab the bottom of the rope, so it’s better to start from as high up on the rope as possible to get a big pull.
Mine Ores (Mining Pit): Click and hold on rocks and let go to hit the rocks with your pickaxe. If you time it so you let go when the meter hits green, your swings will be stronger and you’ll break the rocks more quickly. The task is completed when you have revealed all of the ores–you do not need to break every single rock.
Polish Gem (Mining Pit): Rub the smudges on the gem by dragging your mouse or finger back and forth across the dirty spots until they sparkle.
Replace Water Jug (Storage to Cafeteria): Click and hold on the button to move the water from one jug to the other. Then head over to the Cafeteria and do the same thing to complete the task.
Water Plants (Storage to Greenhouse): Find the blue watering can on one of the shelves in Storage. Then move to the Greenhouse and tap each plant to water them.
The Fungle Vents
The vents are quite special, as compared to other maps, the vents in The Fungle always connect to at least two other vents.
An Among Us player created a handy graphic of the vent systems for easy reference. System One connects the Cafeteria, Splash Zone, Laboratory, and outside of Storage. This four-way system of vents allows you to monitor the majority of the left side of the map.
System Two connects the Kitchen to the middle and bottom right of the Jungle. This allows you to traverse across the bottom half of the map.
Finally, System Three connects Communications, Lookout, and Reactor. Much like System One, this is perfect for Impostors and Engineers to quickly scout the right side of the map. Unlike in System One, all three vents in this system are directly next to vital parts of the map: Comms, the telescope, and Reactor, respectively.
The Fungle Sabotages
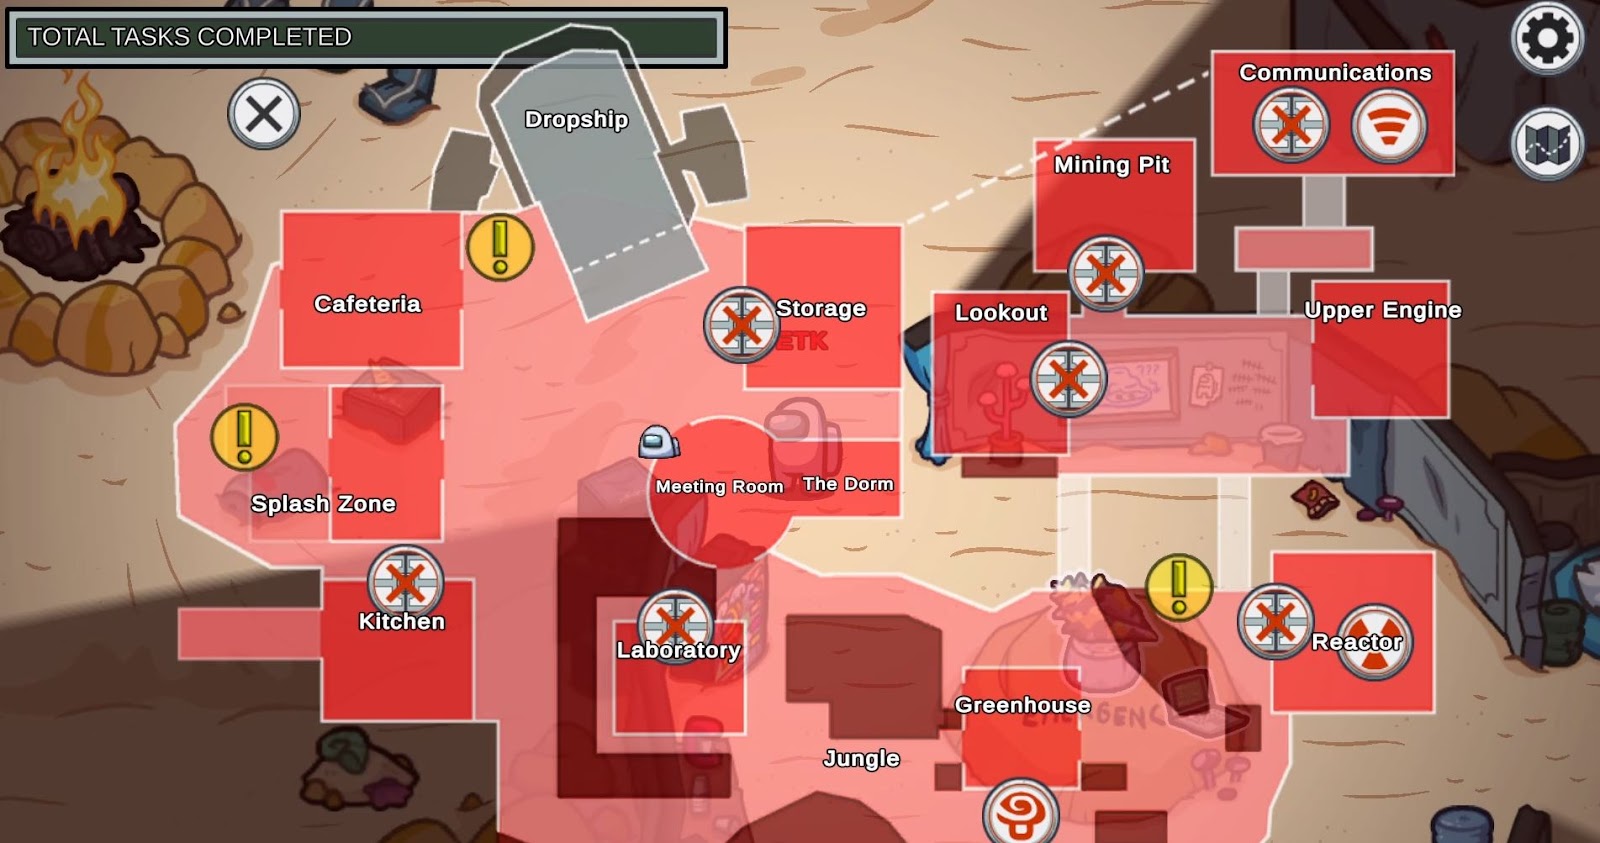
The new sabotage unique to this map is Mushroom Mixup, which can be called by clicking the mushroom icon at the bottom of the sabotage menu. Mushroom Mixup will alter every player’s color and cosmetics for a total of 10 seconds, making everyone completely anonymous.
Expect impostors to be significantly more aggressive during this time, and try to keep track of any goings-on before and after the sabotage to work through what transpired during Mushroom Mixup.
In addition, three other sabotages make a return as well. Players can call the Reactor sabotage by clicking the Reactor icon in the bottom right of the sabotage map. Communications sabotage can be called by clicking on the Wi-Fi symbol in the upper right of the sabotage map. Finally, there are Doors sabotages at Storage, Kitchen, Laboratory, Communications, Mining Pit, Lookout, and Reactor.
Other Important Features
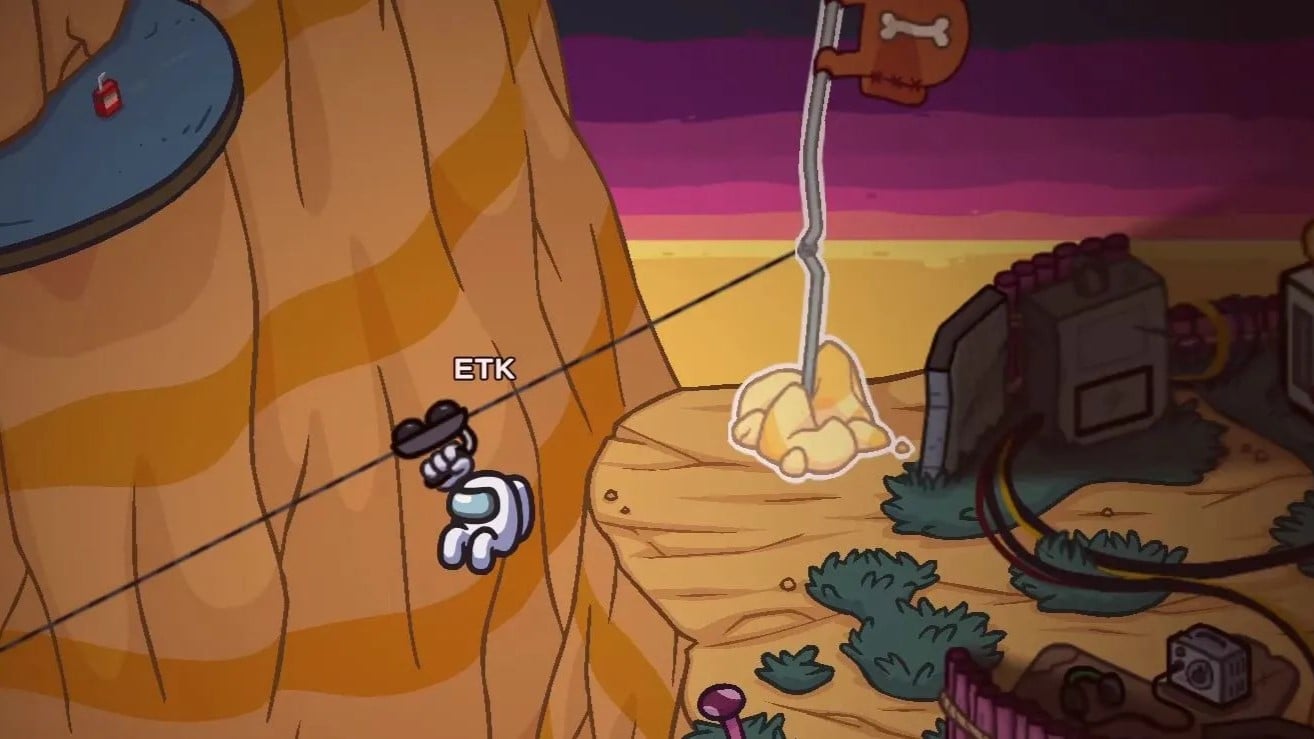
The three new features on The Fungle that were not already covered are the ziplines, telescope, and mushrooms.
The zipline is the only way for players to traverse between Storage and Communications directly and vice-versa. As you move, you can actually catch a glimpse of the Mining Pit below you as well. When you land, you’re put on a three-second cooldown before you can take the zipline again, so you can’t use it to avoid the Impostor indefinitely.
The telescope is on the Lookout point on the right side of the map. This is the best source for surveillance that players will have in the absence of cameras. The telescope allows you to see anywhere on the map, but only in a little circle. Checking everywhere would take a long time, but it’s great to keep an eye on one or two locations at a time if you have a sneaking suspicion about something–or if you’re an Impostor trying to find their next kill.
Mushrooms are scattered throughout the Jungle on the bottom part of the map. If anyone steps on one–be it Crewmate or Impostor–a massive spore cloud emits around it, hiding players from one another. You can even hide bodies by triggering the spore clouds as well, making it the perfect crime scene for killers.
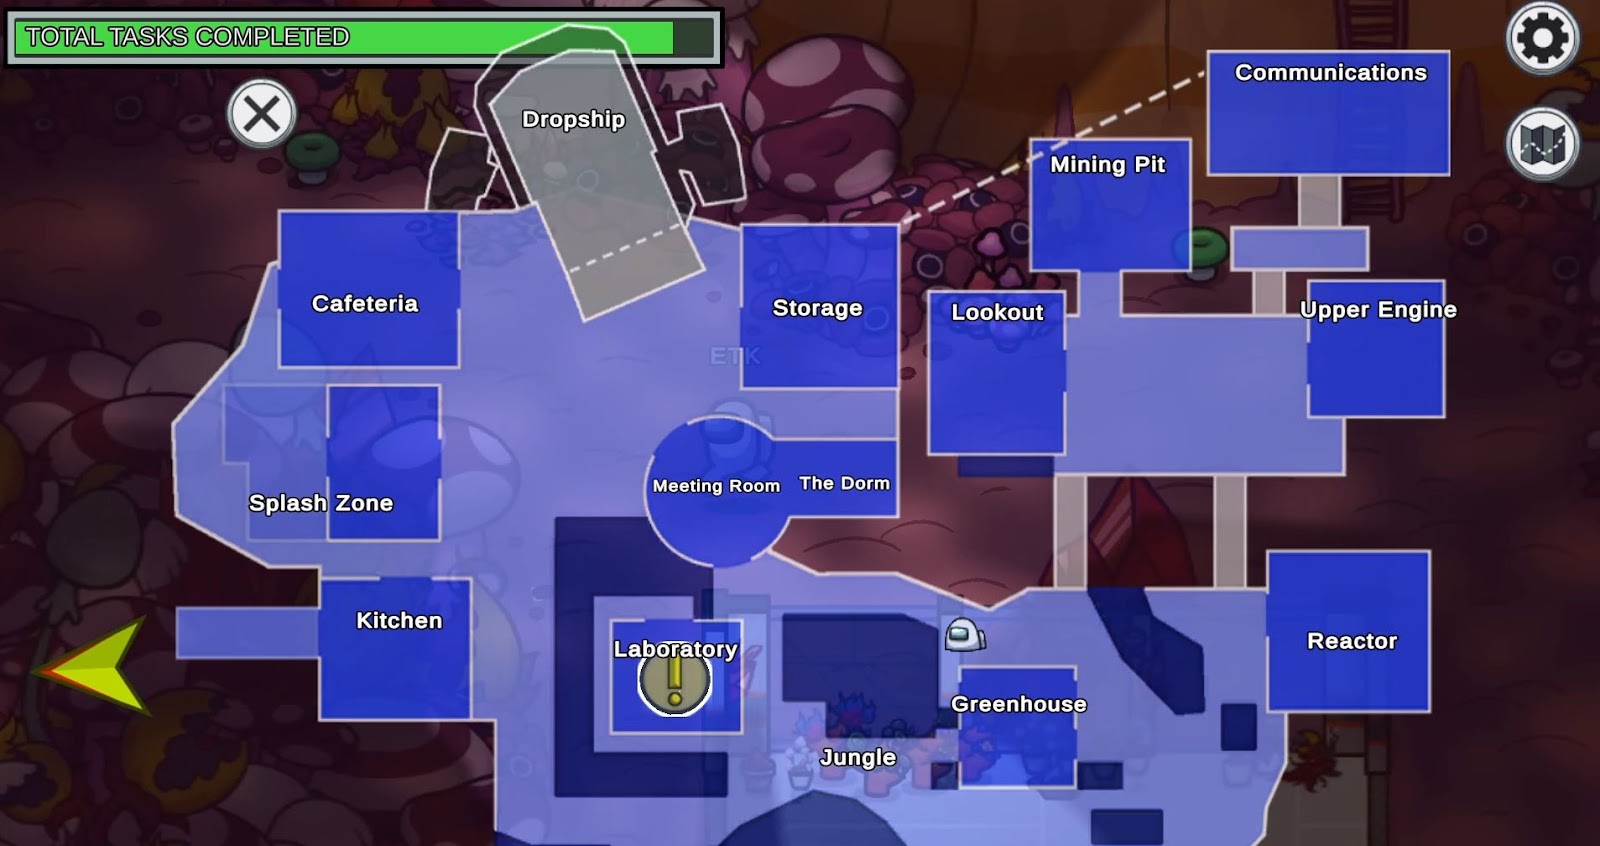
Finally, it’s important to bring up the returning features from previous maps. Vitals can be found on the bottom right of Laboratory. There are four ladders on the right side of the map. And just like with the ziplines, they have a three-second cooldown so you can’t stay invincible. Finally, an emergency meeting can be called using the conch shell in the middle of Meeting Room.


Published: Nov 7, 2023 01:28 am