The Githyanki Warrior Lae’zel can be a gigantic source of damage, crowd control, and durability in Baldur’s Gate 3. To make her work well, you’ll need to equip her with the best feats for the job.
Finding what feats are most effective for our Gith friend can be tricky. Let’s go over the four best choices for her four levels to see why you may want them.
The best choices for Lae’zel Feats in BG3
The best feats for Lae’zel improve her consistency, massively improve her damage, or add additional utility to her kit to make her more effective on the frontlines. Primarily, it is very important to make her hit hard. As a Two-Handed Fighter, she leans towards quickly taking out single targets, which is a goal that several feats can help her reach.
This guide assumes your Lae’zel will be a level 12 Fighter. However, it can work as long as you keep her as a two-handed combat class of some kind, such as a Fighter/Barbarian multiclass. If you plan on respeccing her at Withers to something else, then this guide will be less effective for your Lae’zel.
Ability Improvement
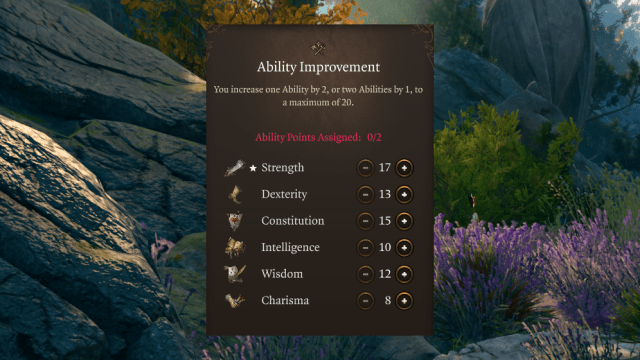
The most consistent option for Lae’zel will be Ability Score improvements in Strength and Constitution. Ability Improvements simply improve the raw ability scores of your character, with Strength being Lae’zel’s primary damage stat and Constitution improving her health.
Giving Lae’zel more Strength should be a huge priority during her level-ups. Improving accuracy is a must for Act Three BG3 as there are several enemies that you otherwise will have a 50 percent chance to hit. Working her Strength towards 20 is pretty important.
That being said, it’s not too tricky to get high Strength in BG3. There are several free boosts to Strength throughout the game, from Auntie Ethel’s Hair to the Potion of Everlasting Vigor. It is very possible to get Lae’zel to 20 Strength with only one Ability Improvement.
Even then, it’s fairly reasonable to boost Lae’zel’s health and Constitution saving throws. Ability Improvements focused on Constitution improve Lae’zel’s survivability, as does the Tough feat. Making sure Lae’zel can take a hit is an excellent idea, as she will be racking up damage as a frontliner.
Great Weapon Master

If you want your Lae’zel to be an effective damage dealer in the endgame, the best feat for her will be Great Weapon Master. Great Weapon Master allows Lae’zel to drop her accuracy by five to improve her damage by 10, provided she is using a two-handed weapon. She also gets the ability to make a bonus action to swing on another enemy after slaying—or critically hitting—a previous one.
Great Weapon Master’s primary bonus is the ability to lower accuracy to pump damage. Plus-10 on a hit is a massive bonus that can easily turn Lae’zel into your best damage dealer. A standard turn for her is three weapon swings by level 11, which means this feat is giving her a +30 to damage per round. With Haste, that’s +60.
However, that minus five to hit is no joke. Lae’zel will often miss if you don’t have a good plan for her when you toggle this ability on. The best way to negate this penalty is through advantage since rerolling the d20 will often close the gap between that minus five and your enemy’s AC. Lae’zel herself can set this up with the Battle Master’s Trip Attack maneuver or by wearing strong weapons that give advantage natively, like the Gandrel’s Aspiration Heavy Crossbow.
We recommend toggling on Great Weapon Master only when you have a high chance of hitting. So, you can attack without the feat on until Lae’zel lands a Trip Attack and then can toggle it on to deal +10 damage more consistently. This will help Lae’zel feel more effective in combat if you find her missing too often.
The other aspect of this feat, where she gains a bonus action on critical hits or kills, will come in handy often. As a primary damage dealer, Lae’zel will often rack up bodies, and getting to swing a Greatsword as a bonus action is highly effective. She doesn’t have fantastic bonus actions—outside of Pommel Strike—so being able to simply attack again is a welcome change of pace.
Polearm Master

Polearm Master is a unique feat that allows Lae’zel to swing the butt-end of a Glaive, Halberd, Quarterstaff, or Spear to deal 1d4 + Strength in damage as a bonus action. In addition, it allows her to make an Opportunity Attack when a target comes into range, rather than when it leaves her range.
Like Great Weapon Master, this feat is fantastic, but it’s best known for its damage-dealing capabilities. Lae’zel is without a very strong bonus action unless she multiclasses. This feat gives her an extremely effective option in simply dealing additional damage. This bonus action carries over many different aspects of Lae’zel and the weapon, including the damage from Great Weapon Master and whatever extra damage the weapon may have on it.
This makes Polearm Master a fantastic level 12 feat, after you’ve gotten some Strength and Great Weapon Master. The follow-up attack is very consistent, unlike the somewhat unreliable Great Weapon Master version. In addition, it allows Lae’zel to spread her wings aside from Greatswords. Glaives and Halberds are versatile and exceptionally enjoyable, ranging from the caveman-strength Harmonium Halberd, which can bring her Strength above 20, to the Dancing Breeze, which turns Lae’zel into a Fireball once per turn.
That isn’t all, however. The ability to make an Opportunity Attack when an enemy approaches, rather than leaves, is basically guaranteed to give Lae’zel another attack per turn. This feat messes with the AI like none other, forcing melee units to walk right into range of her without activating Disengage. Alongside another melee character like a Barbarian or Monk, this can easily give Lae’zel another chance to end turns before they even begin.
This synergizes with the Sentinel feat, another reasonable feat option if you have this feat. Sentinel locks down people who are moving around. With the Reach property, Polearm Master can lock foes ten feet away from Lae’zel, potentially keeping them from being able to punch her.
The only real issue is that Lae’zel only has one reaction per turn since the only option that grants additional reactions is the Duelist’s Prerogative. Having too many reasons to slap someone is hardly a downside, though.
Mage Slayer

A fantastic option for Act Three of BG3 is Mage Slayer, a feat that grants Lae’zel advantage on saving throws against creatures who cast spells within melee range of her. Mage Slayer also grants Lae’zel a reaction to hit a spellcaster who casts magic nearby, as well as the ability to give disadvantage on concentration checks against targets who take damage from her.
Unlike our other recommended feats, all three aspects of this feat support Lae’zel equally. Being able to get advantage on saving throws is a godsend for Act Three. The number of times your Lae’zel will be knocked out of combat due to a Hold Person is, frankly, too much. Getting her in range of the caster first will let her be able to roll twice on the save, giving her a fighting chance. It’ll also make her very annoying for the several mage bosses in BG3, furthering her utility as a frontliner beyond just dealing damage.
That comes with making an attack whenever a target casts a spell, too. Spells don’t normally provoke opportunity attacks from melee warriors. But, this feat causes spells of all kinds to eat some risk when being cast—from Fireball to Misty Step. If it’s a spell like Darkness or Wall of Fire, then you get to have a chance to immediately interrupt the spell, keeping it from going off and messing with your party.
Forcing enemies to roll their concentration check with disadvantage is perfect. Lae’zel hits fairly hard, but will likely only be putting DC 15 concentration saves on enemies’ tables. Forcing enemies to roll twice there is going to be incredibly handy, potentially forcing annoying enemies like Vampire Spawns spamming Darkness or Silence to be less effective against your party.
As you get later and later into BG3, casters are a bigger and bigger nuisance. Mage Slayer will let your Lae’zel threaten them more effectively, freeing your casters to use magic like Haste or Wall of Fire to end fights—instead of weaker spells like Sleet Storm or Grease to cancel concentration. We still recommend scooping up a damage-oriented feat like Great Weapon Master or Polearm Master first, just to make sure the mage dies soon after you end their concentration.
Others Asked
Why is Great Weapon Master considered the best feat for Barbarians in Baldur's Gate 3?
Great Weapon Master is considered the best feat because it grants plus-10 to damage rolls while wielding a melee weapon in two hands and allows an extra attack as a bonus action if critically hitting or killing an enemy, significantly boosting damage potential.
What are the recommended feats for Lae'zel at level four in Baldur's Gate 3?
At level four, it's recommended to improve Lae'zel's Strength and Constitution scores, with an ability score improvement to boost her Strength and Constitution.
Where can you find Lae'zel in the early game of Baldur's Gate 3?
After you crash-land on the beach, you can find Lae'zel trapped in a cage at the exact coordinates (X:238, Y:371), with two Tieflings guarding her.














Published: Dec 2, 2023 09:44 pm