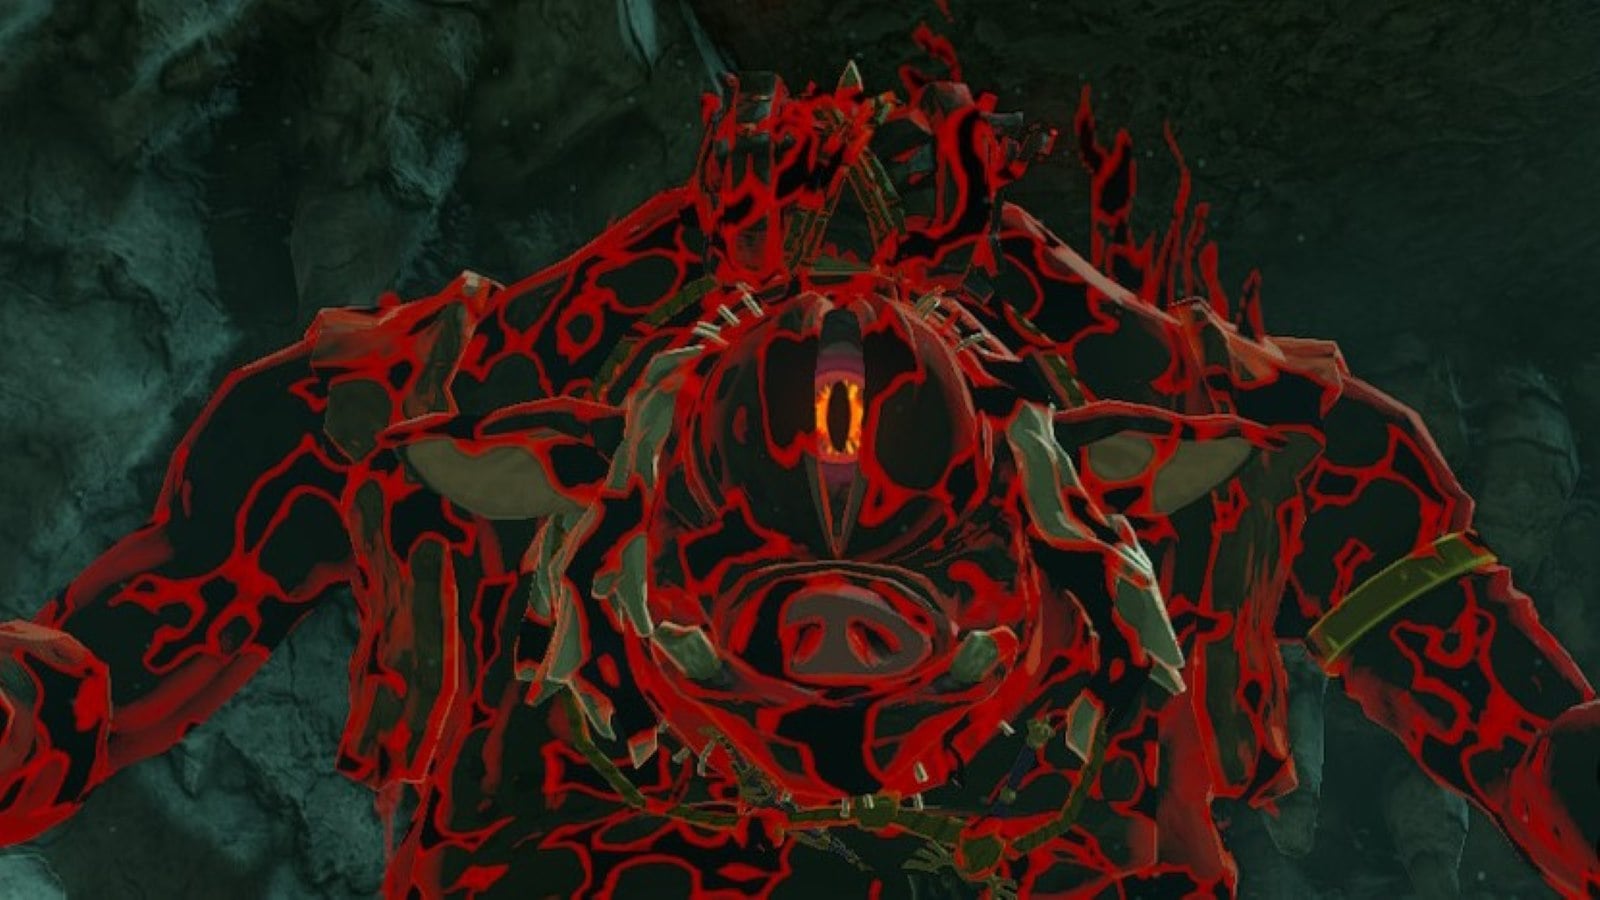
Black Hinoxes are the third (and strongest) version of the Hinox field boss in The Legend of Zelda: Tears of the Kingdom.
They’re also the most reliable source of Hinox Guts, a monster component you need for the three-star upgrades to the Soldier, Royal Guard, and Fierce Deity armor sets, as well as for the initial upgrade for the Ancient Hero set. Black Hinoxes are the only Hinox variant with a 100-percent chance to drop Hinox Guts (as opposed to 20-percent from regular Hinoxes and 50-percent from Blue Hinoxes).
There are 16 fixed locations for Black Hinoxes, with eight on the surface and eight in Hyrule Depths. You need 51 Hinox Guts in total to upgrade every armor set—27 for the Ancient Hero set, six for the Fierce Deity set, nine for the Soldier set, and another nine for the Royal Guard set. You probably want to get all 16 guaranteed Hinox Guts drops before the next Blood Moon reset.
Here are the locations of all Black Hinox spawn locations in The Legend of Zelda: Tears of the Kingdom.
Where to find Black Hinoxes on the surface in TotK
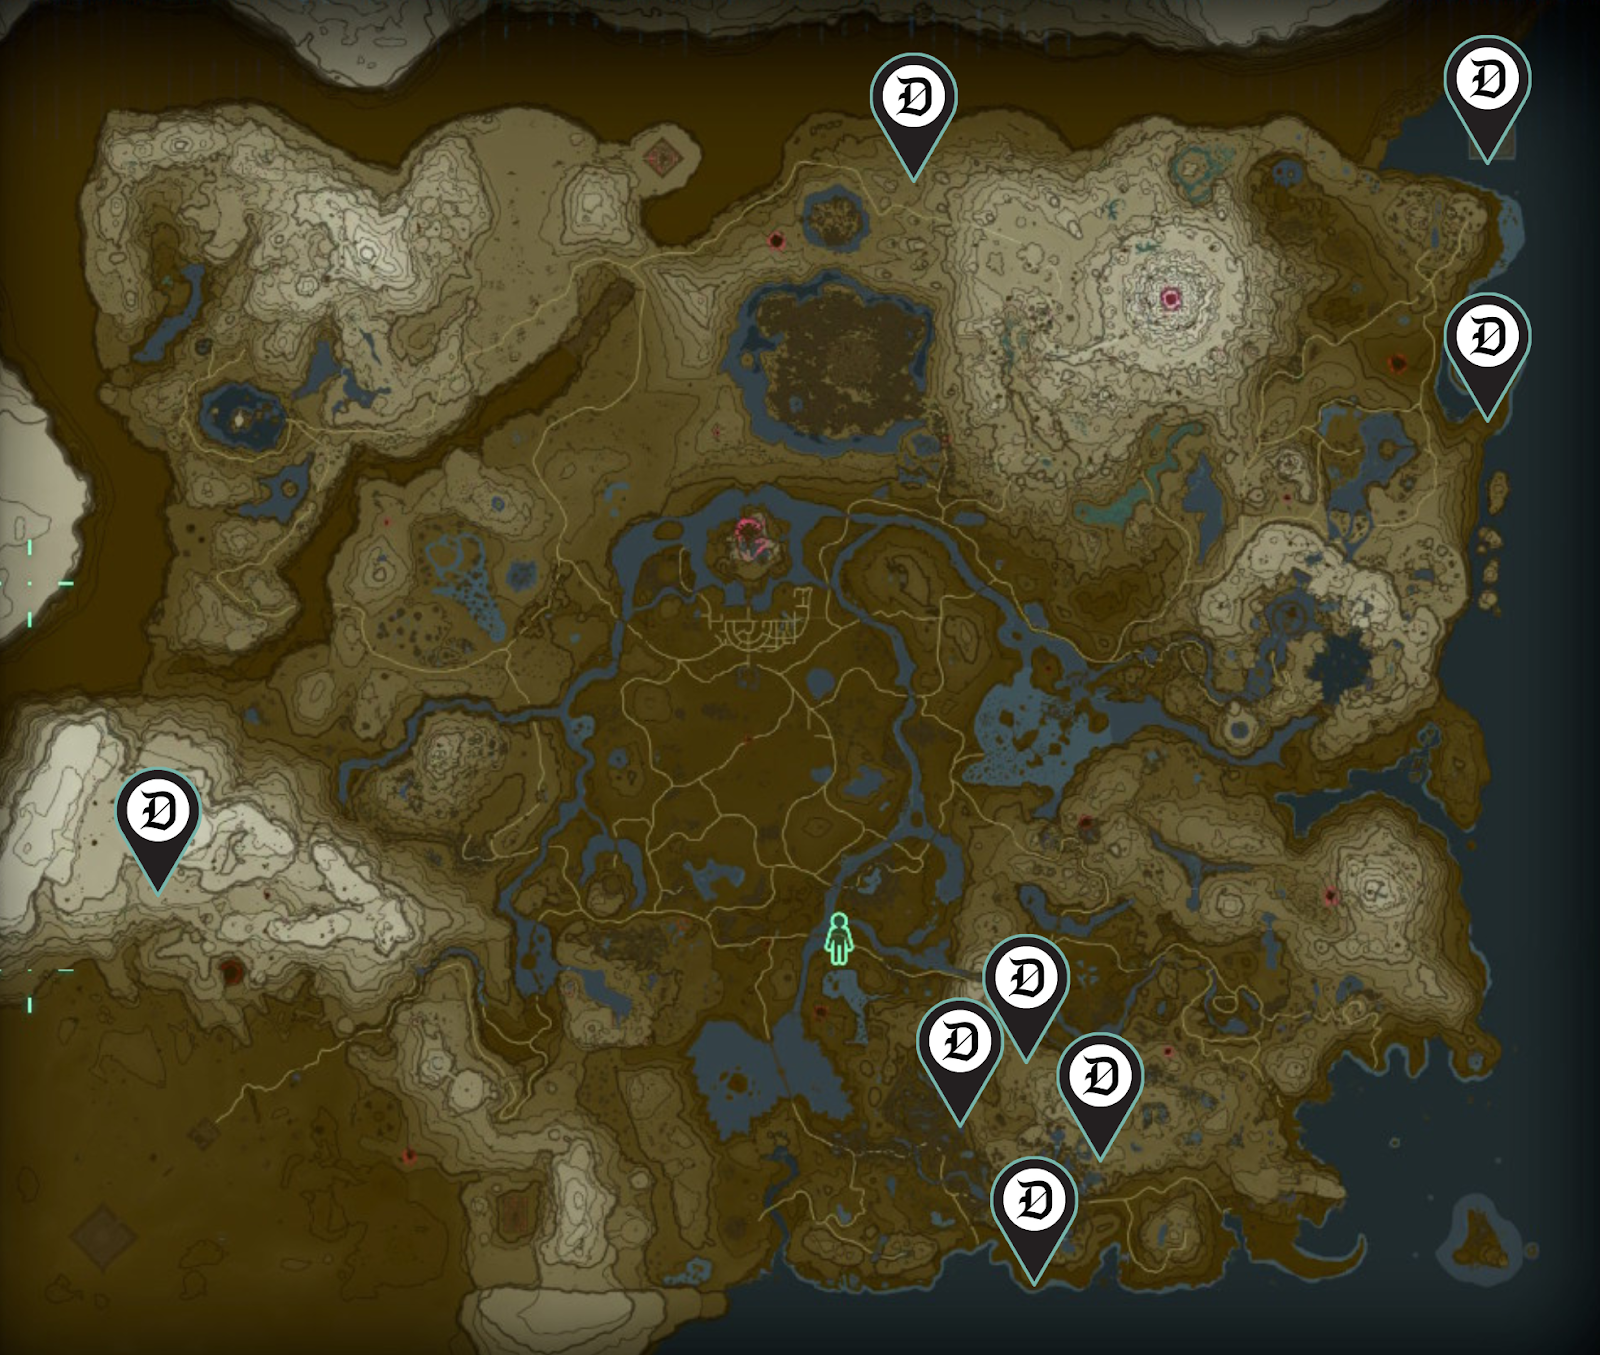
Of the eight Black Hinoxes on the surface of Hyrule, there are four clustered in the Faron region, three gathered in the northeast across the Akkala and Eldin regions, and one lone straggler in the Gerudo region.
North Akkala Beach Cave
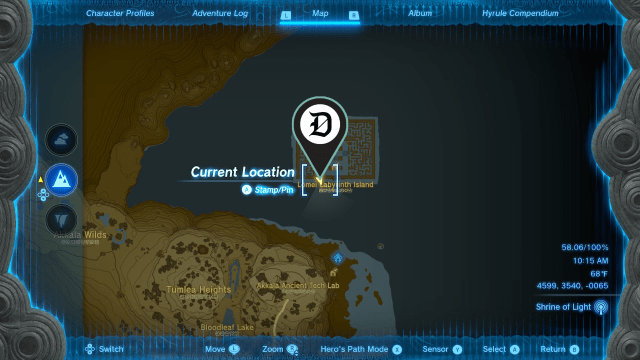
- 4599, 3540, -0065
- Accessible through two cave entrances. The first is the North Akkala Beach Cave’s main entrance, just east of the Akkala Ancient Tech Lab and south of the Rasiwak Shrine (4649, 3207, 008). You have to fight a few Electric Keese, some assorted Horriblins, and a Rock Like before you reach the main cavern where it sleeps.
- Alternatively, if you’ve cleared Lomei Labyrinth Island, you can teleport directly to its shrine (Igashuk) and jump down the hatch, making sure to stop and land in the basement before entering Lomei Labyrinth Chasm. The shorter drop to the Black Hinox is directly across the room; watch out for the Gloom Hands that spawn in the middle.
Malin Bay East
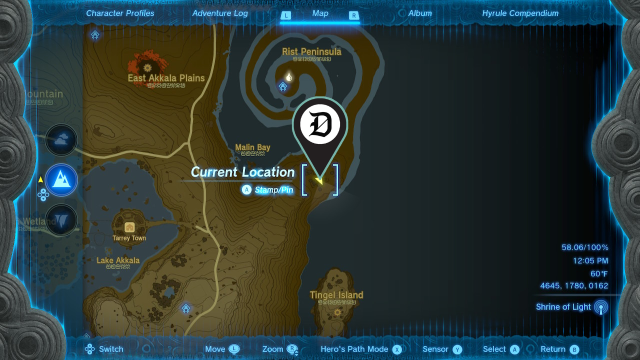
- 4646, 1780, 0162
- Found sleeping in a cluster of ruins and Akkala’s signature red trees just before the start of the Rist Penninsula’s spiral. The closest teleport is technically Gemimik Shrine at the center of the spiral, but you can avoid the hassle of crossing the sand and water by teleporting to the Sky Mine just above (Gikaku Shrine) and dropping down. If you have enough stamina to glide longer distances, Rasitakiwak (on the hill southeast of Lake Akkala) or the Ulri Mountain Skyview Tower are also good starting points.
Deplian Badlands South
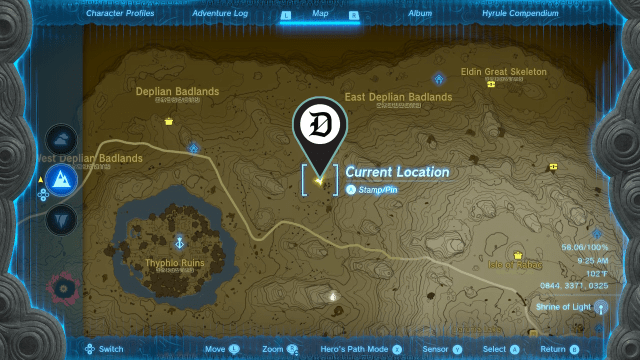
- 0844, 3371, 0325
- Sleeping on a plateau east of the Thyphlo Ruins. All the closest shrines are either underground or involve an inconvenient climb, so take off from the Thyphlo Ruins Skyview Tower and glide in. It’s a short enough distance that you won’t need much stamina to make the journey; if you have two or more pieces of the Glide armor set, you won’t need to use any stamina at all.
Meadela’s Mantle
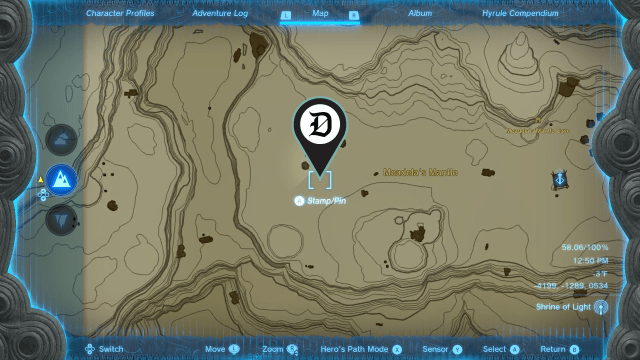
- -4199, -1289, 0534
- Directly west of the Gerudo Highlands Skyview Tower, in the middle of a small grove on the same plateau. Teleport in and either use Ascend to get outside and run over, or use the tower and dive down to get a few bullet time shots in at the start.
The following four locations are all within the Faron region, where it rains and thunders very frequently. Make sure you have a good supply of non-metallic weapons, bows, shields, and armor that’s still strong enough to take on a Black Hinox.
Jia Highlands
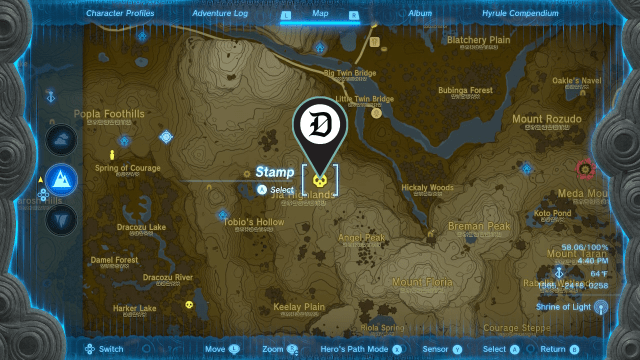
- 1565, -2418, 0258
- Located on the plateau just northwest of Mount Floria and southwest of the Dueling Peaks Stable. The easiest approach is diving down from Ukoojisi Shrine in the West Necluda Sky Archipelago. Alternatively, you can glide in from the Rabella Wetlands Skyview Tower if you have enough stamina.
Harker Lake East
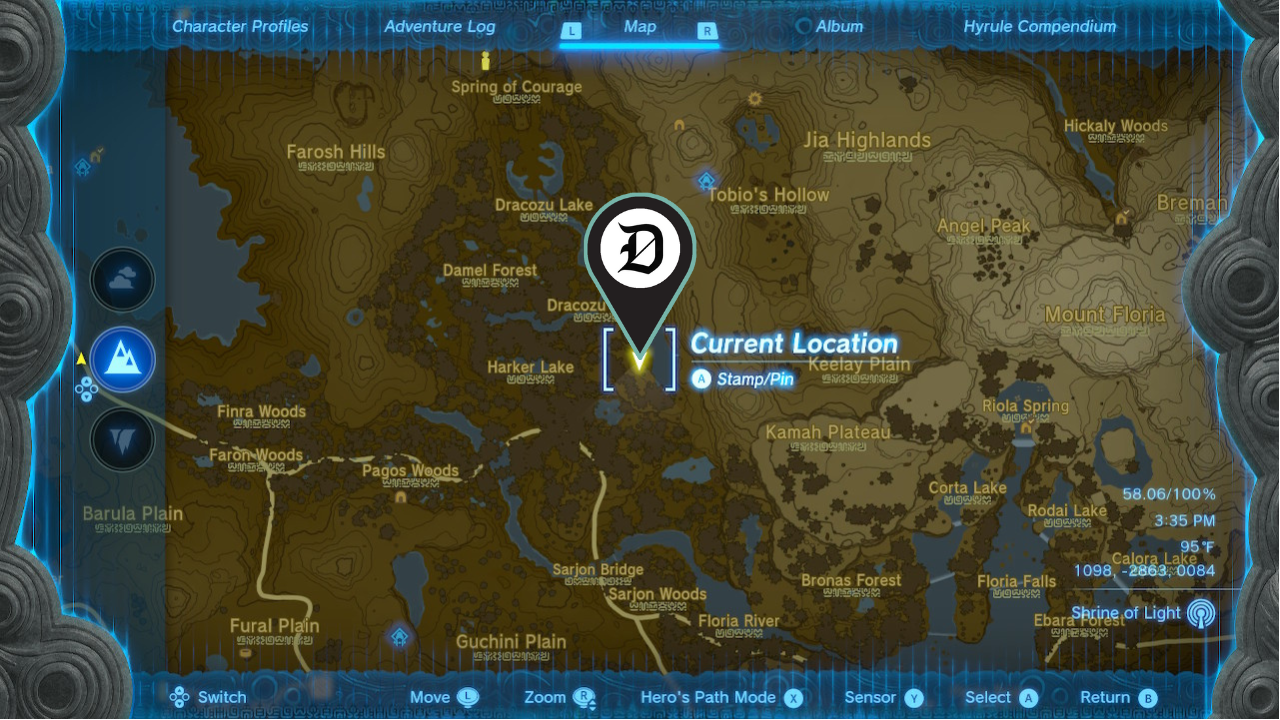
- 1098, -2863, 0084
- Located on a small plateau with its own unnamed pond east of Harker Lake. The closest teleport is Utoji’s Shrine, west of Tobio’s Hollow, where you can Ascend out onto the surface and glide down the cliffs.
Calora Lakefront Cave
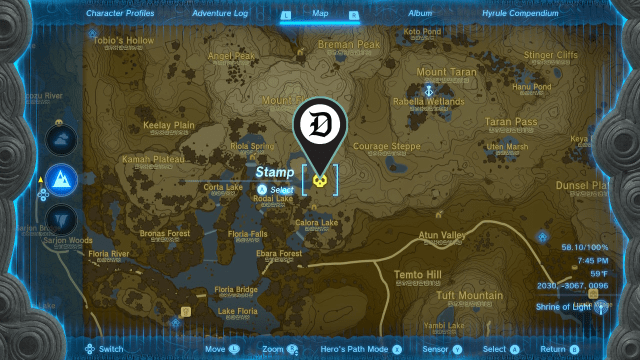
- 2030, -3067, 0096
- Uniquely named “The Eldest Hinox Brother” as part of the Ousting the Giants side quest, but otherwise mechanically identical to any other Black Hinox. You can find it at the bottom of the Calora Lakefront Cave; the main entrance is at approximately 2008, -3163, 0181. This one is a pain to get to, especially if it’s raining. You can either trek across the Floria Bridge from the Lakeside Stable and use Zonai Devices to scale the cliff from Ebara Forest, or use the Rabella Wetlands Skyview Tower for a long but relatively manageable glide onto the lake.
Aris Beach
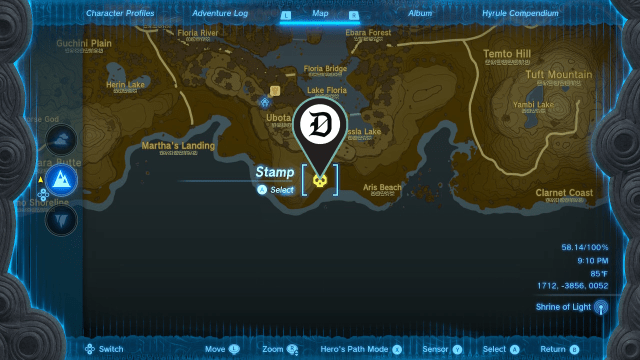
- 1640, -3870, 0003
- Found awake and wandering around on the beach beneath the small outcrop south of Ubota Point. Teleport to the Lakeside Stable’s Shai Utoh Shrine and glide down the cliffs.
Where to find Black Hinoxes in the depths in Tears of the Kingdom
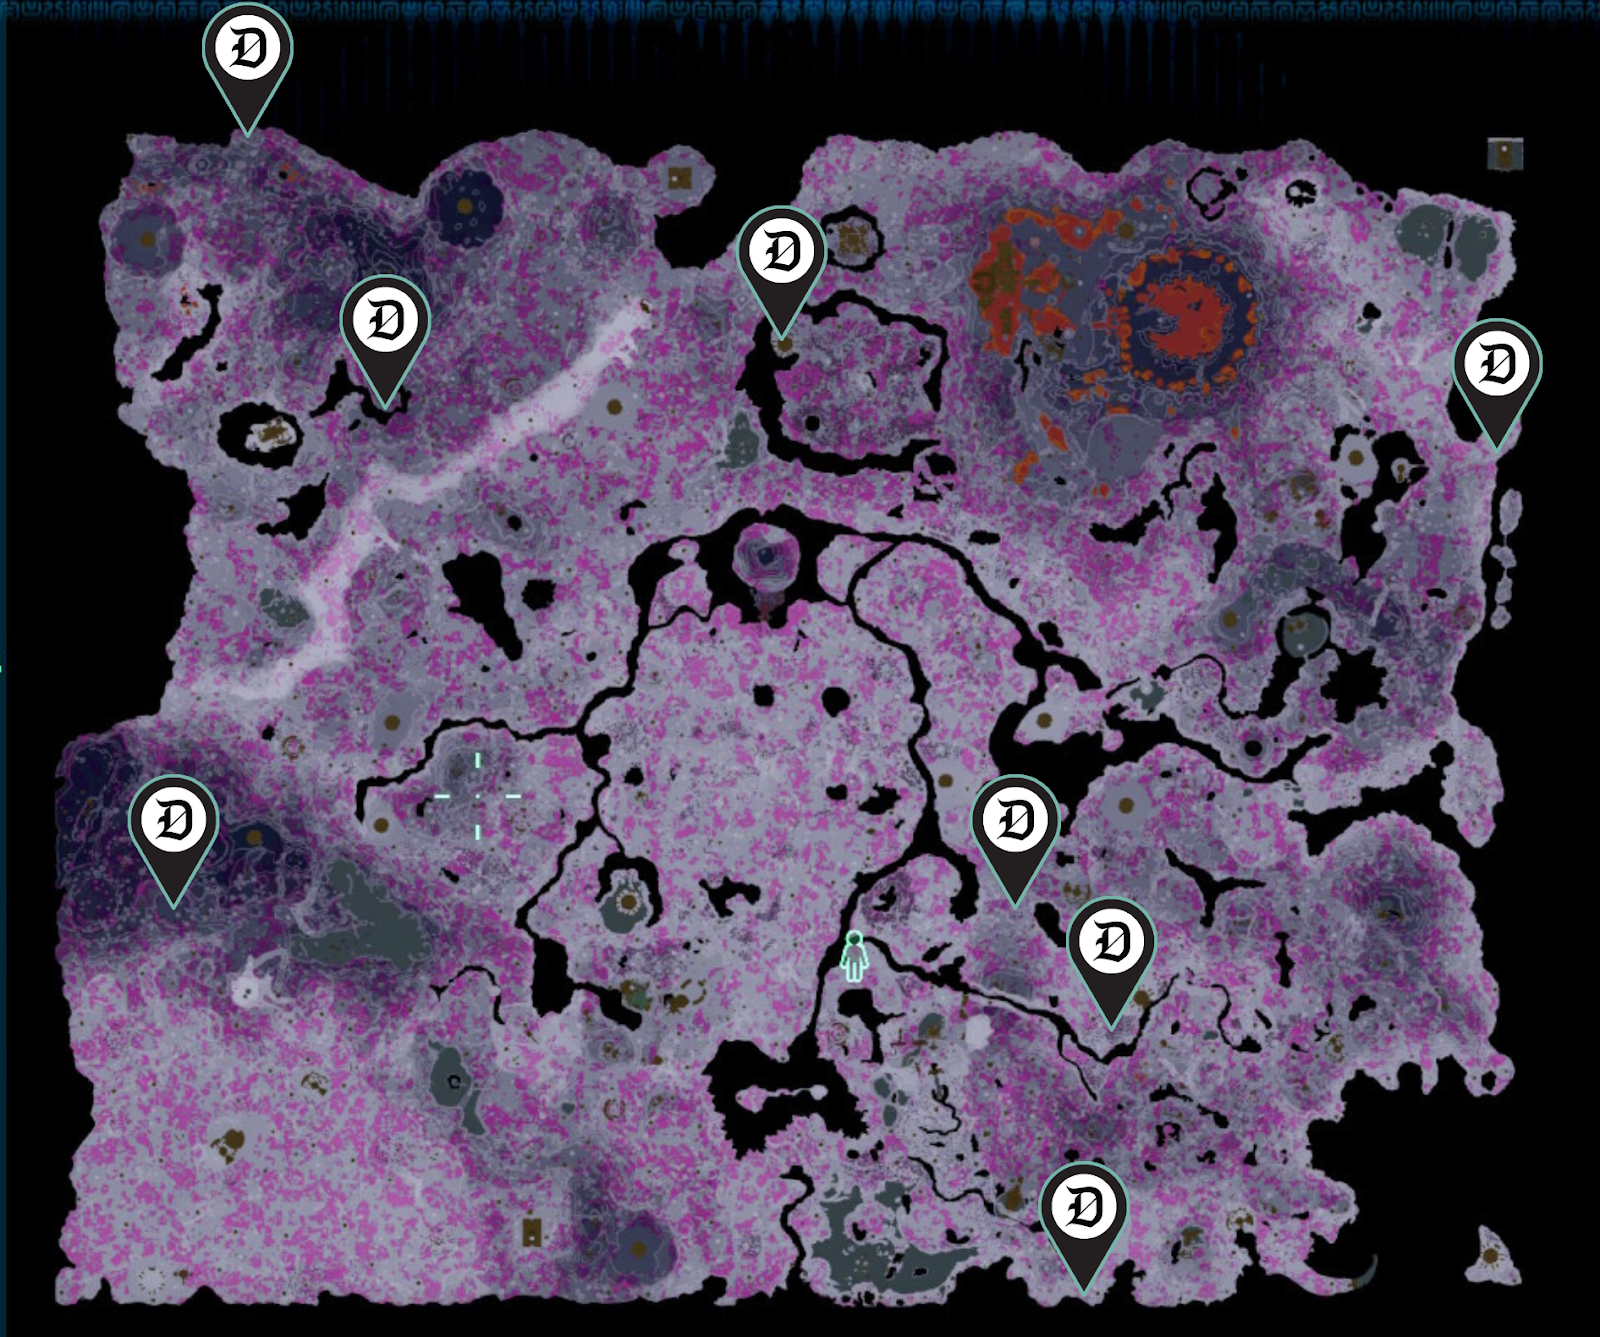
The eight Black Hinoxes found in the Depths are more evenly spaced out across the map, for better or worse. Unlike the surface mini bosses, these Hinoxes are unlabeled by the game itself. Thankfully, a majority of them are close to a Lightroot or other landmark, making them relatively easy to locate.
Tuft Canyon Mine West
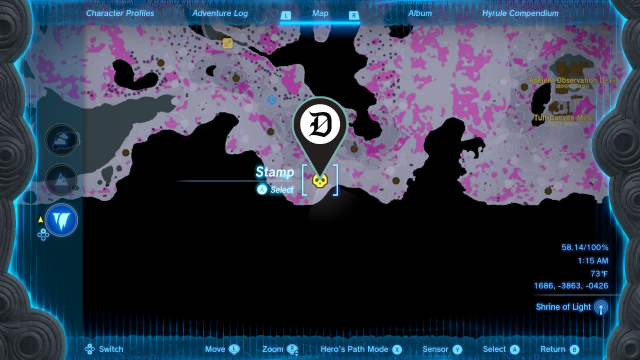
- 1686, -3863, -0426
- Directly underneath the Black Hinox on Aris Beach, on the high ledge hugging the southern edge of the map. Teleport to U-u-ujoj Lightroot and use the Zonai tool cache nearby to fly up. If you’ve completed the story quests after collecting every Sage and reporting back to Purah, you should have access to the Lightroots in this area. Otherwise, you need to make a big expedition southwards from the Meda Mountain Chasm.
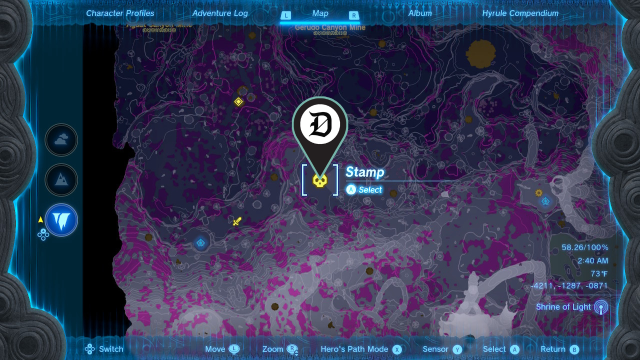
Abandoned Kakariko Mine
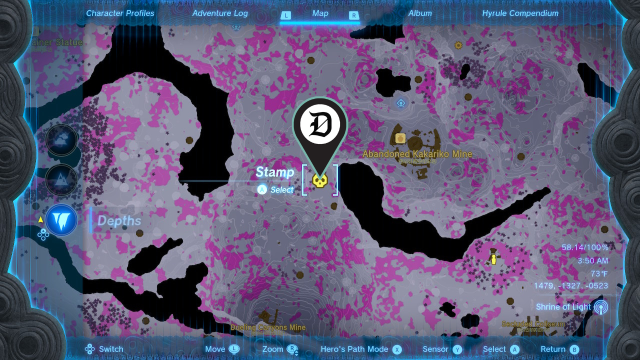
- 1479, -1327, -0520
- Located in a somewhat hard to access area. The closest teleport is technically Arusakam Lightroot north of the Abandoned Kakariko Mine, but that requires a slightly convoluted path past multiple obstacles. If you have enough battery capacity for longer journeys on Zonai machines, teleporting to Sohse Lightroot—near the Dueling Canyons Mine—gives you a straight shot to fly.
- If you haven’t explored this area yet, the East Hill Chasm near Kakariko Village will get you close to Arusakam.
Bubinga Grove
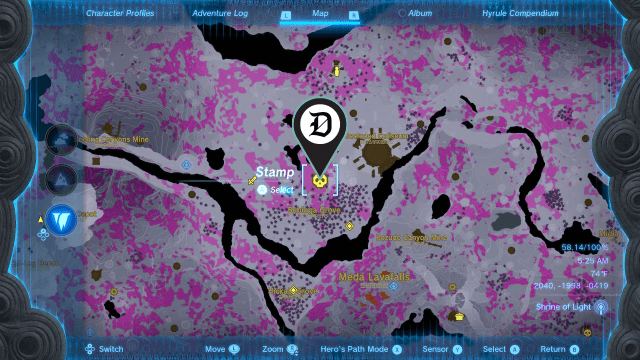
- 2040, -1990, -419
- Located far to the east of the Dueling Canyons Mine, just southwest of the Secluded Coliseum. It’s walkable from Sohse Lightroot, but beware the Lynel, Bokoblin camp, and large patches of gloom along the way.
Abandoned Tarrey Mine/Rist Mine
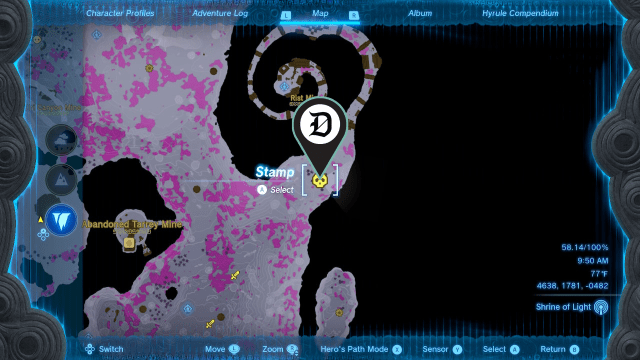
- 4638, 17871, -0482
- Directly underneath the Malin Bay East Black Hinox. Do not teleport into the Rist Mine’s Lightroot unless you’re prepared for the long gauntlet of monsters leading out. Instead, go to Kaikatisar Lightroot, just southeast of the Abandoned Tarrey Mine, then take the uphill path.
- Alternatively, you can drop down from the surface through the East Akkala Plains Chasm and make your way south.
Forest Coliseum
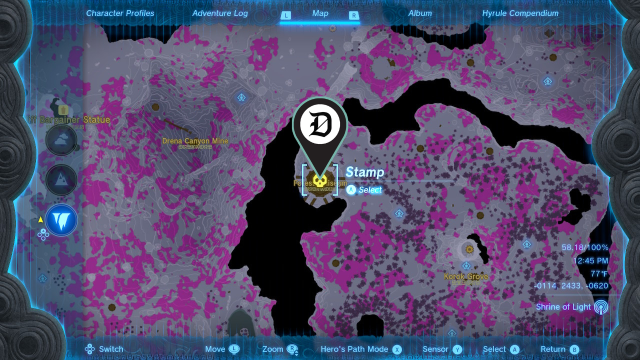
- -0114, 2433, -0620
- Stationed as a coliseum boss inside the Forest Coliseum, which is at the northwestern corner of the Korok Grove. On your first time here, you’re “ambushed” by Yiga Clan members after following the conspicuous trail of bananas leading inside. It’s walkable from the nearest teleport, Ramobnukas Lightroot.
- If you haven’t explored this area yet, the closest access point is the Minshi Woods Chasm on the path leading to the Lost Woods: The rest of the underground Korok Grove is not actually accessible through the Deku Tree Chasm.
Corvash Canyon Mine/Abandoned Hebra Mine
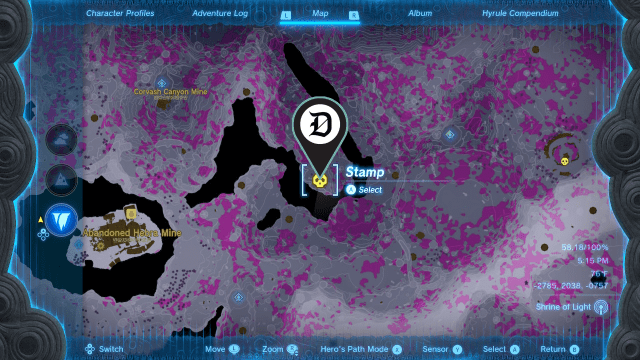
- -2785, 2038, -0757
- Located at the end of a subverted peninsula/dead-end southeast of Corvash Canyon Mine (and east of the Abandoned Hebra Mine, though it’s not accessible from there). Worihas Lightroot at Corvash is the closest teleport. You either need some kind of flying or climbing device to get past the high cliffs blocking the bend, or take a long trek around to the thin entrance at the eastmost side. Use the Zonaite deposits at Corvash to Autobuild a flying machine, if you have a cheap one saved.
- If you haven’t explored this area yet, you can drop down from the Hyrule Ridge Chasm north of Mount Rhoam and work your way northwest through the darkness.
Hebra Dark Skeleton/Goflam’s Lavafalls
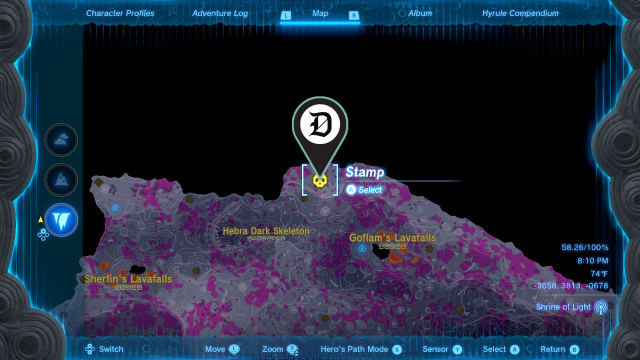
- -3658, 3813, -0678
- Located on the high ledge hugging the upper edge of the map. You can teleport to Muotue Lightroot at Goflam’s Lavafalls, then hike to the Zonai cache to use the hot air balloon or rockets to head up. Alternatively, you can teleport to Narusis Lightroot, far to the east on the same ledge, then run or drive over from the side. Note that there are several enemies in your path if you choose this route.
- If you haven’t explored this area, you can work your way north from Corvash Canyon Mine after clearing the previous entry.
Gerudo Depths
- -4211, -1287, -0871
- Located directly under the Black Hinox at Meadela’s Mantle. It’s walkable from Stamayam Lightroot to the left, though you’ll need to use the Zonai cache to rocket or fly up and over the cliff blocking your way. You can also access it by dropping through the Yiga Clan Hideout Chasm to the east of the Gerudo Highlands Skyview Tower, then heading west from the Umamustor Lightroot.


Published: Apr 10, 2024 04:34 pm