Though magic users are usually the squishiest targets in MMORPGs, healers in Elder Scrolls Online aren’t exactly defenseless thanks to the myriad of class skills they can use while throwing healing spells at their allies. All classes have their share of healing tools at their disposal, and these get better if you have the right sets for the job.
Though choosing the right abilities matters in ESO, having the best sets for healing at your disposal can make your job significantly easier. These will normally depend on class, playstyle, and what you’re going up against, but the good news for healers is that there is a wide variety of sets available.
Here are the best healer sets in ESO in our opinion, ranked in no particular order. Choosing between them should be based on preference, playstyle, and how easy it can be to acquire them.
Here are the best healer sets in Elder Scrolls Online
Spell Power Cure
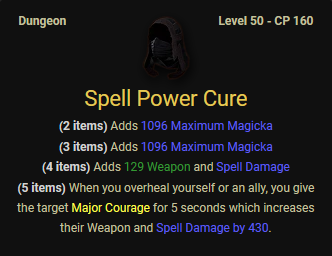
- Source: White-Gold Tower
- Required DLC: Imperial City
If you like to keep your allies topped up, you’ll get tremendous benefits from Spell Power Cure. Whenever you overheal an ally, you’ll grant them Major Courage, increasing their weapon and spell damage for five seconds. If you’re using this set, take advantage of big burst heals to top them up, then throw continuous healing spells like Grand Healing or your Rejuvenation morph of choice to keep this buff active. It takes a similar approach to Vestments of Olorime, which we’ll talk about further down.
Order’s Wrath
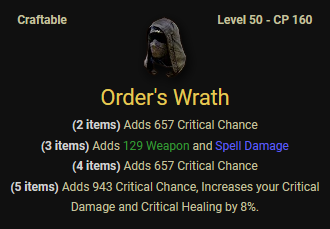
- Source: Craftable (High Isle/Amenos)
- Required DLC: High Isle
Order’s Wrath should be on the list of any player looking for a healer build. This craftable set gives you plenty of critical chance and increases your critical damage and critical healing by eight percent. Throw in how easy it is to obtain and a little bit of damage as a bonus, and this should be on the radar for anyone who wants bigger heals or wants to try taking on the role.
Vestment of Olorime
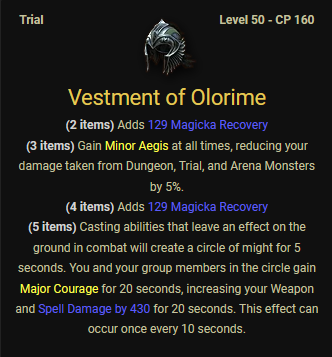
- Source: Cloudrest Trial
- Required DLC: Summerset
Vestment of Olorime can be hard to obtain since it’s a reward from the Cloudrest Trial, but it might just be worth the trouble you’ll go through to farm it. Using an area-of-effect heal—like the ubiquitous Grand Healing—will create a puddle that grants targets Major Courage, increasing their weapon damage and spell damage. As a bonus, it also grants you Minor Aegis, reducing damage taken from dungeon, Trial, and Arena monsters by five percent. This set kind of takes a similar approach as Spell Power Cure, and since both grant Major Courage, they don’t stack.
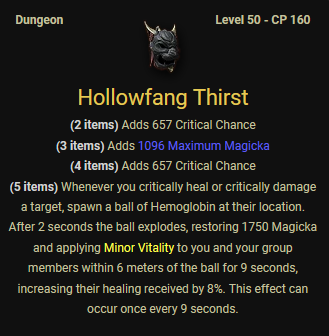
Hollowfang Thirst
- Source: Moongrave Fane
- Required DLC: Scalebreaker
Hollowfang Thirst helps with sustain, especially for you and your Magicka-based teammates. After landing a critical heal, you’ll spawn a ball of hemoglobin that restores Magicka and increases healing received by eight percent, helping you get the most out of your healing spells. Pair this with sets that give you more critical chance to get the most out of it.
Mother’s Sorrow

- Source: Deshaan (Overland)
- Required DLC: None
The Mother’s Sorrow set has been a household name for Magicka users in ESO for some time. It’s easily obtainable from Deshaan and from Guild Traders around Tamriel, and it gives you heaps of critical chance to help you land critical heals. This is perfect for a starting healer, but its effectiveness doesn’t exactly fall off (since critical chance is always welcome), so it can also help in end-game content.
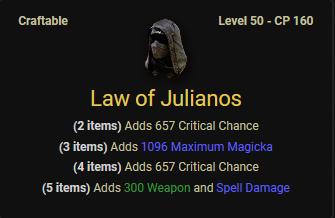
Law of Julianos
- Source: Craftable (Wrothgar)
- Required DLC: Orsinium
Though it requires six researched traits to craft it, the Law of Julianos set is a good addition for Magicka-based characters. It’s most commonly seen in DPS builds, but it has room in a healer’s arsenal, especially if you’re just trying out the role or don’t want to chase other sets. With free critical chance, spell damage, and even some Magicka in the mix, Law of Julianos is a good starter set. And like the Mother’s Sorrow set, it can last you past your first forays into healing.
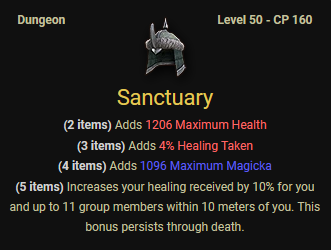
Sanctuary
- Source: Banished Cells (I and II)
- Required DLC: None
Much like the Worm Cult’s Raiment or the Ebon Armory set, Sanctuary will benefit you and up to 11 players. The Sanctuary set boosts healing received by 10 percent for allies within 10 meters of you. Though that effect is powerful, the range limit can make it trickier to get the most out of Sanctuary, especially in 12-man content. It’s easy enough to use in most dungeons, though some boss fights may cause your team to spread out to avoid mechanics and dilute the efficacy of the Sanctuary set.
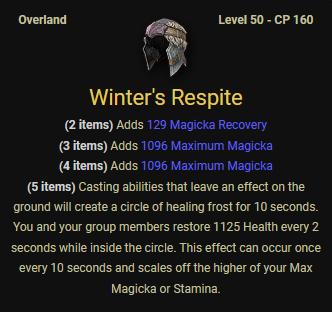
Winter’s Respite
- Source: Western Skyrim (Overland)
- Required DLC: Greymoor
If you’re relying on Grand Healing and other area-of-effect heals, the Winter’s Respite set might come in handy. Whenever you cast an ability that leaves an effect on the ground, you’ll create a circle of healing frost, which ticks every two seconds and gives allies some health back. This effect lasts for 10 seconds and has a 10-second cooldown, meaning you can keep it up essentially all the time. The downside is that it requires players to stay in the target area to get the most out of its effect, so its efficiency also drops if you have to move around a lot.
Sentinel of Rkugamz
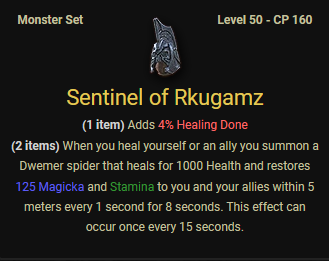
- Source: Darkshade Caverns I
- Required DLC: None
- Type: Monster
Monster sets can be powerful in their own right, and Sentinel of Rkugamz is a perfect choice for a healer who has their head and shoulder slots empty. With one piece, this set gives you an extra four percent healing done, but the two-piece bonus summons a Dwemer Spider that heals you and allies close to you, replenishing all three resources. The spider sticks around for eight seconds and has a 15-second cooldown, meaning you can get a decent amount of uptime and give nearby allies extra sustain.
Nightflame

- Source: Elden Hollow II
- Required DLC: None
- Type: Monster
The Bogdan Nightflame fight can be one of the most visually impressive in ESO, and using a fire-breathing dragon’s head as a helmet is one of the biggest power moves in the game. Healers won’t use the Nightflame set just for fashion, though: Whenever you heal yourself or an ally, this set’s two-piece effect has a chance of creating a totem that throws even more healing toward you and allies within five meters of you.


Published: Jun 8, 2022 05:08 pm