Finding Home Part Nine is one of the last quests in a series of Comic Page gatherings in Avatar: Frontiers of Pandora, and you need to be well into the second half of the game before you can complete this treasure hunt quest.
This particular Finding Home quest involves two regions and requires access to the Clouded Forest, so some extra help is likely going to be needed. Read on to learn exactly how to start and finish Finding Home Part Nine.
How to start Finding Home Part Nine in Avatar: Frontiers of Pandora
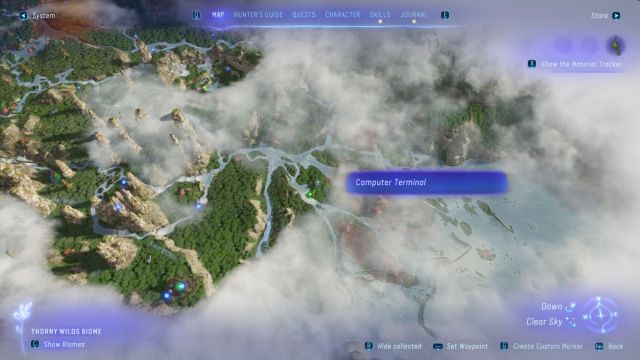
While the location where you will eventually find the ninth lost Comic Page is in the Clouded Forest, the Computer Terminal that begins Finding Home Part Nine is located in Kinglor Forest—the first region you explore in Avatar: Frontiers of Pandora. With that said, it’s in a part of the map the main story will actually never bring you to, so the odds of stumbling across this Computer Terminal organically are pretty low.
The Computer Terminal you need to hack using SID to begin this quest is found southeast of Resistance Headquarters in Kinglor Forest. Look at your map, and you can see that a river splits off into several parts in the Thorny Wilds Biome beneath Resistance Headquarters. The Computer Terminal is found in the center of an island shaped like a long diamond that is formed in the middle of this splitting river.

Make your way to the POI in the center of this island by placing and following a custom marker. The island itself is full of dense green vegetation, and as you approach its center, you will see a metal outpost that looks long abandoned. Go inside of the outpost, and use your Na’vi Senses to locate the Computer Terminal that begins Finding Home Part Nine. Now, it’s just a simple matter of hacking the terminal using SID and the quest will be started.
How to find the location from the picture and complete Finding Home Part Nine
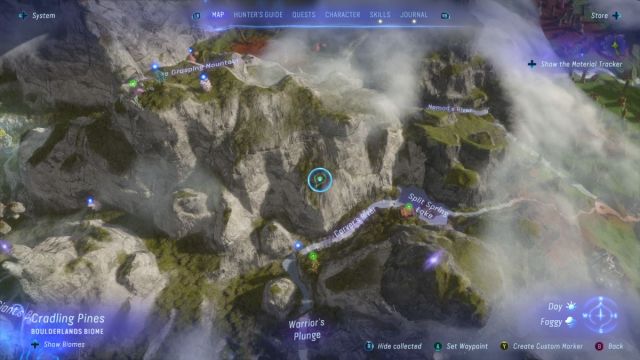
After you hack the terminal to begin Finding Home Part Nine, make sure to track the quest, as the Quests menu tab is the only place you can see the photo meant to act as a clue for completing the quest. The photo shows a large semi-circle stone archway, and the guide tells you the photo looks like it was taken north of Warrior’s Plunge near Carver’s River in the Cradling Pines region of the Clouded Forest. I mean, duh. I could have told you that with one glance. Anyway, the spot you’re looking for is indeed where the photo says, but it’s probably much easier for you to just look at the location on the map, which I will provide below.
If you haven’t been to the Clouded Forest yet, then you will need to progress the main story of the game until you are brought to this region. It isn’t something you can skip ahead to by flying over some mountains or anything like that.

The map marker in the screenshot that I provided is on the exact location of the Comic Page, however, there is probably an even easier way for you to find it. Again, it’s imperative you’re tracking Finding Home Part Nine. If you enter the general area of the Comic Page while tracking the quest, your character will say “This must be the place,” and then you will receive a Quest Marker both on your map and when using Na’vi Senses. Using the Quest Marker and Na’vi Senses leads you directly to the outpost that contains the ninth Lost Comic Page, and when you pick it up, Finding Home Part Nine will be complete.
There are tons of other Comic Pages to be found during other Finding Home quests, and we already have guides for most of them. If you’re caught up, check out this guide on Finding Home Part 10. If you’re new to the Comic Page treasure hunt in Avatar: Frontiers of Pandora, then you can always start with Finding Home Part One. Happy hunting!


Published: Dec 15, 2023 12:34 am