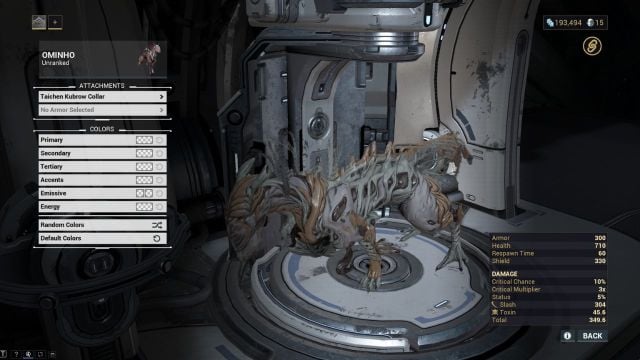
The Kubrow Collar in Warframe is a special cosmetic item for your Kubrow companions.
The Kasava Prime Kubrow Collar, offering slight stat boosts, is available exclusively from other players in the Market. But the purely cosmetic Taichen Collar can be acquired by completing the Howl of the Kubrow quest.
Pre-requisites to get a Kubrow Collar
To get the Taichen Kubrow Collar, the most basic of the three collars in Warframe, you must have the Howl of the Kubrow quest unlocked and fully complete it. That means you must have cleared the Mercury Junction on Venus in the Star Chart, then start this quest in your Codex.
To get the Kasava Prime Kubrow Collar, you must buy it from the Warframe Market since it’s not dropping from any currently unvaulted Prime Relics. The price ranges from 10 to 50 Platinum a piece, depending on the seller.
In this article, I’ll detail how to get the Taichen version since it’s the most accessible and readily available Kubrow Collar in Warframe today.
Howl of the Kubrow walkthrough
1) Acquire the Incubator Segment
To begin the Howl of the Kubrow quest, head to the Unda node on Venus, which is a Survival map. Your task is straightforward: For five minutes, eliminate enemies to collect Life Support cells. These cells need to be delivered to the Life Support units to keep the mission going. After the five-minute mark, you’ll have the option to extract and successfully complete the mission.
2) Install the Incubator Segment
Once you’re inside your ship, head to the area near the Foundry. There, you’ll find a designated empty spot for installing the Incubator Segment. Interact with this area and watch the brief scene that follows. This will automatically progress you to the next step of the process.
3) Acquire a Kubrow Egg
Next, head to E Prime on Earth to find a Kubrow Egg. In this phase, your objective is to destroy the marked Kubrow Den on the map to obtain an egg. A quick strategy is to use a melee weapon to swiftly attack the den after dashing through the stage and bypassing other enemies. Once you secure the egg, the extraction point will be highlighted in green on your map. Head there to exit the area and complete this step of the quest.
4) Incubate and mature a Kubrow using the Incubator

With your Kubrow egg ready, approach the Incubator you set up earlier and interact with it. If you’re missing an Incubator Power Core, you’ll need to head over to the Mars Junction on Earth to obtain one.
Choose the Begin Incubation option. If you have a Helminth Cyst, you can opt to use it to incubate a Helminth Charger, which is also categorized as a Kubrow. In case you have a Genetic Code Template, you have the opportunity to select specific traits and customize your Kubrow’s appearance. If not, simply proceed by selecting “Begin a random incubation.” The incubation process takes 48 hours, but you have the option to complete it instantly by spending 15 Platinum.
After the Incubation is done, you can name your Kubrow and choose to Mature For Combat to proceed with the quest.
5) Defend your Kubrow in combat
Head over to Gaia on Earth for the final step of the Howl of the Kubrow quest, which involves a Defense mission spanning five waves. Your main task is to keep your newly hatched Kubrow alive throughout the mission, reviving it if needed. Successfully defeat all the waves, and upon completion, the mission will auto-complete. Finishing Howl of the Kubrow rewards you with the Kubrow Collar.
Equipping the Kubrow Collar
Your Kubrow will automatically have the Kubrow Collar equipped. If you get another collar later, you can switch it by navigating to your Arsenal, then to the Companion Loadout. Select your Kubrow and choose the Appearance option. Under Attachments, the Collar will be the first item listed, allowing for easy swapping.


Published: Jan 12, 2024 03:29 pm