DeathWave is a very powerful deck in Marvel Snap and many players have already lost large amounts of cubes to it thanks to its explosive final turn. It’s not enough to just have the right cards though—players also need to understand how to use the DeathWave deck to climb the ranks.
The DeathWave deck has a long history, dating back to the beta of Marvel Snap. Over time, players have continued to refine the 12-card decklist and improve its strategies. As a result, there are now very few cards in the deck that can be replaced if a player wants to fully take advantage of its potential.
Next, learn how to play the DeathWave deck, which are the best cards and locations, how to Snap, and which opponents may be good to run from.
How to use DeathWave in Marvel Snap?

The main strategy of the deck is to prepare the game for an explosive final turn, using cards like Death and She-Hulk, thanks to Wave’s ability and how it interacts with the other cards capable of reducing their costs. In addition to the significant power of these two cards, Aero is also crucial for defeating challenging opponents, as its effect can control where the opponent’s cards are played, preventing them from contesting the locations where Death or She-Hulk will be played.
Therefore, it is crucial for players to understand the effects of these cards and how they interact with one another.
Cards with destroy synergy should be used for two purposes: accumulating points to beat a location and reducing the cost of Death, which will allow it to be played in the final turn alongside other cards.
The main move and one that should be made whenever available is to play Wave on turn five. If at least two cards were destroyed and Wave was played alone, both She-Hulk and Death will have their costs reduced and can be played together, while the opponent will usually only be able to play one card, as their hand will be affected by Wave in the same way.
Staple cards in DeathWave


Death and She-Hulk are the main cards to score points and both have effects to reduce their costs. Thanks to this they can be played together. To reduce the cost of She-Hulk, just don’t use any amount of energy in the previous turn. That amount of energy will be reduced from the cost of She-Hulk. Death, on the other hand, needs cards to be destroyed to reduce its cost; every card destroyed in the game reduces its cost by one, so it’s important that the deck contains cards with destroy effects and cards that can be destroyed.
Wave is what makes this deck possible. Its effect changes the base cost of cards in players’ hands to four, so cards that have had their costs reduced by different effects stack. When played on turn five, both players will only have four-cost cards in hand, making it difficult for most decks to play more than one card.
Aero, in turn, is a card with an extremely powerful control effect. Changing the location in which the opponent will play their cards can guarantee an otherwise contested victory. For this to work it is important the player has the initiative, so the opponent’s cards are moved before they are revealed, preventing their effects from activating in the desired locations. Since Aero’s cost cannot normally be reduced, it will be four when Wave is played, leaving two energy points left over to play Death and She-Hulk.
With all the cards in the final combo explained, here’s how to reach the desired number of four cards destroyed in the game to reduce the Death cost to zero.
The destroy cards in DeathWave


These are largely responsible for bringing Death to the end of the game. The main objective is to get at least four cards destroyed.
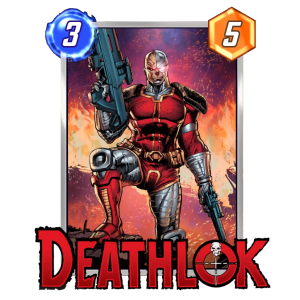
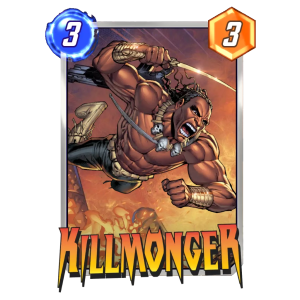
Carnage and Deathlok destroy the player’s cards in a location and can contribute a good amount of points for the player to acquire the initiative advantage for later turns. Killmonger on the other hand can destroy all one-cost cards in play, so he’s a great counter to decks like Thanos and Kazoo, which play a lot of these cards.
Yondu is useful not only to increase the destroy count but also to acquire information from the enemy deck, since his effect has no requirement and is very easy to activate.
Cards to be destroyed in DeathWave


Cards with destroy effects need targets and the best targets available are these.
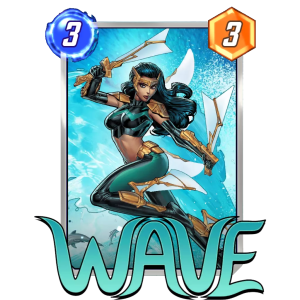
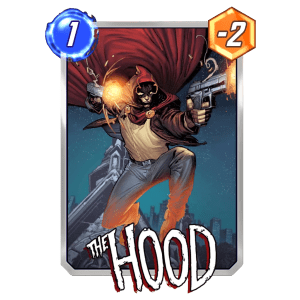
Squirrel Girl not only contributes three cards to be destroyed if Killmonger is played later, but it also helps the player gain initiative for turn two, ensuring that nothing will stop a destroy effect from triggering. Bucky Barnes is one of the biggest power contributors until inning four. If Carnage destroys it, both can reach 10 points. The Hood has the effect of creating a Demon in the player’s hand, a one-cost card with six power. Since the Demon is played after Killmonger’s effect is an important points contributor.
With that, we have eleven cards defined, which leaves room for only one replacement.
Tech cards in DeathWave
America Chavez is a consistent choice to close the DeathWave deck. Her effect ensures it will only be drawn on turn six, which increases the chances of drawing the necessary cards for the final combo until turn five.
This makes it possible for the player to analyze the situation and decide whether it is favorable or not, without being able to rely on luck on the last drawn card.
However, some other available options involve Moon Girl, as her effect can be extremely powerful when copying Death. Nova is another card option to be destroyed, but because the deck strategy doesn’t include keeping many cards on the board, Nova’s effect isn’t as impactful. Shang-Chi can be an interesting option, mainly to be able to counter opponent strategies, and its effect counts as destroy to reduce the cost of Death.
Best and worst locations for DeathWave
There are specific locations that players could target to maximize the potential of the DeathWave deck, some of which can make the player want to Snap earlier. On the other hand, there are locations that can make the player retreat knowing it will be a more difficult match.
Best locations for DeathWave
Altar of Death, Collapsed Mine, Death’s Domain, Lamentis-1, and Rickety Bridge are ideas for reducing Death’s cost to zero.
Bar With No Name can be beaten with the help of The Hood, since its power is negative, if it is played in the final turn the opponent will rarely be able to respond.
Morag is a location where Wave can stop the opponent from playing their cards on turn six, as they can usually only play a single card.
The Big House only allows low-cost cards to be played, so it’s easy for Death and She-Hulk to beat the location, as their costs will be low, but their power will outweigh any card that can naturally be played there.
Central Park and Savage Land generate in-game tokens that can be destroyed by Killmonger, easily reducing the cost of Death.
Worst locations for DeathWave
Wakanda is a particularly challenging location for a destroy-based deck, as it will be one less location to destroy cards.
Even though Sanctum Sanctorum can be reached with Squirrel Girl, most of the time the player wants to destroy the Squirrels.
Mindscape can be a problematic location, as players may need to go off on turn five and win the game before the switch, giving up the best synergies from turn six.
Ego is another location to avoid as it doesn’t use cards synergistically, making it difficult for combo-oriented decks to perform well.
How DeathWave can be countered in Marvel Snap
There are some strategies and cards that can make a match much more difficult for DeathWave to win. While some of them are more popular than others, the player must always be aware of the opponent’s moves.
Decks focused on playing only one card per turn strategy may not be impacted by Wave’s effect on the final turn. The greatest examples are Shuri Zero and Galactus. Shang-Chi is a good option to try to deal with them, but facing these decks can always be more difficult than desired.
Both decks can use Sandman, which is a big problem for DeathWave’s final turn. Similarly, Leech is a card that can kill your chances of playing Death. Both are played on turn five, so it might be a good idea to retreat when that happens.
The same can be said about decks that can decide when they want to be explosive like Lockjaw Thanos. While they tend to keep their most explosive turns for the endgame surprise factor, they are flexible enough to go off a turn earlier and just play a big card on turn six.
Armor is another common card that can thwart important plays to reduce the Death cost. Most players can use Armor right after playing Sunspot in order to protect it from Killmonger, so it’s important to never play Bucky Barnes in the same location as a Sunspot. Furthermore, Armor can be played on turn three if the player uses Bucky Barnes, as it is easy to understand where Carnage or Deathlok should be played next. To avoid this, it is necessary for the player to have the initiative, activating his destroy effect before Armor. Cosmo can also be used in the same way, but cannot be used on turn two.
When to Snap with DeathWave?
With all the information we’ve had so far, the player must take into account different factors when choosing the right moment to Snap.
There are locations that can be very difficult for DeathWave, so the player will never want to use a Snap before the start of turn three when all locations are revealed.
Since DeathWave’s core strategy revolves around turn six plays, it’s possible to wait until the start of turn five before deciding to Snap. Thanks to the presence of America Chavez in the deck, the player has as much information as they need in turn five. Until then, the player needs to understand what kind of deck they are facing.
If the opponent is using some of the cards that can counter DeathWave, the player must not Snap. On the other hand, if the outcome of turn five involves the opponent playing Leech or Sandman, the player may retreat, even if they snapped at the start of the turn.
Whenever it is possible to include Aero in the final turn, the player must have priority to consider the Snap. If Aero is not in hand, then it’s best not to have priority, so neither Death nor She-Hulk can be destroyed by Shang-Chi.
The best plays for each turn
The best cards to play during turn one are Squirrel Girl and Yondu. Having early turn priority is a great way to guarantee your destroy effects, on the other hand, Yondu can give you important information about the opposing deck.
Without a doubt, Bucky Barnes is the best option for round two. Since this move overtly announces the player’s intentions, avoid using it on locations that have high-value one-cost cards like Sunspots or Quinjet.
Turn three is when the player wants to start destroying their cards to reduce the cost of Death while getting some power, so both Deathlok and Carnage can be used for this, especially if Bucky Barnes was played the previous turn.
Turn four is the last chance to get all four destroys, so Killmonger is usually the best option, as the opponent has also had time to play his one-cost cards.
Shifts five and six are usually quite standard: It’s best to play Wave and only Wave. If the player managed to destroy at least four cards, the final turn could have Death costing zero, She-Hulk costing two, and Aero costing four—the perfect move to control the opponent’s cards and score the necessary points to win the other locations.

Published: Mar 9, 2023 10:17 pm