Forgot password
Enter the email address you used when you joined and we'll send you instructions to reset your password.
If you used Apple or Google to create your account, this process will create a password for your existing account.
This site is protected by reCAPTCHA and the Google Privacy Policy and Terms of Service apply.
Reset password instructions sent. If you have an account with us, you will receive an email within a few minutes.
Something went wrong. Try again or contact support if the problem persists.
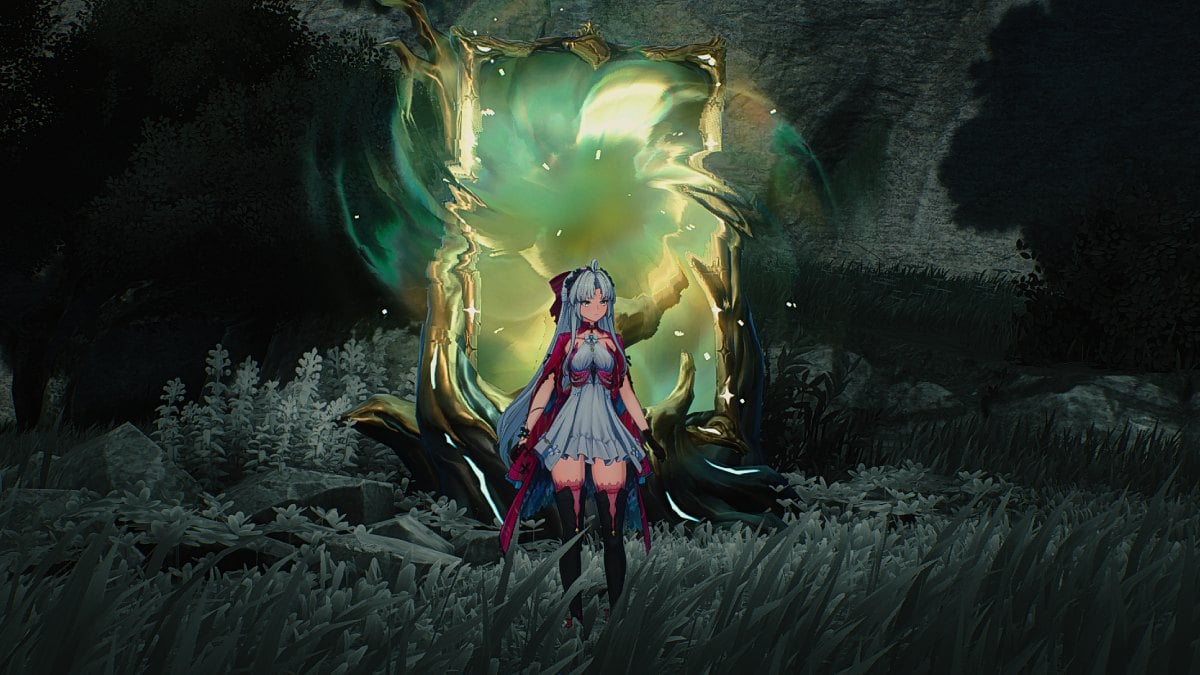
Wuthering Waves Overflowing Palette with greyed out world and Carlotta in front
The Overflowing Palette sucks all the color out of the world. Screenshot by Dot Esports

All Overflowing Palette puzzle locations and solutions in Wuthering Waves

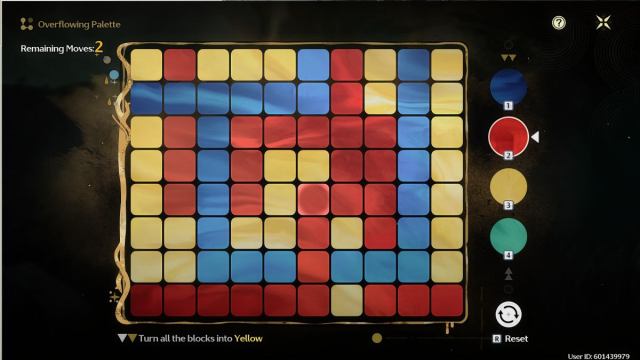
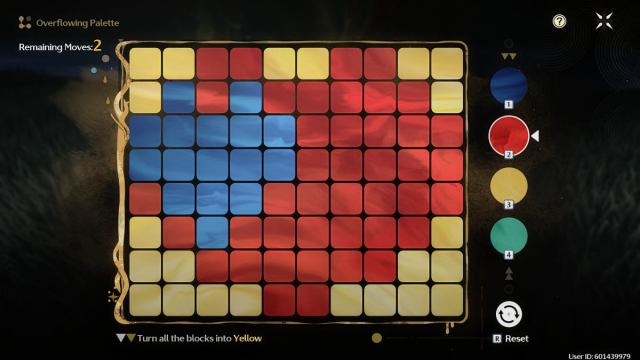
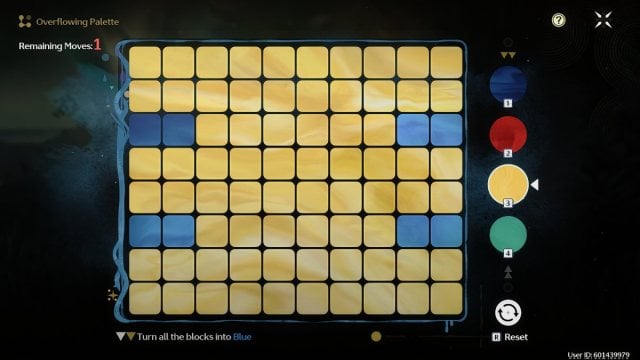
We're going over each of the Overflowing Palettes in Wuthering Waves and how to solve them.

The Overflowing Palettes are one of the colorful new puzzles added in Wuthering Waves 2.0. These require you to solve painting grids by painting a single color across the board within a few turns. We’re going to go over all the Overflowing Palette puzzle locations and solutions in Wuthering Waves.

Recommended Videos

How to solve Overflowing Palettes in Wuthering Waves

The Overflowing Palette puzzle requires you to change all colors on the palette to a specified color within a set number of turns. Completing Overflowing Palettes contributes to your exploration progress and unlocks more items for you to purchase at the unique Egla Town merchant, as you get 20 Resonant Calcite for each puzzle. If you reset the Overflowing Palette enough times, the game will lower the difficulty and give you more turns to solve it.
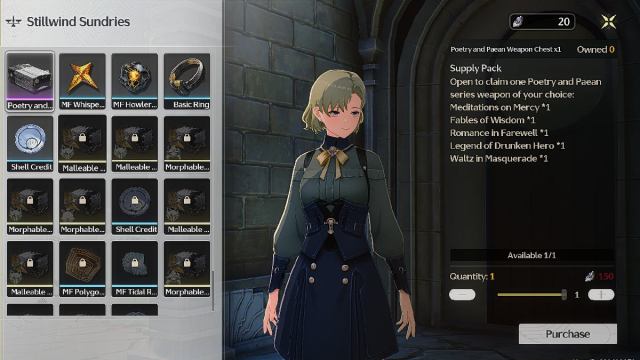
The Stillwind Sundries sells supplies for Resonant Calcite
The Poetry and Paean set is available here. Screenshot by Dot Esports

All Overflowing Palettes in Whisperwind Haven and solutions

There are a total of four Overflowing Palettes in the Whisperwind Haven region.

Whisperwind Haven Overflowing Palette No. 1

Location: This is the first Overflowing Palette you can find in Whisperwind Haven located at the north next to the Polyphemos Windmills.
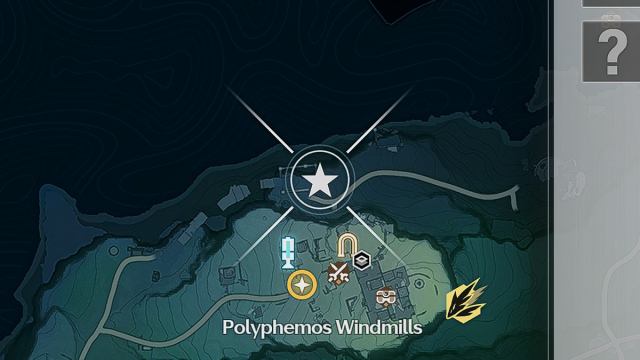
Wuthering Waves map showing location of Overflowing Palette 1 for Whisperwind Haven
The very first Overflowing Palette. Screenshot by Dot Esports

Objective: Turn all blocks into Yellow in three moves.
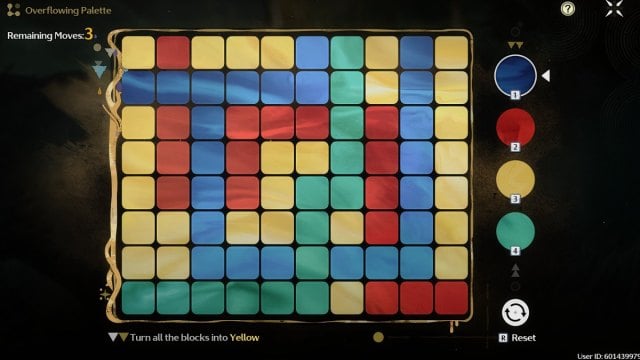
Wuthering Waves whisperwind haven palette puzzle 1 default state
Make it all yellow. Screenshot by Dot Esports

Move one: Turn the green blocks red.

Wuthering Waves Whisperwind Haven Overflowing Palette #1 step 1
Connect with red. Screenshot by Dot Esports

Move two: Change the remaining blue blocks to red.
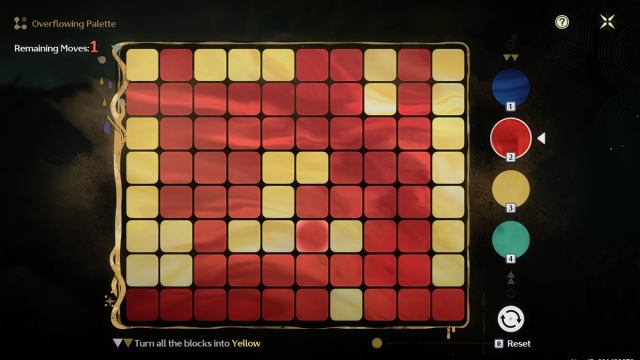
Red and yellow blocks on overflowing pallet board
One more splash. Screenshot by Dot Esports

Move three: Turn all the red blocks yellow to finish the puzzle.

Whisperwind Haven Overflowing Palette No. 2

Location: Located in a cave beneath Egla Town. Jump off the edge on the right side of the town and make your way to the cavern below.
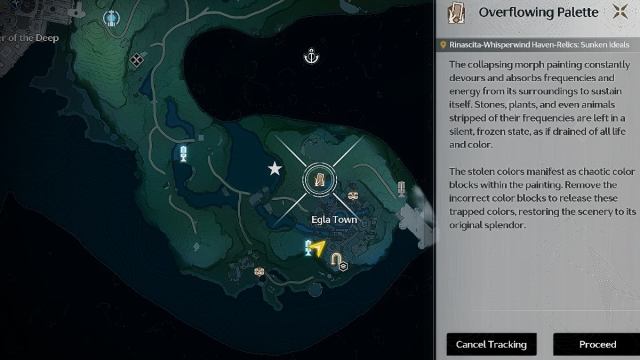
Wuthering Waves map showing location of Overflowing Palette 2 for Whisperwind Haven
Right outside town. Screenshot by Dot Esports

Objective: Turn all blocks green in three moves
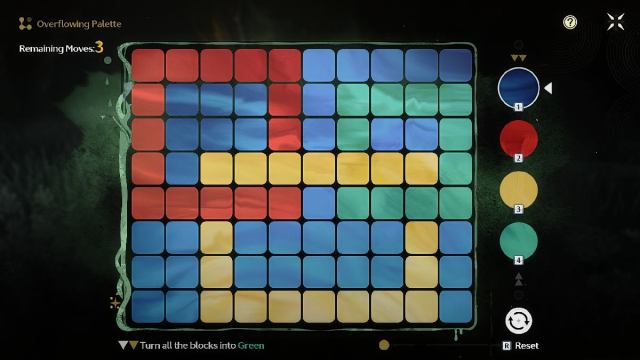
Wuthering Waves whisperwind haven palette puzzle 2 default state
This puzzle is quite tricky. Screenshot by Dot Esports

Move one: Turn the red blocks yellow.
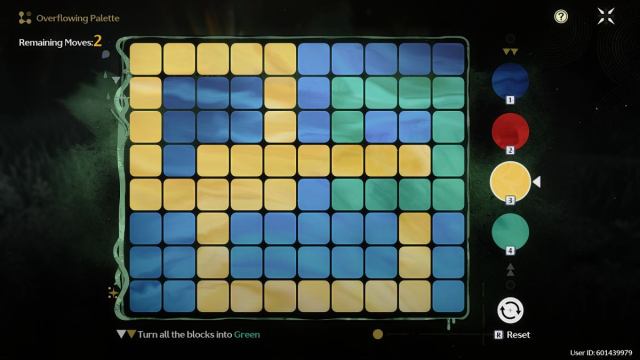
Wuthering Waves Whisperwind Haven Overflowing Palette #2 step 1
Two colors too many. Screenshot by Dot Esports

Move two: Change all yellow blocks to blue.
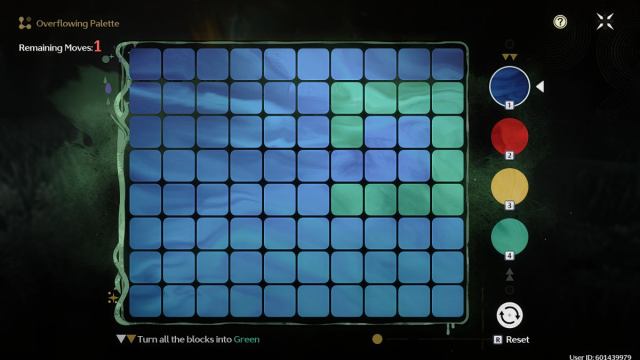
Mostly blue boxes with some slight green boxes on overflowing pallete board
Reverse coloring complete. Screenshot by Dot Esports

Move three: Change all blue blocks to green to solve the puzzle.

Whisperwind Haven Overflowing Palette No. 3

Location: Located right outside Egla Town near the lake on the left.
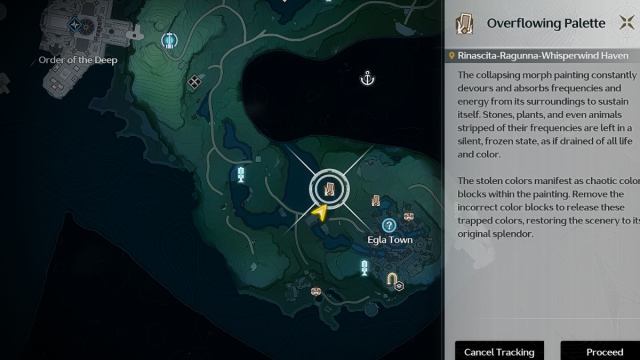
Wuthering Waves map showing location of Overflowing Palette 3 for Whisperwind Haven
Get the Sonance Casket nearby. Screenshot by Dot Esports

Objective: Turn all blocks red in four moves.
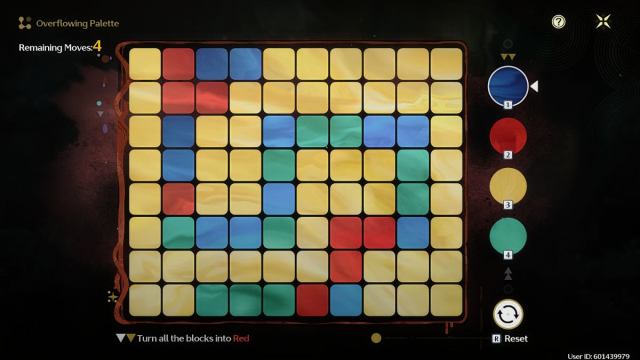
Wuthering Waves whisperwind haven palette puzzle 3 default state
Every color is needed. Screenshot by Dot Esports

Move one: Turn the yellow blocks on the bottom left green.

Move two: Turn the yellow blocks on the top right green until your palette looks like this:
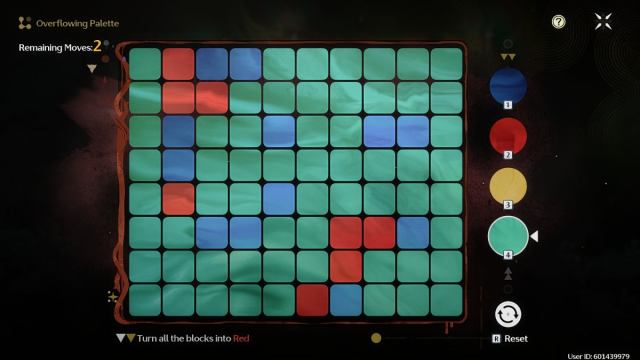
Wuthering Waves Whisperwind Haven Overflowing Palette #3 step 3
Now merge the greens. Screenshot by Dot Esports

Move three: Change all the green blocks to blue.
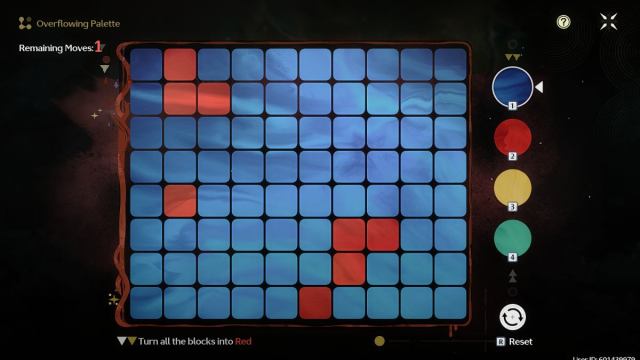
Wuthering Waves Whisperwind Haven Overflowing Palette #3 step 3
Clicks in place. Screenshot by Dot Esports

Move four: Change all the blue blocks to red to solve the puzzle.

Whisperwind Haven Overflowing Palette No. 4

Location: The last Overflowing Palette in Whisperwind Haven is located near the Nightmare Thundering Mephis boss.
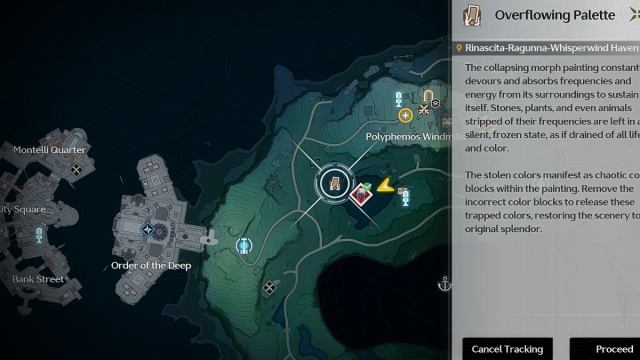
Wuthering Waves map showing location of Overflowing Palette 4 for Whisperwind Haven
Next to the Nightmare boss. Screenshot by Dot Esports

Objective: Turn all the blocks blue within three turns.
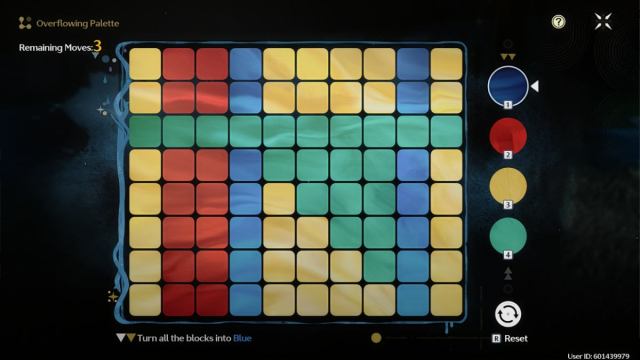
Wuthering Waves whisperwind haven palette puzzle 4 default state
The green gap. Screenshot by Dot Esports

Move one: Change the green blocks to yellow.
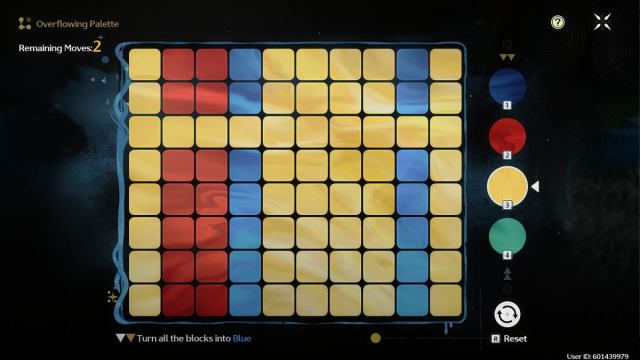
Wuthering Waves Whisperwind Haven Overflowing Palette #4 step 1
Now swap it all again. Screenshot by Dot Esports

Move two: Swap all yellow blocks to red.
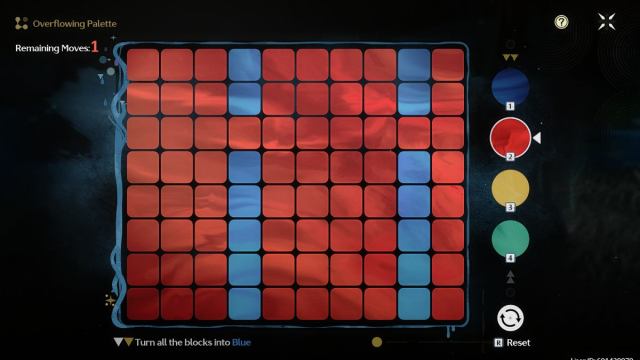
Wuthering Waves Whisperwind Haven Overflowing Palette #4 step 2
Connection complete. Screenshot by Dot Esports

Move three: Make all the red blocks blue to solve the puzzle.

All Overflowing Palettes in Nimbus Sanctum and solutions

There are a total of three Overflowing Palettes in the Nimbus Sanctum region.

Nimbus Sanctum Overflowing Palette No. 1

Location: Located at the east side of Mistveil Bay you can ride an Echo here easily.
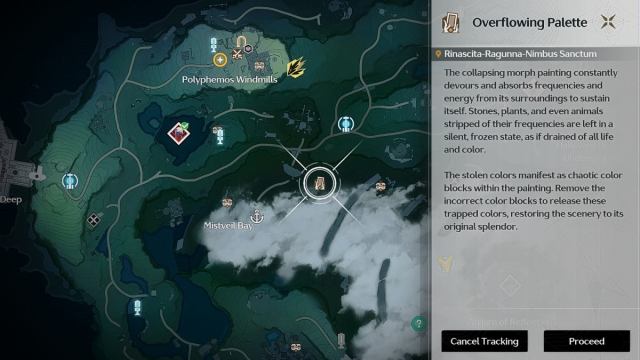
Wuthering Waves map Overflowing Palette location in Nimbus Sanctum 1
Before the mist. Screenshot by Dot Esports

Objective: Turn all blocks yellow in three moves.
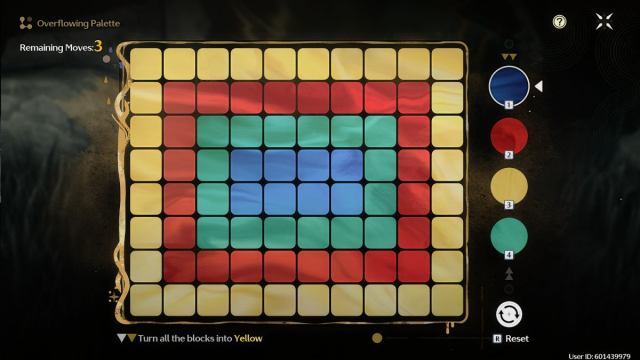
Wuthering Waves map Nimbus Sanctum Overflowing Palette 1 default
Layers upon layers. Screenshot by Dot Esports

Move one: Turn the red blocks yellow.

Move two: Turn the green blocks yellow
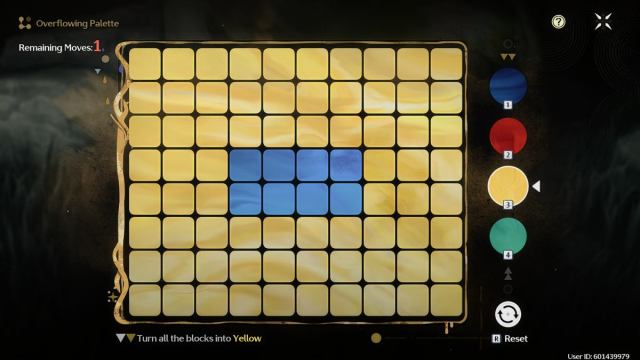
Wuthering Waves Overflowing Palette small blue rectangle surrounded by yellow blocks
Doesn’t get easier than that. Screenshot by Dot Esports

Move three: Turn the blue blocks yellow

Nimbus Sanctum Overflowing Palette No. 2

Location: Located near the bottom of a waterfall at the southern side of the Nimbus Sanctum.
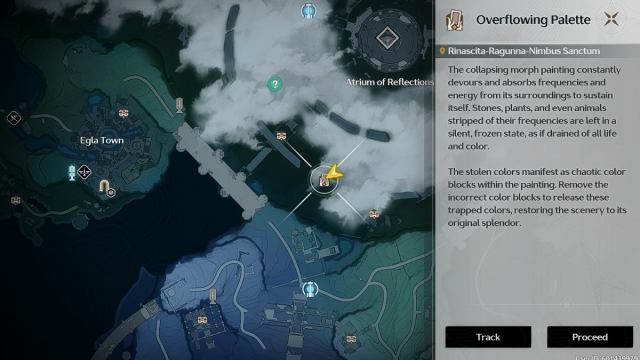
Wuthering Waves map Overflowing Palette location in Nimbus Sanctum 2
Edge of the mist. Screenshot by Dot Esports

Objective: Turn all blocks yellow in two turns.
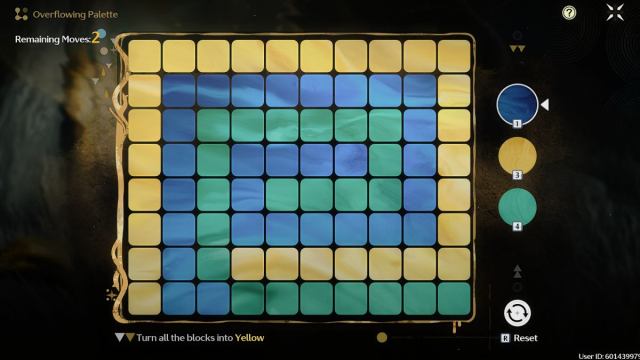
Wuthering Waves map Nimbus Sanctum Overflowing Palette 2 default
Snaking colors. Screenshot by Dot Esports

Move one: Change all blue blocks to green.
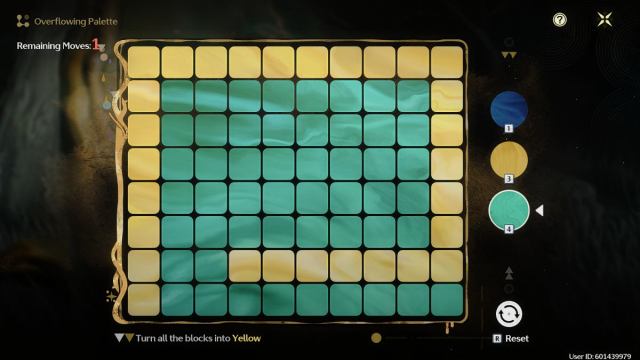
Wuthering Waves overflowing palette green colors in middle surrounded by yellow border
All connected. Screenshot by Dot Esports

Move two: Turn all green blocks yellow to solve the puzzle.

Nimbus Sanctum Overflowing Palette No. 3

Location: Located at the eastern side of the Nimbus Sanctum.
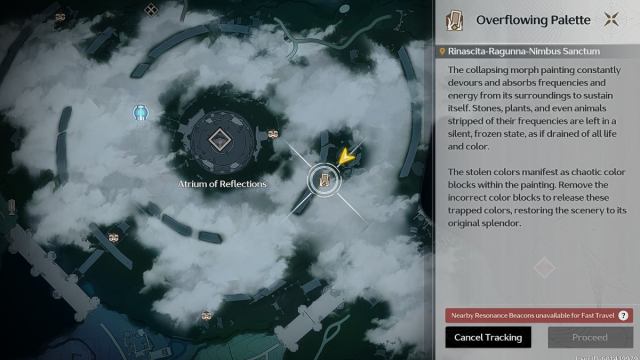
Wuthering Waves map Overflowing Palette location in Nimbus Sanctum 3
Located in the mist. Screenshot by Dot Esports

Objective: Turn all blocks yellow within three moves.
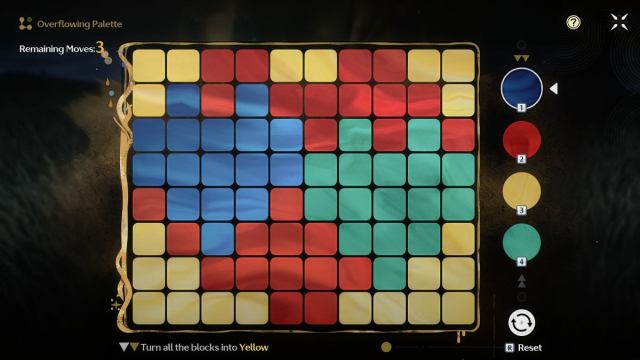
Wuthering Waves map Nimbus Sanctum Overflowing Palette 3 default
. Two hearts. Screenshot by Dot Esports

Move #1 Turn the green blocks red.

Wuthering Waves overflowing pallete board with red yello and blue boxes in heart shapes
Small blue heart. Screenshot by Dot Esports

Move two: Turn the remaining blue blocks red.
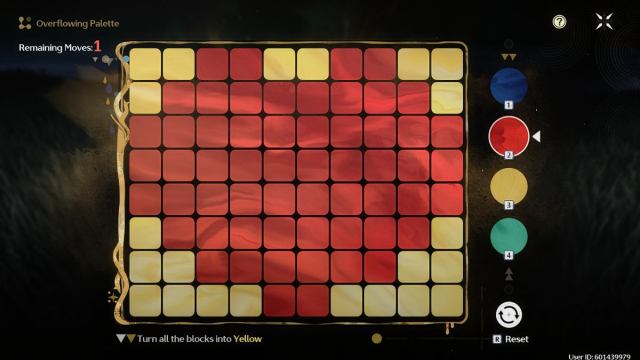
Heart shaped red pallete with yellow color around the rectangle board
Looks like a heart. Screenshot by Dot Esports

Move three: Turn all red blocks yellow to solve the puzzle.

All Overflowing Palettes in Thassaleo Fells and solutions

There are a total of five Overflowing Palettes in the Thassaleo Fells region.

Thassaleo Fells Overflowing Palette No. 1

Location: Located to the right side of the nearby Nexus tower.
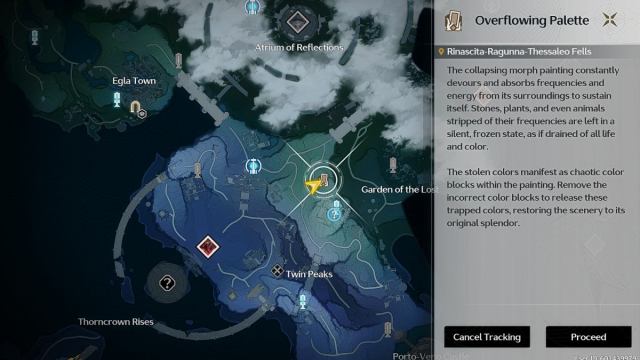
Wuthering Waves overflowing palette puzzle location in Thassaleo Fells 1
A quick flight here. Screenshot by Dot Esports

Objective: Turn all blocks yellow within three moves.
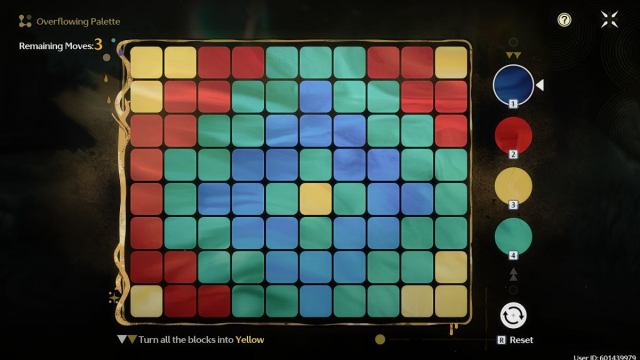
Wuthering Waves Thassaleo Fells overflowing palette puzzle 1 default state
A three-move puzzle. Screenshot by Dot Esports

Move one: Turn all the blue blocks green.
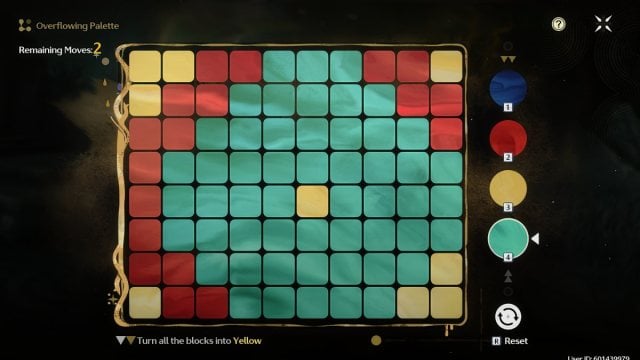
Mostly green pallete board with yellow in middle and around corners and some red
First move for this puzzle. Screenshot by Dot Esports

Move two: Change green blocks to red.
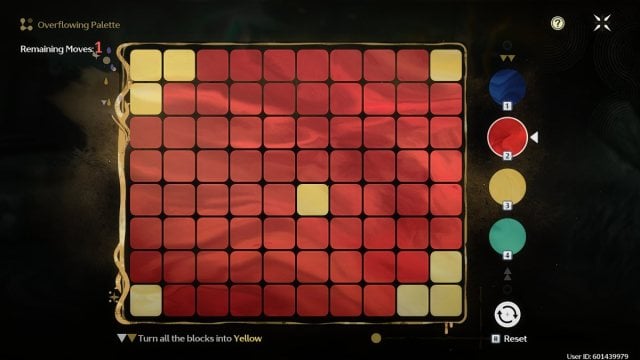
Mostly red pallete board with yellow in middle and around corners
. Change to red to get them all. Screenshot by Dot Esports

Move three: Apply yellow to red blocks to solve the puzzle.

Thassaleo Fells Overflowing Palette No. 2

Location: Located right next to the Nightmare: Impermanence Heron boss.
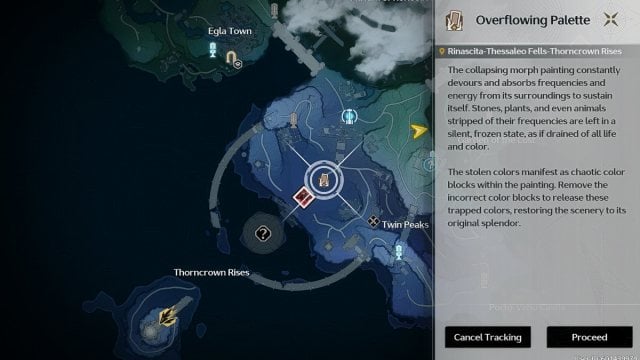
Wuthering Waves overflowing palette puzzle location in Thassaleo Fells 2
Get the Heron too. Screenshot by Dot Esports

Objective: Turn all blocks blue in four moves.
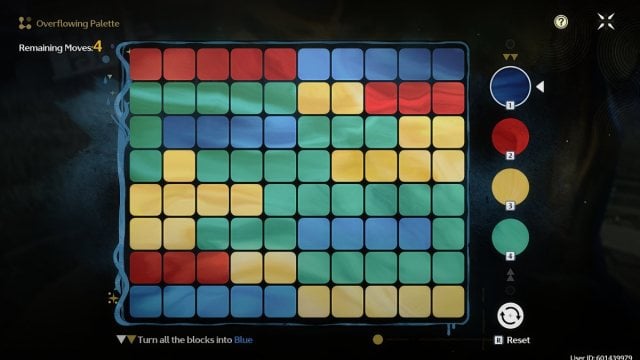
Wuthering Waves Thassaleo Fells overflowing palette puzzle 2 default state
Assimilate in four. Screenshot by Dot Esports

Move one: Turn the central green blocks yellow.
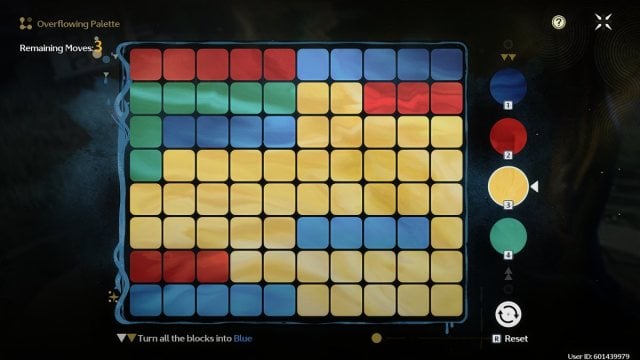
Pallete board with a mix of yellow, blue, red and green on rectangle board
Assimilate. Screenshot by Dot Esports

Move two: Convert all yellow blocks to red.
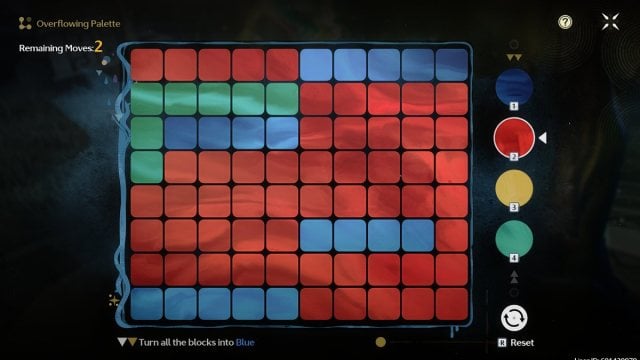
Wuthering Waves pallete board with mostly red and some blue and green blocks
One to go. Screenshot by Dot Esports

Move three: Change the remaining green blocks to red.
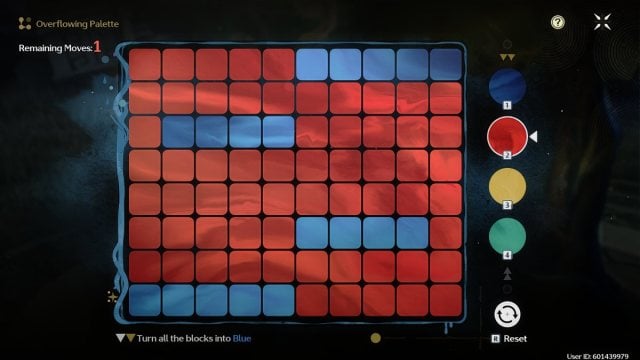
Wuthering Waves pallete board with mostly red and only some blue blocks
All Red-y to go. Screenshot by Dot Esports

Move four: Convert all red blocks to blue.

Thassaleo Fells Overflowing Palette No. 3

Location: Right next to Porto-Veno Castle at the bottom of the map.
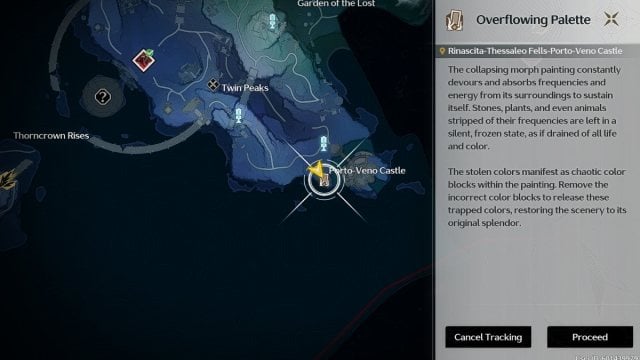
Wuthering Waves overflowing palette puzzle location in Thassaleo Fells 3
Visit the nearby castle. Screenshot by Dot Esports

Objective: Turn all blocks yellow in four turns
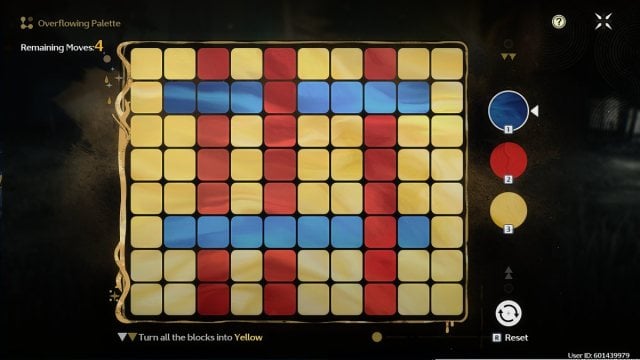
Wuthering Waves Thassaleo Fells overflowing palette puzzle 3 default state
Easier than it looks. Screenshot by Dot Esports

Move one: Turn the middle red column blue.
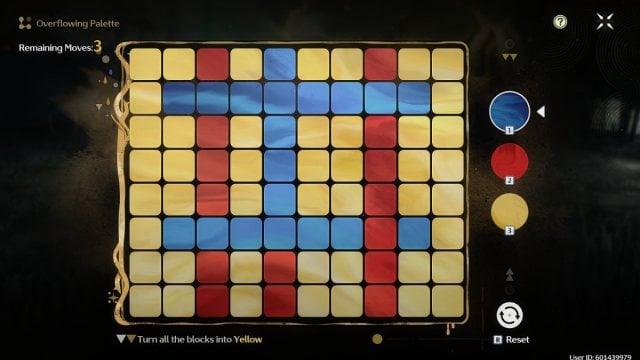
Wuthering Waves pallete board with yellow board with blue and red columns
Get the middle blue section first. Screenshot by Dot Esports

Move two:Turn the middle blue section red.
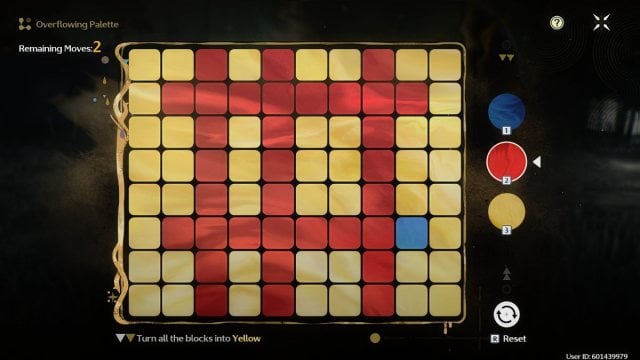
Wuthering Waves pallete board with red columns on mostly yellow board
Now get them all red. Screenshot by Dot Esports

Move three:Turn all the red columns yellow in one go.
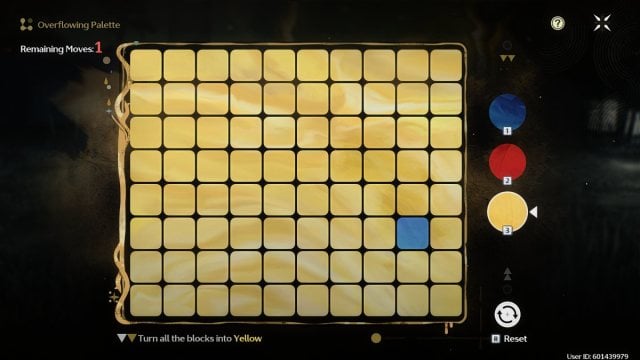
Wuthering Waves pallete board with yellow board and one blue block
One last pesky blue block. Screenshot by Dot Esports

Move four: Turn the last blue block yellow to solve the puzzle.

Thassaleo Fells Overflowing Palette No. 4

Location: Located right next to the Twin Peaks under the cliff.
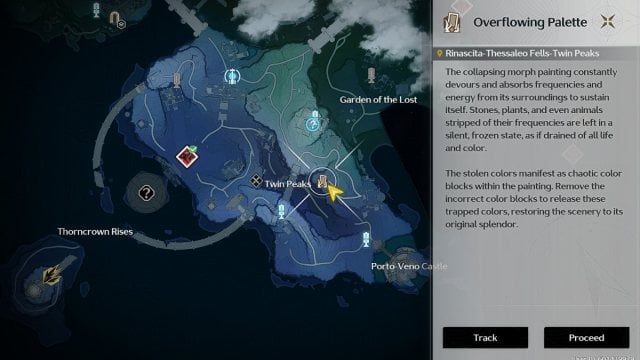
Wuthering Waves overflowing palette puzzle location in Thassaleo Fells 4
Next to a small castle. Screenshot by Dot Esports

Objective: Turn all blocks red in three moves.
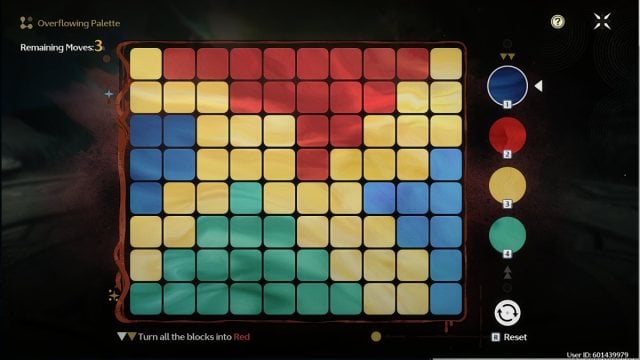
Wuthering Waves Thassaleo Fells overflowing palette puzzle 4 default state
Merge them into one. Screenshot by Dot Esports

Move one: Turn the middle yellow blocks blue.
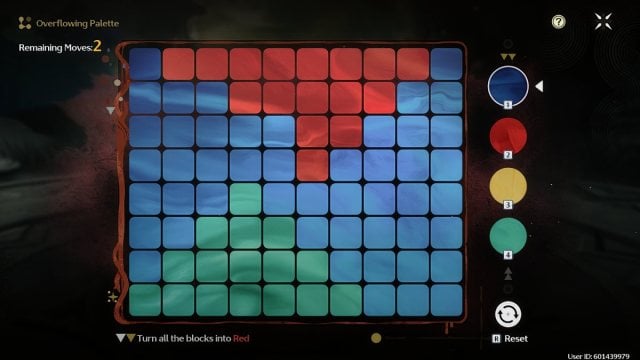
Wuthering Waves pallete board with red blue and green sections
Now remove the green. Screenshot by Dot Esports

Move two: Change the green blocks to blue.
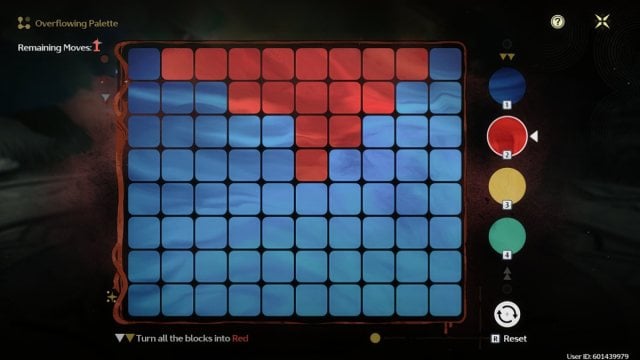
Wuthering Waves pallete board with major blue section with a red area up top
All good to go. Screenshot by Dot Esports

Move three: Swap all blocks to red to finish the puzzle.

Thassaleo Fells Overflowing Palette No. 5

Location: Located at the bottom floor of the large building structure. Watch out for nearby enemies.
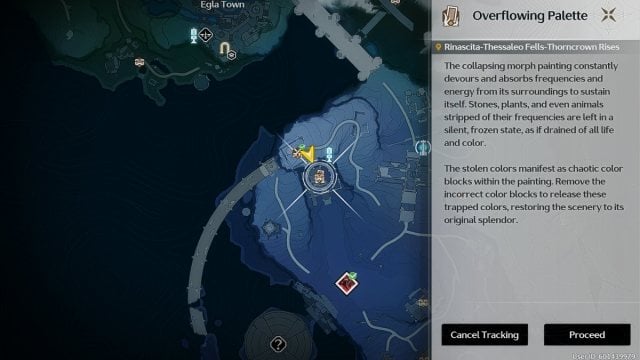
Wuthering Waves overflowing palette puzzle location in Thassaleo Fells 5 on map
Lots of puzzles here. Screenshot by Dot Esports

Objective: Turn all blocks blue in four moves
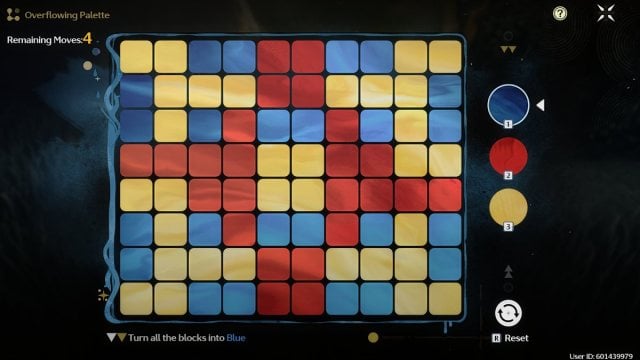
Wuthering Waves Thassaleo Fells overflowing palette puzzle 5 default state
Segmented yellows. Screenshot by Dot Esports

Move one: Turn the two middle blue blocks in the third row red.
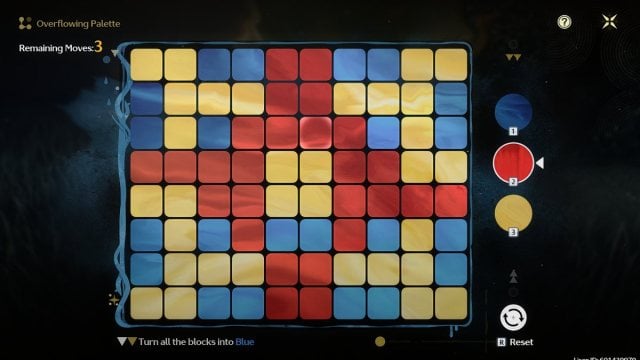
Wuthering Waves pallete board with mix of red yellow and blue colors in patterns
Just wait. Screenshot by Dot Esports

Move two: Do the same for the blue middle blocks in the sixth row.
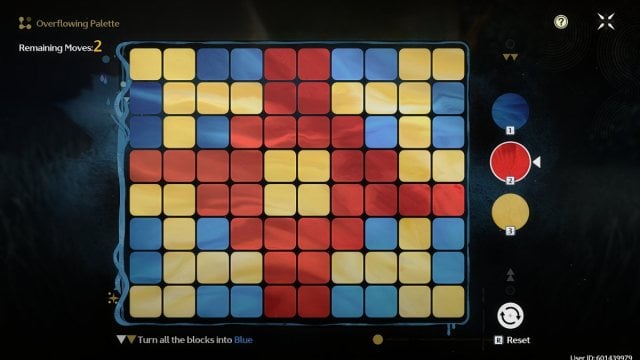
Wuthering Waves pallete board with red color cross in middle and yellow and blue patterns
Connect the reds. Screenshot by Dot Esports

Move three: Turn all the red blocks yellow.
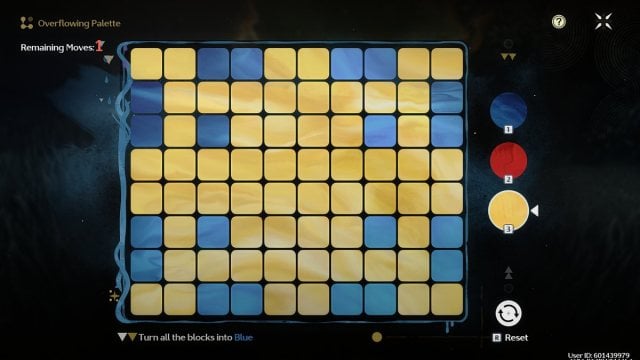
Wuthering Waves pallete board with mostly yellow board with blue around corners
Big yellow splash. Screenshot by Dot Esports

Move four: Change all the yellow blocks to blue to finish the puzzle.

All Overflowing Palettes in Averardo Vault and solutions

There are a total of five Overflowing Palettes in the Averardo Vault region.

Averardo Vault Overflowing Palette No. 1

Location: Located near the Nightmare Inferno Rider under the Averardo Vault.
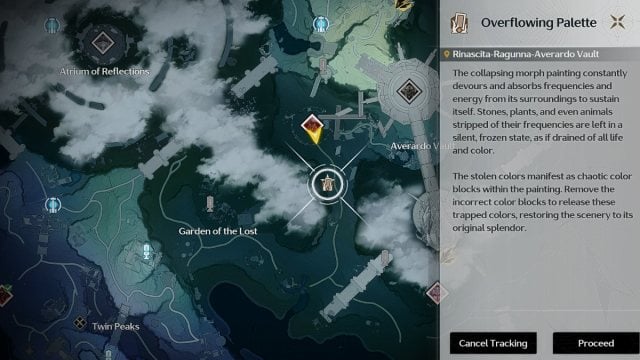
Averardo Vault Overflowing Palette location on wuthering waves map
Get the Inferno Rider on your way. Screenshot by Dot Esports

Objective: Turn all blocks green in three moves.
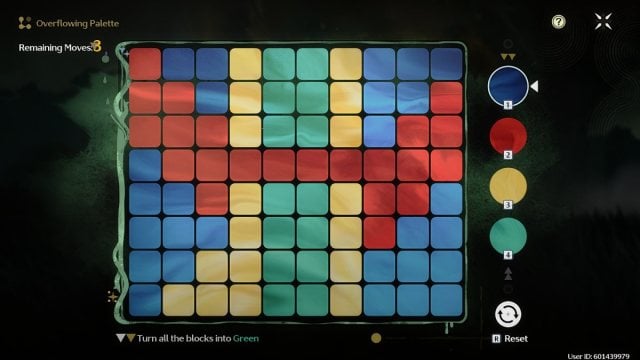
Averardo Vault Overflowing Palette Puzzle 1 default state
Connect all sides. Screenshot by Dot Esports

Move one:Turn the red blocks in the middle blue.
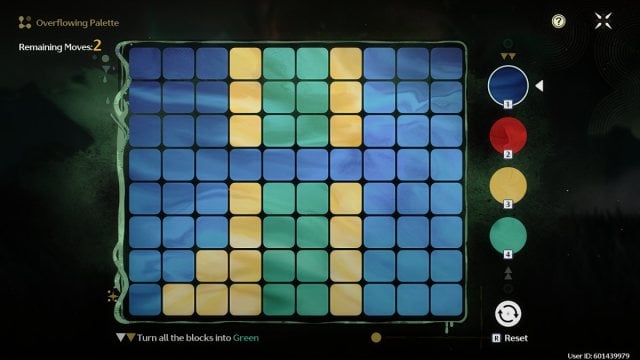
Wuthering Waves pallete board with blue on left and right and middle parted by yellow and green columns in middle horizontally
Connect both sides. Screenshot by Dot Esports

Move two: Change all the blue to yellow blocks.
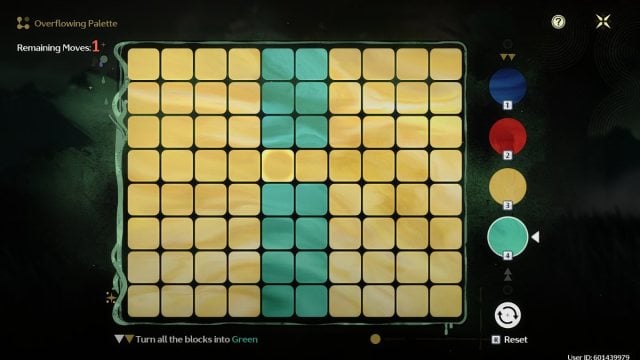
Wuthering Waves pallete board with yellow on left and right with a green column down the middle
Yellow bridge. Screenshot by Dot Esports

Move three: Change all the yellow blocks to green to solve the puzzle.

Averardo Vault Overflowing Palette No. 2

Location: Located near Nightmare: Mourning Aix at the bottom right of the map.
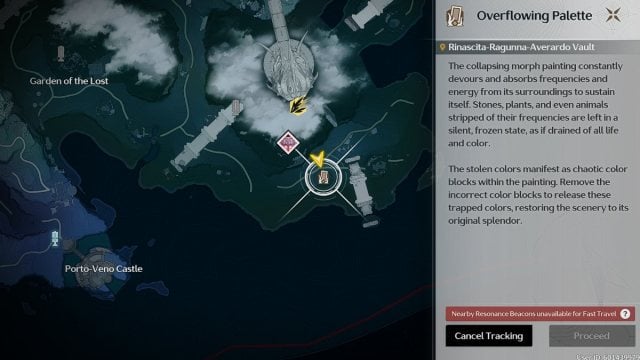
Averardo Vault Overflowing Palette 2 location on wuthering waves map
Bottom right of the map. Screenshot by Dot Esports

Objective: Turn all blocks red in three moves.
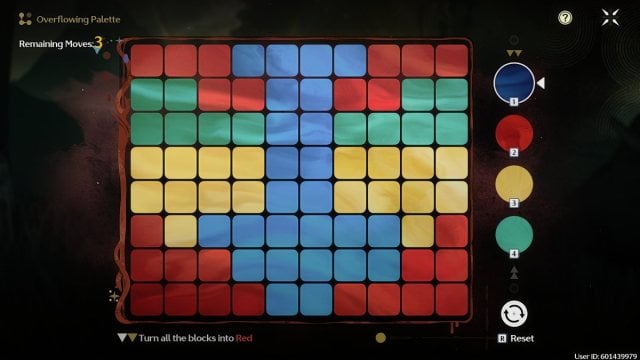
Averardo Vault Overflowing Palette Puzzle 2 default state
Simple enough. Screenshot by Dot Esports

Move one: Change the blue in the middle to yellow.
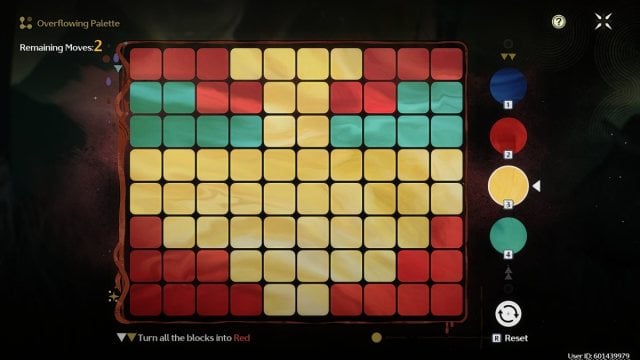
Wuthering Waves pallete board with mostly yellow board with red corners and some green blocks
Just a splash of green needed. Screenshot by Dot Esports

Move two: Now change all the yellow to green blocks.

Move three: Swap the green to red to finish the puzzle.

Averardo Vault Overflowing Palette No. 3

Location: Located to the west of the Averardo Vault in the Garden of the Lost.
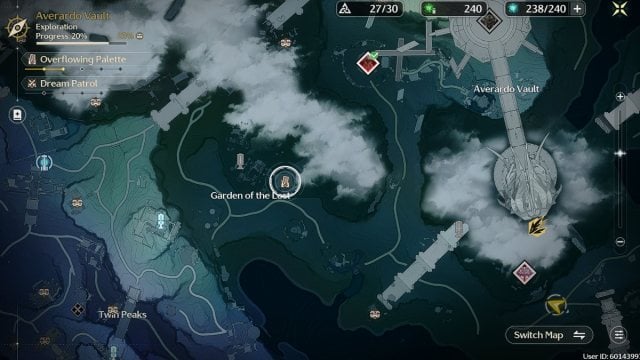
Averardo Vault Overflowing Palette location 3 on wuthering waves map
Located in the middle of nowhere. Screenshot by Dot Esports

Objective: Turn all tiles red in two turns.
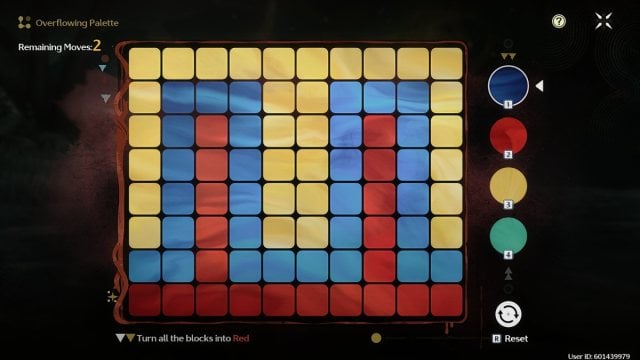
Averardo Vault Overflowing Palette Puzzle 3 default state
Is this even a puzzle? Screenshot by Dot Esports

Move one: Change the blue color to red.
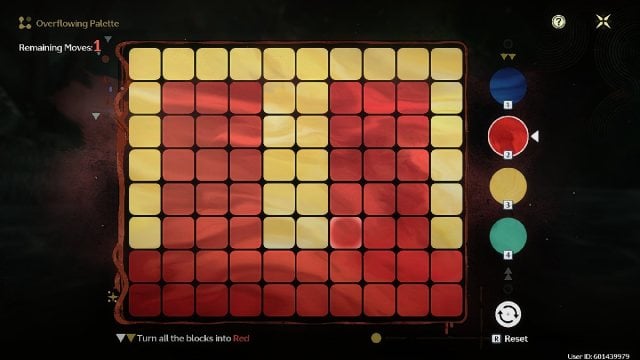
Wuthering Waves pallete board with mostly red board with single yellow section above
Too easy. Screenshot by Dot Esports

Move two: Change the remaining yellow to red to solve the puzzle.

Averardo Vault Overflowing Palette No. 4

Location: Located at the far east of the Raguuna map.
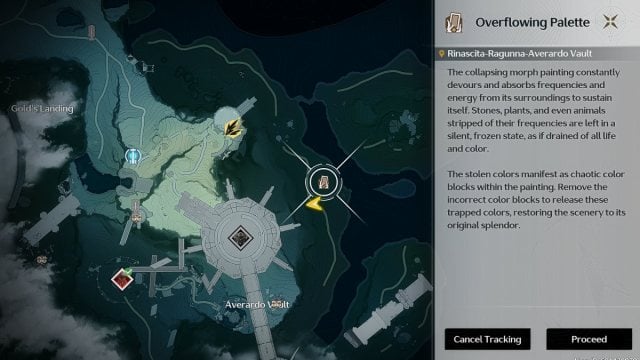
Averardo Vault Overflowing Palette location 4 on wuthering waves map
At the very east. Screenshot by Dot Esports

Objective: Turn all blocks blue in three moves.
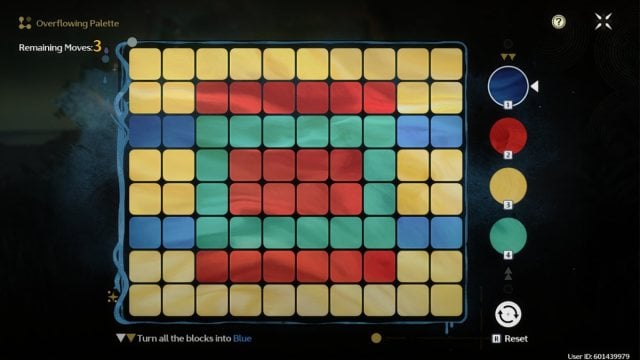
Averardo Vault Overflowing Palette Puzzle 4 default state
Tricky but doable. Screenshot by Dot Esports

Move one: Turn the green square red to get a big red square.
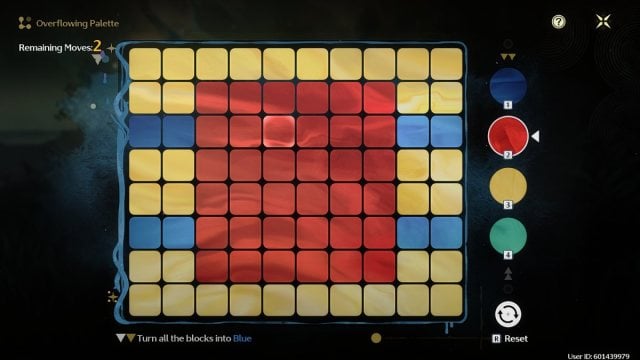
Wuthering Waves pallete board with red square in middle and yellow and blue sections around it
Connect the reds. Screenshot by Dot Esports

Move two: Swap the red to yellow.

Wuthering Waves pallete board with mostly yellow section with eight blue blocks around it
Now change it all to yellow. Screenshot by Dot Esports

Move three: Change all the yellow to blue to finish the puzzle.

Averardo Vault Overflowing Palette No. 5

Location: Located right next to the Gold Landing at the entrance of the Averardo Vault area.
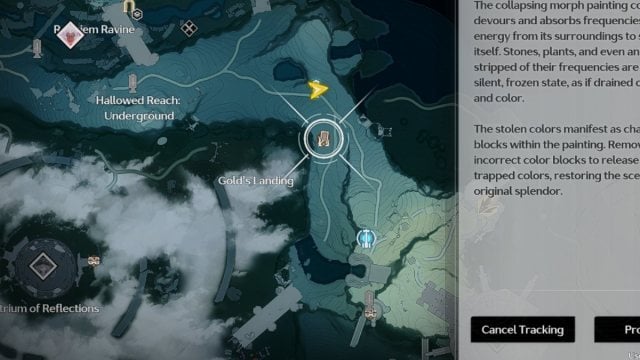
Averardo Vault Overflowing Palette location 5 on wuthering waves map
Middle of nowhere. Screenshot by Dot Esports

Objective: Turn all blocks green in three turns.
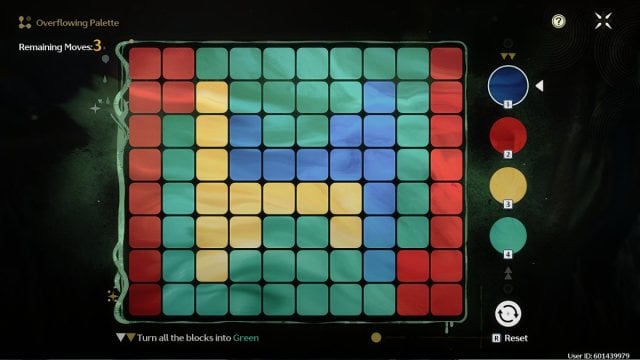
Averardo Vault Overflowing Palette Puzzle 5 default state
Go green. Screenshot by Dot Esports

Move one: Swap the blue blocks to yellow.
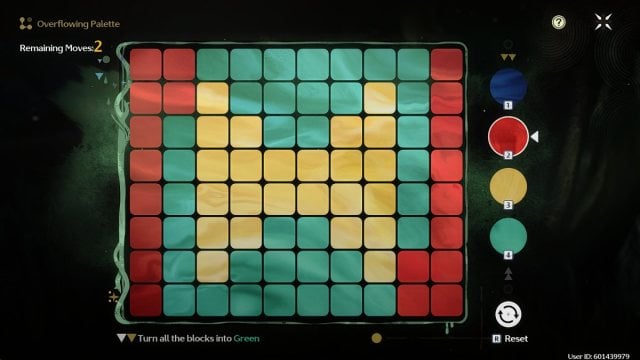
Wuthering Waves pallete board with yellow bow shape with green and red above and next to it
Yellow to blue works too! Screenshot by Dot Esports

Move two: Now swap the middle color to red and connect both sides.
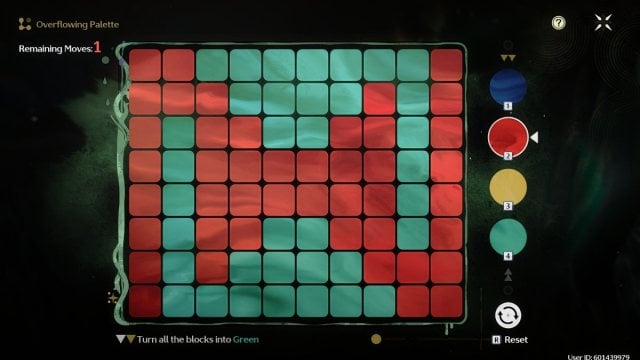
Wuthering Waves pallete board with green and red board with two green sections and one big red section
Red connection. Screenshot by Dot Esports

Move three: Change all the red to green to solve the puzzle.

All Overflowing Palettes in Fagaceae Peninsula and solutions

There are a total of four Overflowing Palettes in the Fagaceae Peninsula region.

Fagaceae Peninsula Overflowing Palette No. 1

Location: Climb up the tower to the left of the Oakheart Highcourt.
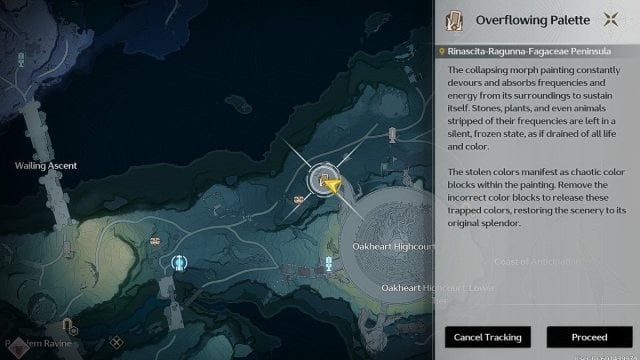
Fagaceae Peninsula Overflowing Palette #1 map location
Elden Ring reference area. Screenshot by Dot Esports

Objective: Turn all blocks red in three moves.
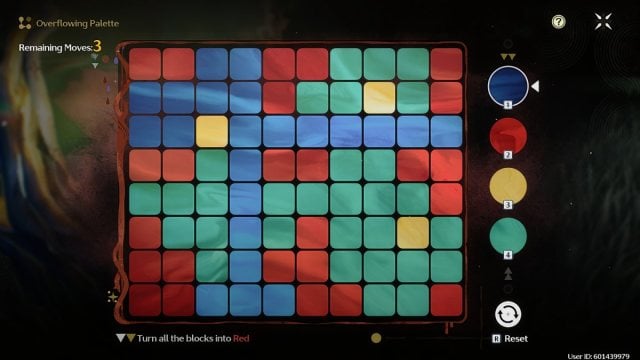
Wuthering Waves pallete board with blue cross area and yellow dots with red patterns and large green sections dotting it
Routine puzzle. Screenshot by Dot Esports

Move one: Change the blue blocks to green.
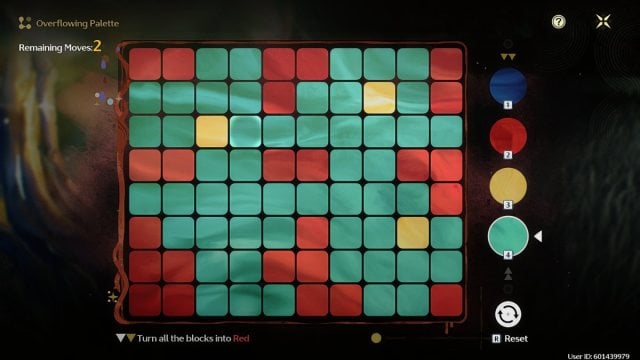
Wuthering Waves pallete board with large green areas in four quadrants and red and yellow patterns across
Go green first. Screenshot by Dot Esports

Move two: Swap all the green to yellow.
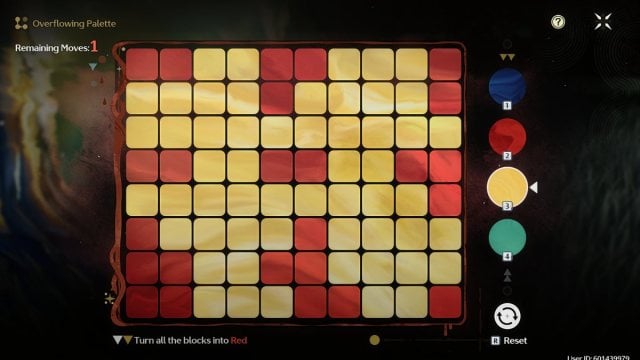
Wuthering Waves pallete board with yellow quadrants with some red patterns
Just splash some red now. Screenshot by Dot Esports

Move three: Change all the yellow blocks to red to finish the puzzle.

Fagaceae Peninsula Overflowing Palette No. 2

Location: Now go to the tower located on the other side of the Oakheart Highcourt.
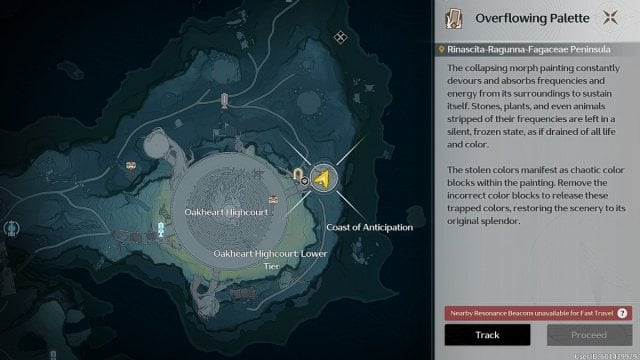
Fagaceae Peninsula Overflowing Palette #2 location on map in wuthering waves
Enjoy the beautiful skybox on your way. Screenshot by Dot Esports

Objective: Turn all blocks yellow in three moves.
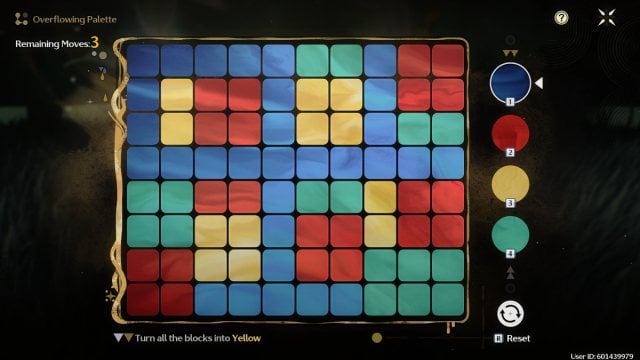
Wuthering Waves pallete board with blue crossing section and yellow, green and red patterns
Almost the same as the last one. Screenshot by Dot Esports

Move one: Change all the blue blocks to red.
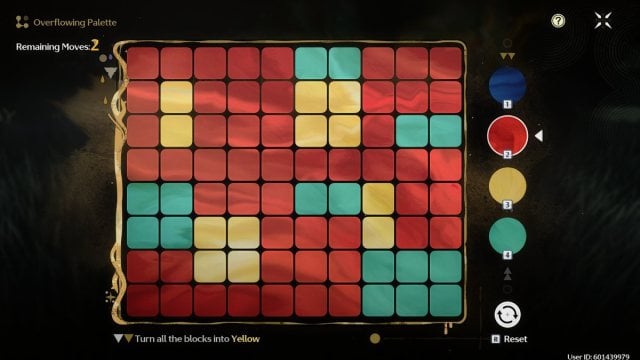
Wuthering Waves pallete board with red majority and some green and yellow blocks
Assimilate each color. Screenshot by Dot Esports

Move two: Now change all the red blocks to green.
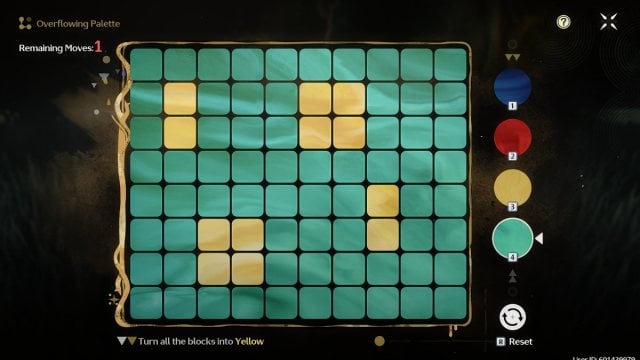
Wuthering Waves pallete board with mostly green blocks with some yellow blocks
Save the target color for last. Screenshot by Dot Esports

Move three: Change all the green blocks to yellow to solve the puzzle.

Fagaceae Peninsula Overflowing Palette No. 3

Location: Located at the bottom of a cliff near the shore at the northeast of the map.
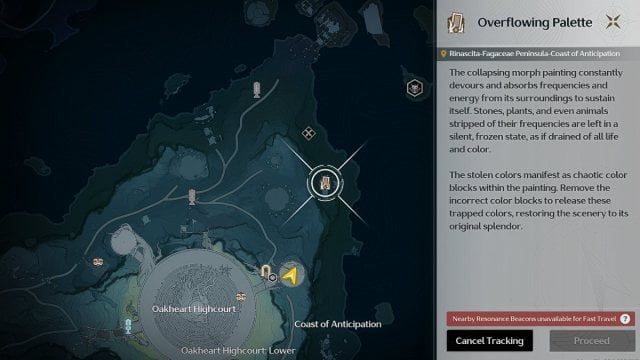
Fagaceae Peninsula Overflowing Palette #3 location on map in wuthering waves
Breathtaking view. Screenshot by Dot Esports

Objective: Change all blocks to yellow in three turns.
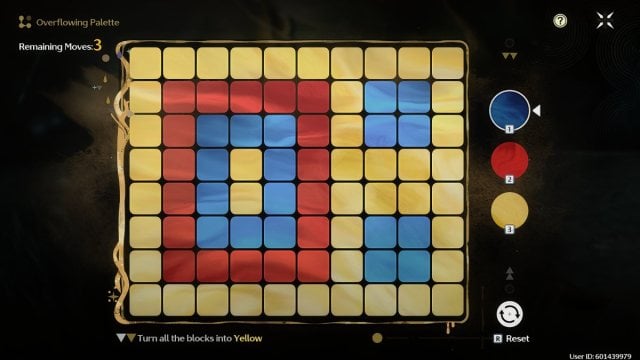
Wuthering Waves pallete board with blue squares and a red square on a yellow block board
An unorthodox solution. Screenshot by Dot Esports

Move one: Change all the yellow blocks to blue.
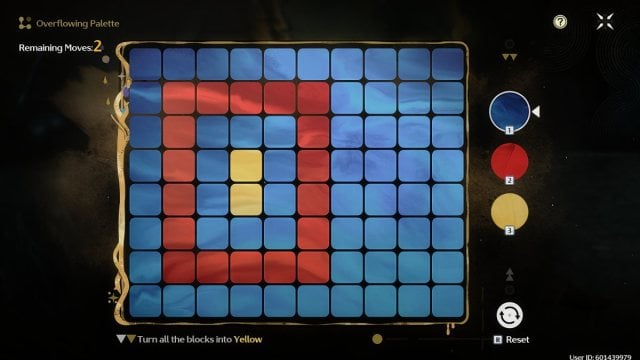
Wuthering Waves pallete board with mostly blue area with some red and yellow squares in middle
Trust me. Screenshot by Dot Esports

Move two: Change the red rectangle to blue blocks instead.
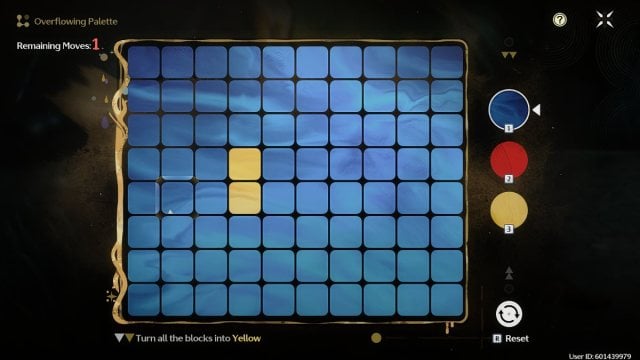
An almost fully blue palette with two yellow blocks in overflowing palette
Add back some yellow. Screenshot by Dot Esports

Move three: Now just swap all the blue blocks to yellow to solve the puzzle.

Fagaceae Peninsula Overflowing Palette No. 4

Location: Located right in the heart atop the Oakheart Highcourt.
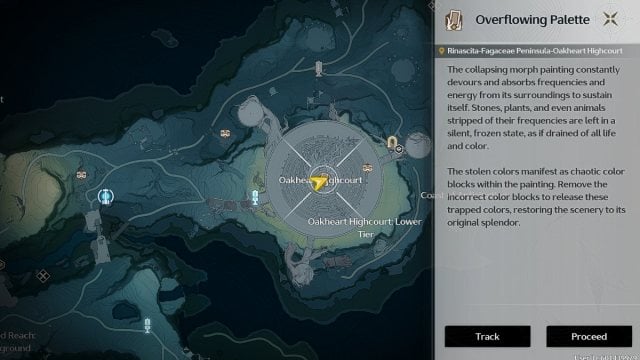
Fagaceae Peninsula Overflowing Palette #4 location
Return the beauty here. Screenshot by Dot Esports

Objective: Turn all blocks red in four turns.
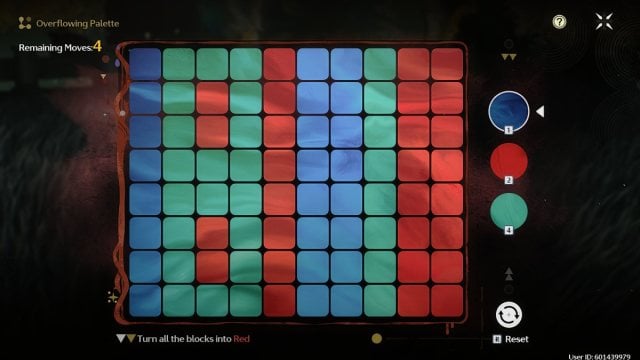
Wuthering Waves overflowing palette board with green red and blue columns
Multiple solutions here. Screenshot by Dot Esports

Move one: Paint the two blue columns in the middle green.
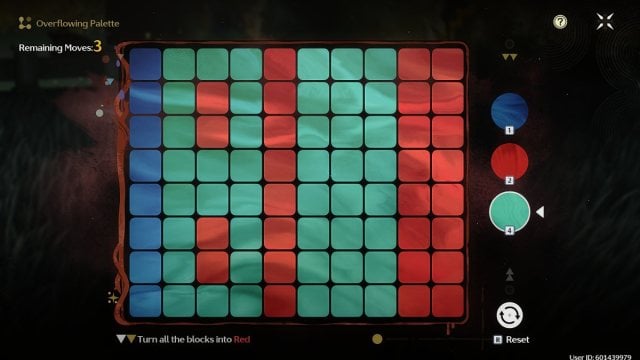
Wuthering Waves overflowing palette board with green red and blue columns
You can also pick blue. Screenshot by Dot Esports

Move two: Paint the blue column on the left green.
Wuthering Waves overflowing palette board with green and red columns only
Or color both sides red. Screenshot by Dot Esports

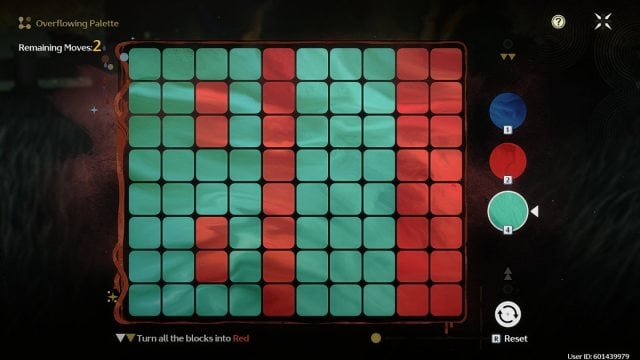
Move three: Now just color the red column in the middle green.
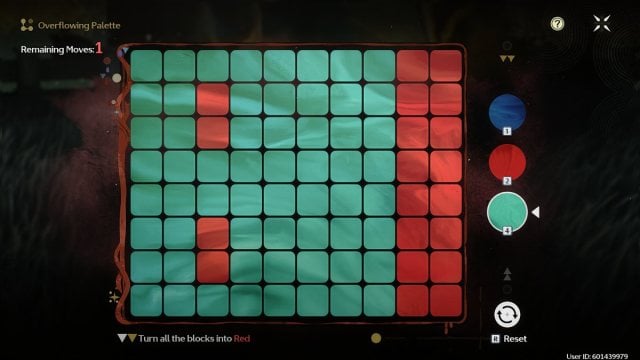
Wuthering Waves overflowing palette board with green board and some red regions
One red splash left. Screenshot by Dot Esports.

Move four: Now just convert all of them to red blocks to solve the puzzle.

All Overflowing Palettes in Penitent’s End and solutions

There are a total of four Overflowing Palettes in the Penitent’s End region.

Penitent’s End Overflowing Palette No. 1

Location: Hidden under a cliff in the northmost area of Penitent’s End.
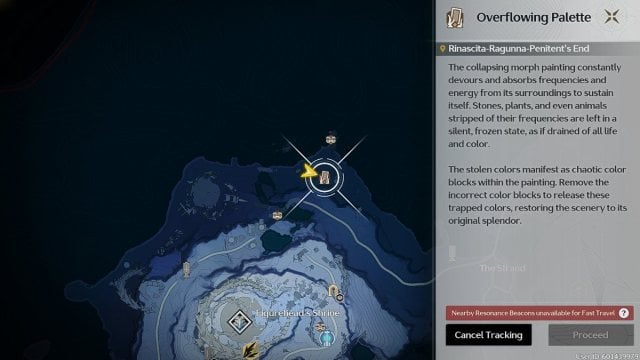
Penitent's End Overflowing Palette #1 location on map
Chop Chop boss behind it. Screenshot by Dot Esports

Objective: Turn all blocks red in three turns.
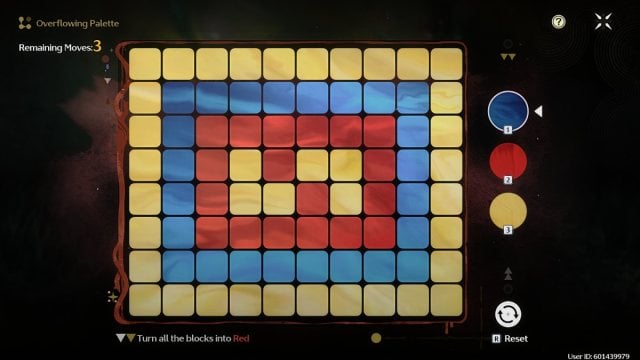
Wuthering Waves pallete board with a yellow board of blocks with a blue rectangle shape in middle with red and yellow blocks in it
Another unorthodox solution. Screenshot by Dot Esports

Move one: Paint all the red blocks yellow instead.
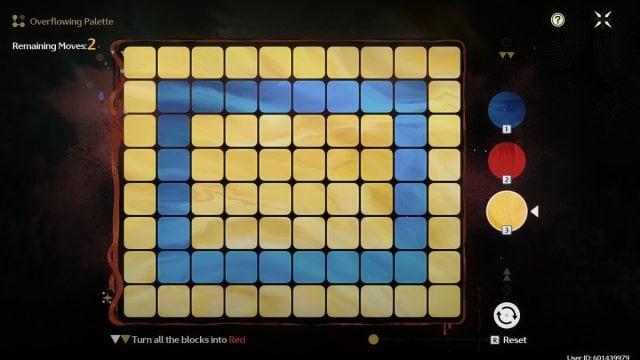
Wuthering Waves pallete board with a yellow board of blocks with a hollow blue rectangle shape in middle
No red. Screenshot by Dot Esports

Move two: Change all the blue blocks to yellow.
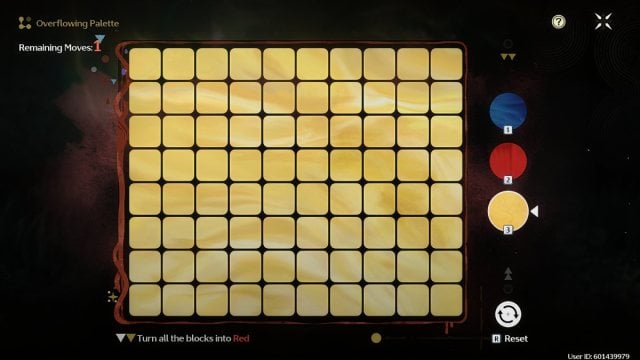
Wuthering Waves pallete board with a complete yellow board of blocks
Wrong color. Screenshot by Dot Esports

Move three: Now flip all the yellow blocks to red to complete the puzzle.

Penitent’s End Overflowing Palette No. 2

Location: Located at the Southwest of the Penitent’s End region.
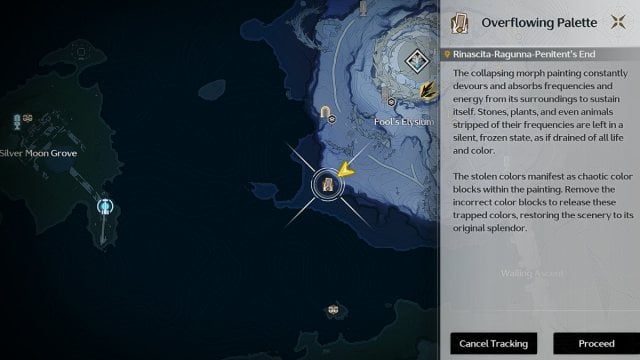
Penitent's End Overflowing Palette #2 location on map
The second puzzle. Screenshot by Dot Esports

Objective: Turn all blocks blue within three moves.
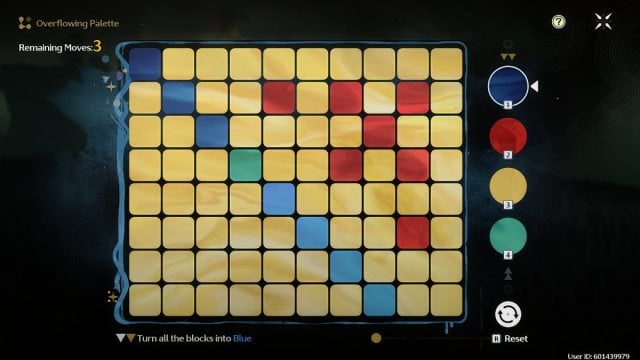
Wuthering Waves pallete board with mostly yellow blocks with a blue diagonal and some red blocks and one green block in between blue diagonal
Pesky green. Screenshot by Dot Esports

Move one: Change the one green block to yellow instead.
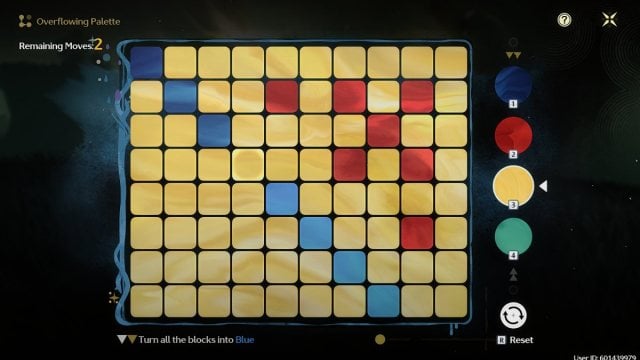
Wuthering Waves pallete board with mostly yellow blocks with a blue diagonal and some red blocks
Yellow bridged. Screenshot by Dot Esports

Move two: Change all the yellow blocks to red.
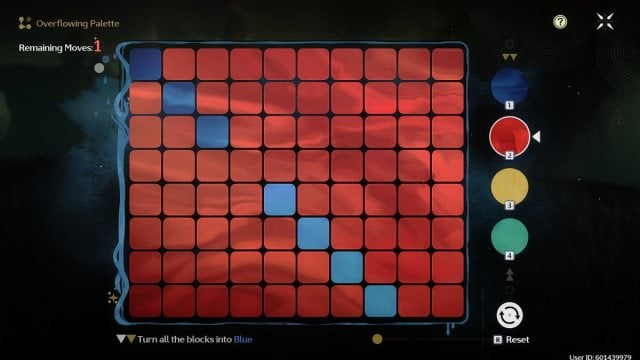
Wuthering Waves pallete board with mostly red blocks and a blue diagonal
Sea of Red. Screenshot by Dot Esports

Move three: Now change all red blocks to blue to solve the puzzle.

Penitent’s End Overflowing Palette No. 3

Location: Located above the west coast of the Penitent’s End region.
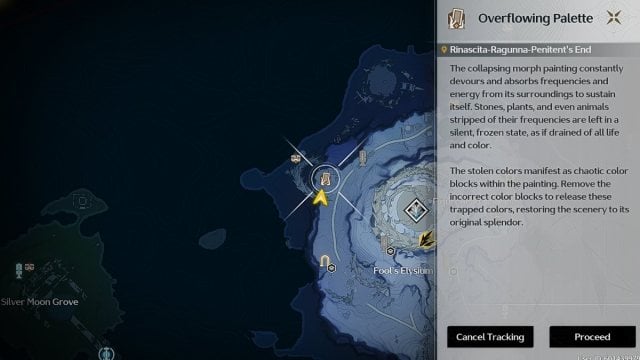
Penitent's End Overflowing Palette #3 location on map
Watch out for enemies along the path. Screenshot by Dot Esports

Objective: Turn all the block to blue in four moves.
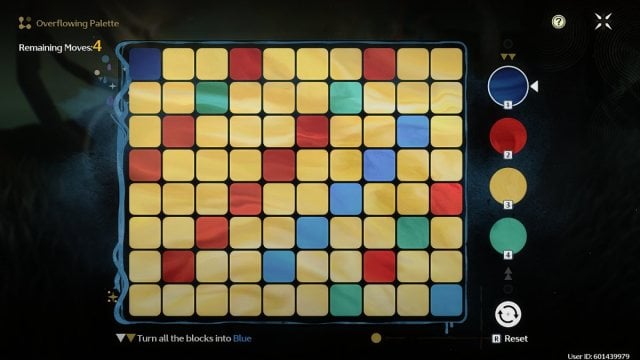
Wuthering Waves pallete board with mostly yellow blocks and some blue. green and red on corners
Every color once. Screenshot by Dot Esports

Move one: First change all the yellow blocks to green.
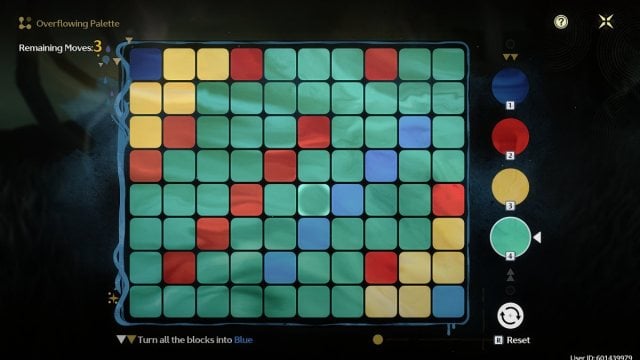
Wuthering Waves pallete board with mostly green blocks and some red, blue and yellow on corners
Green first. Screenshot by Dot Esports

Move two: Now change all the green blocks to red.
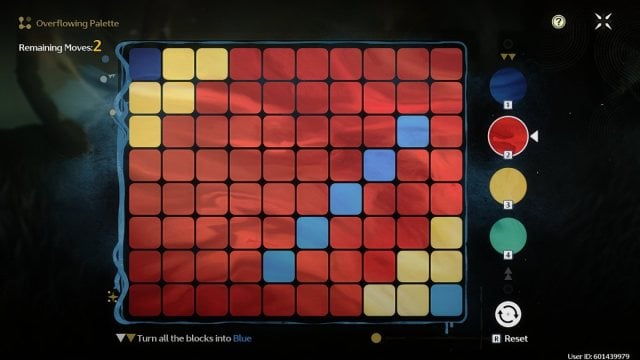
Wuthering Waves pallete board with mostly red blocks and some blue and yellow on corners
Now Red. Screenshot by Dot Esports

Move three: Change all the red blocks to yellow to cover everything.
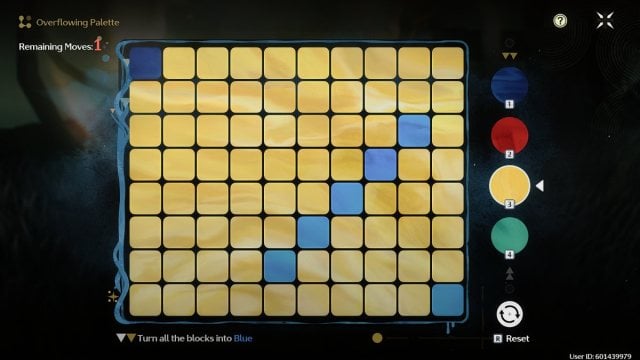
Wuthering Waves pallete board with mostly yellow board with a blue diagonal block cut
It’s almost done. Screenshot by Dot Esports

Move four: Now change all the yellow blocks to blue to finish the puzzle.

Penitent’s End Overflowing Palette No. 4

Location: Located on a cliff right before the coast at the north of the Penitent’s End.
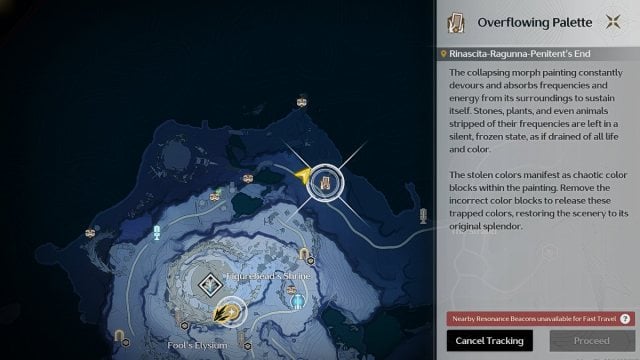
Penitent's End Overflowing Palette #4 location on map
On a random cliff. Screenshot by Dot Esports

Objective: Turn all blocks yellow in four moves.
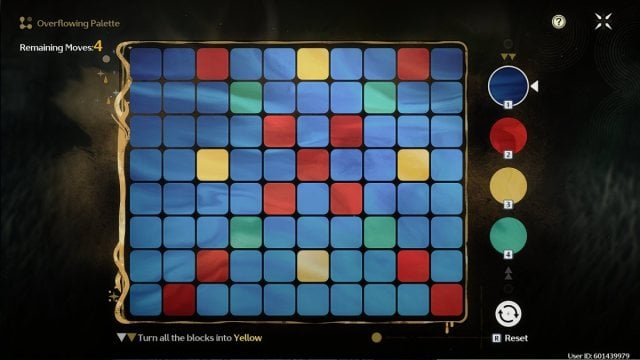
Wuthering Waves pallete board with mostly blue blocks and three other colors in cross pattern
Same logic as the previous one. Screenshot by Dot Esports

Move one: Turn the middle red cross blocks into blue blocks.
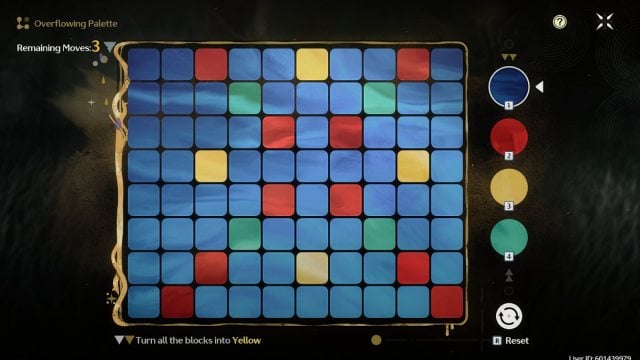
Wuthering Waves pallete board with mostly blue blocks and three other colors in cross pattern
Connecting blue. Screenshot by Dot Esports

Move two: Now turn all the blue blocks red.
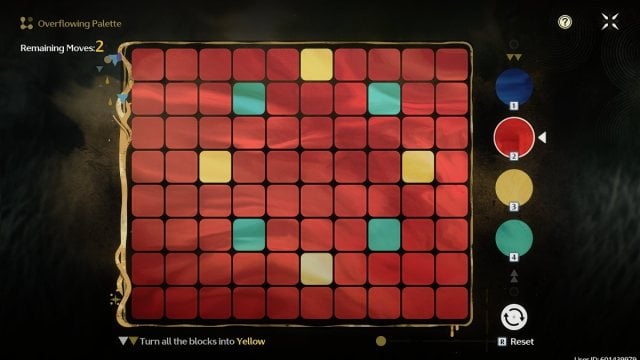
Wuthering Waves palette board with mostly red board with four yellow blocks and four green blocks
Now red. Screenshot by Dot Esports

Move three: Change all the red blocks to green.
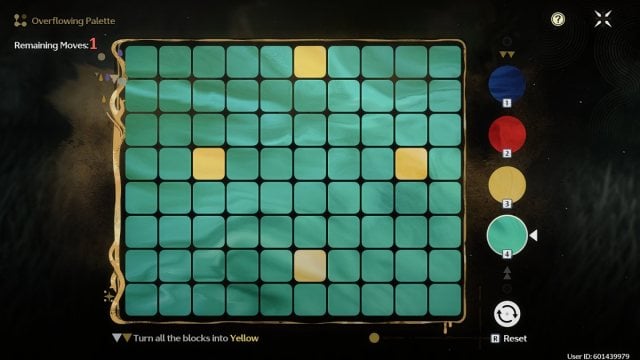
Wuthering Waves palette board with mostly green board with four yellow blocks
Swap it all. Screenshot by Dot Esports

Move four: Complete the puzzle by turning all the green blocks yellow.

All Overflowing Palettes in Hallowed Reach and solutions

There are a total of three Overflowing Palettes in the Hallowed Reach region.

Hallowed Reach Overflowing Palette No. 1

Location: Located in the middle of the small Hallowed Reach area.
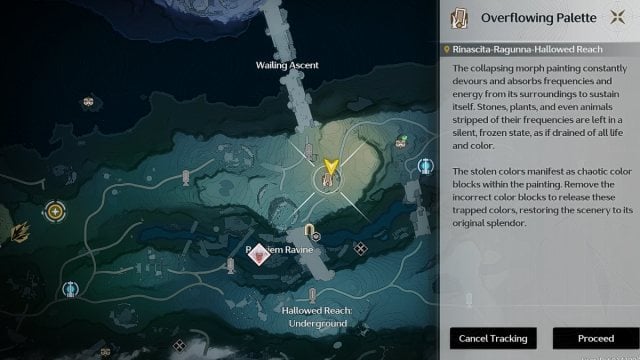
Wuthering Waves map Halowed Reach overflowing palette puzzle 1 location
The final region. Screenshot by Dot Esports

Objective: Turn all the blocks blue in three turns.
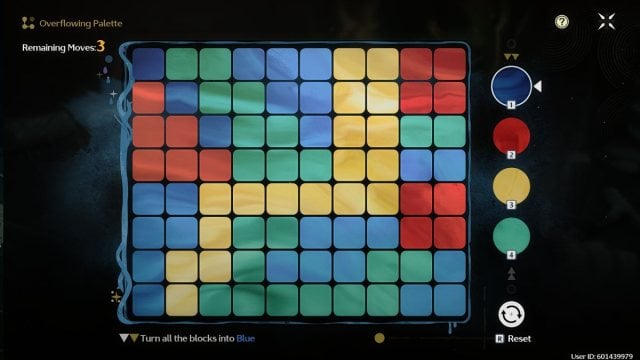
Wuthering Waves palette board with all four colored areas
Yellow divider. Screenshot by Dot Esports

Move one: First change the yellow blocks in the middle to green.
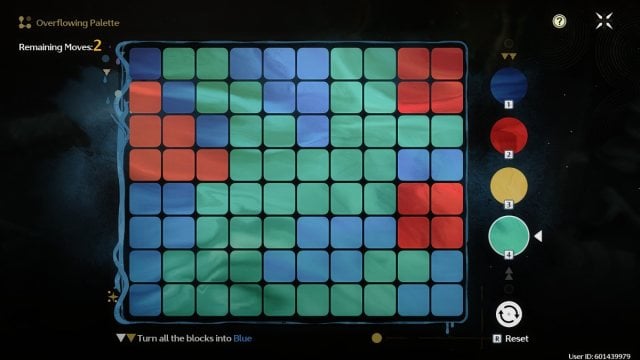
Wuthering Waves palette board with mostly green blocks with small red and blue sections
One by one. Screenshot by Dot Esports

Move two: Change all the green blocks to red.
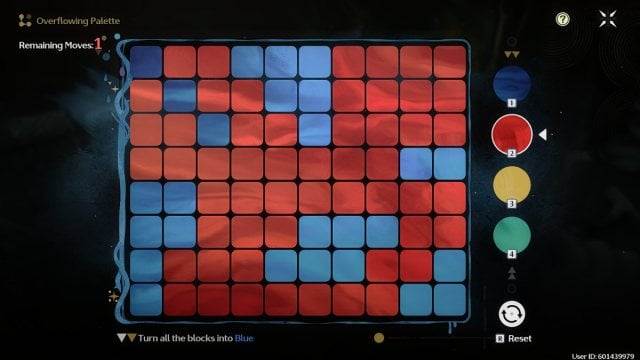
Wuthering Waves palette board with red majority area with some blue leftover
Back to blue. Screenshot by Dot Esports

Move three: Now just turn all the red blocks blue to finish the puzzle.

Hallowed Reach Overflowing Palette No. 2

Location: Located in a ravine near the Nexus.
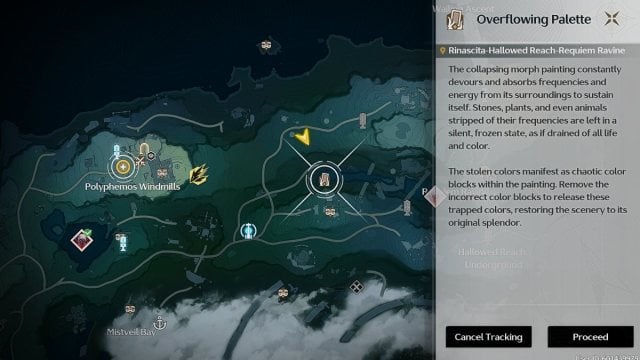
Wuthering Waves map Halowed Reach overflowing palette puzzle 2 location
Watch out for Fractsidus elites. Screenshot by Dot Esports

Objective: Turn all blocks green in three turns.
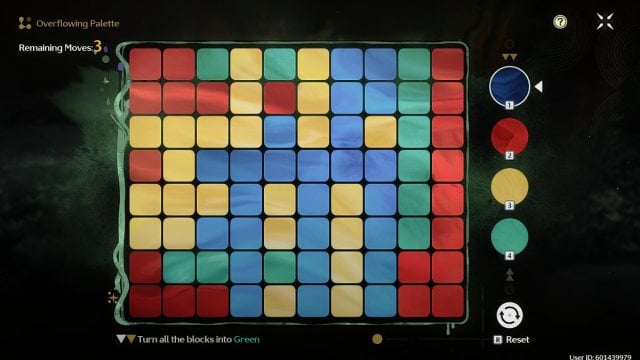
Wuthering Waves palette board with board with all four colors on it
All colors needed. Screenshot by Dot Esports

Move one: Change the blue blocks in the middle to yellow.
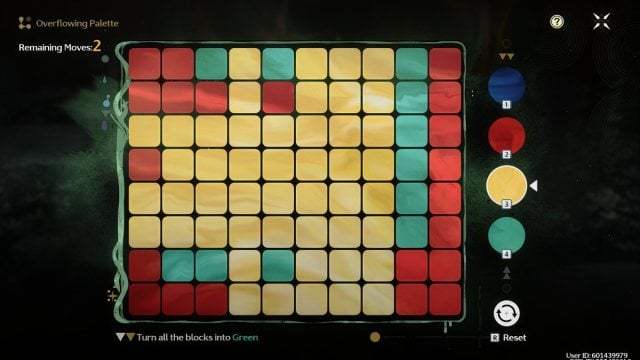
Wuthering Waves palette board with mostly yellow blocks and some green and red blocks
Connect the middle. Screenshot by Dot Esports

Move two: Change all the yellow blocks to red.
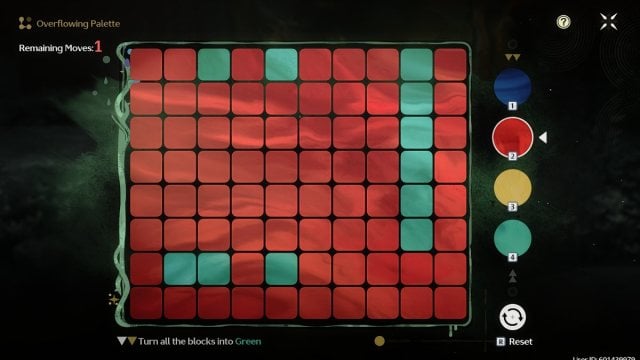
Wuthering Waves palette board with mostly red blocks and some green blocks
Just one more. Screenshot by Dot Esports

Move three: Now turn all the red blocks green to finish the puzzle.

Hallowed Reach Overflowing Palette No. 3

Location: Located on a cliff overlooking the Nimbus Sanctum.
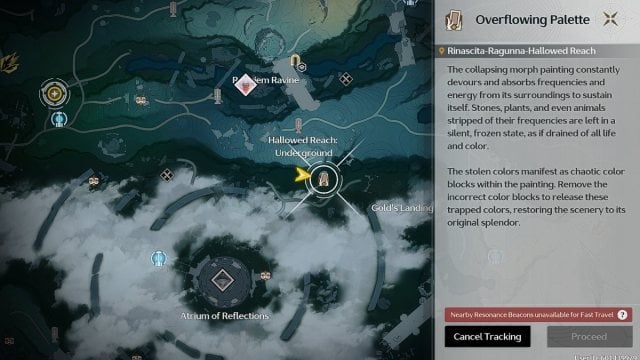
Wuthering Waves map Halowed Reach overflowing palette puzzle 3 location
Beautiful view from here. Screenshot by Dot Esports

Objective: Turn all blocks blue in four moves.
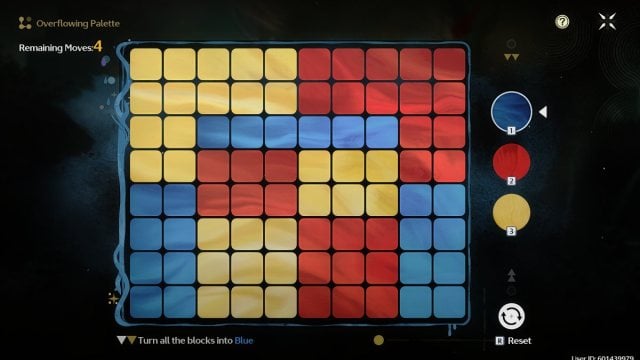
Wuthering Waves Halowed Reach overflowing palette puzzle 3 default state
Easy peasy. Screenshot by Dot Esports

Move one: First turn the small red rectangle yellow.
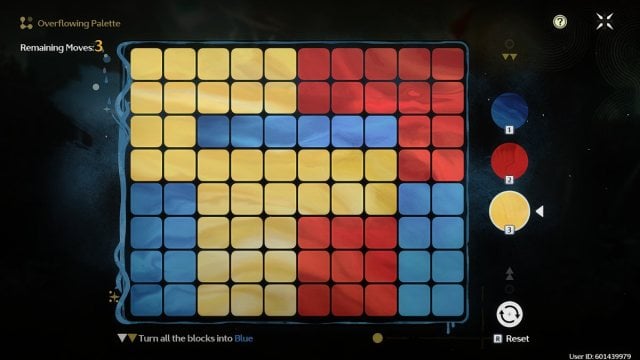
Wuthering Waves map Halowed Reach overflowing palette puzzle 3 step 1
Just setting it up. Screenshot by Dot Esports

Move two:Now just turn all the yellow blocks back into red blocks.

Move three: Now turn all the red blocks blue, and you’re done with all of the Overflowing Palette puzzles.
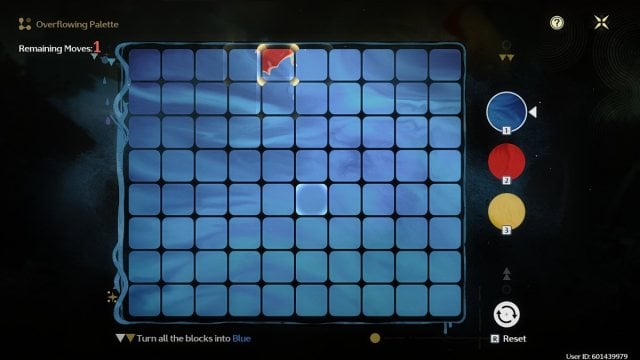
Wuthering Waves map Halowed Reach overflowing palette puzzle 3 completed
With one move left. Screenshot by Dot Esports

That completes our guide for the solutions and locations for all the Overflowing Palette puzzles in Wuthering Waves. For more guides, check out the best Carlotta build and how to unlock Nightmare Echoes.


Dot Esports is supported by our audience. When you purchase through links on our site, we may earn a small affiliate commission. Learn more about our Affiliate Policy
Author
Image of Syed Hamza Bakht
Syed Hamza Bakht
Freelance Writer
After writing for several years across many publications I've found my latest home at Dot Esports, where I plan on putting my years of League and TFT experience to good use as well as covering anything new on the indie side of things. You can find me buried in the neverending gacha grind of Hoyoverse, WuWa, and GFL2.