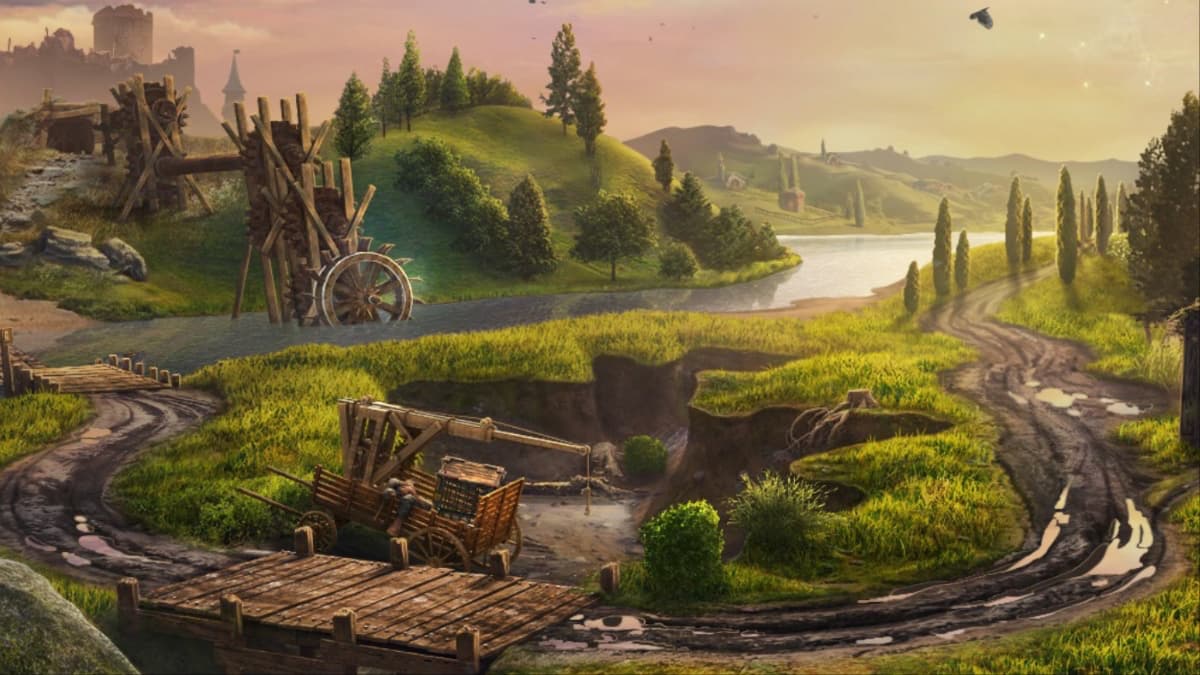
Lost Lands 10 continues the adventures of Susan, who is now trying to enjoy her retirement but gets embroiled in another adventure in the Lost Lands. Solve puzzles and find hidden objects in this magical adventure game.
Recommended Videos
Table of contents
Lost Lands 10 walkthrough
Susan Shepherd is taken against her will into the Lost Lands and must escape. During her adventure, Susan discovers an old friend has murdered someone, so she must find answers.
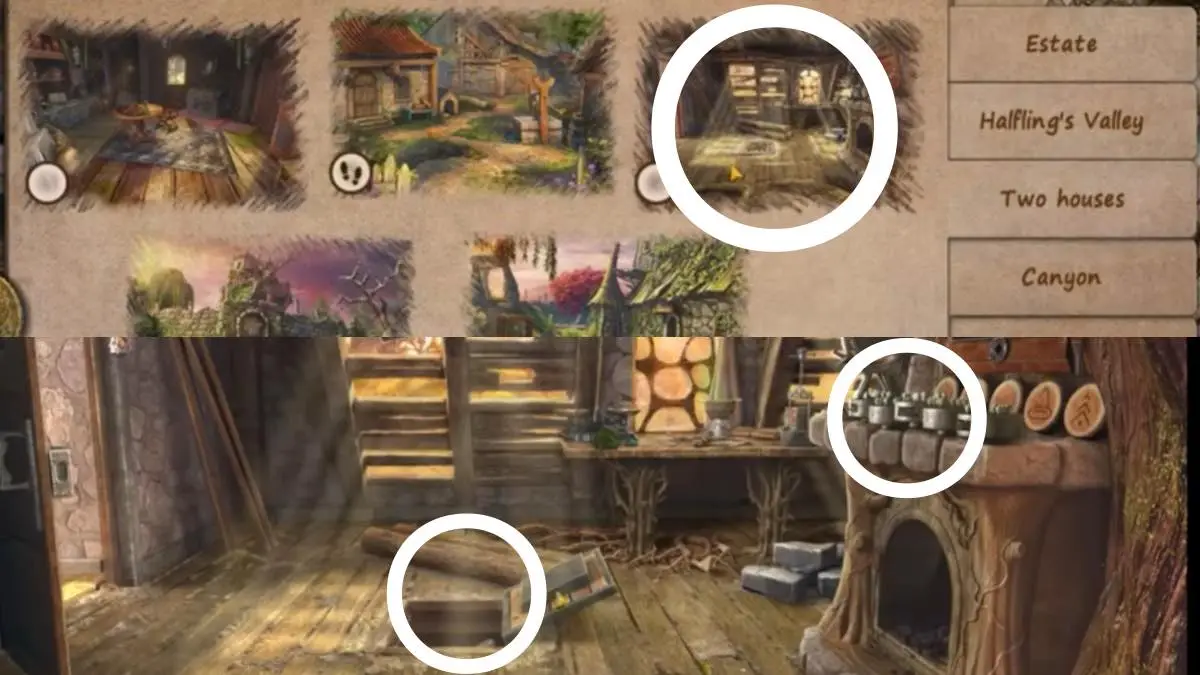
Mysterious Mansion
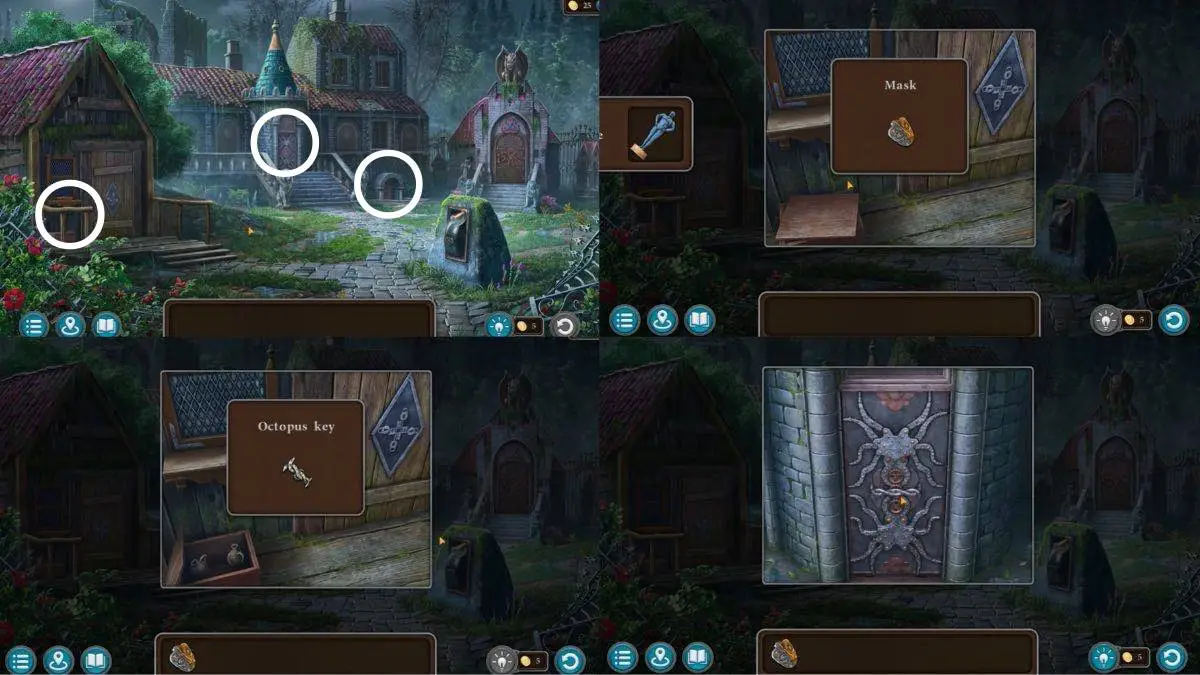
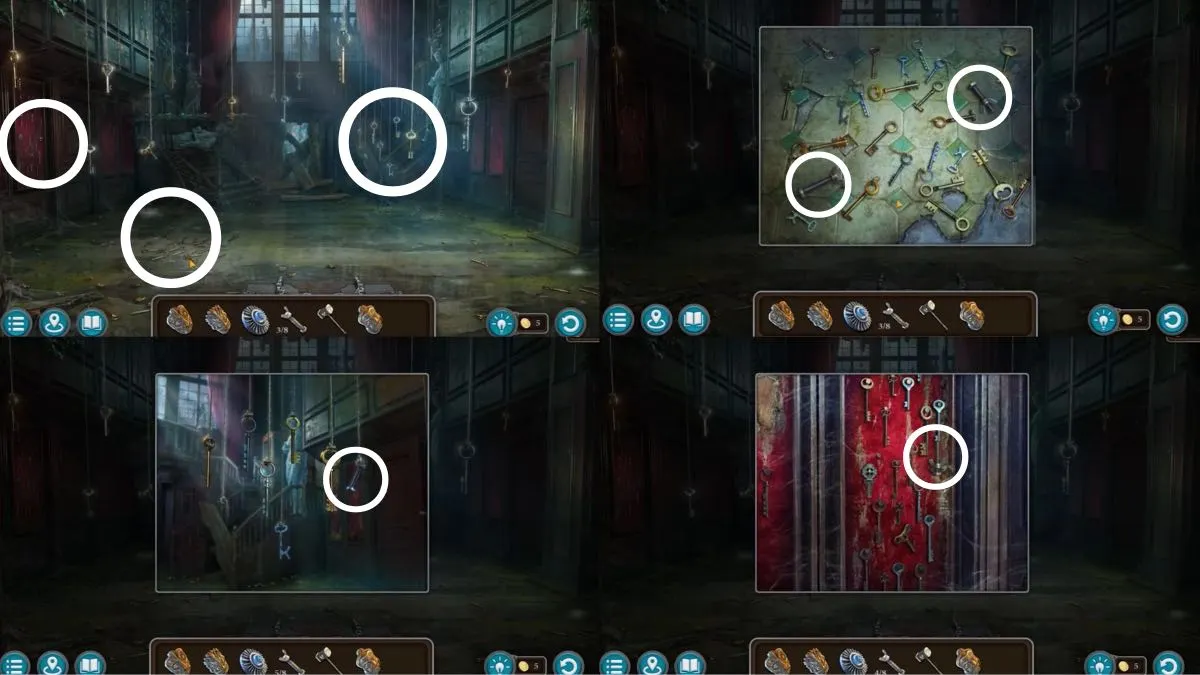
- Look at the basement door.
- Get the mask.
- Open the drawer.
- Get the octopus key.
- Use the key.
- Open the door.
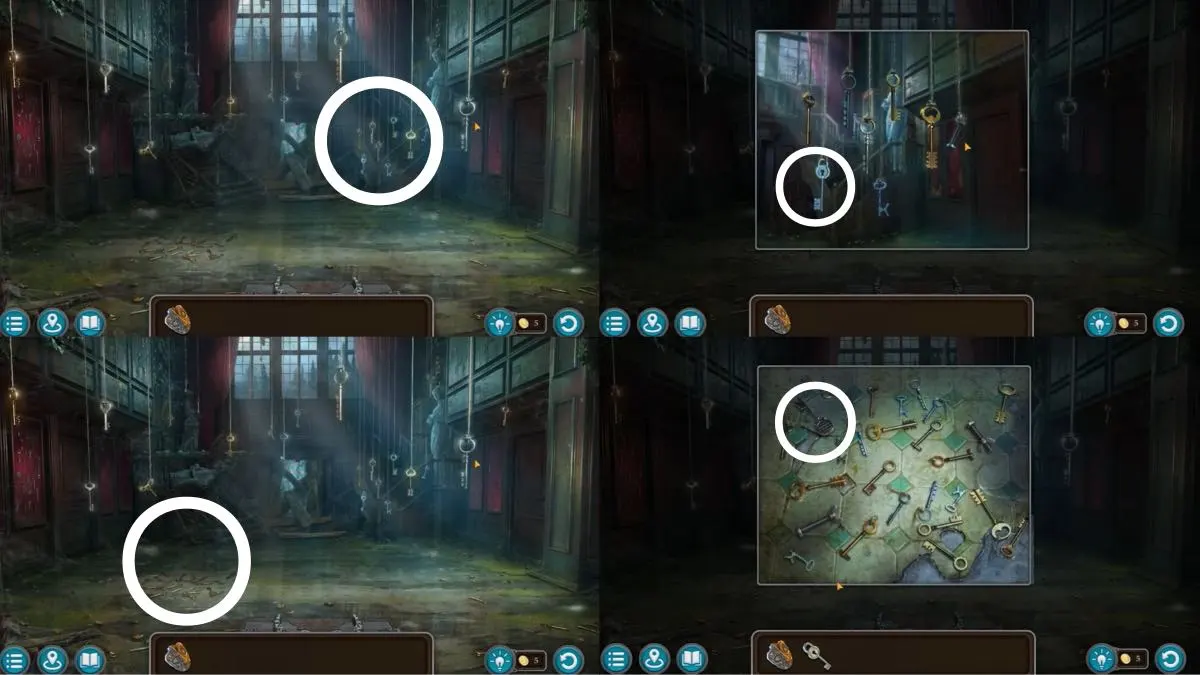
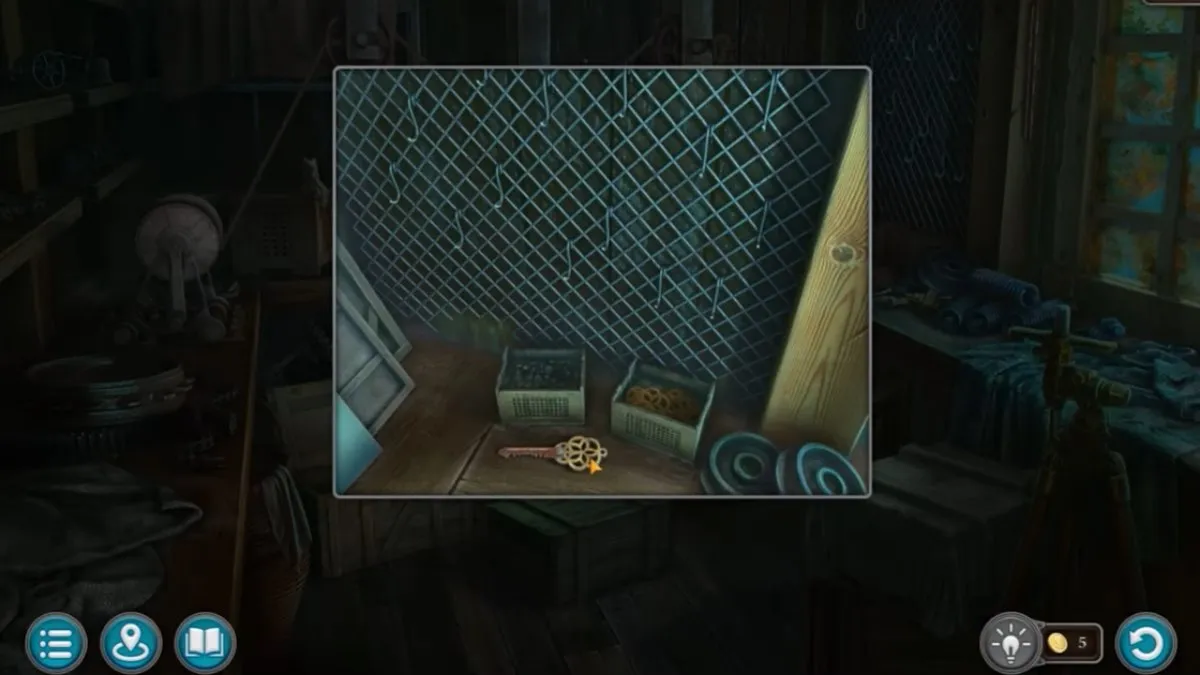
- Get the workshop key from the hanging keys.
- Get the basement key from the floor.
- Go back
- Unlock the basement door.
- Enter.
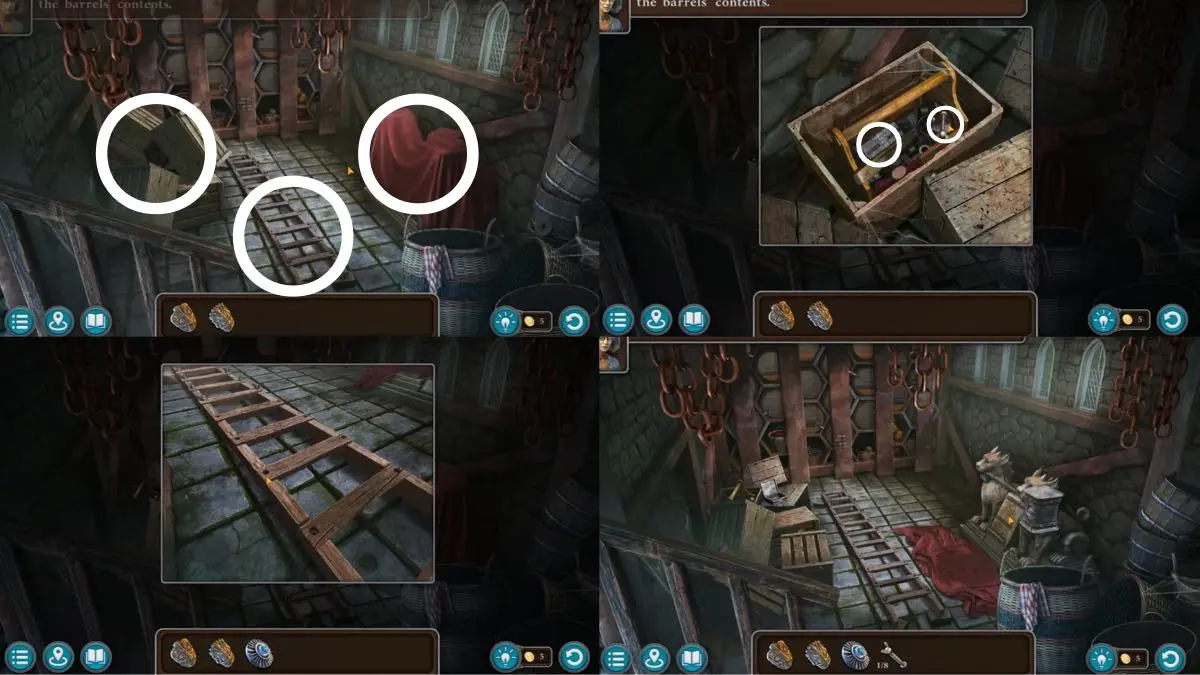
- Look at the staircase.
- Move the cloth.
- Move the boxes.
- Get the clamp.
- Open the box.
- Get the washer.
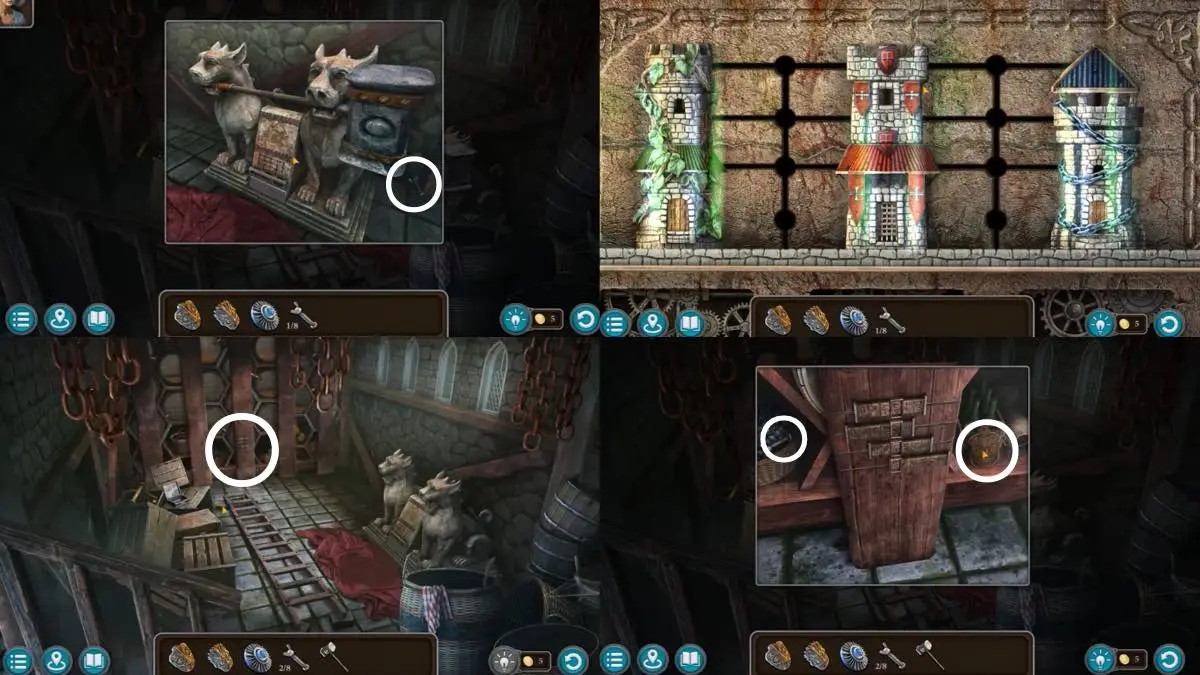
- Get the second clamp.
- Rearrange the castle sections until the puzzle is solved.
- Get Folnur’s hammer.
- Take the mask.
- Get the third clamp.
- Take the final four clamps.
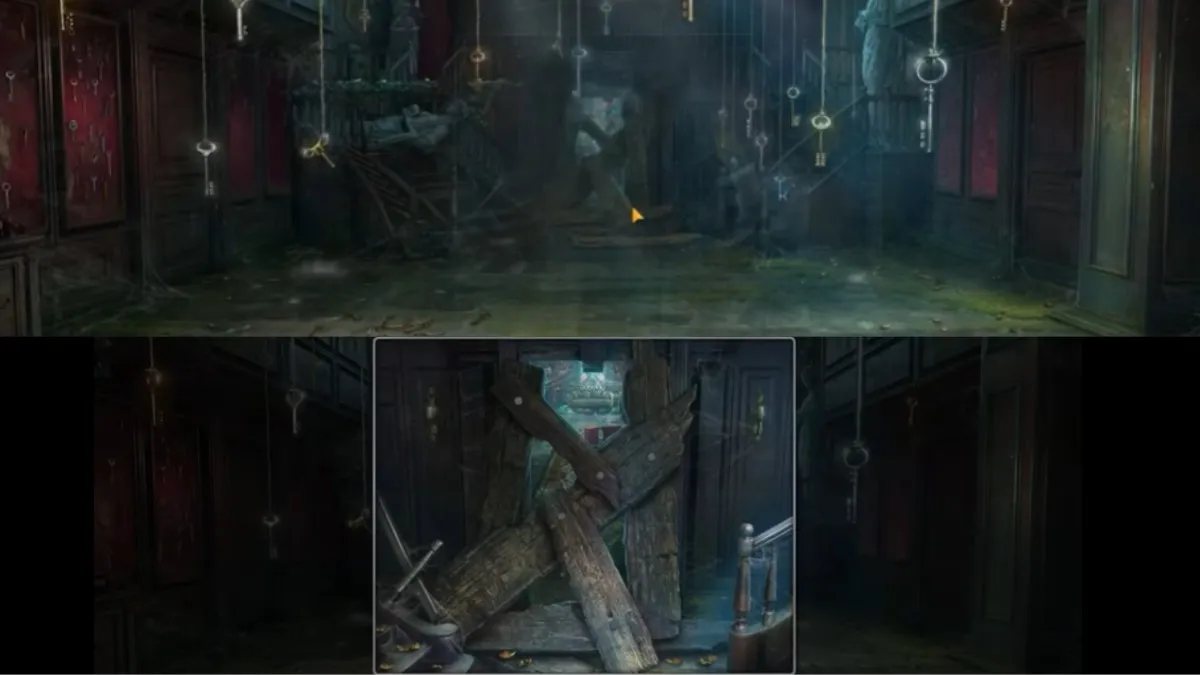
- Use Folnur’s hammer on the wooden slats.
Secret of the Crypt
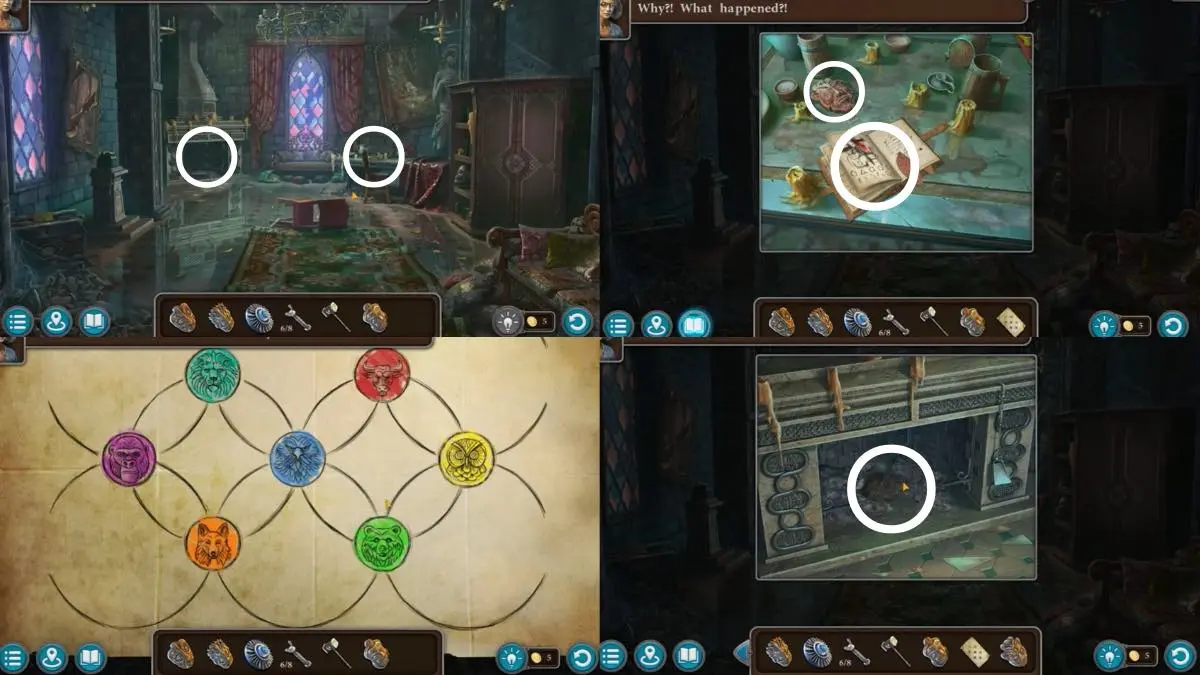
- Enter the room.
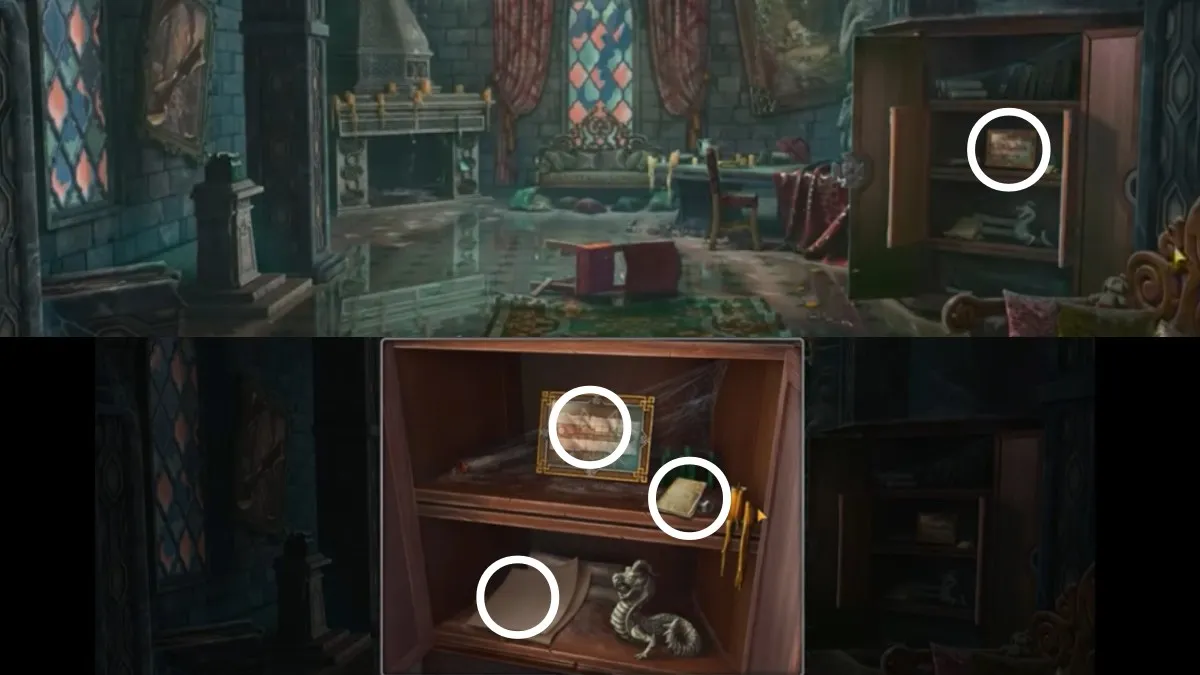
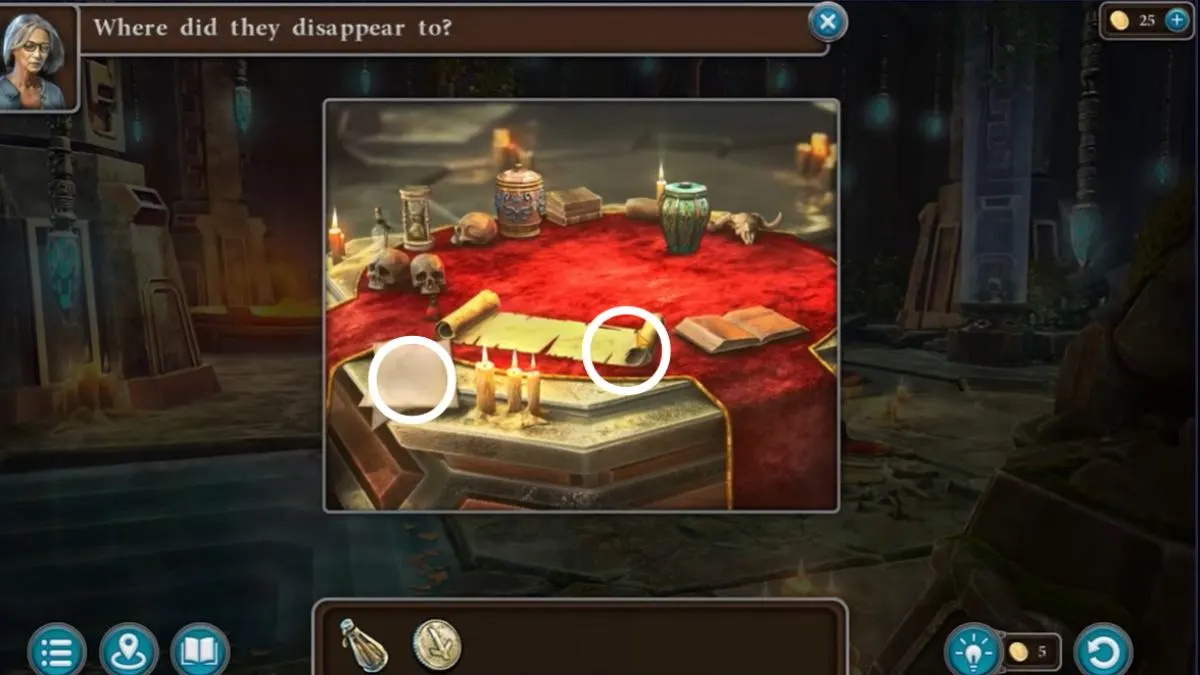
- Click the table to the right.
- Get the mask.
- Open the book.
- Read the book.
- Take the drawing.
- Look at the fireplace.
- Clear the ashes.
- Get the mask.
- Go back to the key room.
- Take the cabinet key.
- Return to the previous room.
- Unlock the cabinet using the key.
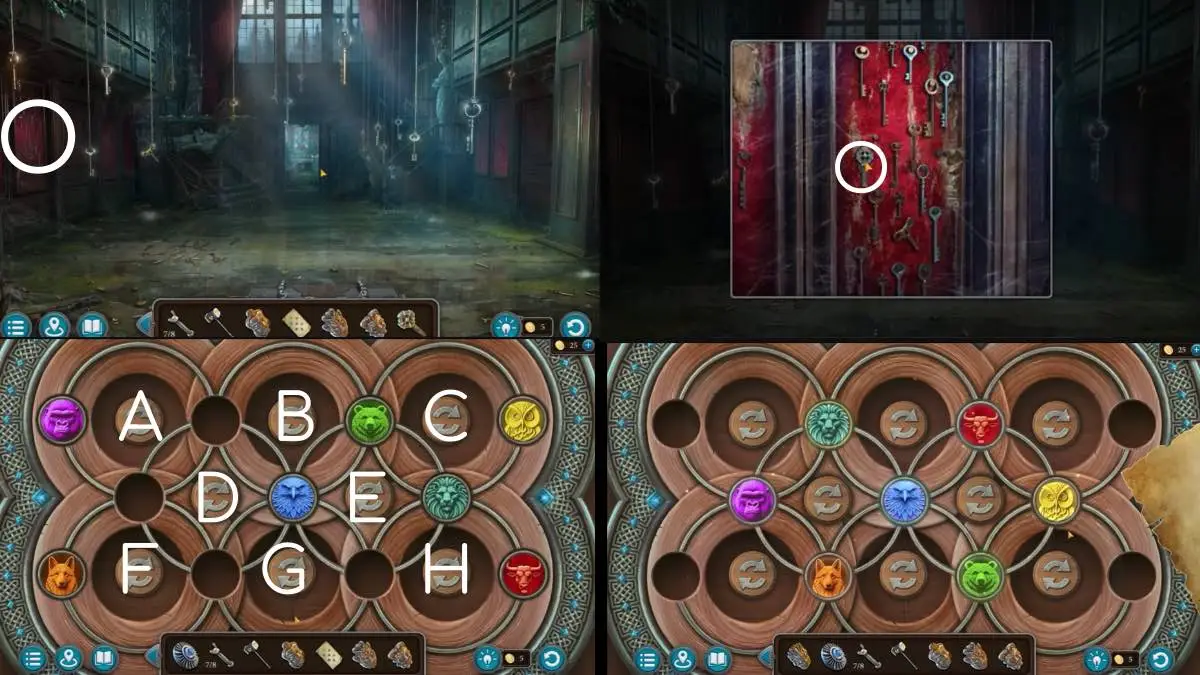
- Solve the puzzle:
- C, H, C, H, C, C, B, B, D, A, F, F, A, B, H, H, H, C, C, H.
- Take the papers, mask, and rag.
- Go outside.
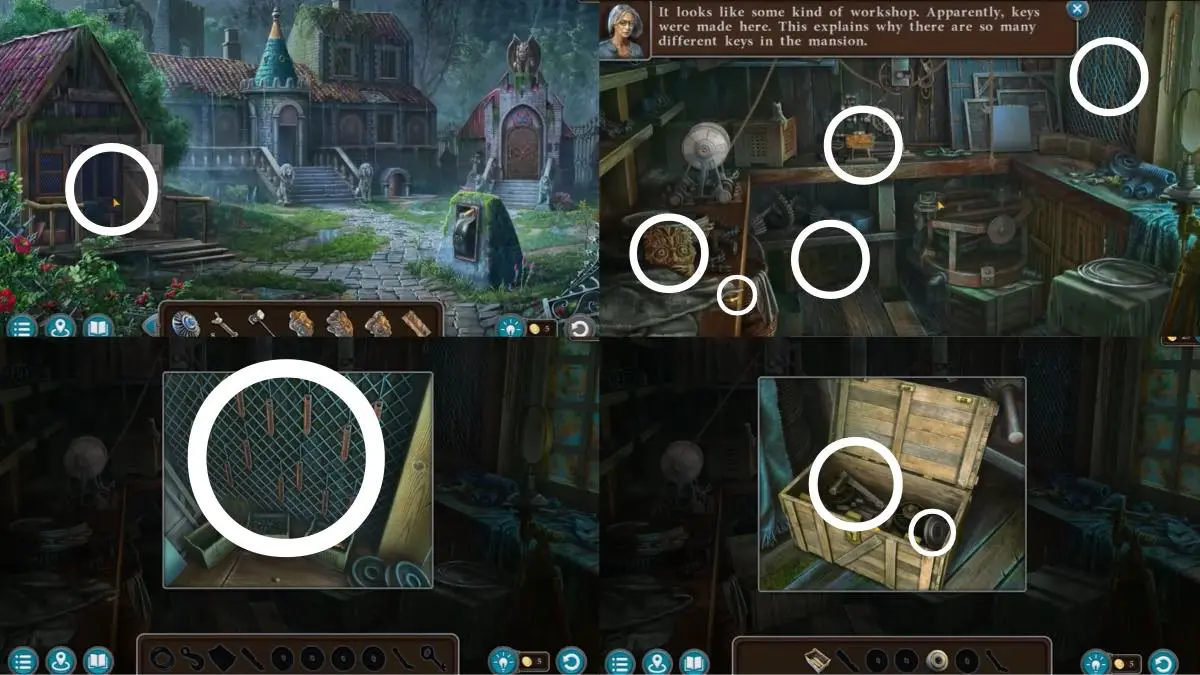
- Click on the workshop.
- Use the workshop key.
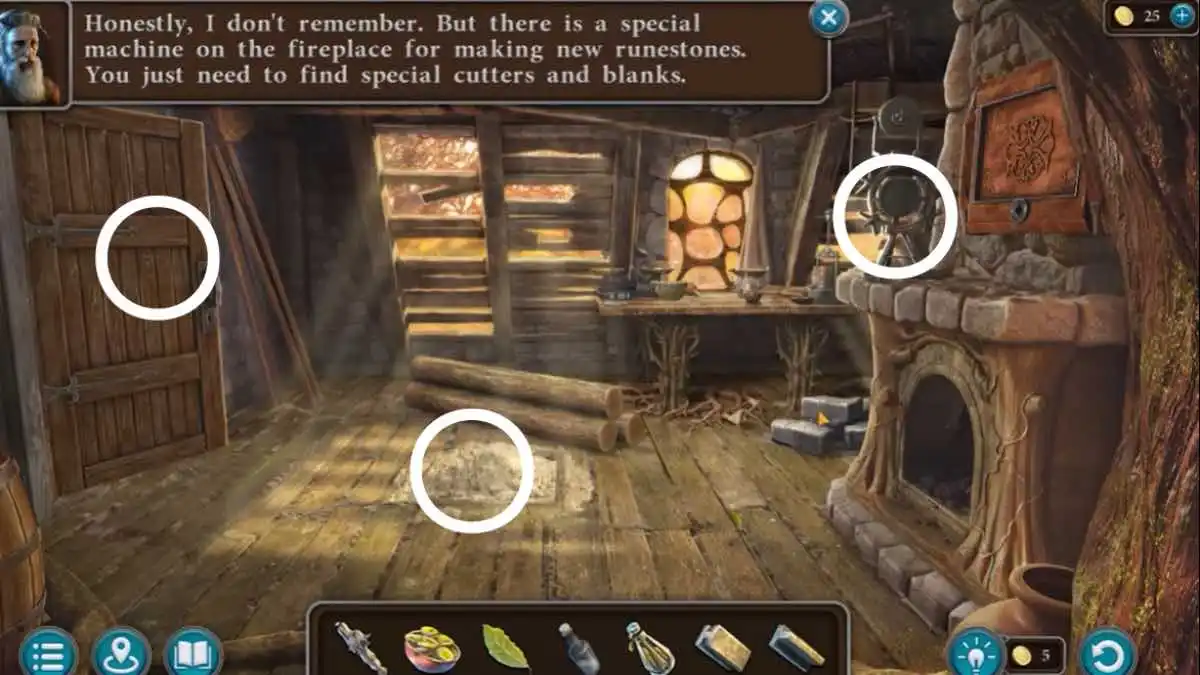
- Go inside.
- Get the mask.
- Get the key under the cloth.
- Open the box under the workbench.
- Take the circle cutter.
- Take the winch lever.
- Take the key blanks on the right wall.
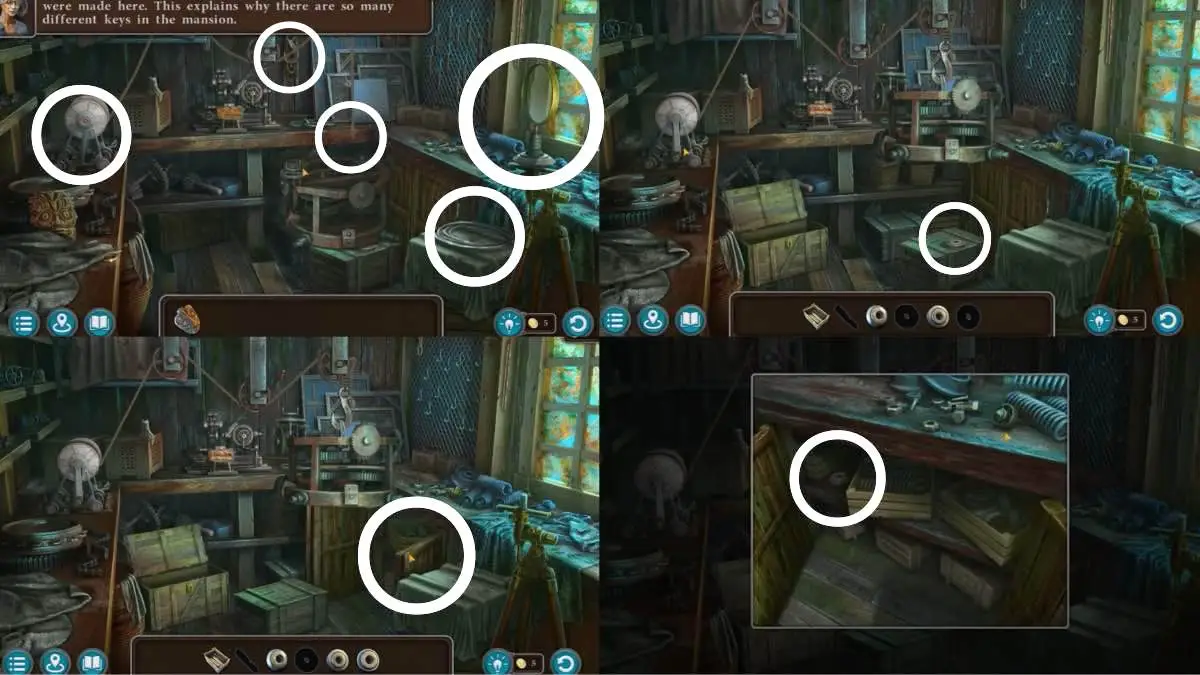
- Unscrew the lens on the right.
- Take the circle cutter.
- Take the wire from the box nearby.
- Take the hook from the wall.
- Place the hook and wire on the rope above the frame.
- Place the winch lever on the winch to the left.
- Move the frame.
- Take the circle cutter.
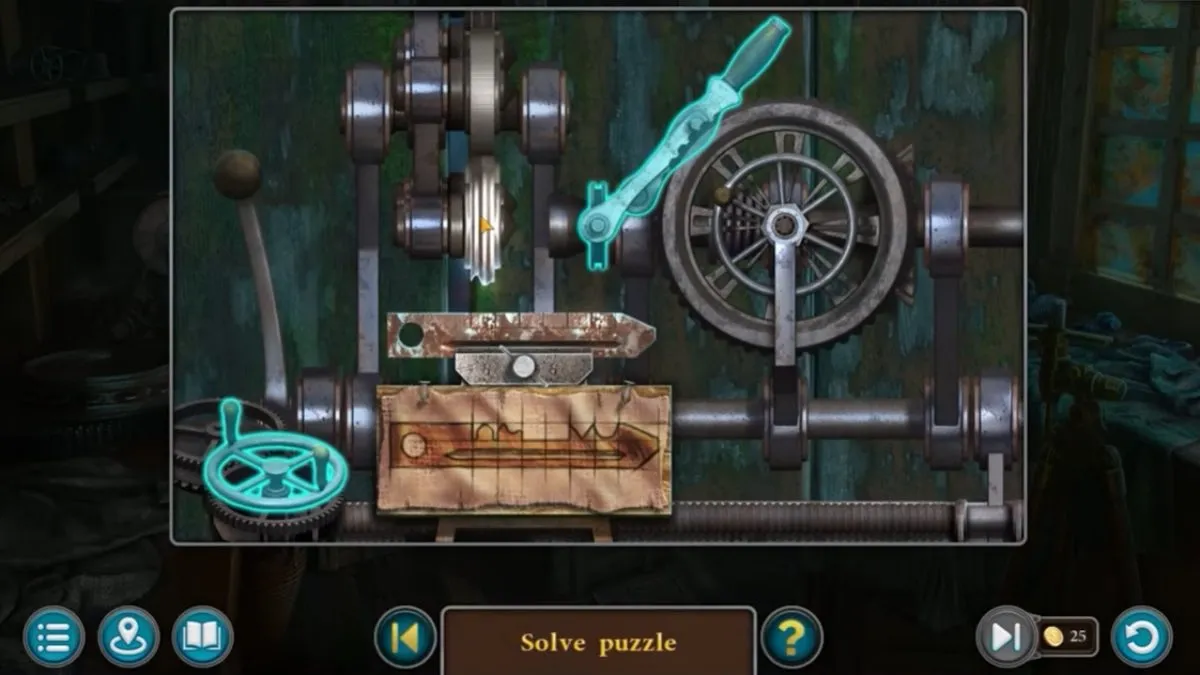
- Place the blueprint.
- Place the circle cutters.
- Place the blanks.
- Use the machine to craft the key.
- Take the future key part.
- Go back to where you took the blanks.
- Open the box on the right.
- Take a part.
- Make the crypt key.

- Go outside.
- Go to the door on the right.
- Place all masks on the door.
- Use the crypt key.
- Enter
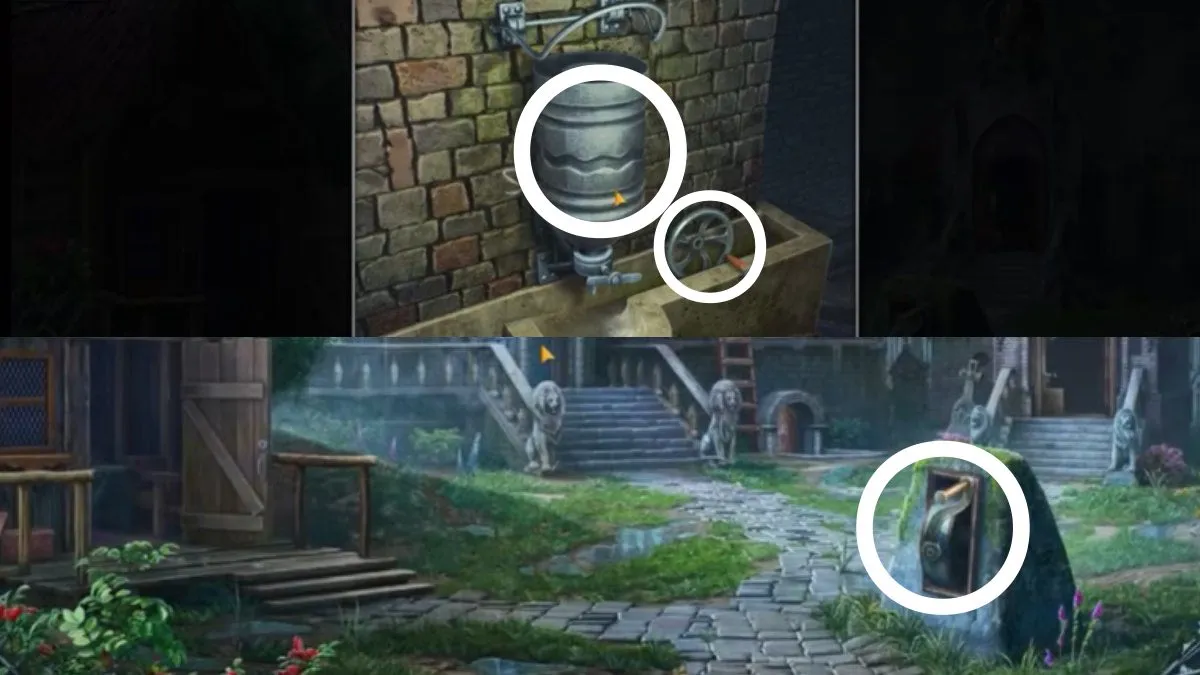
- Take the valve from the right.
- Pick up the fuel tank.
- Take note of the writing.
- Go outside.
- Use the valve outside.
- Go to the basement.
- Place clamps.
- Get ladder.
- Click the puzzle.
- Enter the code from behind the fuel tank.
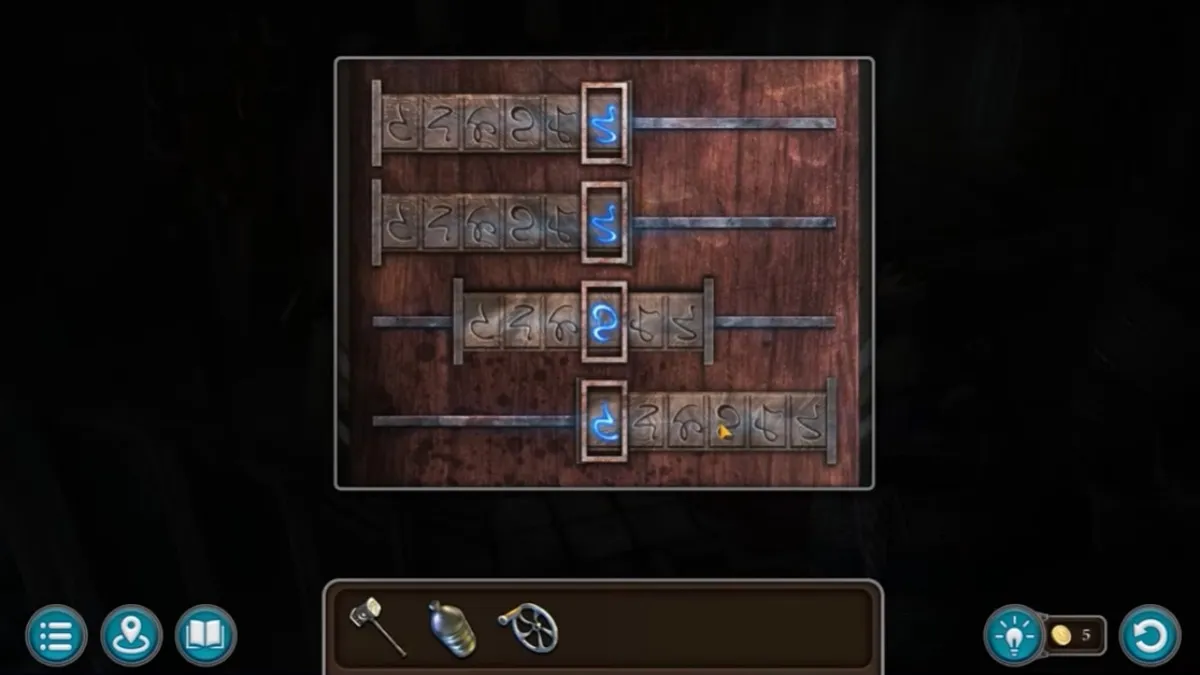
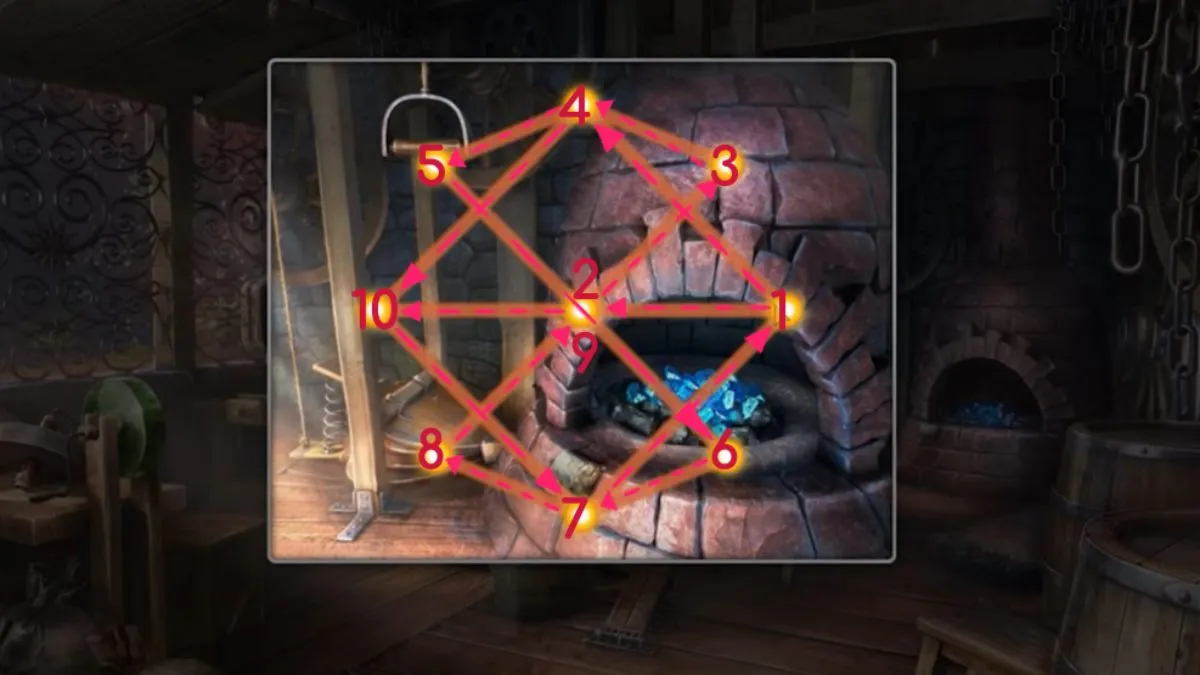
- Solve the puzzle:
- 1 – 2, 3 – 2, 2 – 10, 10 – 11, 11 – 17, 5 – 4, 4 – 11, 14 – 13, 7 – 6, 6 – 13, 13 – 18, 18 – 17, 11 – 17, 3 – 10, 10 – 11, 11 – 17.
- Place the fuel tank to gather the liquid.
- Go outside.
- Use the ladder.
- Place the washer.
- Rotate to align.
- Turn the handle in the courtyard.
- Place the fuel in the crypt entrance.
- Go back to the main mansion hall.
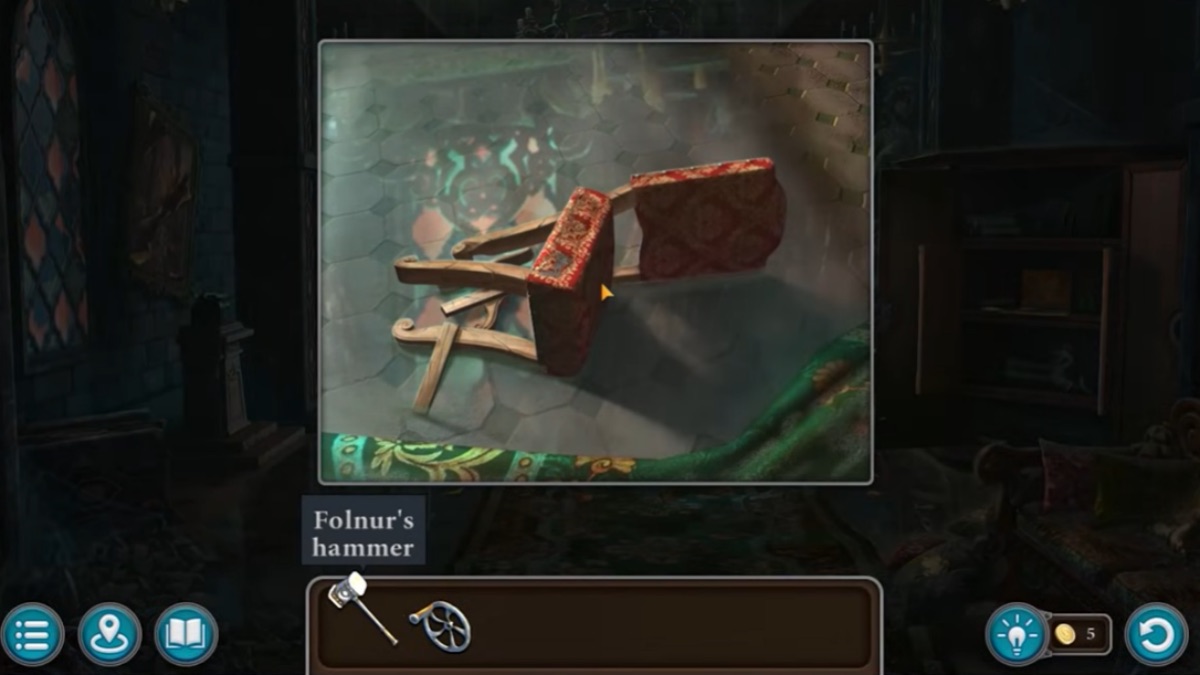
- Use the hammer on the chair.
- Take the torch.
- Go outside.
- Enter the crypt.
- Open the valve outside.
- Use the torch on the fuel.
- Go back inside.
- Light the torch in the fireplace.
- Use the lit torch on the fuel in the crypt entrance.
- Go down.

- Take the shimmering crystal.
- Move the boxes.
- Move the sheet.
- Go back to the mansion hall.
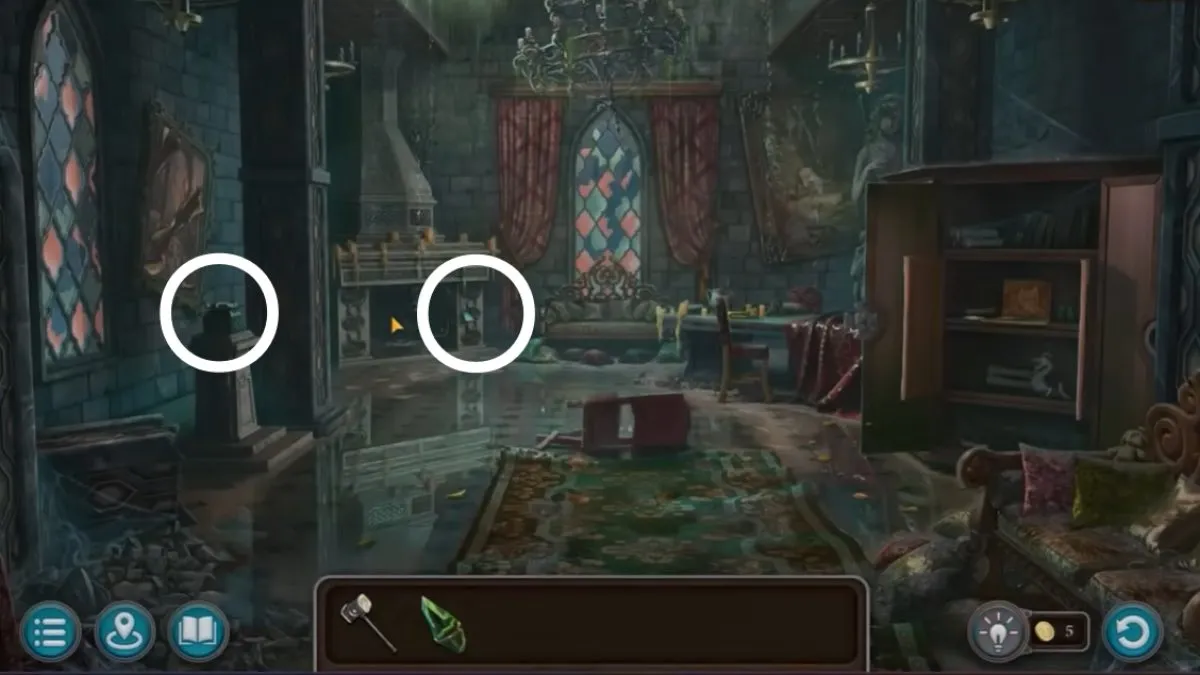
- Place the shimmering crystal.
- Take the poker from the fireplace.
- Go to the crypt.

- Use the poker to get the medallion part from the cell.
- Use the medallion part on the puzzle box.
- Solve the puzzle:
- Bird tile: slide to the left gold (LG) section, slide LG down, move to the bird space.
- Skull tile: slide left to the skull space.
- Hand tile: slide to the LG piece, slide the LG piece up to the center, slide the hand tile into the space.
- Book tile: click the center piece twice to rotate, move the book tile onto the LG piece, slide the bottom gold (BG) piece left, move the book tile onto the BG piece, slide the BG piece right and then move the book tile to the book space.
- Take the manuscript.
- Move the pot.
- Take the hexagon.
- Move the spanner.
- Take the energy core.
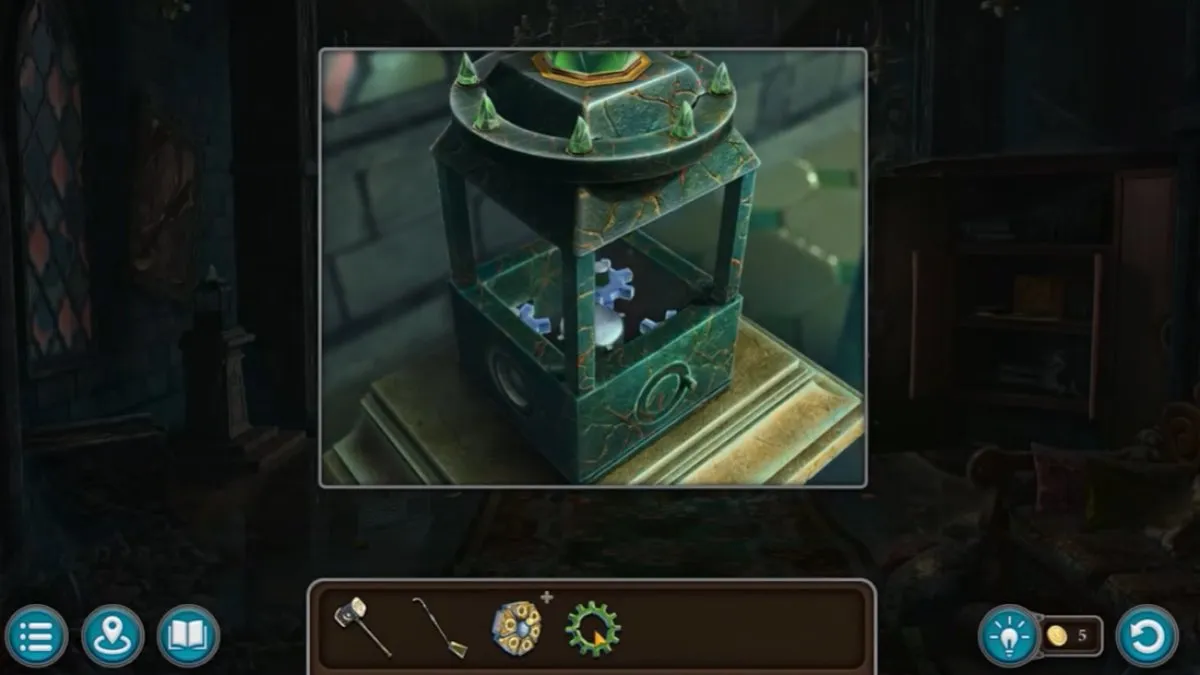
- Go back to the energy crystal.
- Place the energy core.
- Take the charged crystal.
- Go to the crypt.
- Place the charged crystal on the robot.
- Open his mouth.
- Take the key.
- Open his body.
- Take the talking device.
- Insert the talking device in his mouth.
Back to the Past Again
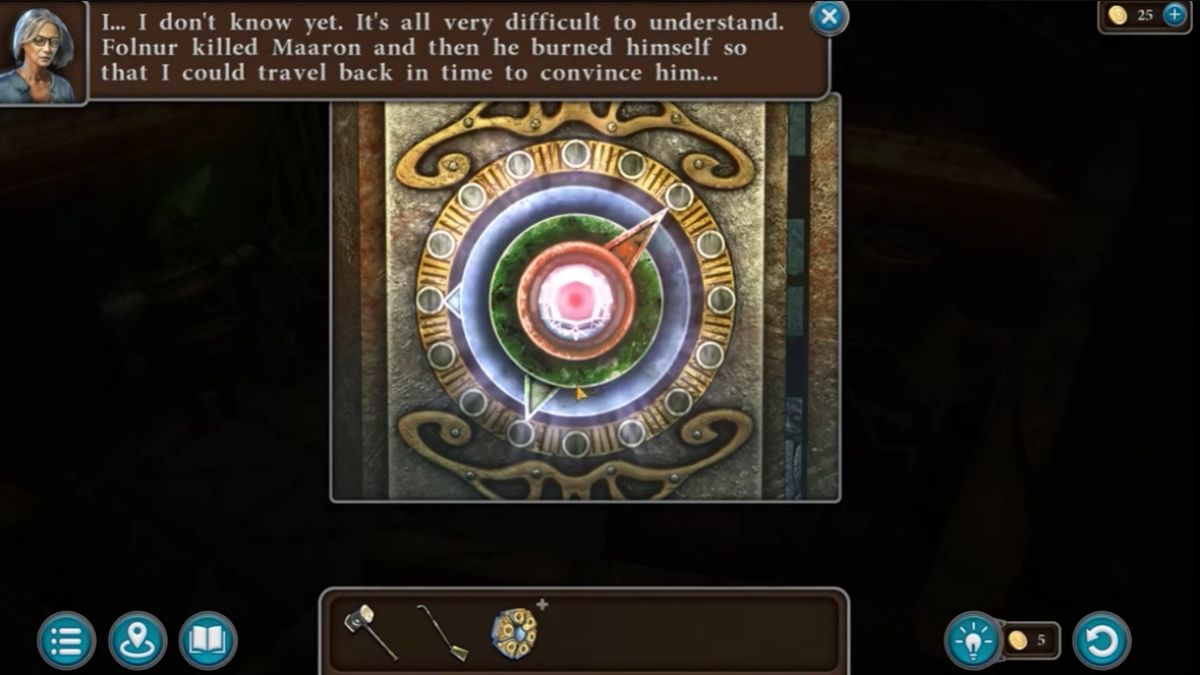
- Solve the puzzle on the cell door using the clue:
- Red northeast, green south-southwest, blue west.
- Use the poker to get Follnur’s ashes.
- Open the time hexagon.
- Add Follnur’s ashes.
- Take the charged hexagon.
- Use the charged hexagon in the courtyard.
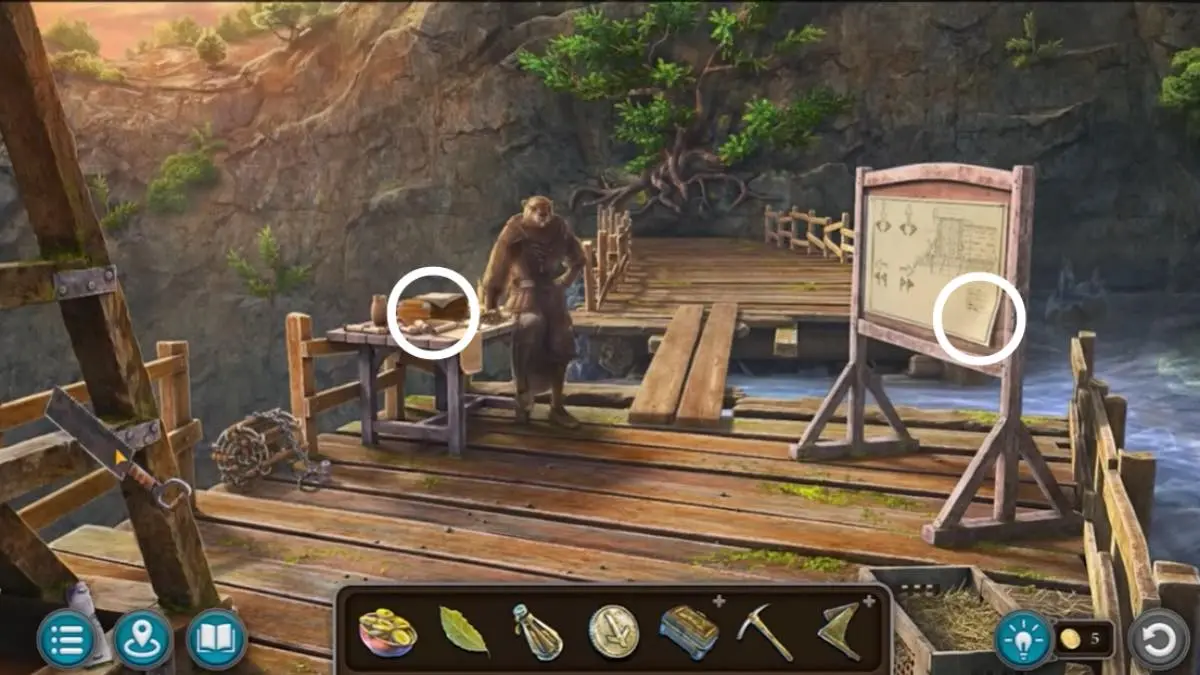
Mine by the River
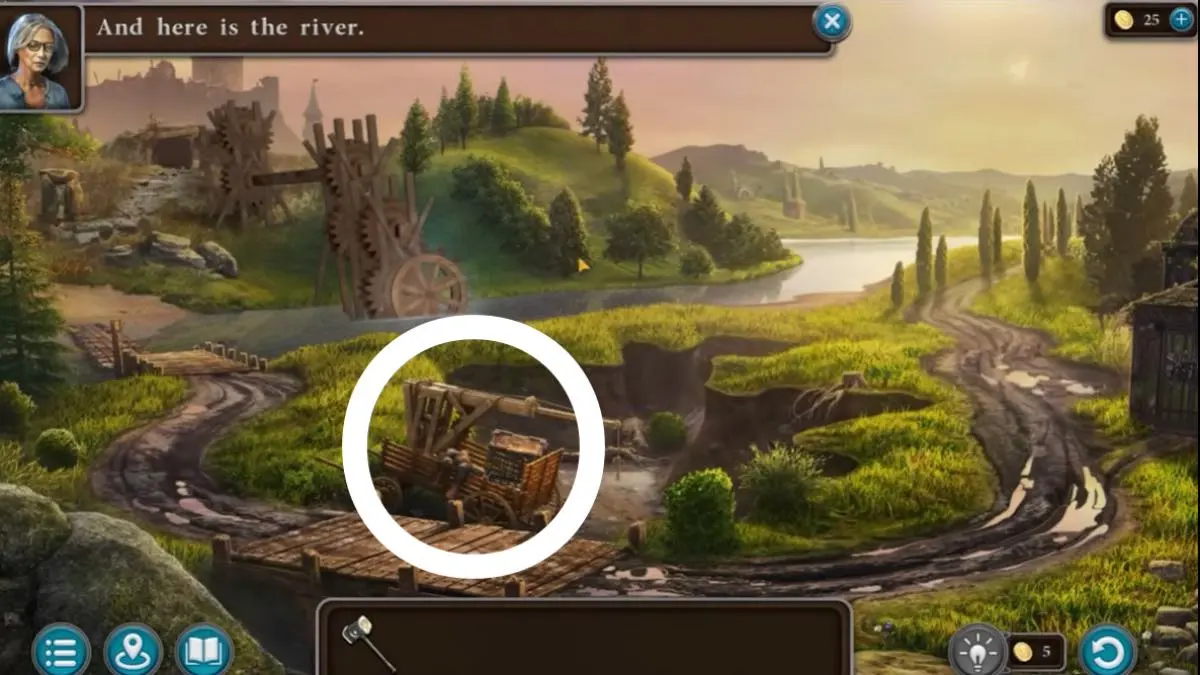
- Go to the next area.
- Click the crashed cart.
- Take the torn announcement.
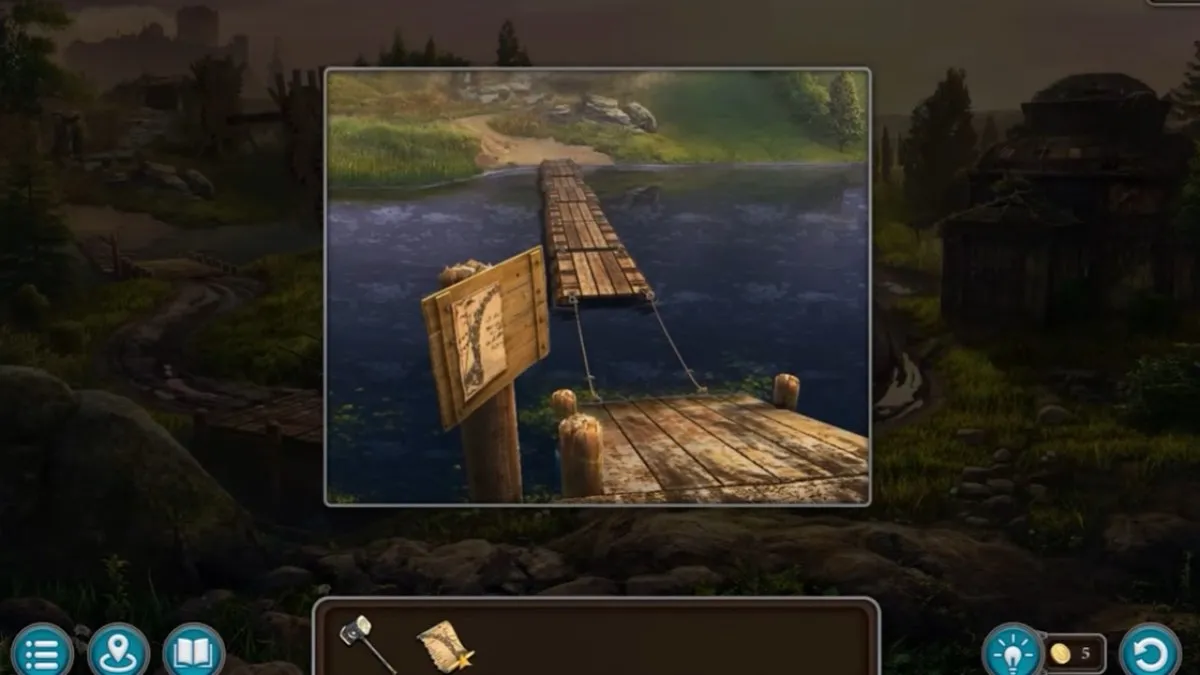
- Click the bridge to the left.
- Use the torn announcement on the sign.
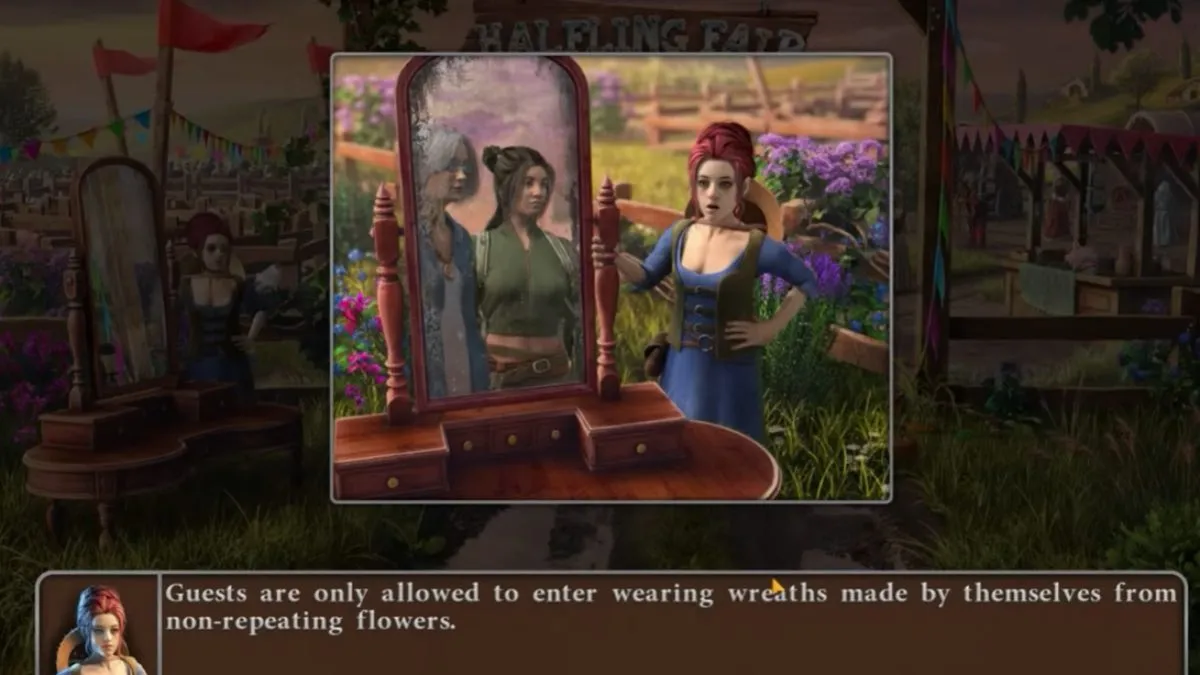
- Click the tree-lined path on the right.
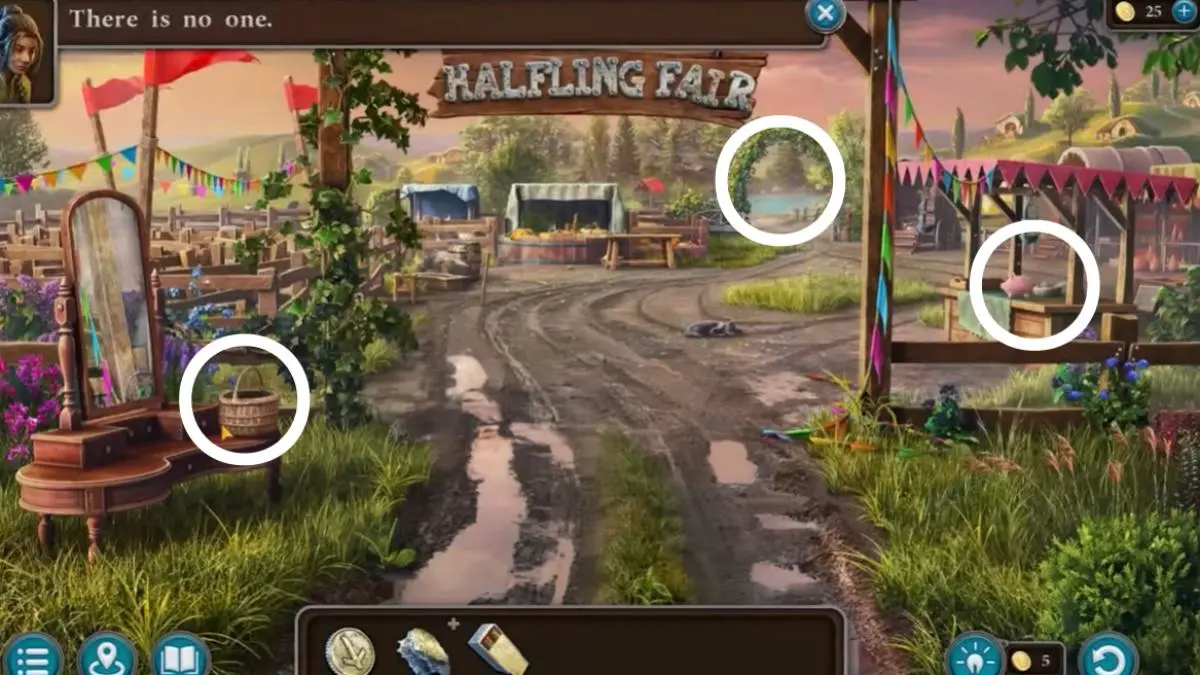
- Go to the fair.
- Talk to the girl.
- Take the greenhouse key.
- Go back.
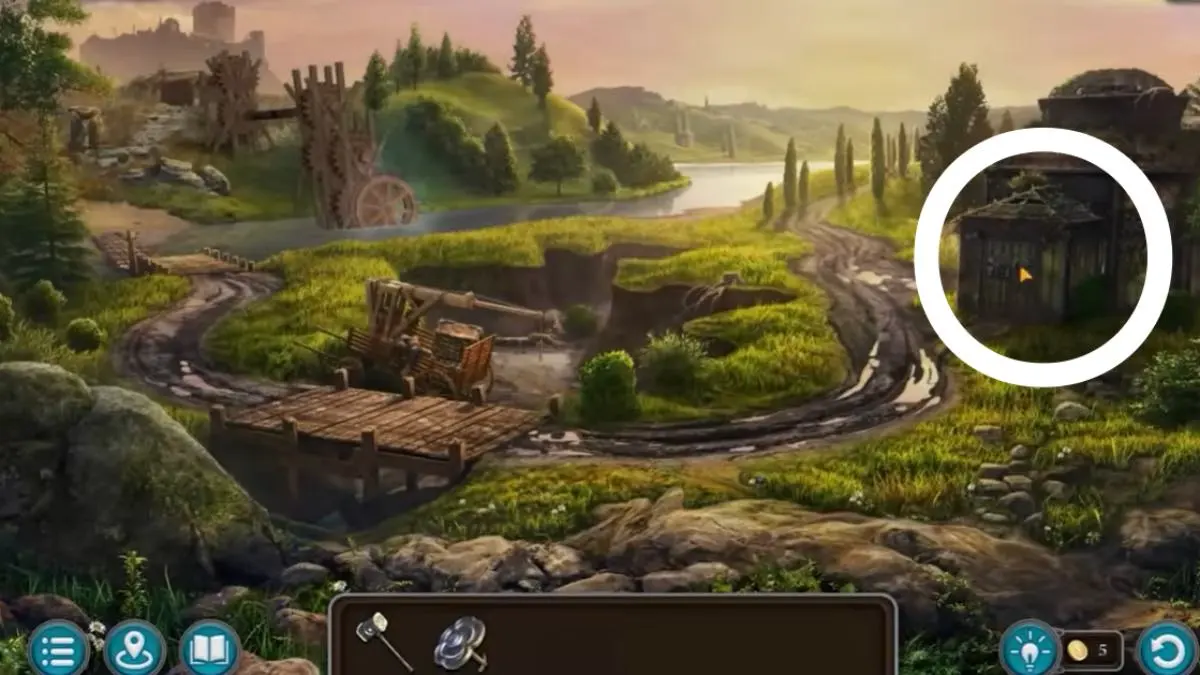
- Click the building to the right.
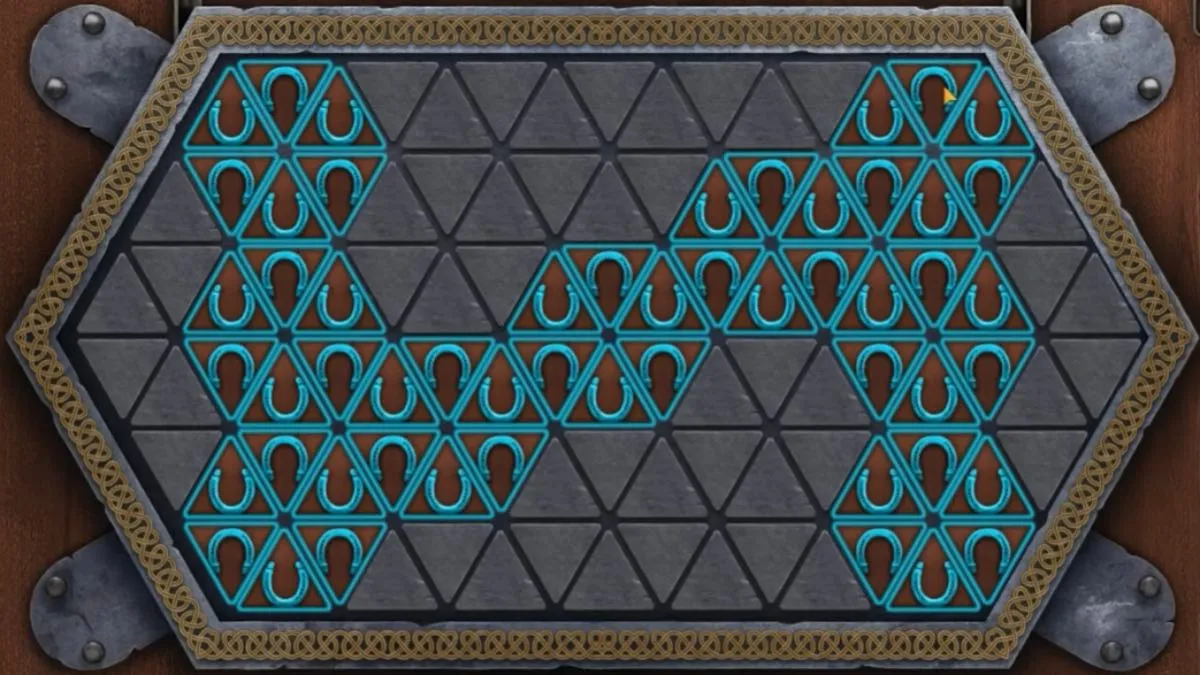
- Use the greenhouse key.
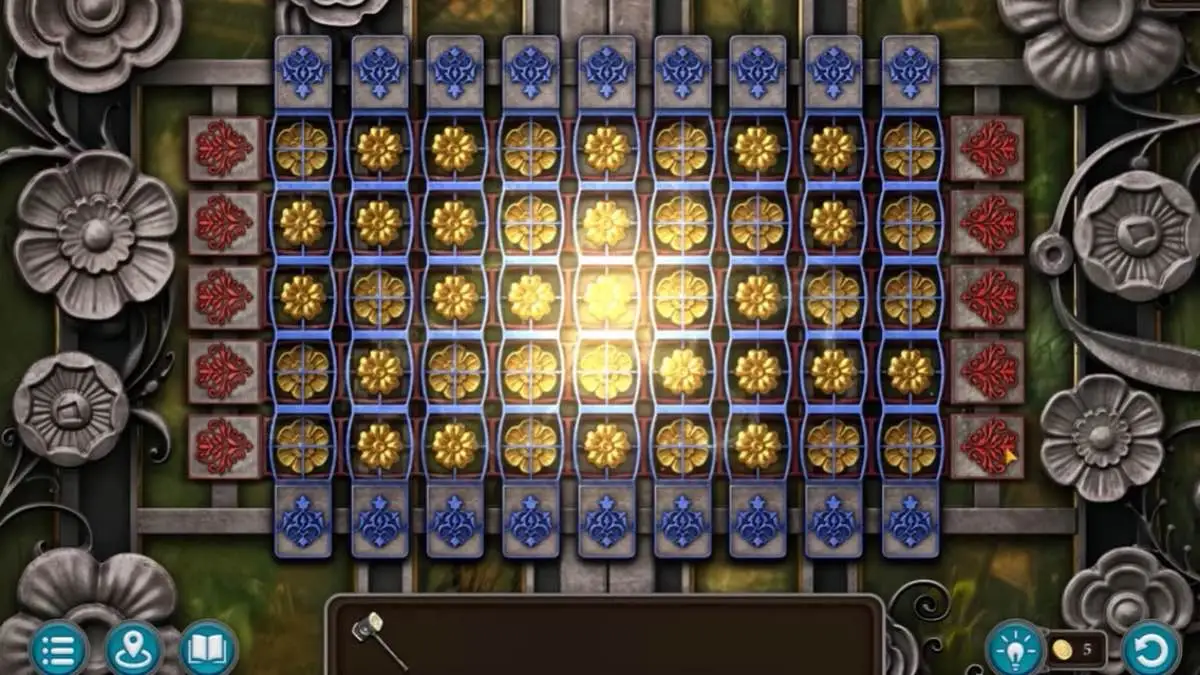
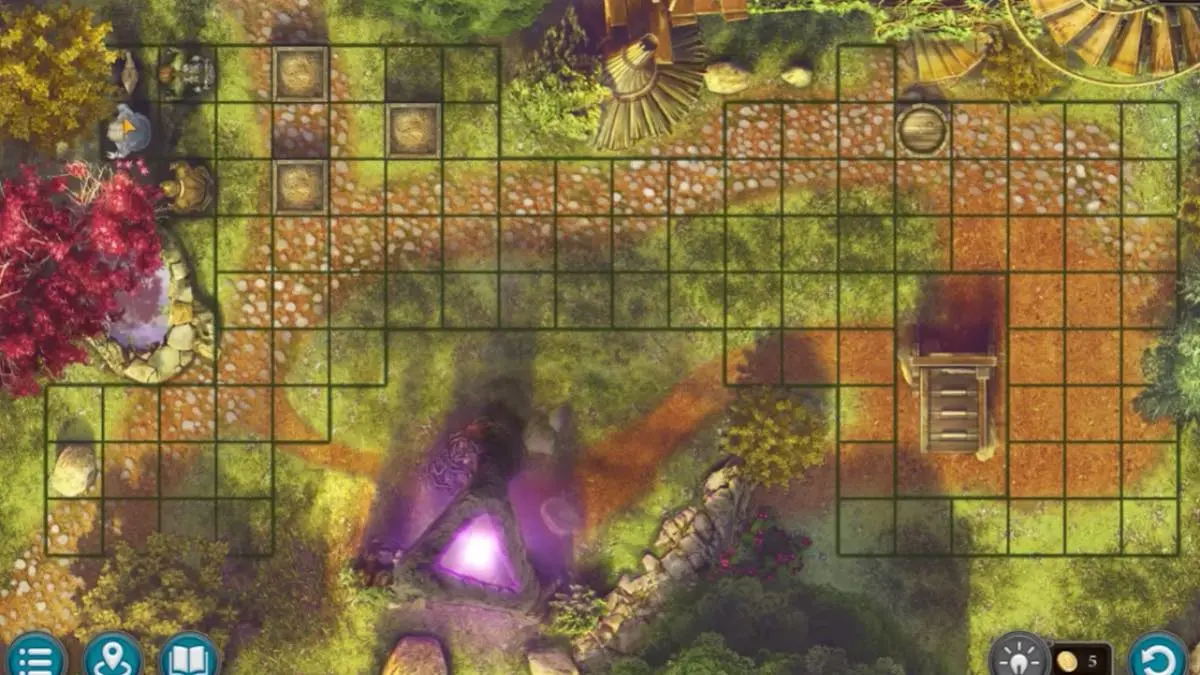
- Solve the puzzle by rearranging the grids so every cell has a flower:
- Requires some trial and error.
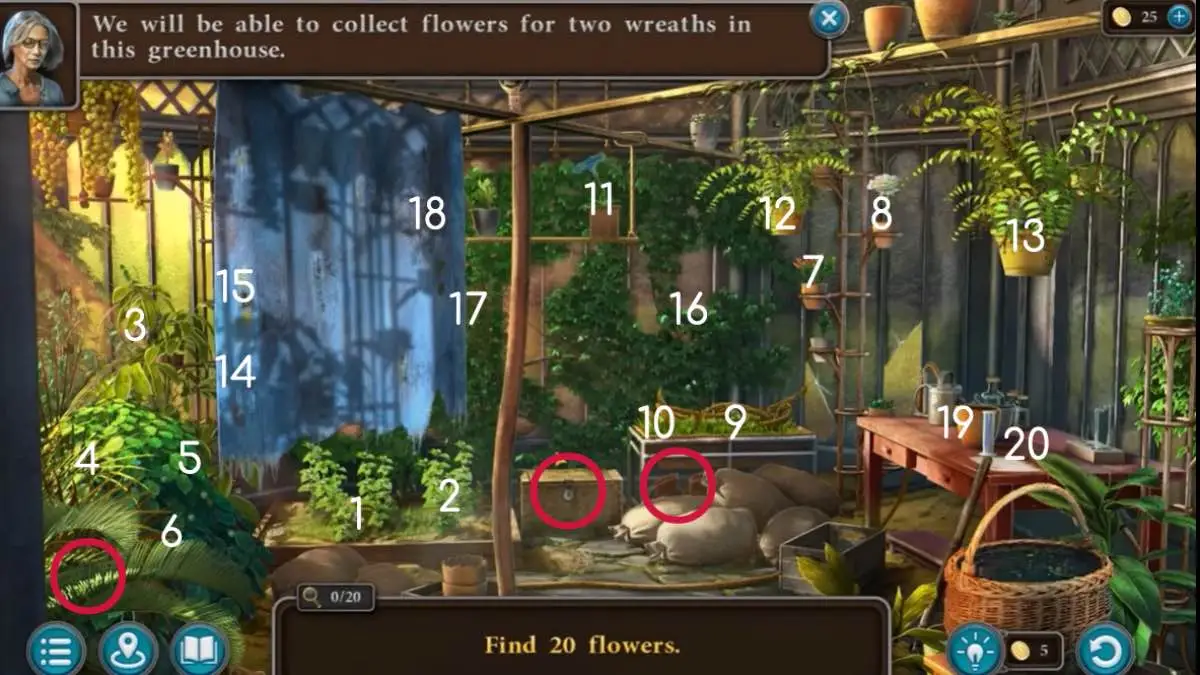
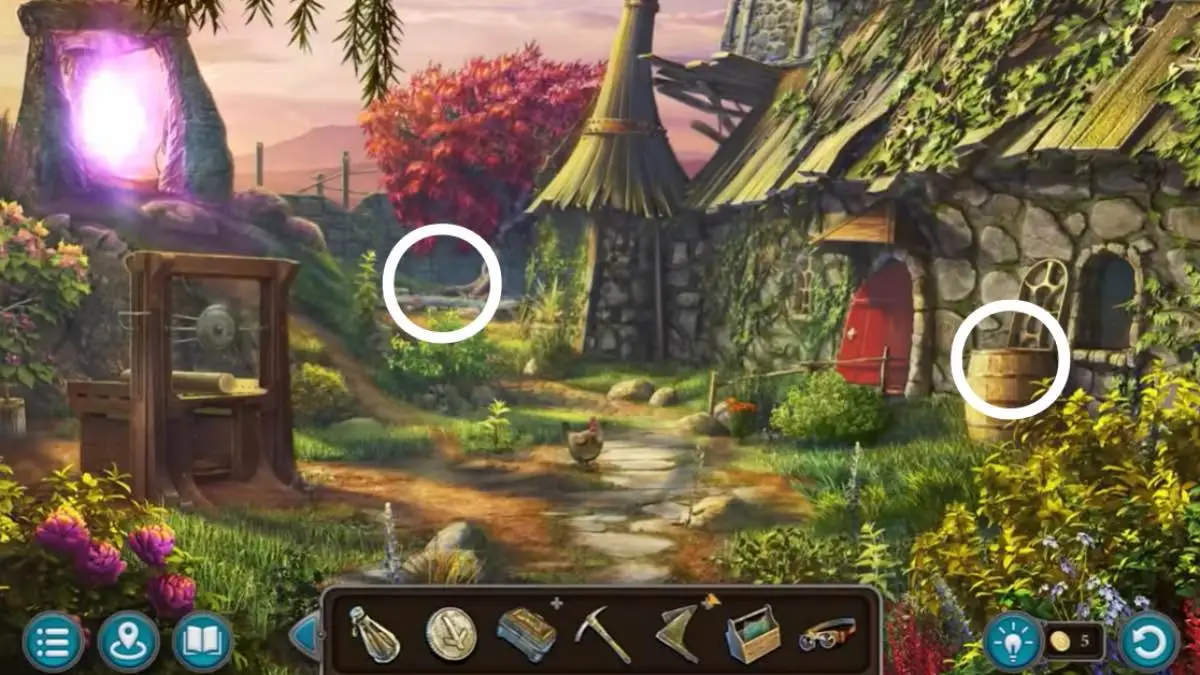
- Collect 20 flowers:
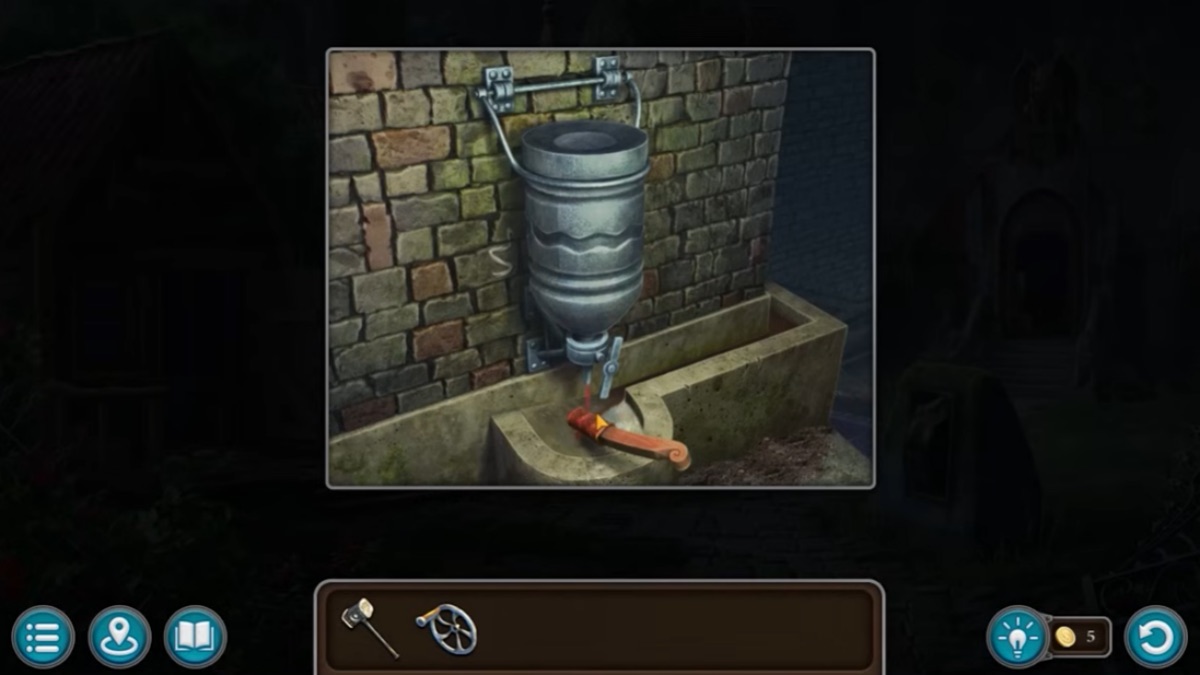
- Find the tap handle in a bush.
- Find 4, 5, and 6 in that same bush.
- Fix the tap.
- Place the hose.
- Click the table.
- Open the drawers.
- Place seeds in pots.
- Add green rapid growth liquid to the measure and watering can.
- Water the pots.
- Collect the flowers.
- Look in the boot under the table.
- Use the key to open the box.
- Move the watering can.
- Take the clippers.
- Clip the weeds to find 9 and 10.
- Move the blue sheet aside to find 14, 15, 17, and 18.
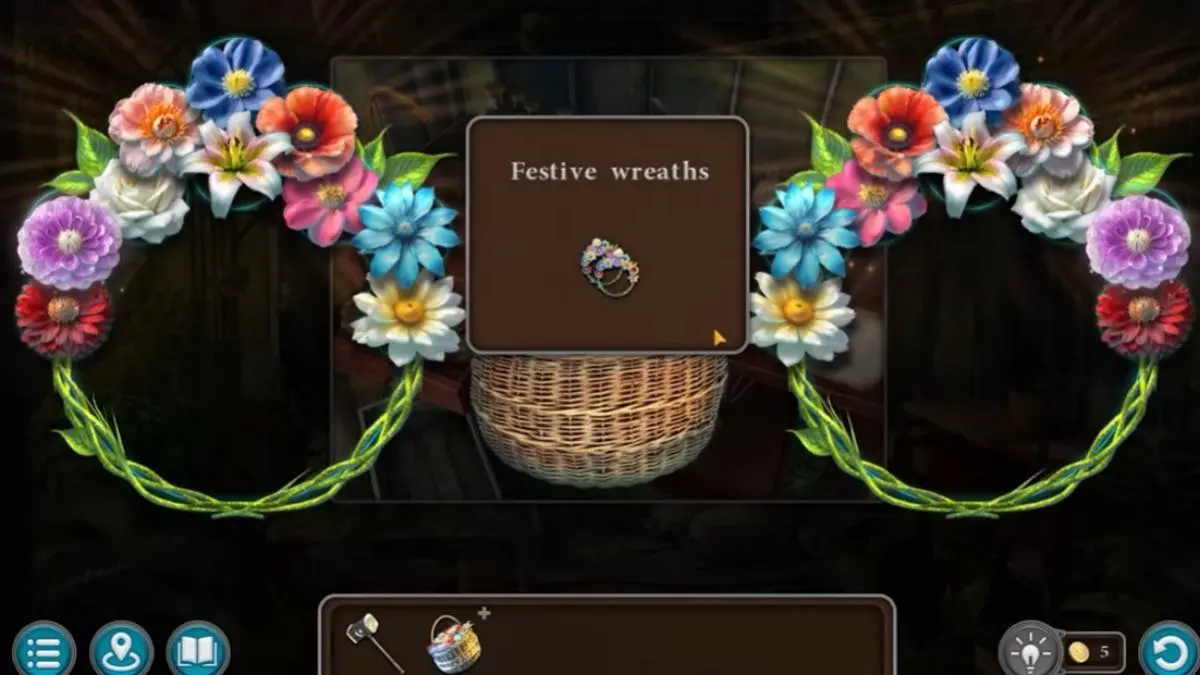
- Craft the wreaths so each has unique flowers.
- Take the wreaths and the empty basket.
- Go to the fair.
- Give the wreaths to the girl.
Fair Pigs
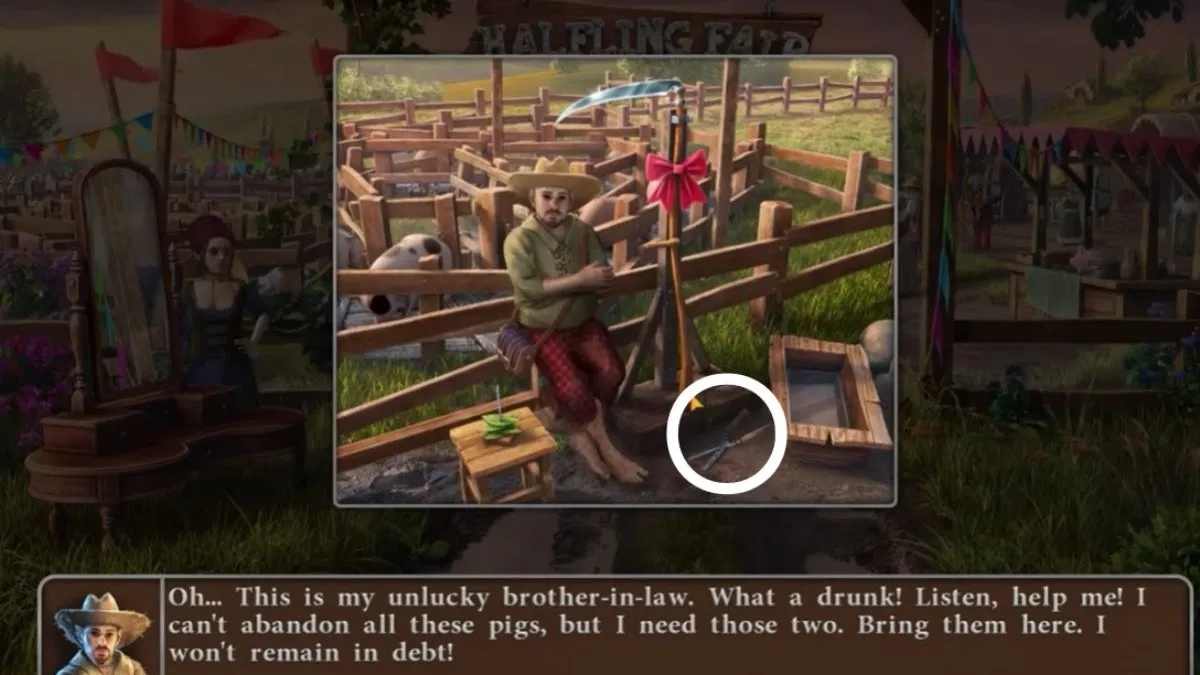
- Speak to the pumpkin man.
- Take the broken pumpkin.
- Speak to the pig man.
- Take the secateurs.
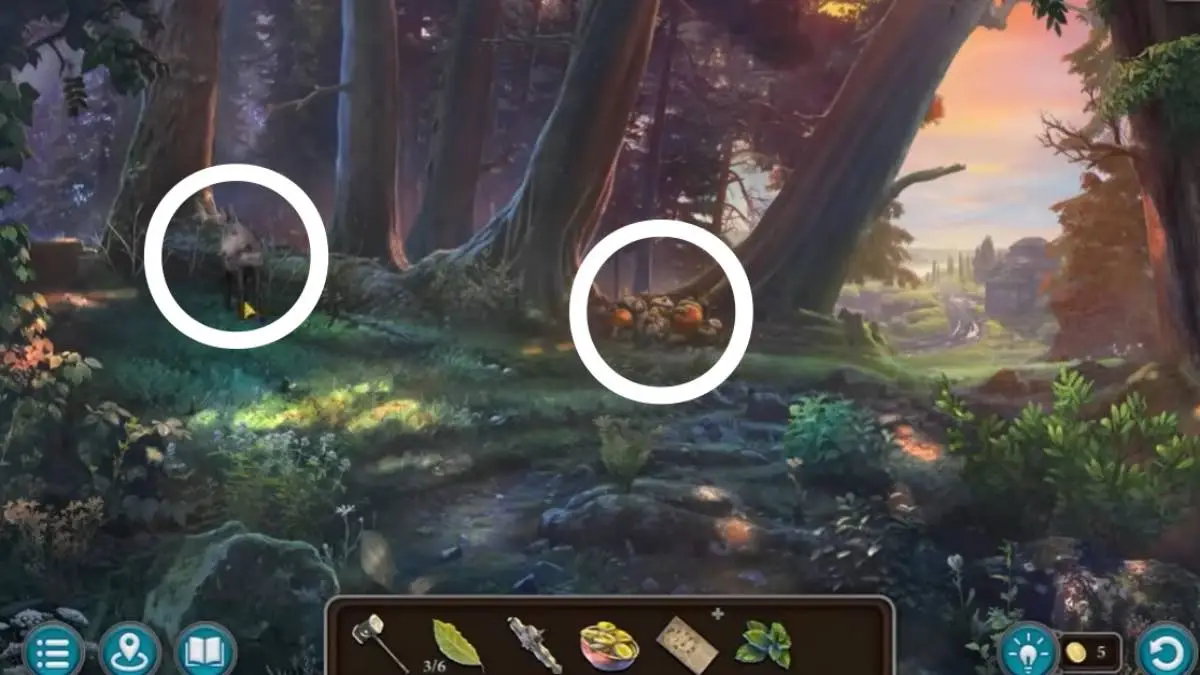
- Go to the woodlands.
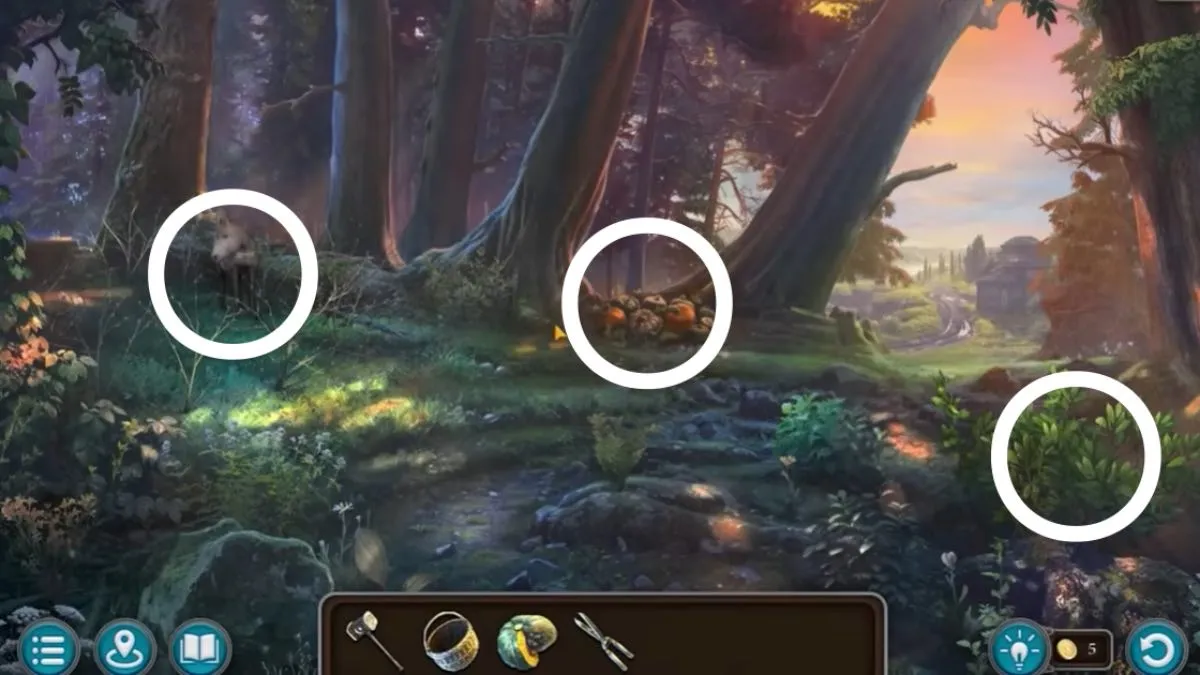
- Use the secateurs to free the donkey.
- Place the broken pumpkin on the patch.
- Pick a pumpkin.
- Place the basket by the bush.
- Get bay leaves.
- Go to the fair.
- Give bay leaves to the girl.
- Give the pumpkin to the man to get a dog whistle.
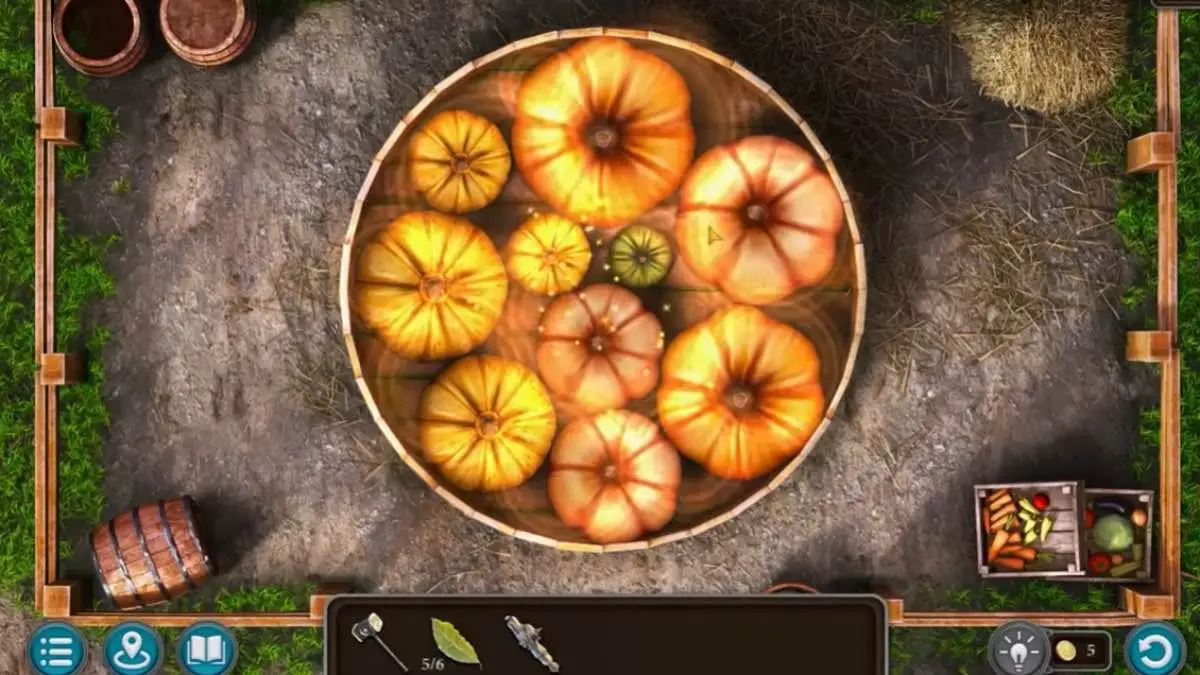
- Play the pumpkin game by fitting all pumpkins in the tub.
- Take the sugar lollipops.
- Speak to the woman.
- Give her sugar lollipops and two leaf passes.
- Speak to the couple in the pond.
- Talk to the boy and get the perfume recipe.
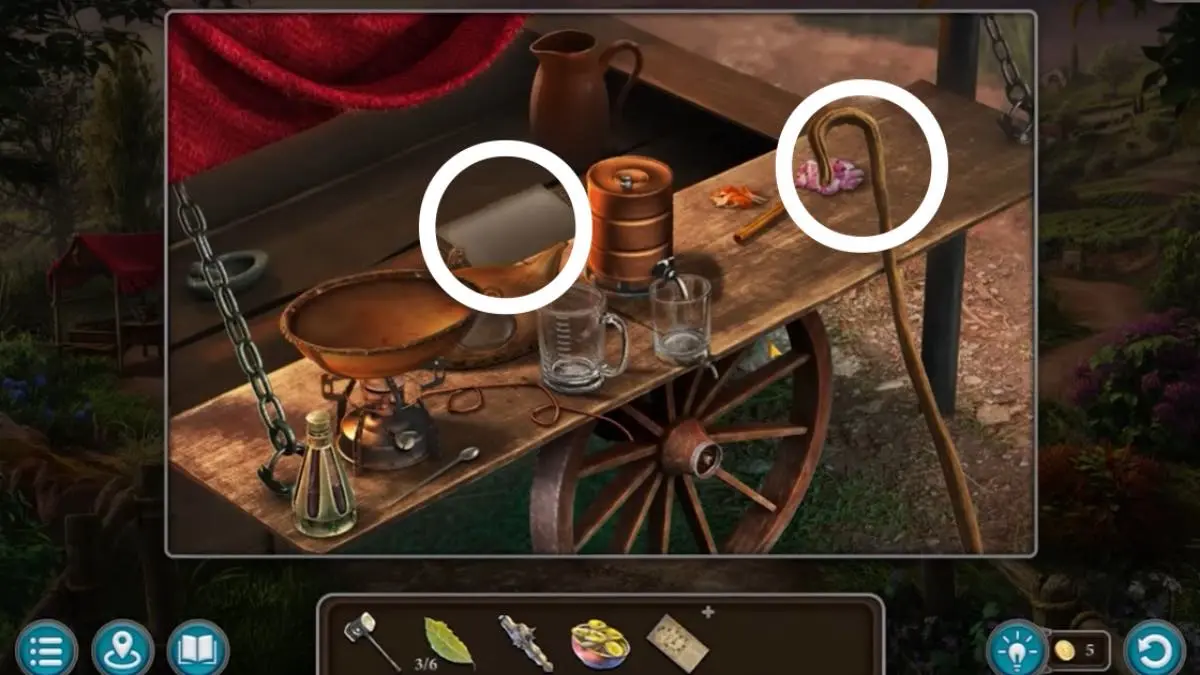
- Look at Joko’s stall.
- Take the staff.
- Take the manuscript.
- Use the staff to get the lotus flower from the pond.
- Look at the sign to the right.
- Pick the wheat ear.
- Head to the greenhouse.
- Click the plant box to the left and pick melissa leaves.
- Go to the woods.
- Use the sugar lollipops on the donkey.
- Go ahead.
- The donkey will pull the cart out of the ditch.
Hafling’s Scent
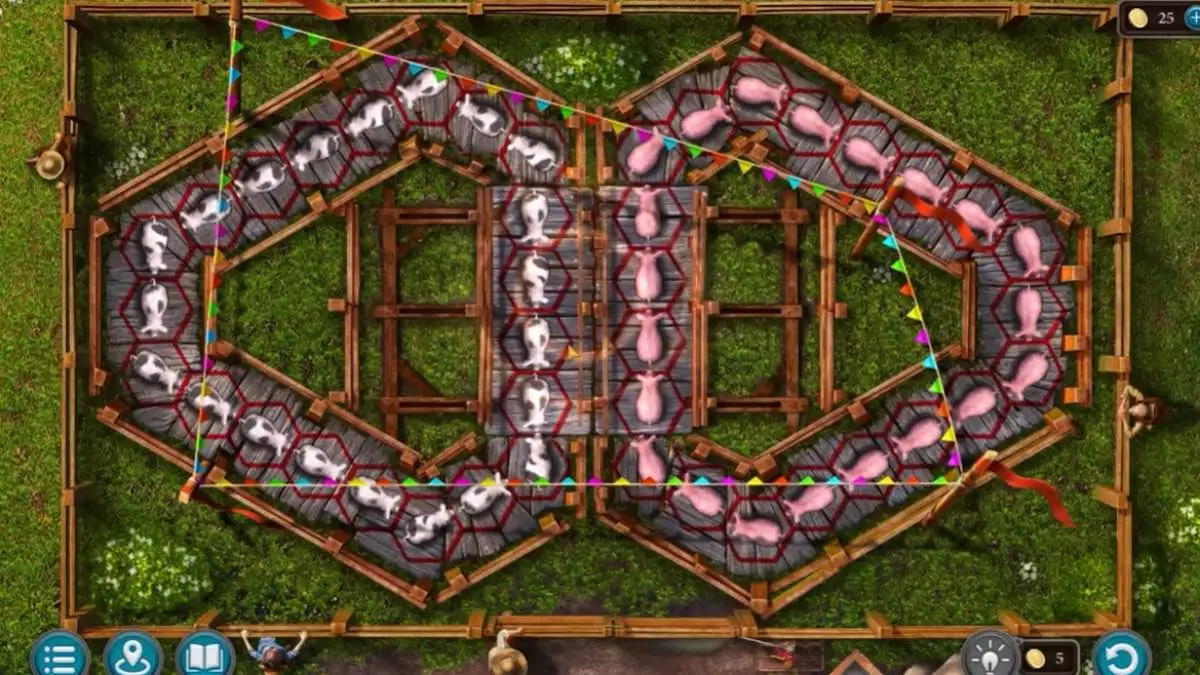
- Go to the fair.
- Give the pig man bay leaves.
- Solve the pig puzzle by moving the pigs and fences to separate the animal colors.
- Take the sickle.
- Take the pig.
- Go to the woods.
- Use the scythe on the pumpkins.
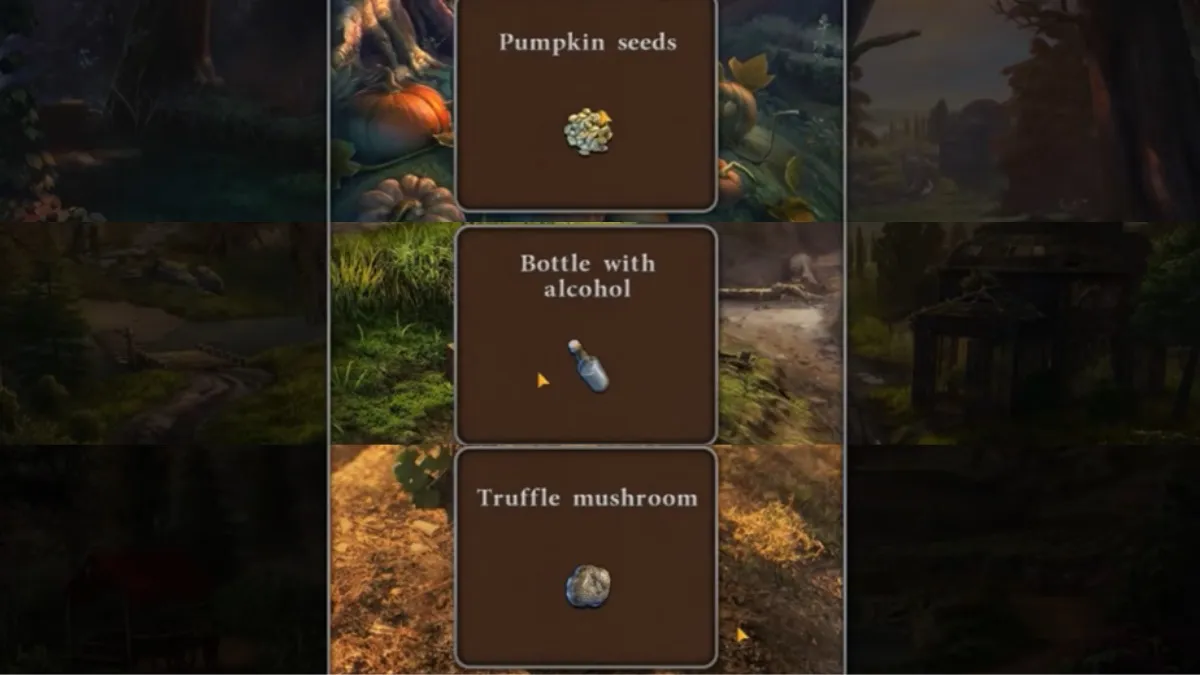
- Get seeds.
- Go to the crashed cart site.
- Grab the alcohol bottle.
- Go to the pond area.
- Get the pig to sniff out truffles.
- Add all ingredients to the recipe.
- Take the perfume set.
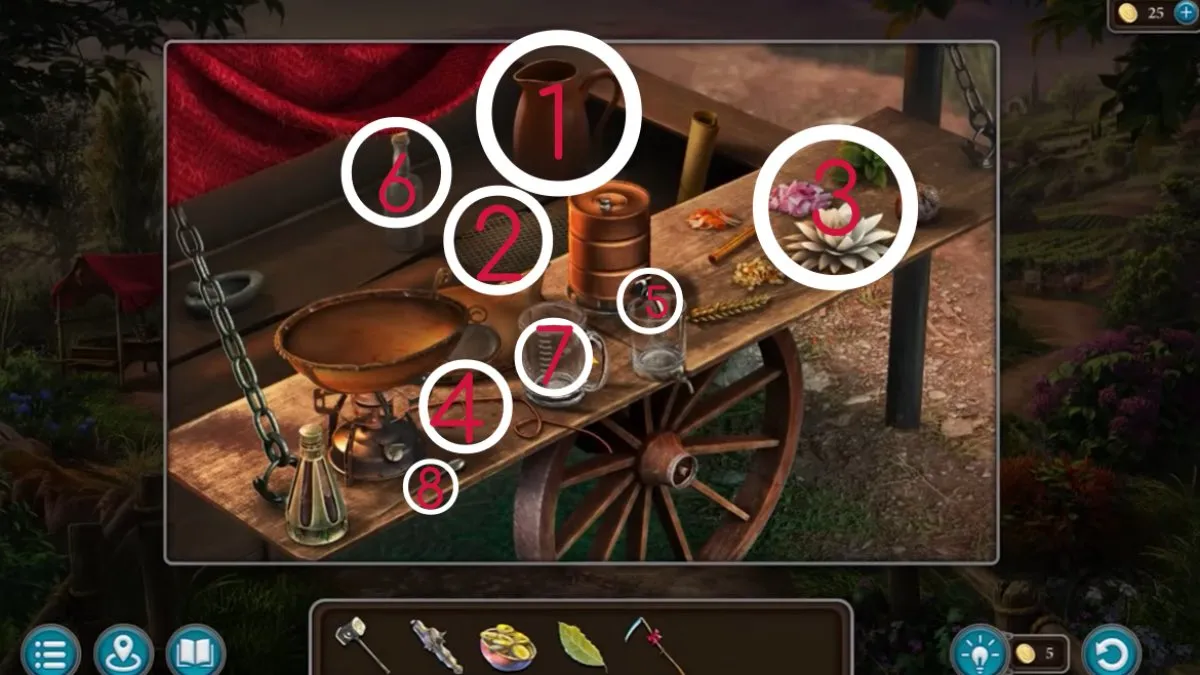
- Go to the stall on the left.
- Place the perfume set.
- Pour water from the pitcher into the shallow bowl.
- Place the grid over the water.
- Place all ingredients on top of the grid.
- Attach the tube.
- Empty the liquid.
- Add alcohol.
- Use water from the pitcher.
- Mix the concoction.
- Take the Halfling Scent.
- Go to the fair.
- Use sugar lollipops on the donkey.
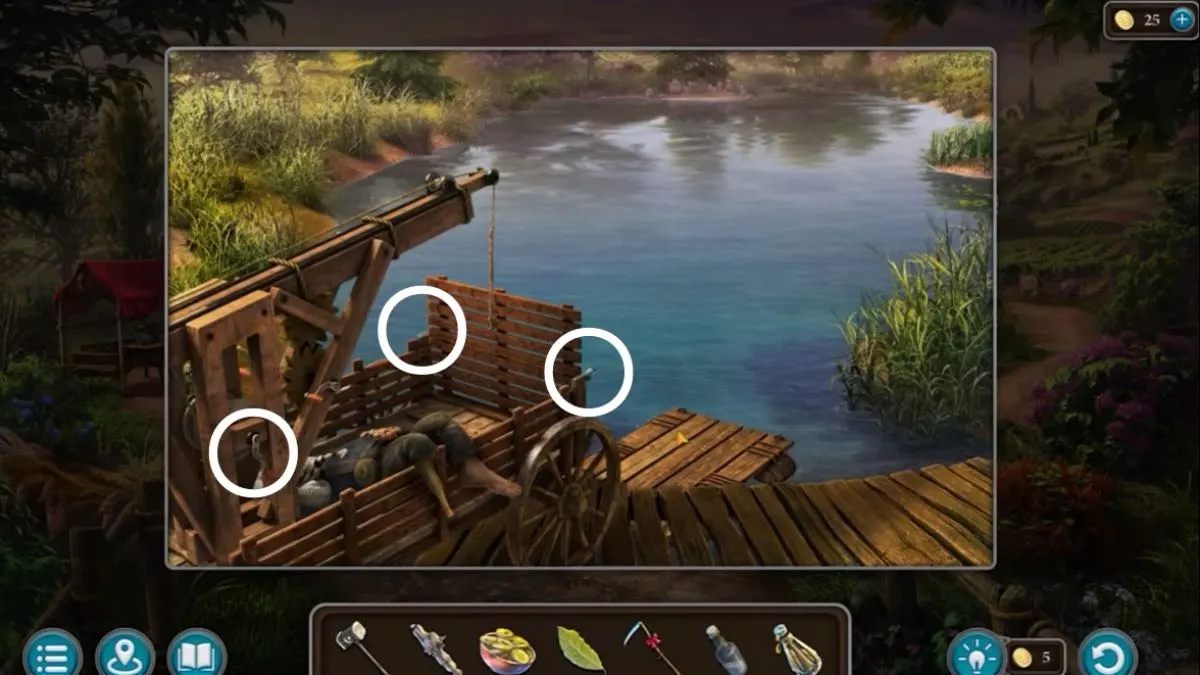
- Use the hammer on the clamps.
- Turn the wheel to extend the arm.
- Attach the pontoon.
- Use sugar lollipops to tempt the donkey.
- Place the pontoon.
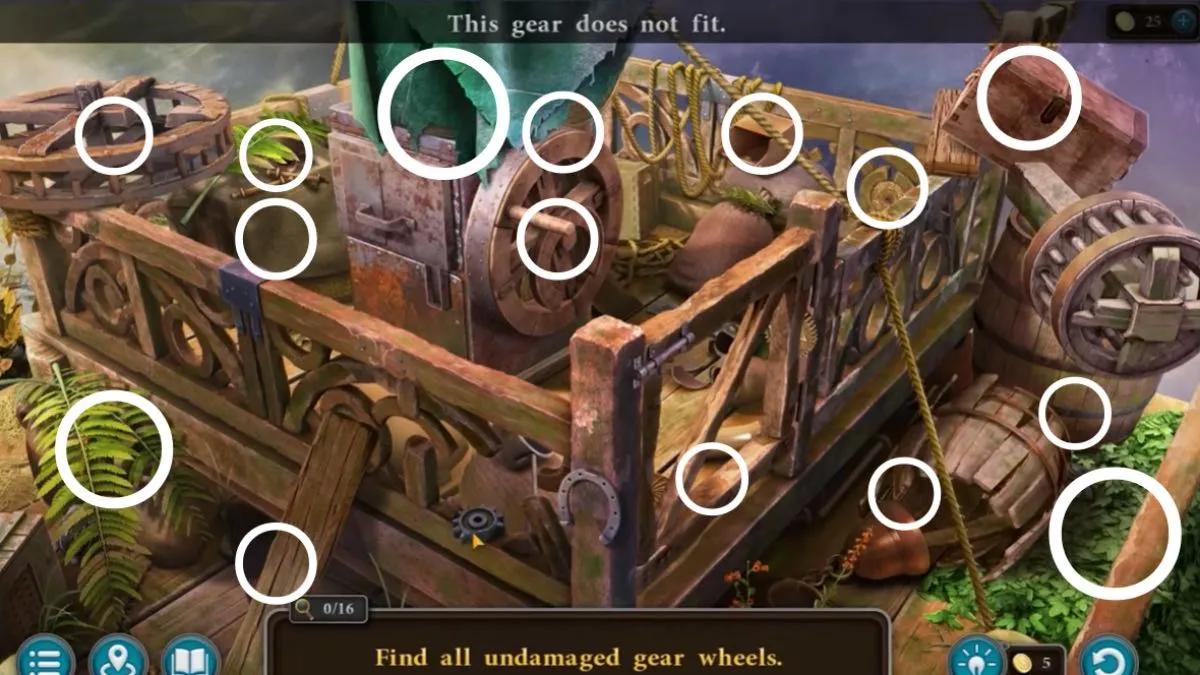
- Click the mine.
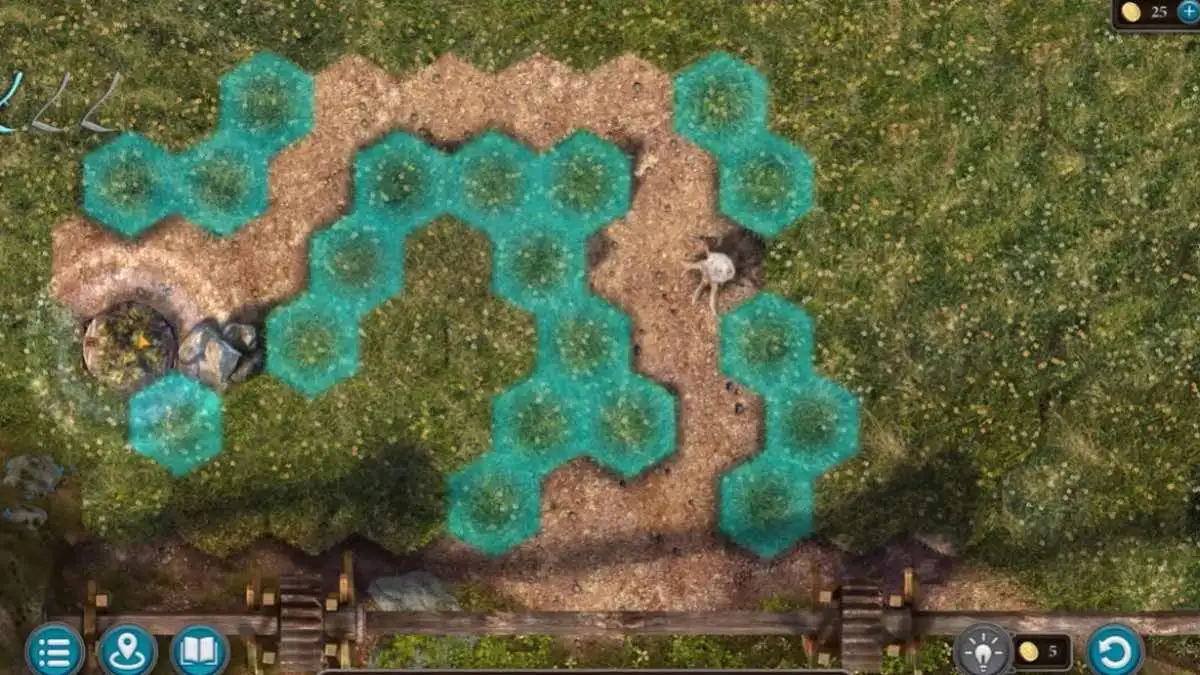
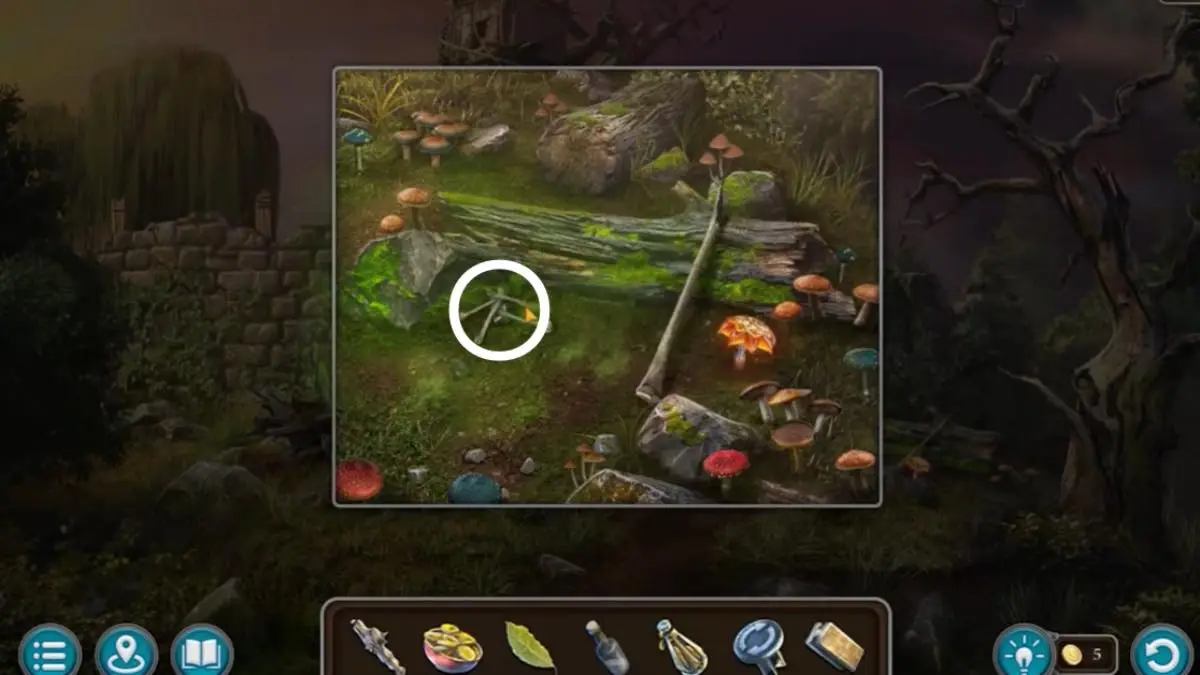
- Use the scythe on the grasses.
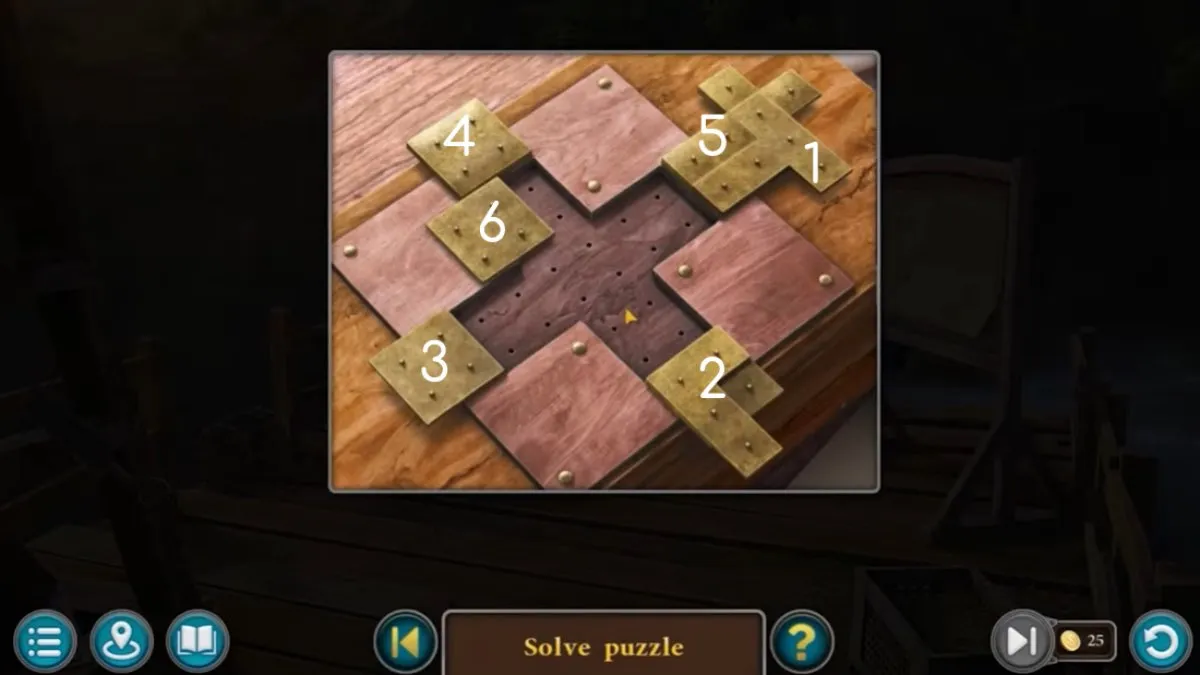
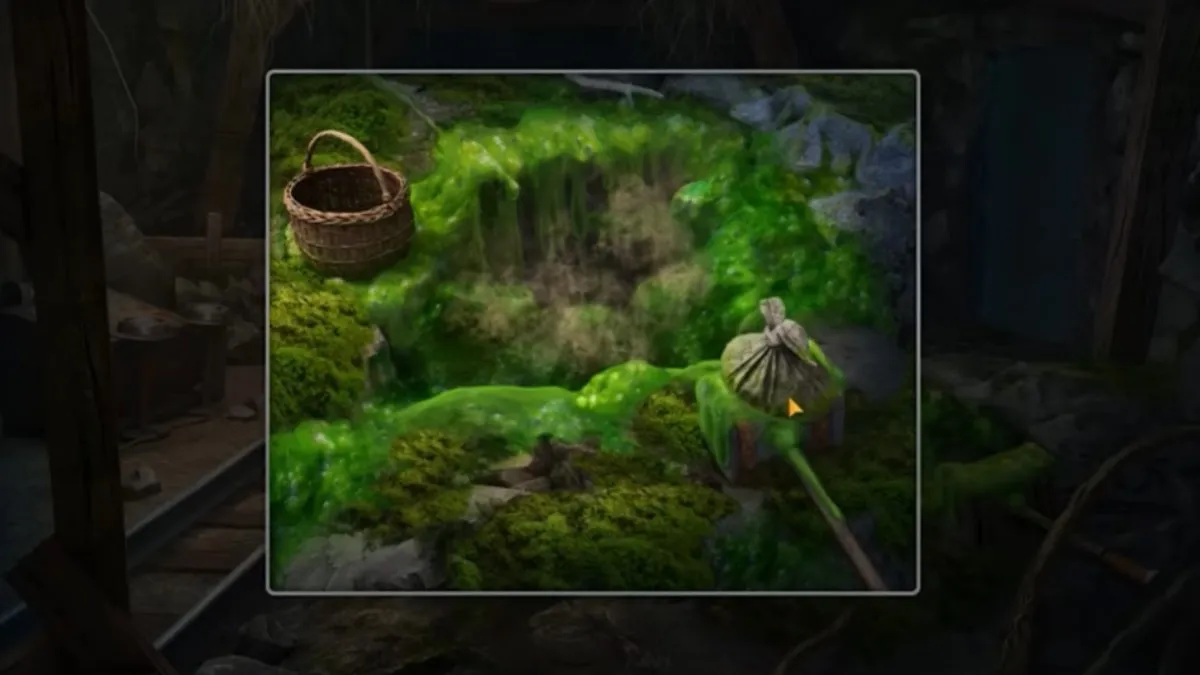
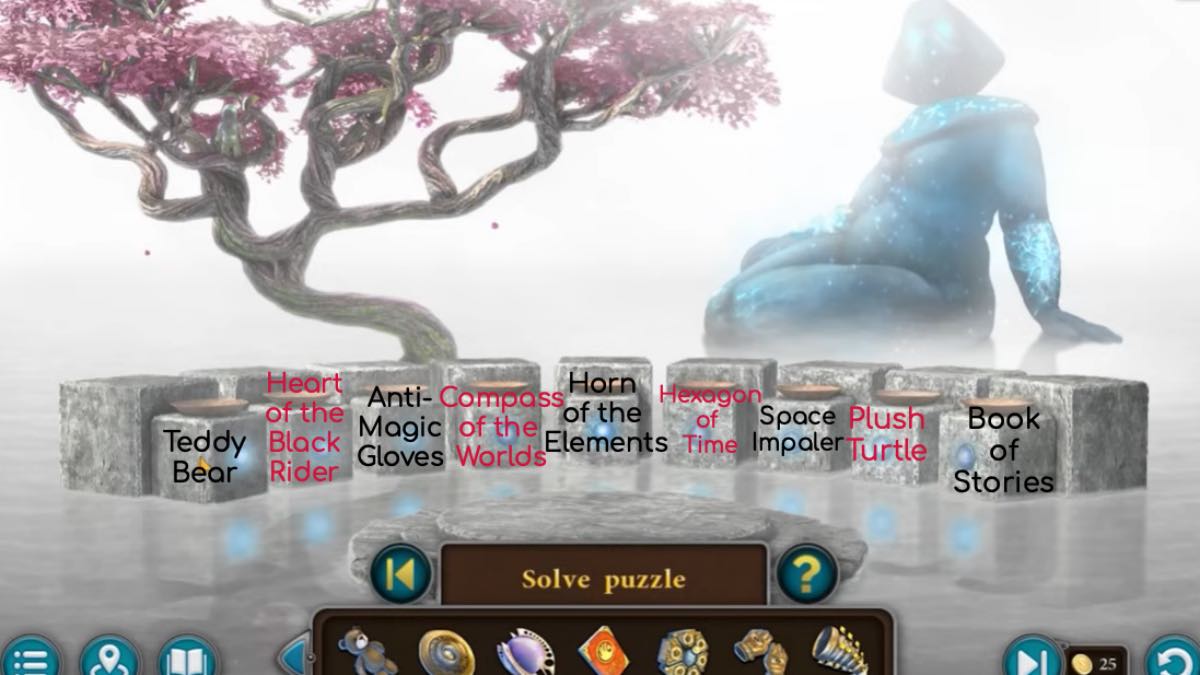
- Solve the puzzle to find the stash.
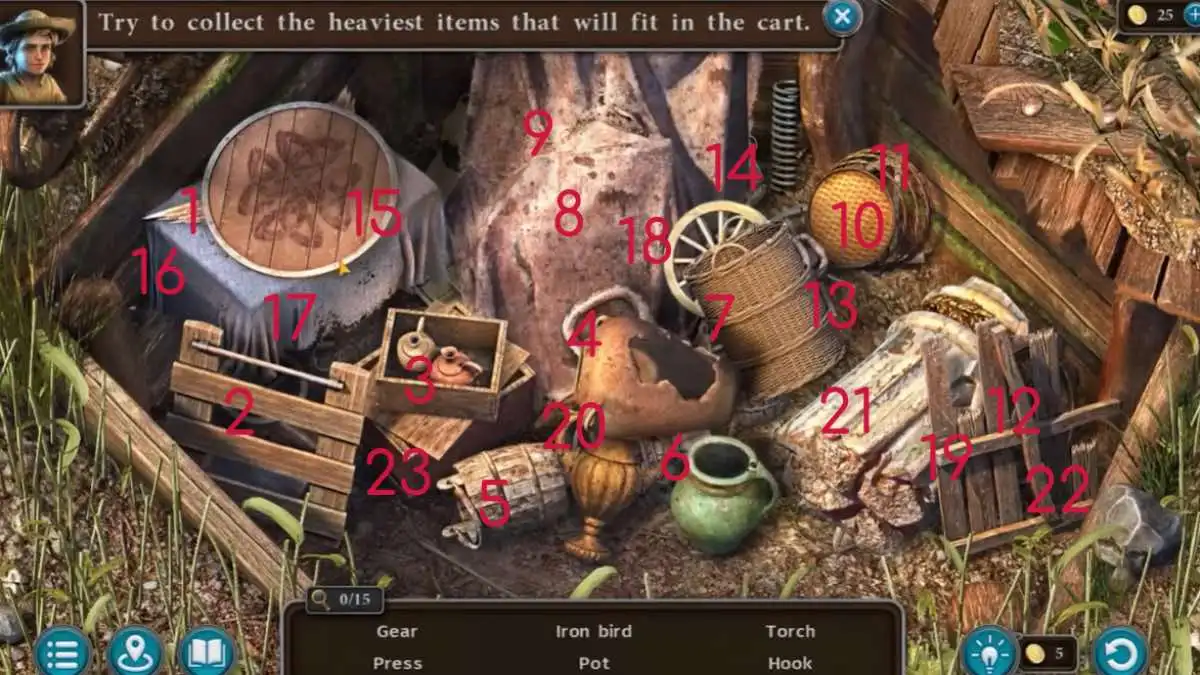
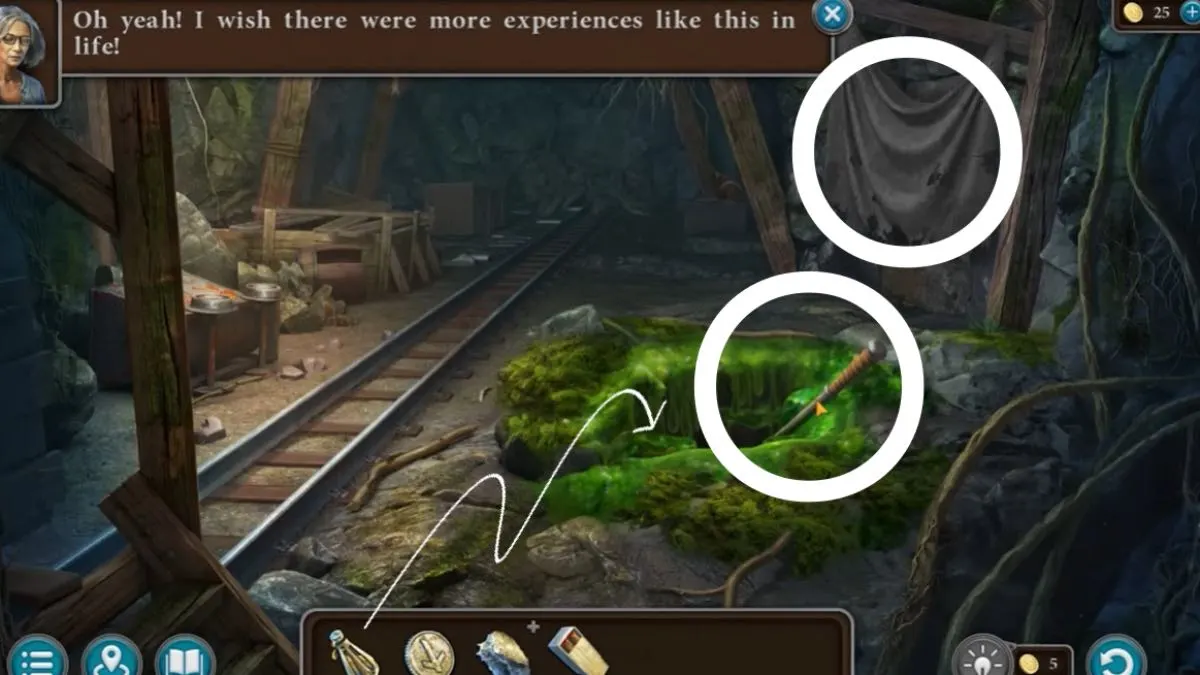
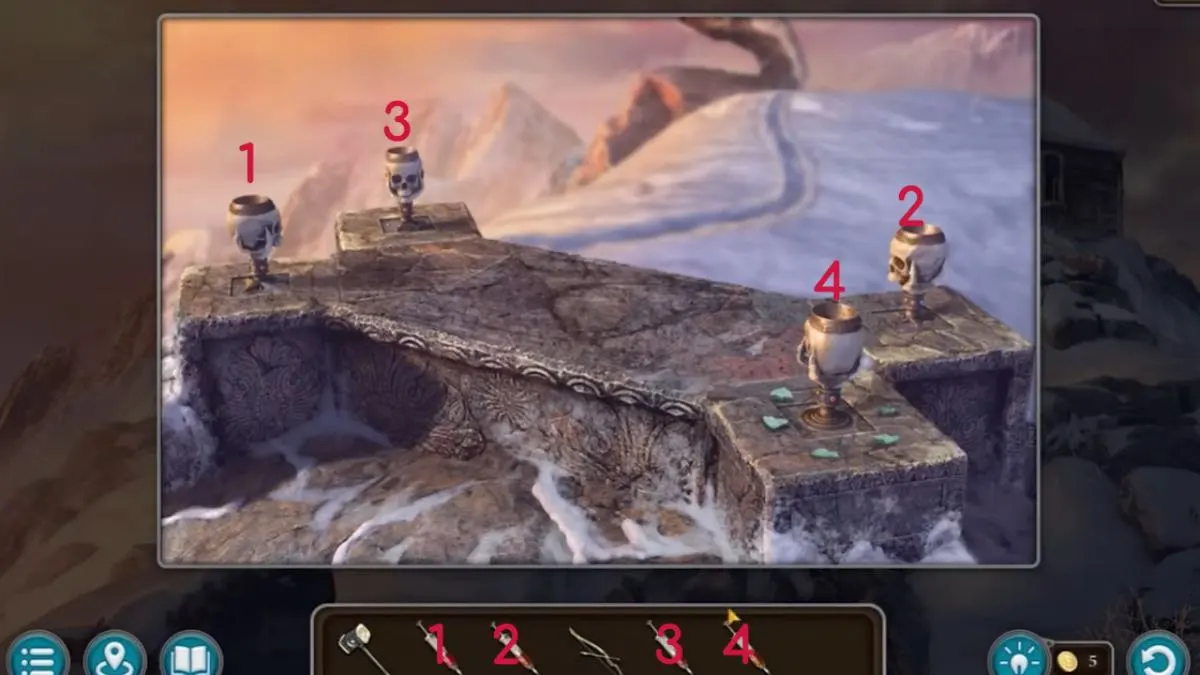
- Go to the mine.
- Get the cart.
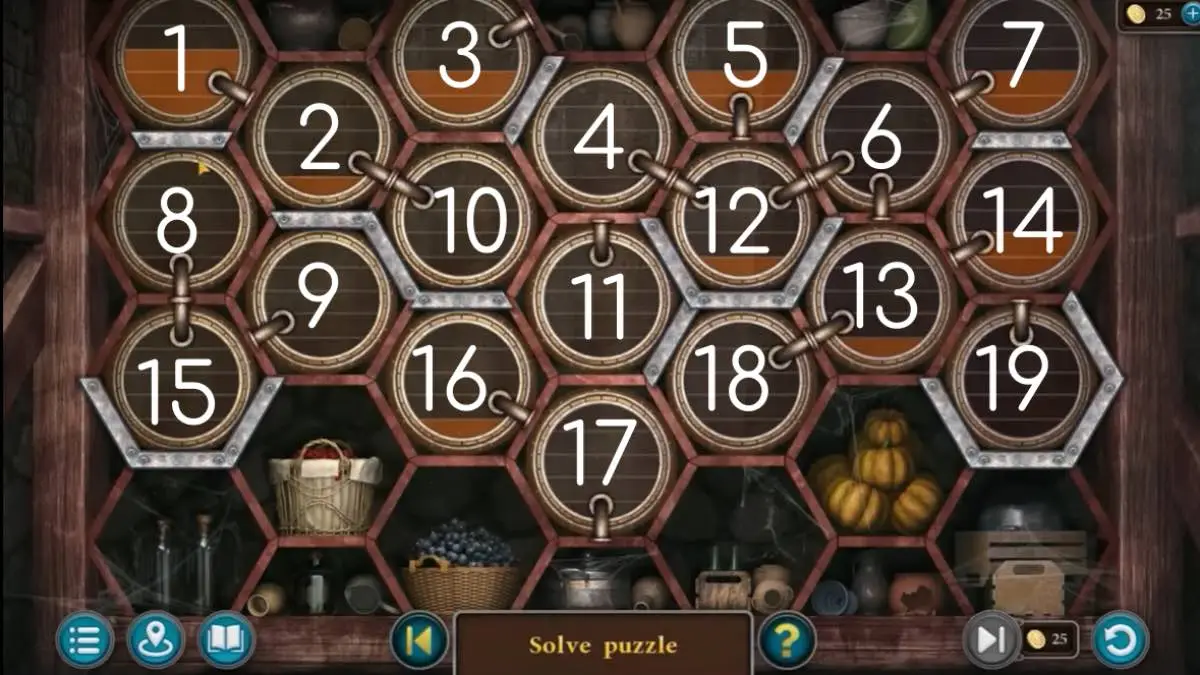
- Collect the stash.
- You will have to move items.
- Use the numbered image above as a guide.
- Use the spade at 15 to dig the statue at 18.
- Use the staff at 20 to lift the column at 21.
- Use the clippers at 22 to open the box at 23.
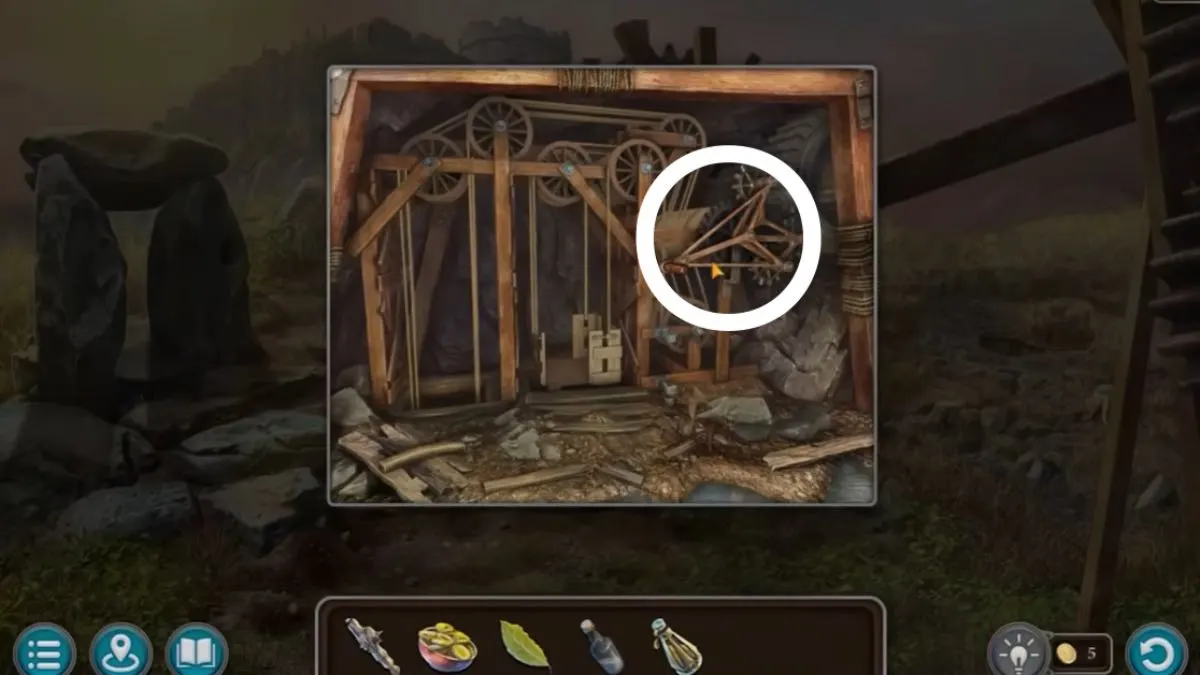
- Take the wheelbarrow to mine.
- Install the mechanism.
- Lower the lift.
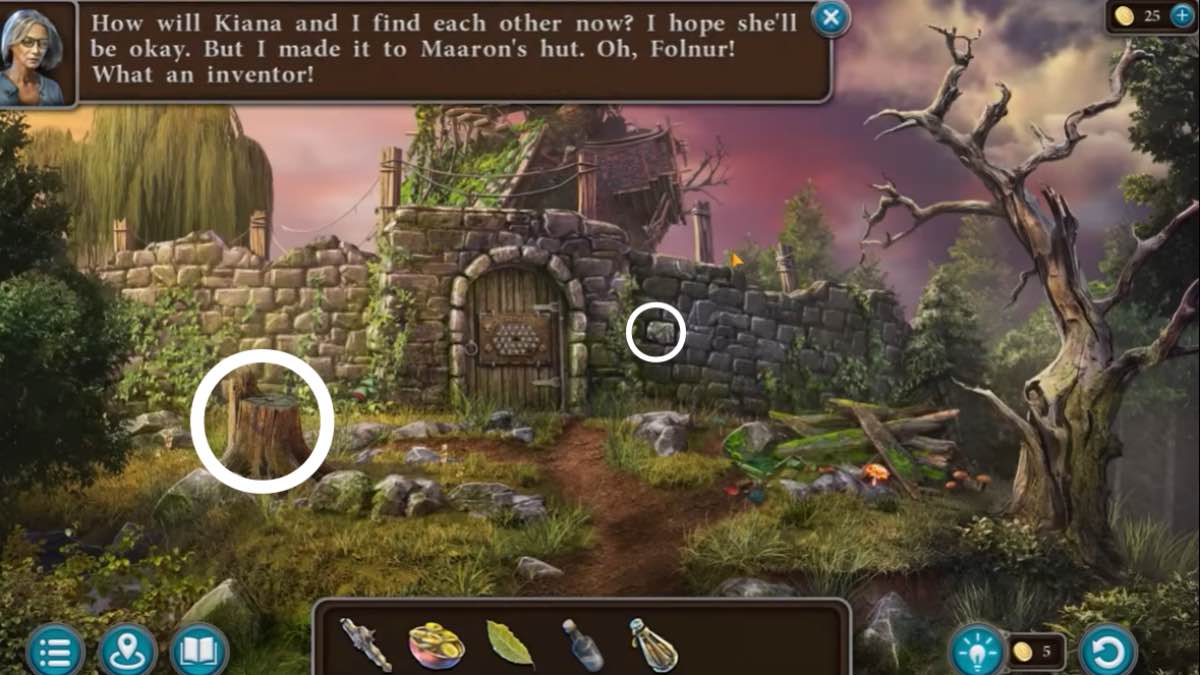
- Find a key in the wall.
- Pull up the tree stump.
- Get the H-shaped rod.
- Click the debris and branches.
- Move things to find the T-shaped rod.

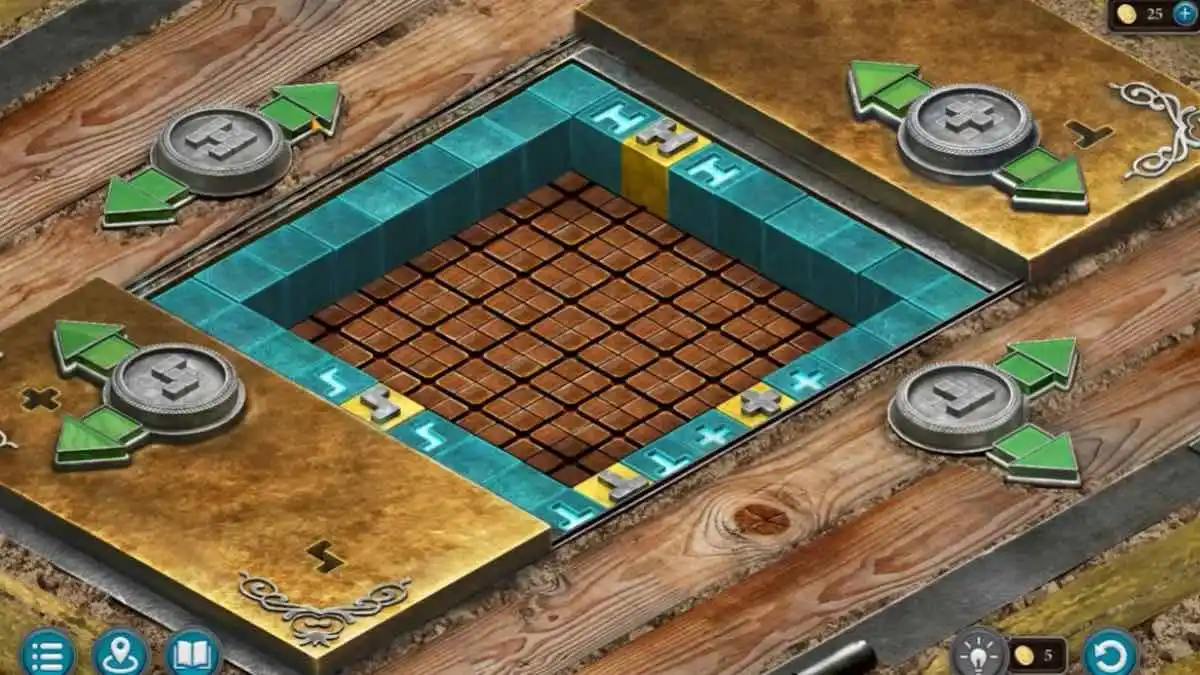
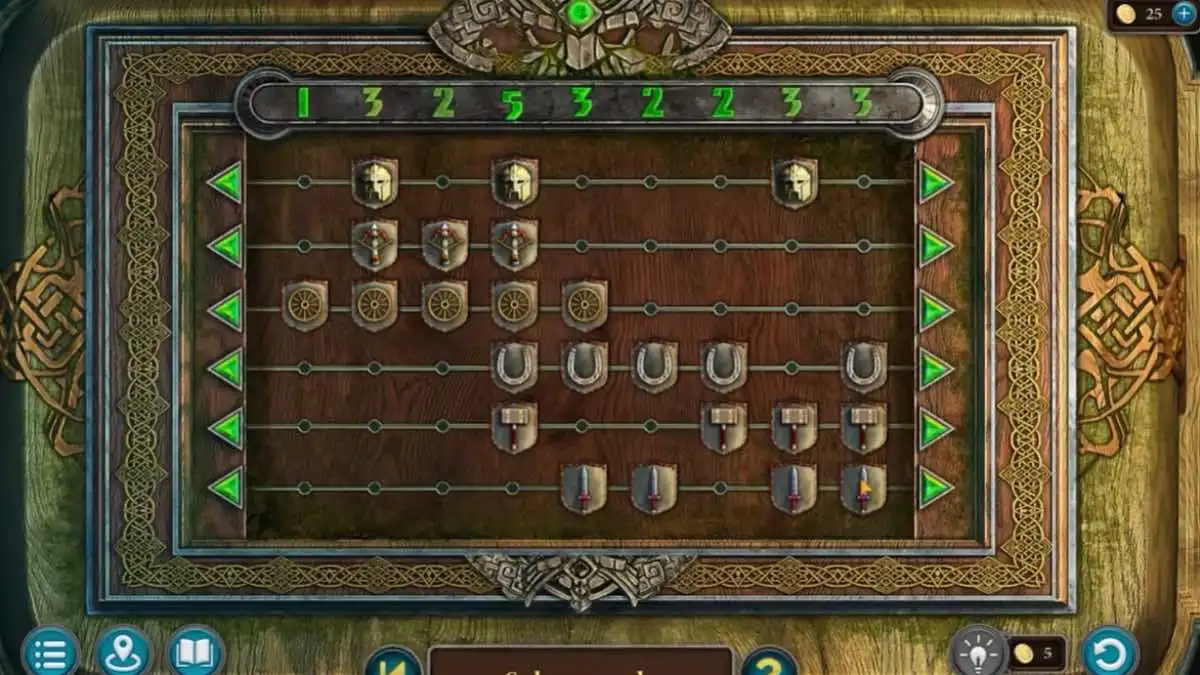
- Use the gate key to start the puzzle.
- Remove the chips from all the locks. Press the arrows to move the dividers and rotate the chips to move them to the empty spots. You can move the chips as many times as you need to.
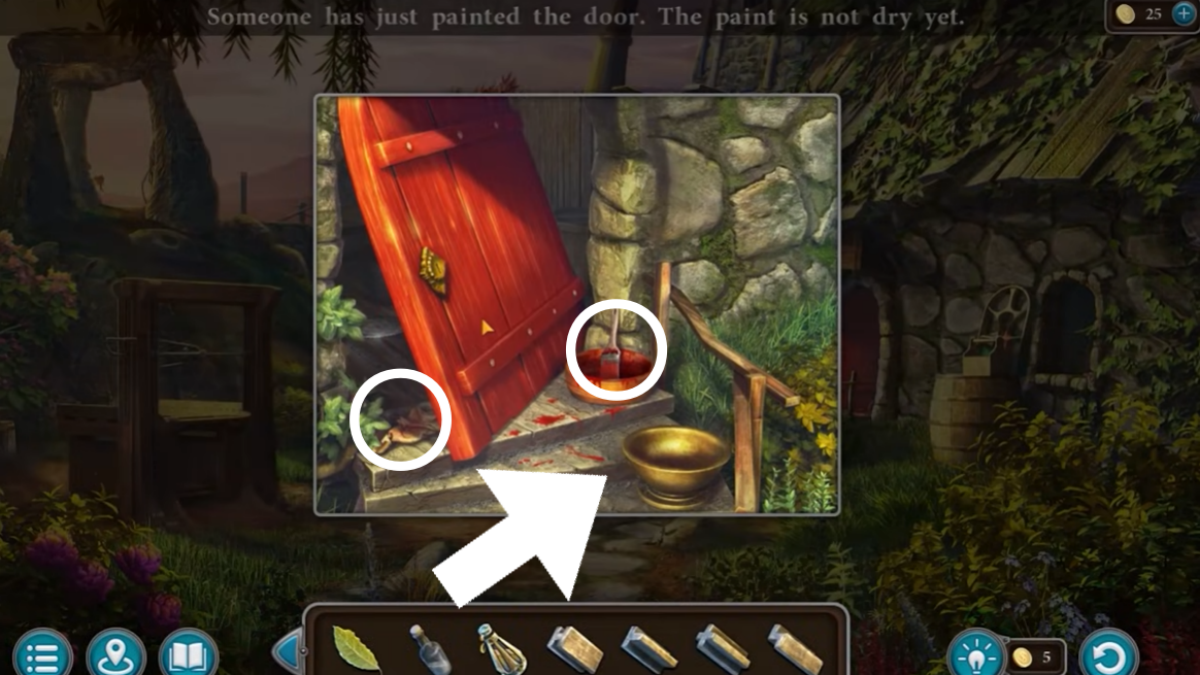
Portal Bridge
- Click the freshly painted door.
- Take the glass from the window.
- Go back.
- Get the pointed bone from the pile of debris.
- Use the bone on the window.
- Go inside.
- Remove the sand.
- Look at the mantlepiece.
- Take the Z-shaped rod.
- Click the doll on the left.
- Take the X-shaped rod.
- Go outside.
- Place alcohol in the dish by the door.
- Dip the paintbrush.
- Clean it on the rag.
- Go back inside.
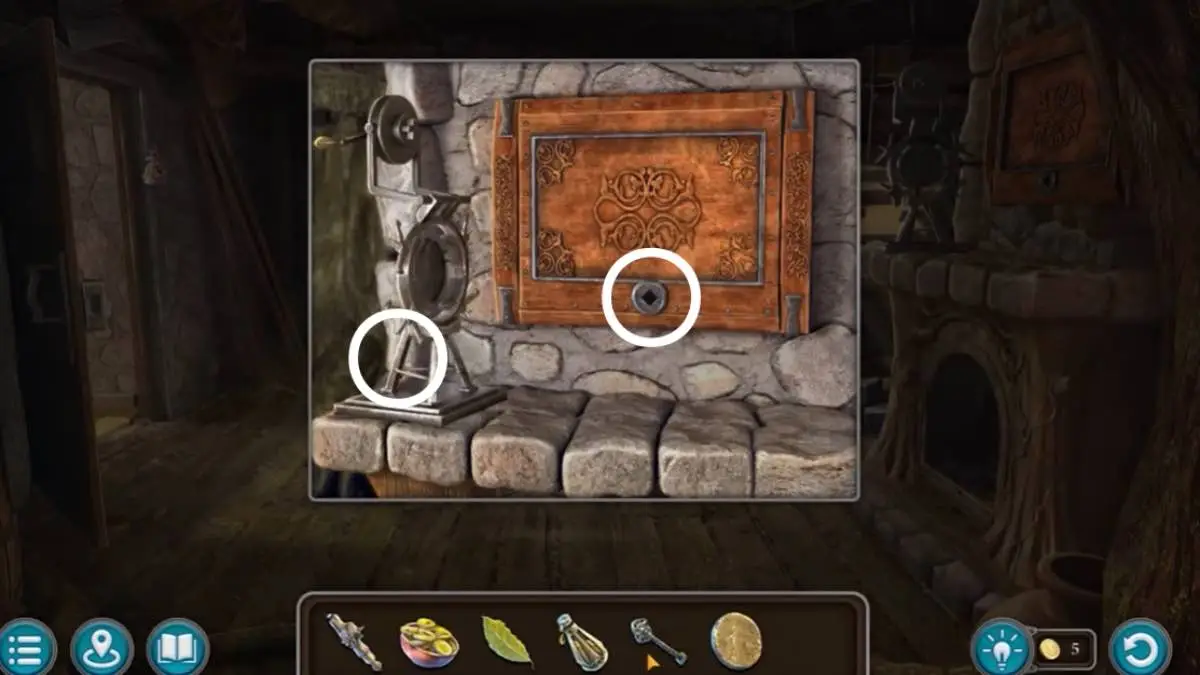
- Look at the hatch.
- Use the paintbrush to clear.
- Place the T/H/Z/X-shaped rods.
- Solve the puzzle by moving the cubes to match.
- Not all cubes can move in every direction.
- Use cubes to move the others.
- Take the blank rune stone.
- Take the cache key.
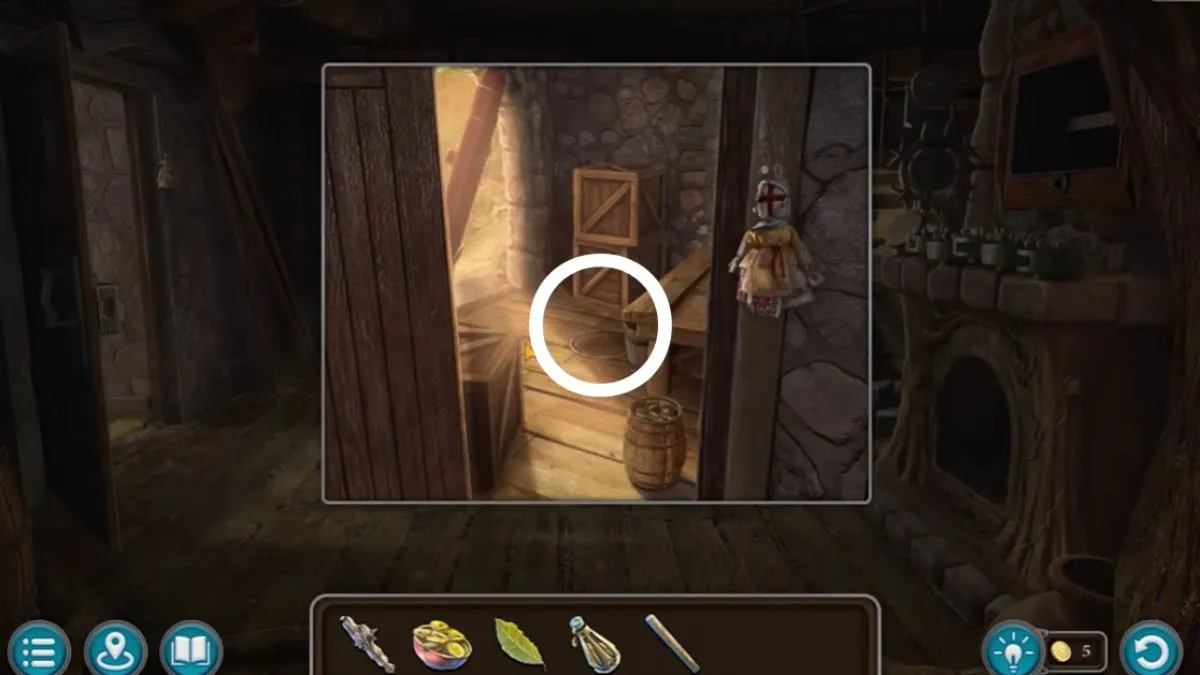
- Go to the fireplace.
- Use the key on the hatch.
- Place the rune stone on the mechanism.
- Get the log from the back.
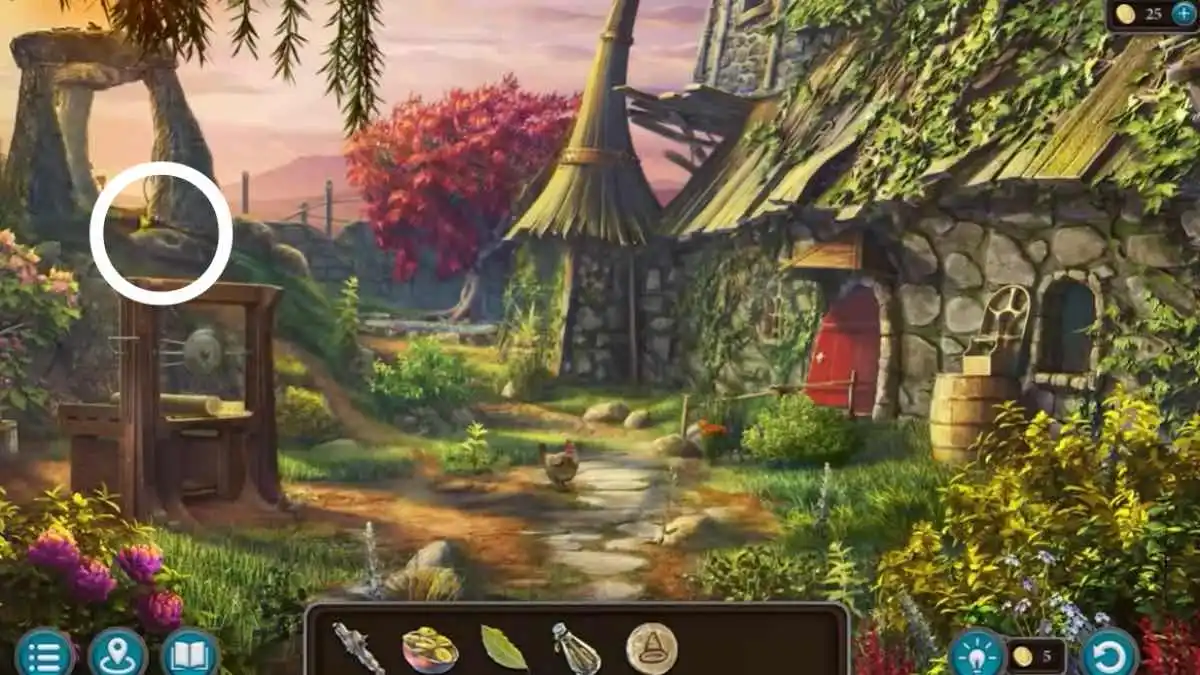
- Go to the garden.
- Click on the sawmill.
- Place the log on the sawmill.
- Go back inside.
- Go through the door.
- Get the circular blade.
- Place it on the sawmill outside.
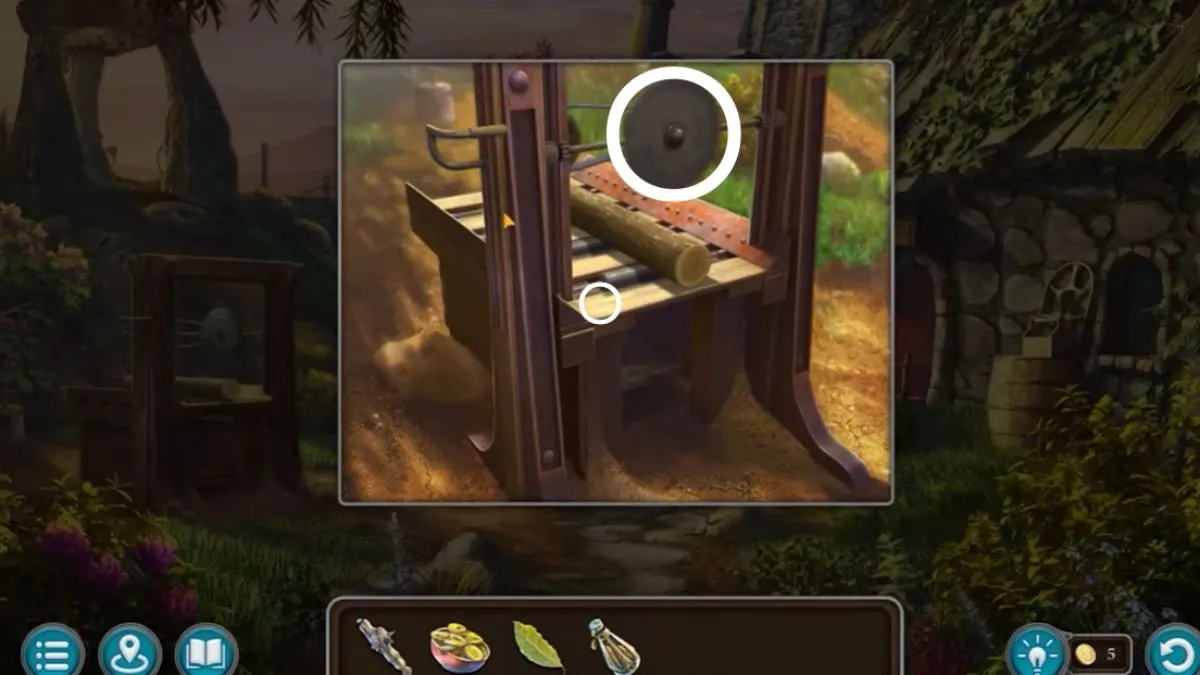
- Secure the blade with a nut.
- Use the saw.
- Cut five blanks.
- Go back inside.
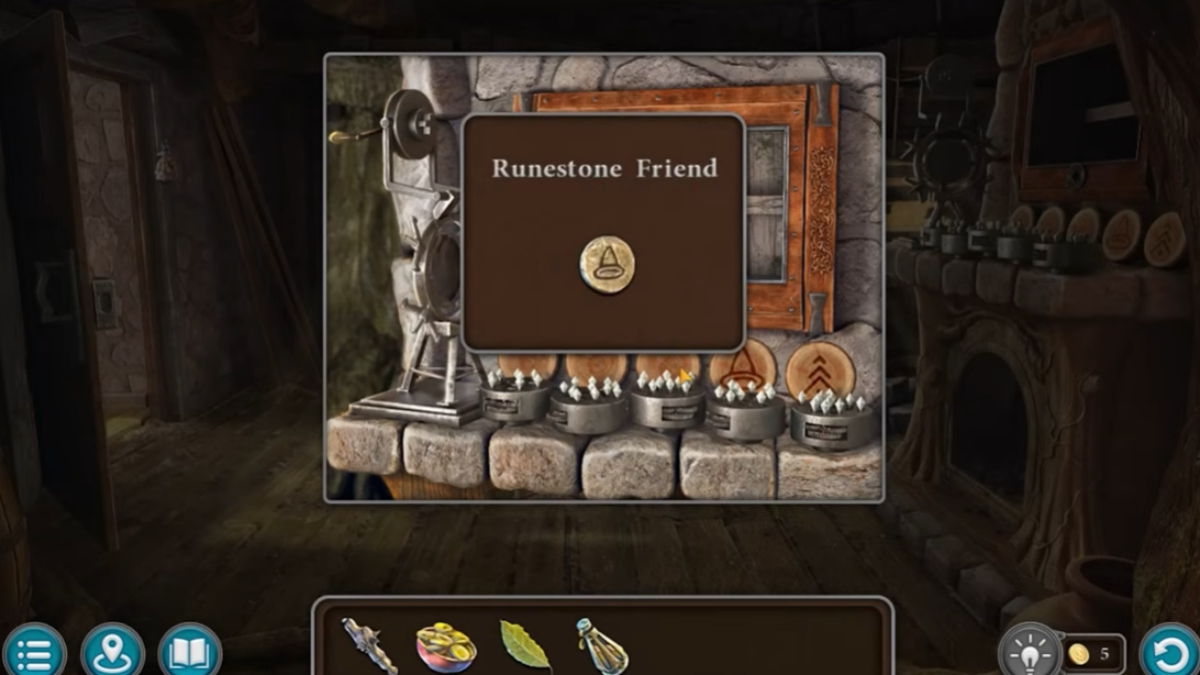
- Use the blanks.
- Create a sample.
- Set the correct rune stone.
- Take the Friend rune.
- Place the Friend rune in the stone.
Bogro’s Estate
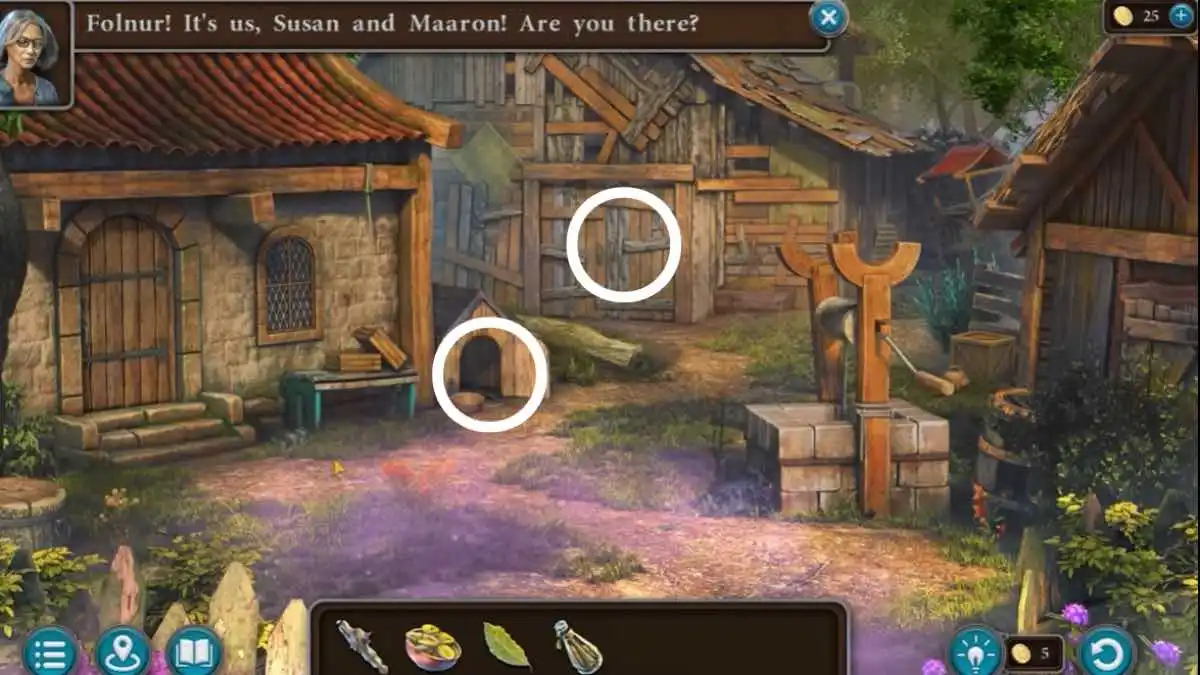
- Use the dog whistle.
- Approach the kennel.
- Shut the door.
- Take the magnet.
- Go to the bar.
- Use the magnet on the haystack.
- Go back.
- Select the magnet.
- Remove the extra items on the magnet.
- Take the key and iron kjol.
- Use the key.
- Go inside.
- Look at the table.
- Remove the cloth.
- Move the fruits.
- Take the winding key.
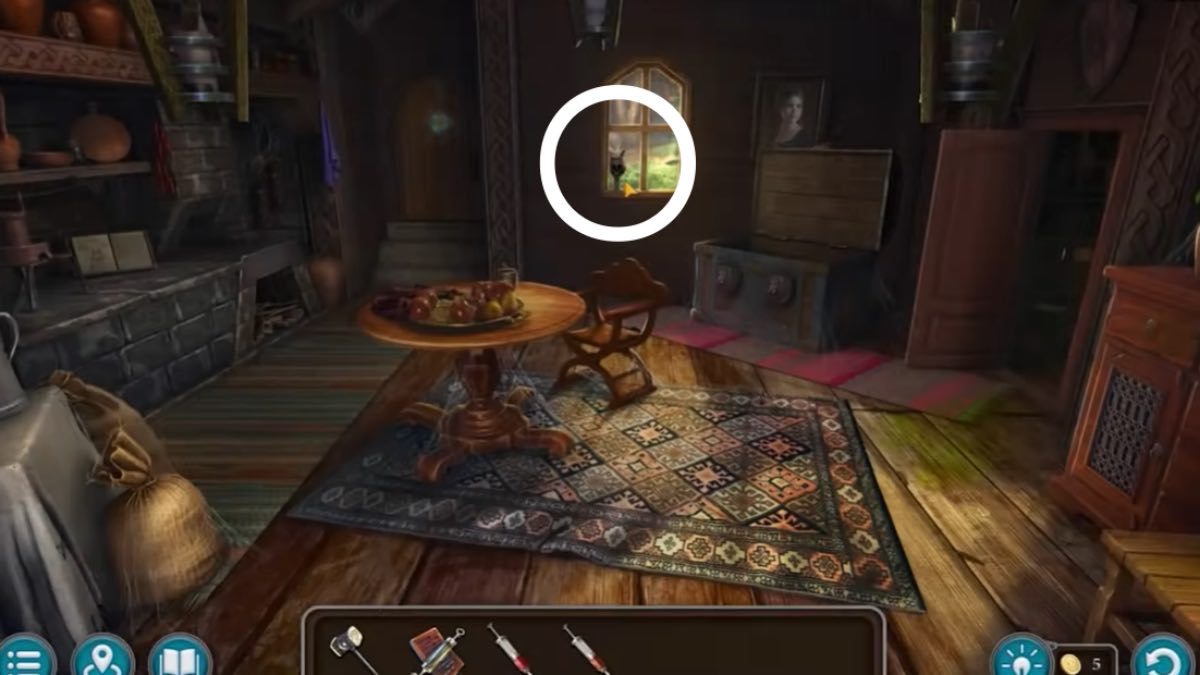
- Go to the window sill.
- Pick up the manuscript and tiny horse.
- Click the door.
- Place the mechanical horse.
- Use the winder key.
- Solve the puzzle:
- Click tiles until they light up.
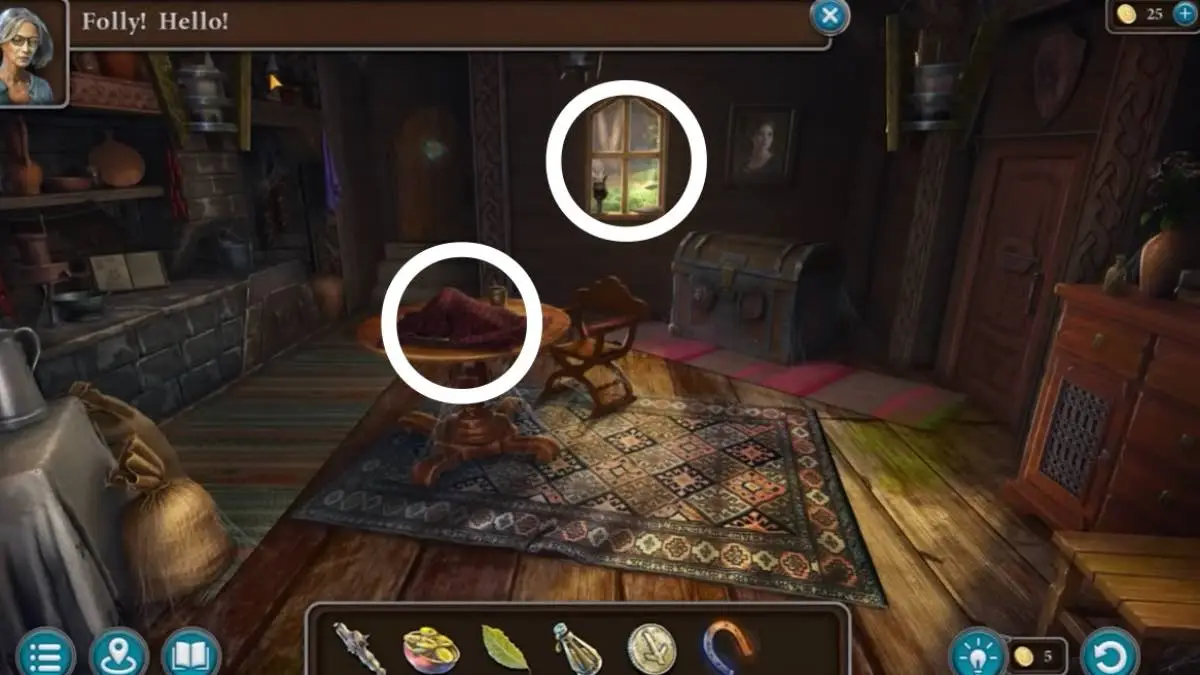
- Enter the study.
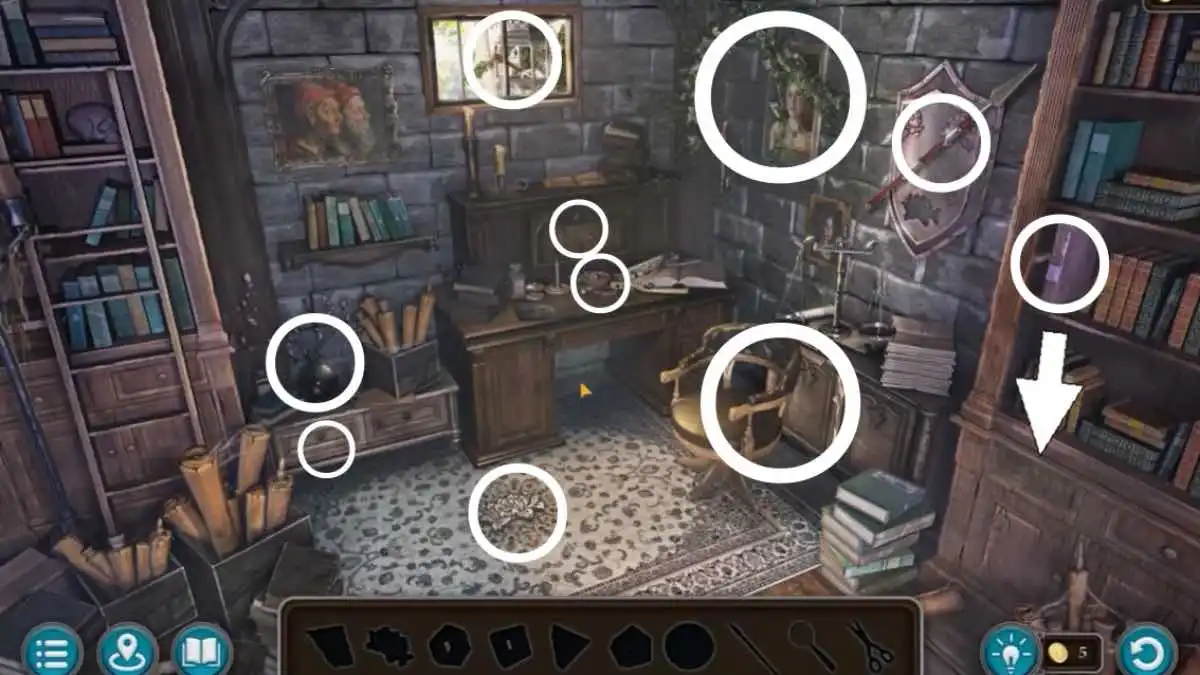
- Solve the hidden object puzzle.
- Purple book opens the drawer.
- Flower on the shield gets the spear.
- Use the spear on the jammed window.
- Empty the green vase on the table.
- Look through the small bowl on the desk.
- Use scissors on the ivy.
- Look behind the painting.
- Place the compass on the book.
- Pull the chair to get to the cupboard.
- Add the paper to the scrap on the desk to get the compass clue.
- Look at the paper with the magnifier to get the clue.
- Use the clue on the compass on the book.
- Open the small desk door.
- Place and turn the wheels until they match the clue on the paper.
- Move the shields until all numbers light up.
- Read the scroll.
- Take the key.
- Speak to the man.
- Get the See-Remember Stone and Folnur’s Box.
Dog’s Memories
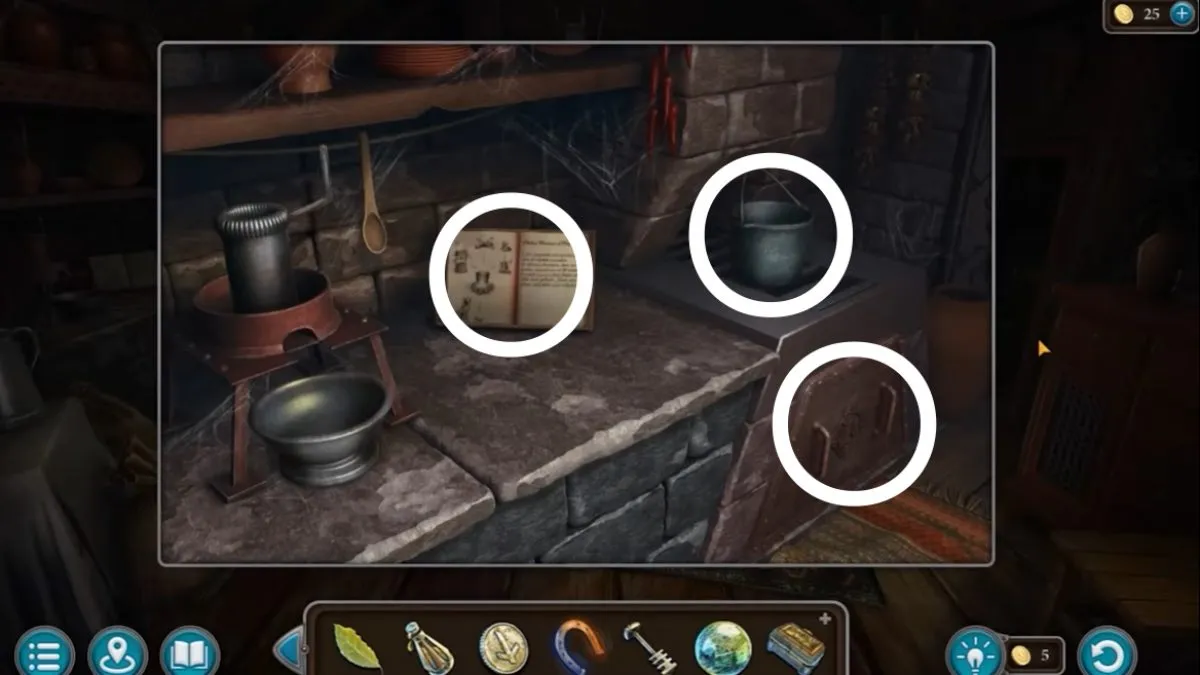
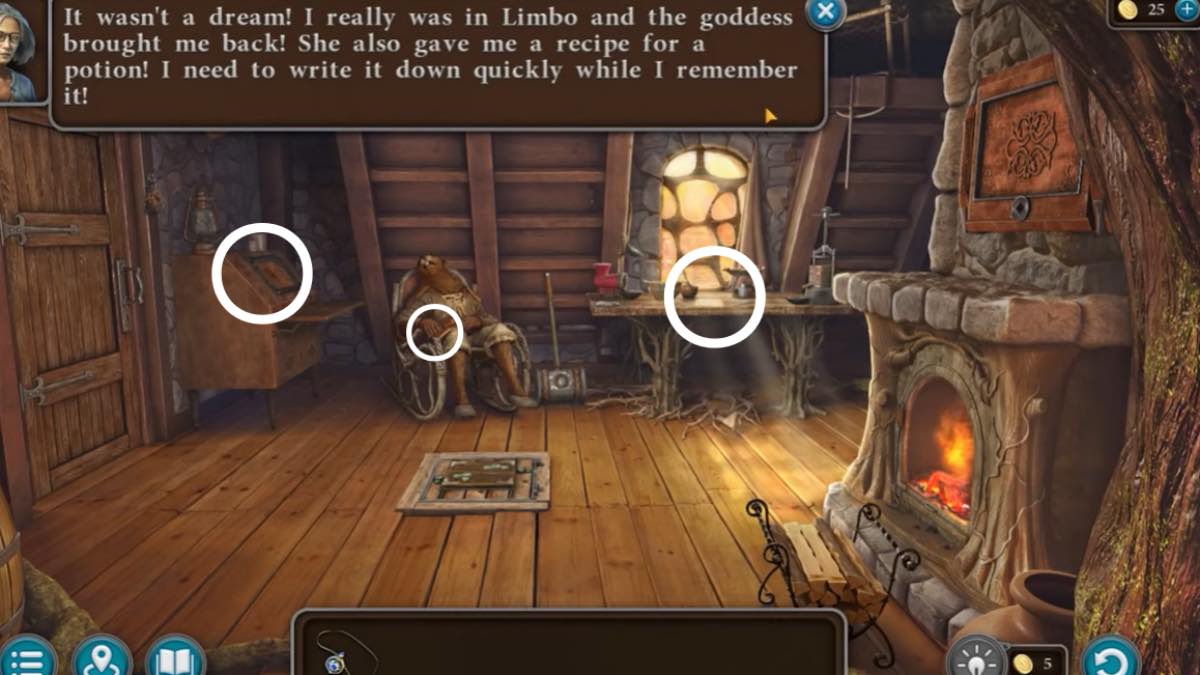
- Look at the recipe.
- Take the cauldron.
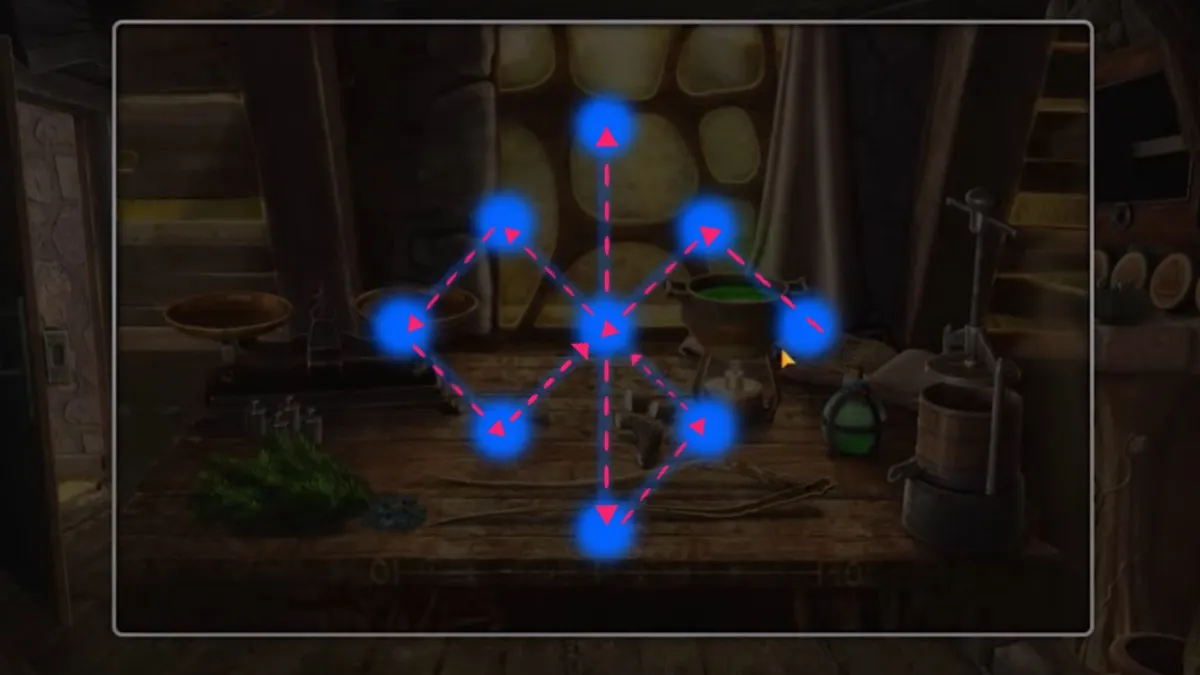
- Look at the oven door.
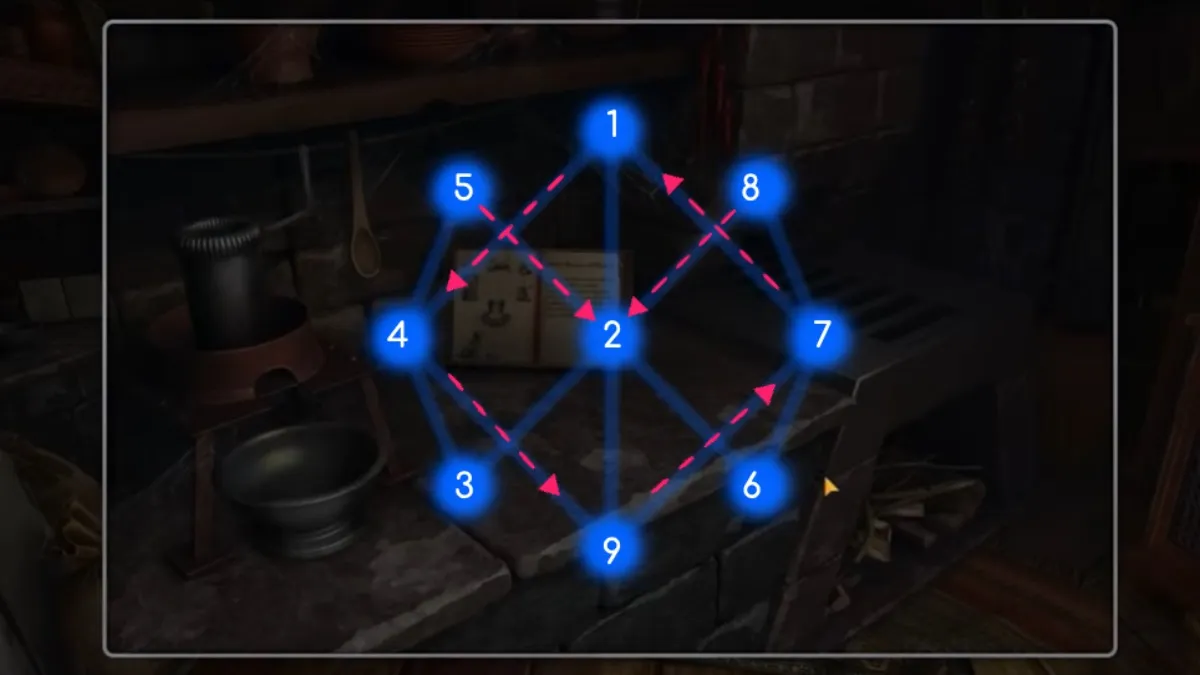
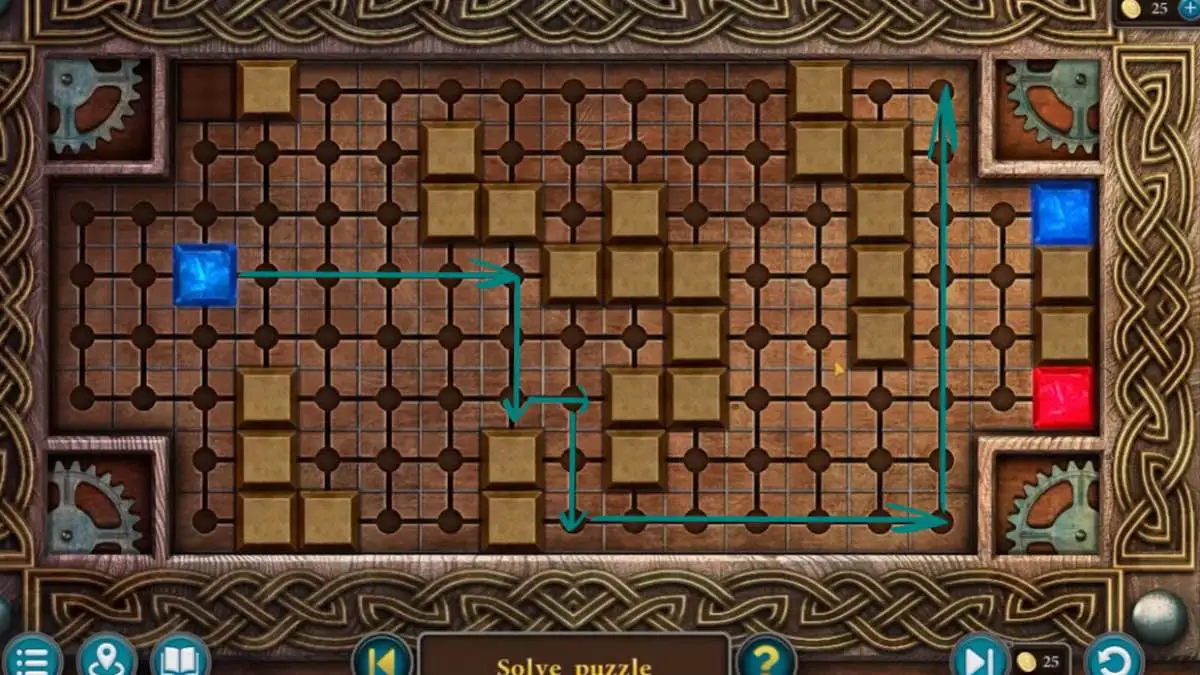
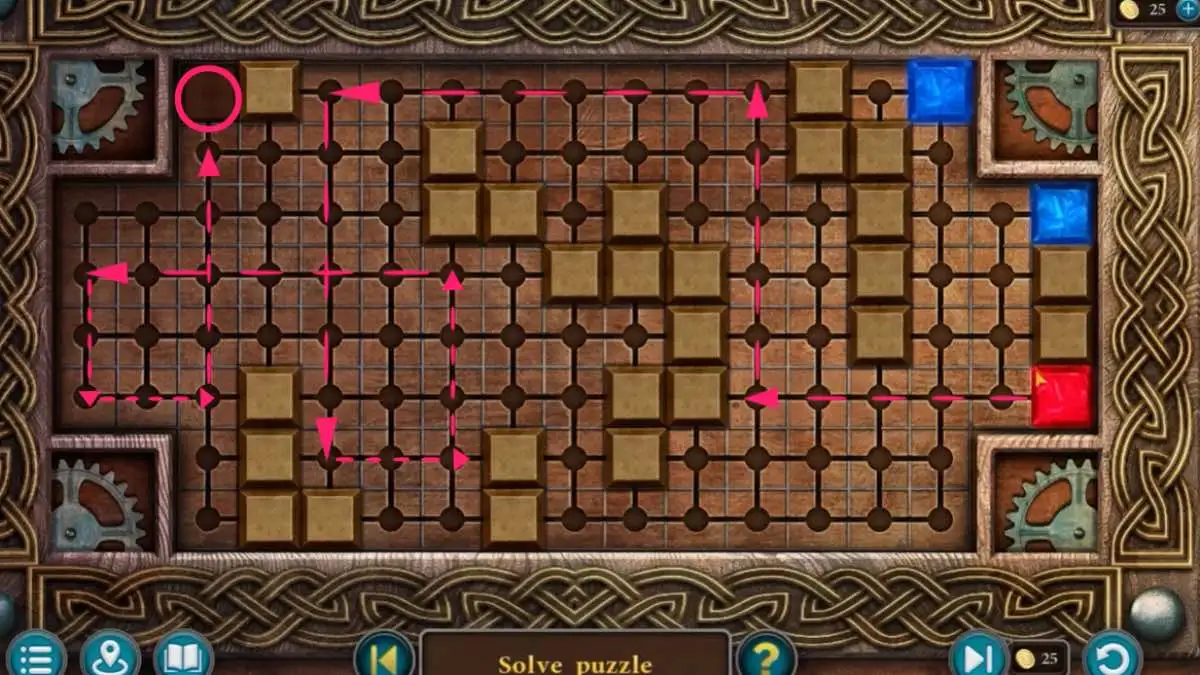
- Solve the puzzle by connecting all the dots with lines. Draw each line once.
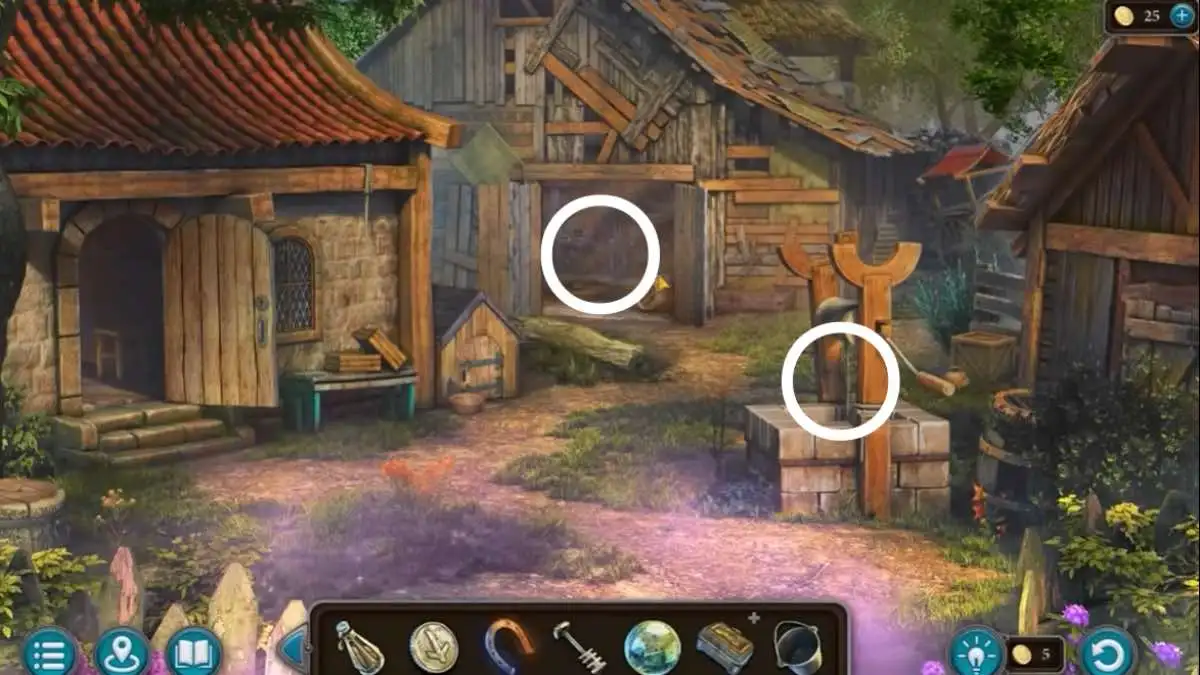
- Go outside.
- Enter the barn.
- Get the grain.
- Use the cauldron at the well.

- Put grain in the mill.
- Place the water on the stove.
- Go back to the entrance.
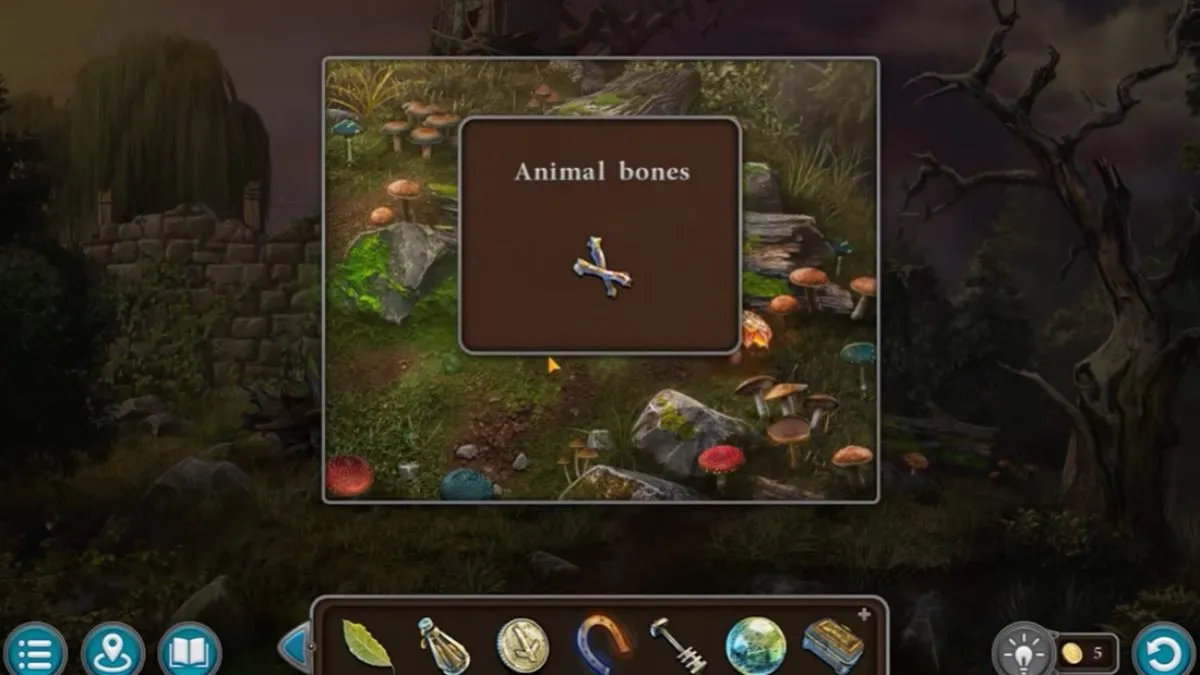
- Get the bones.
- Place the bones in the boiling water
- Place the milled grain in the boiling water.
- Use the wooden spoon to stir.
- Take the porridge.
- Give the dog the porridge at his kennel.
- Use the whistle to summon the dog.
- Click on the dog.
- Use the See-Remember ball.
Dog’s Sniff
- Use the magnet at the well.
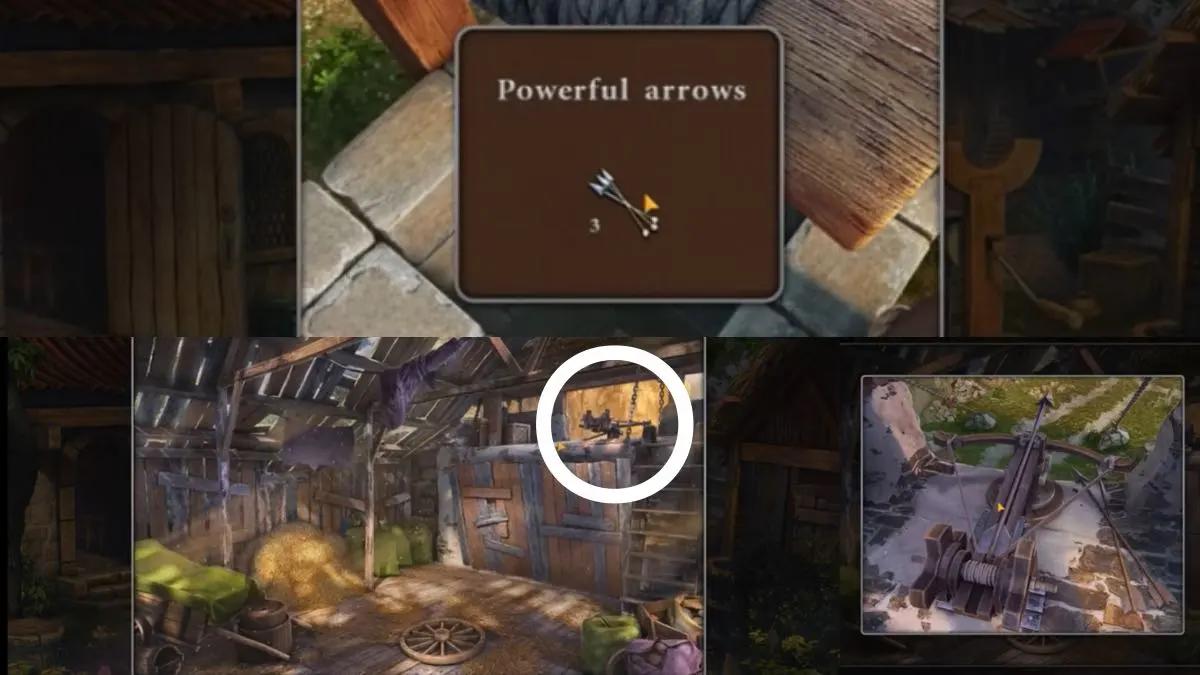
- Take the arrows.
- Go to the barn.
- Click the crossbow.
- Use the arrows.
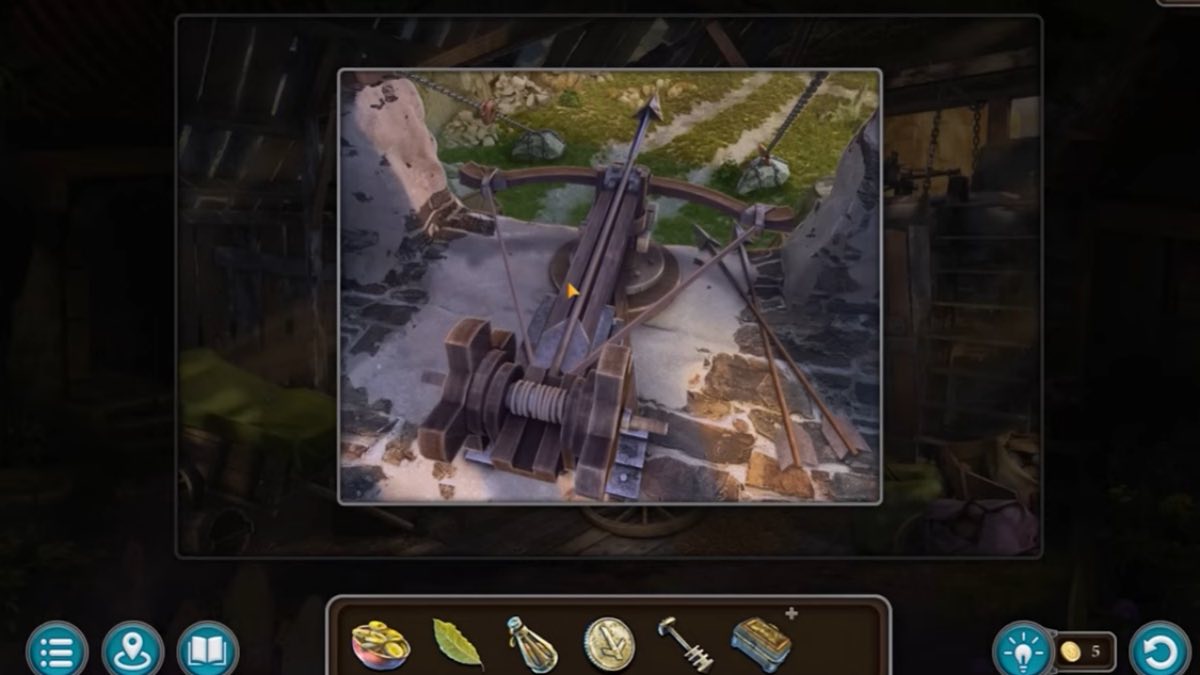
- Place an arrow every time you shoot the crossbow.
- Shoot left.
- Shoot left.
- Shoot right.
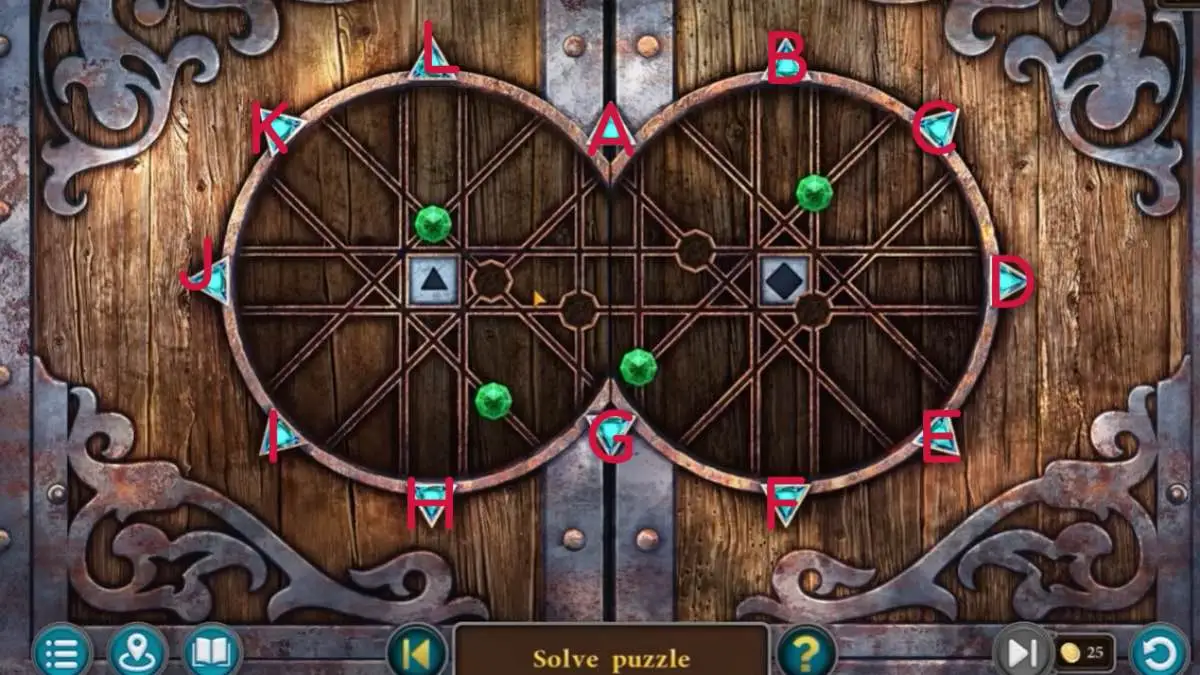
- Use the key to start the puzzle.
- Move the green stones using the arrows:
- I, K, K, K, F, C, C, D, D, K, D, D, E, E, J, J, J, C, J, C, J, F, E, D, E, J, J, J, J, J, A, D, D, D, D, D, A, A, F, F, J, J, J, G, G, B, B.
- Go through the barn door.
- Look for a note and Folnur’s glasses in the debris.
Beaverling Problems
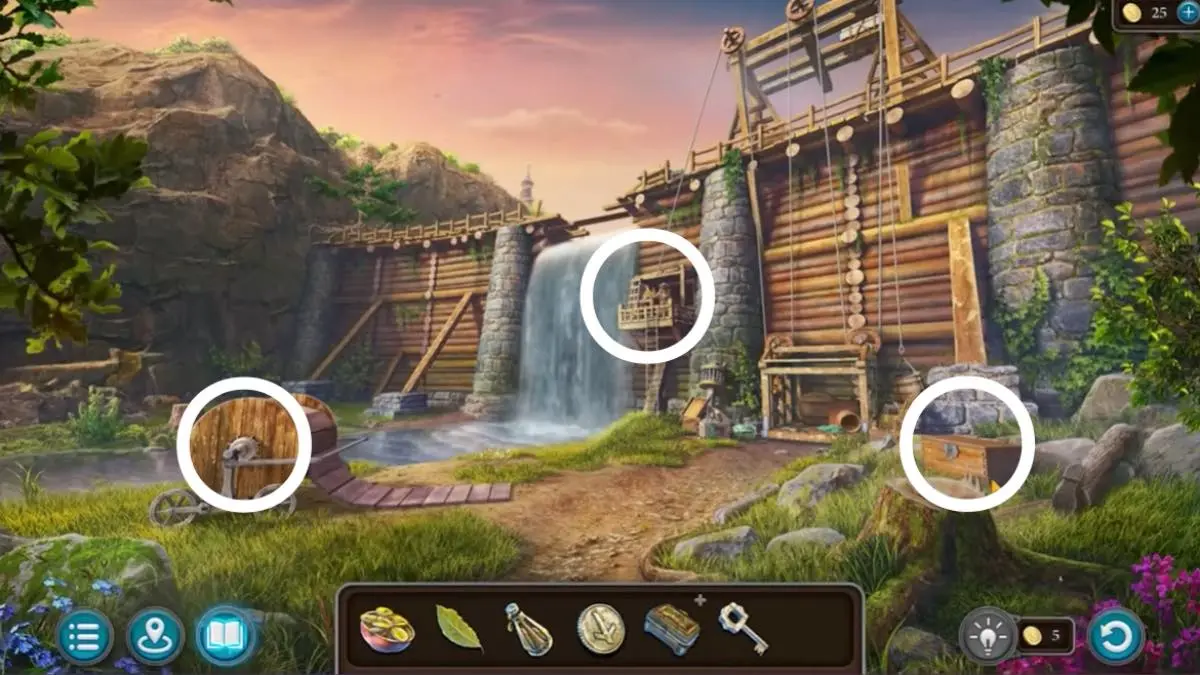
- Go straight ahead.
- Speak to the beaver.
- Take the key.
- Open the box.
- Take the hatchet.
- Take the reel with the ramp.

- Go back.
- Put the ramp with wheels by the cart.
- Use the hatchet on the cart.
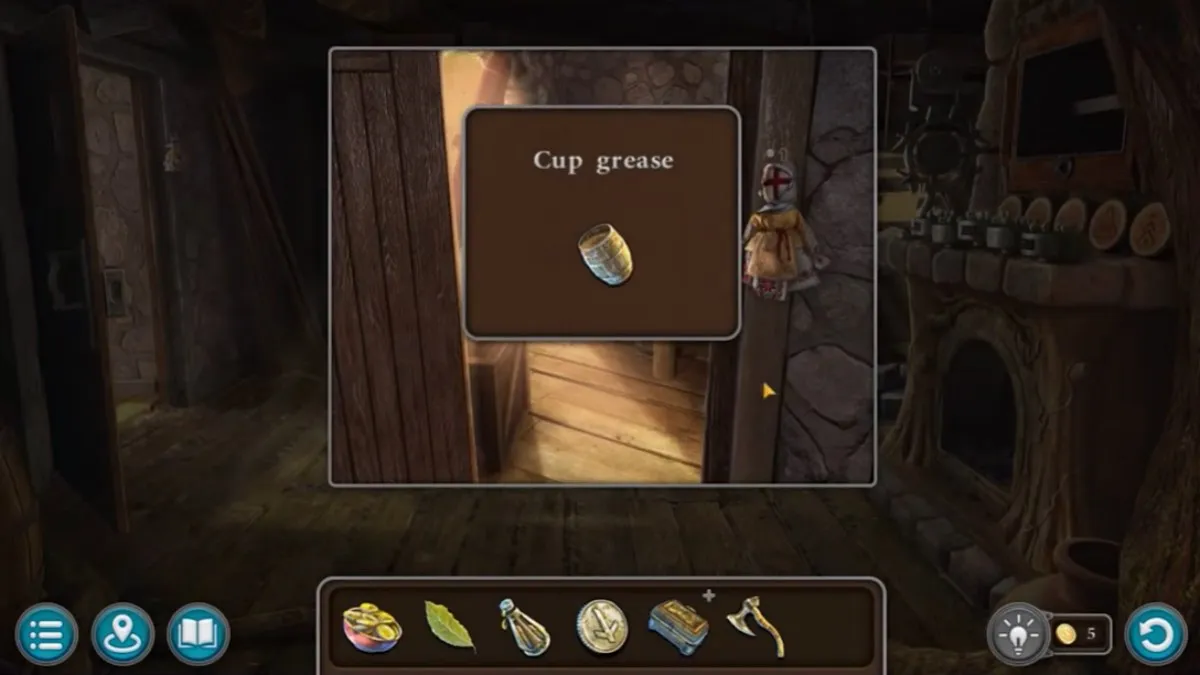
- Return to the house.
- Get the cup of grease.
- Go to the cart.
- Try to use the grease.
- Go forward.
- Get the trowel from the box.
- Go back.
- Use the grease.
- Guide the pallet along the track.
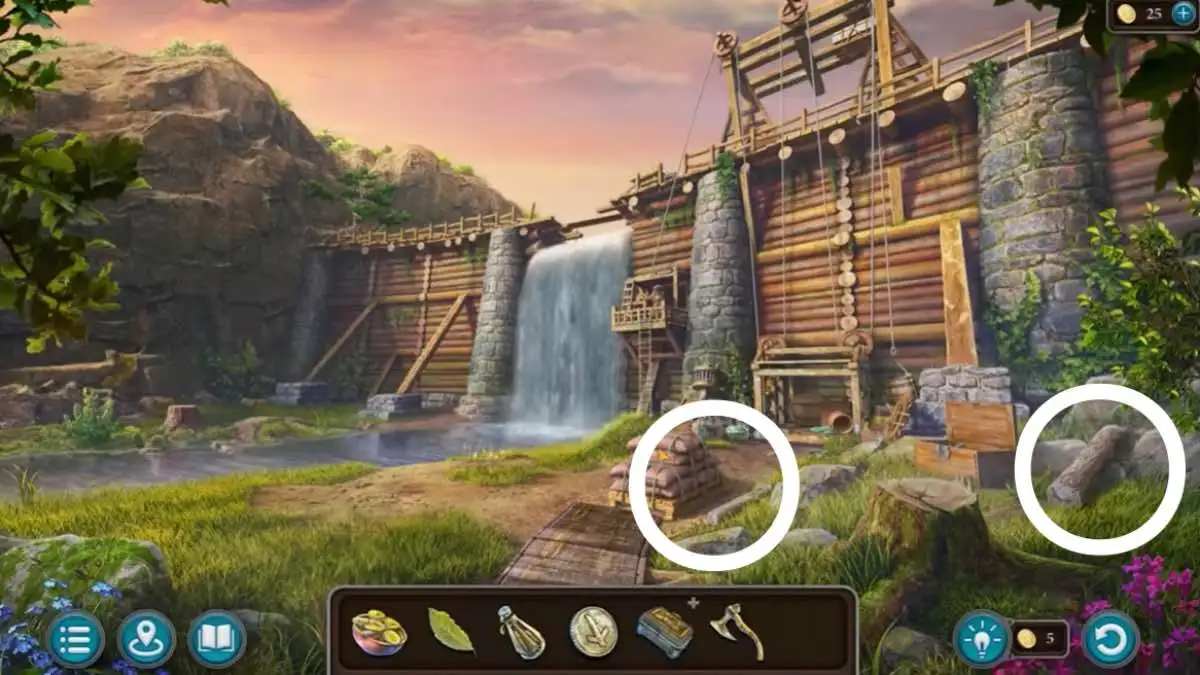
- Get the pickaxe from the box.
- Take the round timber next to the box.
- Go back.
- Chop down the broken tree with the hatchet.
- Use the hatchet to smooth.
- Get the carpenter’s drawknife from the box.
- Use it to process the log.
- Click on the pallet.
- Find the rough beam.
- Lift the pallet with the pickaxe.
- Place the log under.
- Use the round timbers to move the pallet.
- Take the key from the beaver.
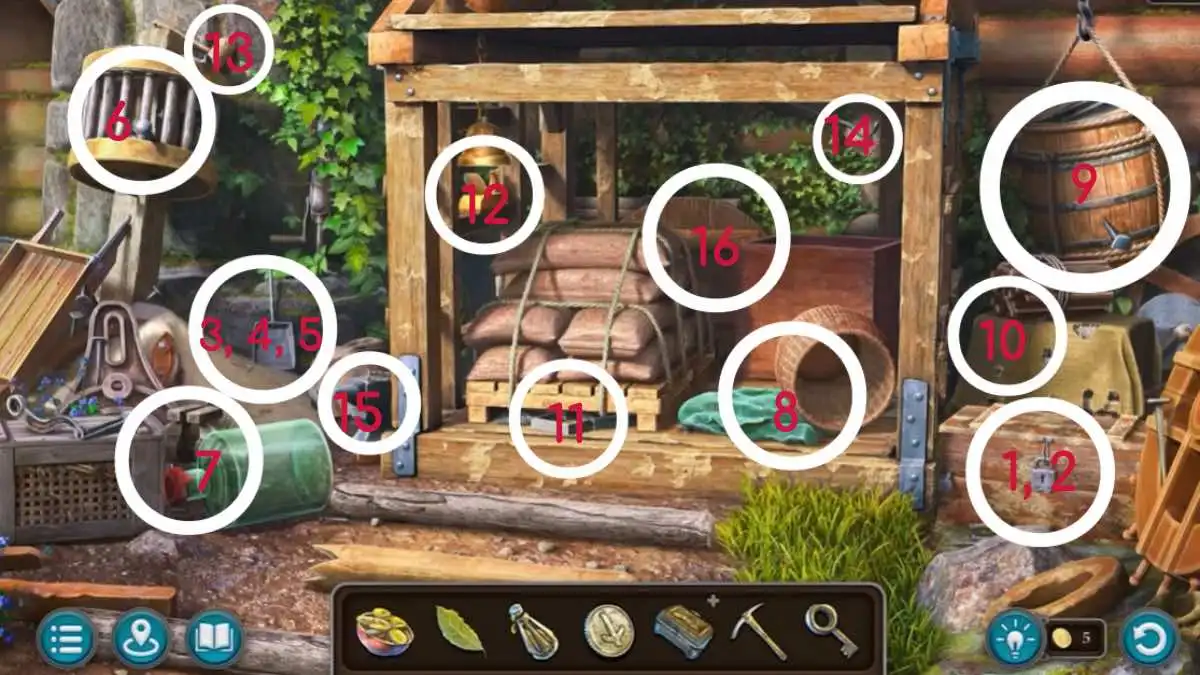
- Open the box.
- Solve the hidden object puzzle:
- Take the spanner.
- Assemble the tongs.
- Look under the cloth and rubble to the left for steel angles.
- Collect the sand in the sack.
- Use the spade to dig for the scissors.
- Use the metal rod to break the wood and get the chisel.
- Move the green container to get the vice.
- Move the basket and green cloth to get the rope.
- Move the wood, use the wheel to break open the barrel, use wood piece to move glass aside to get the glass cutter.
- Move the yellow cloth to get the pallet with bricks.
- Take the construction brackets.
- Take the plane.
- Take the mallet.
- Take the crowbar.
- Take the anvil.
- Move the wooden wheel. Take the boards tied with rope.
Dam Repair
- Talk to the beaver.
- Get the flags.
- Get the key from the sign on the right.
- Look on the table.
- Get the manuscript.
- Use the key on the locked chain
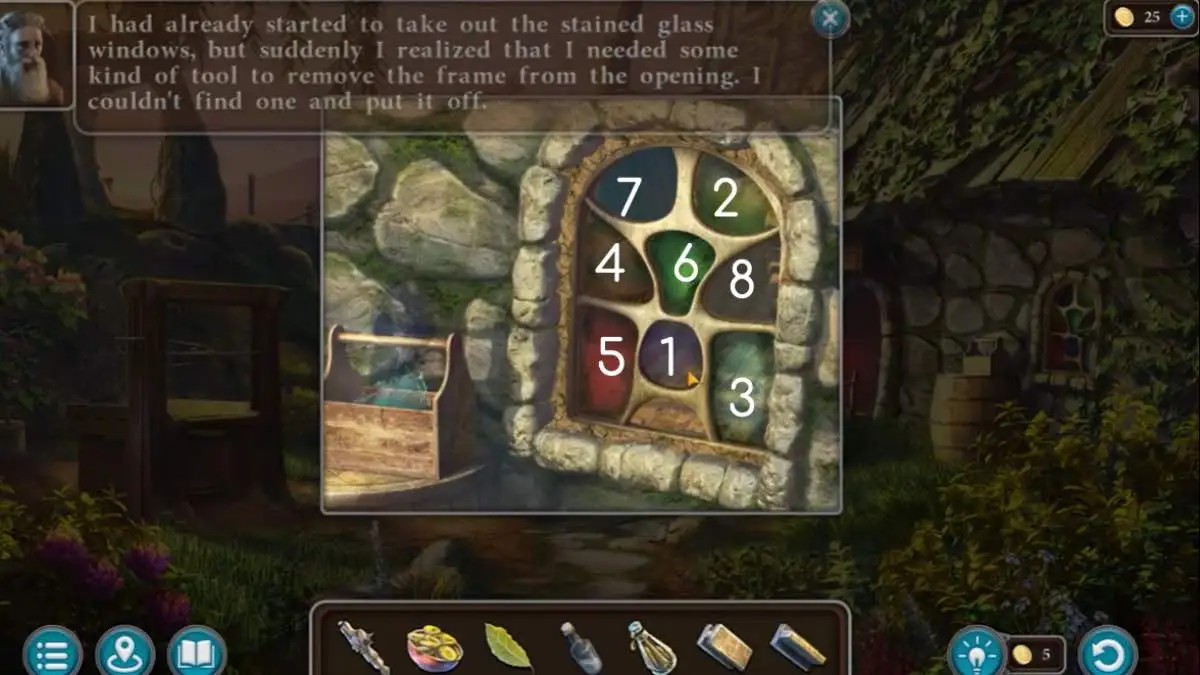
- Solve the puzzle:
- 1, 2, 3, 6, 4, 6, 5, 6.
- Go back to the cottage.
- Get the colored glass.
- Click the pond.
- Use the pickaxe to get diamond crystal.
- Combine the colored glass and flags.
- Use the diamond crystal to cut the glass.
- Use the sugar lollipops on the flags.
- Use Folnur’s glasses to melt the sugar.
- Combine the glass and flags.
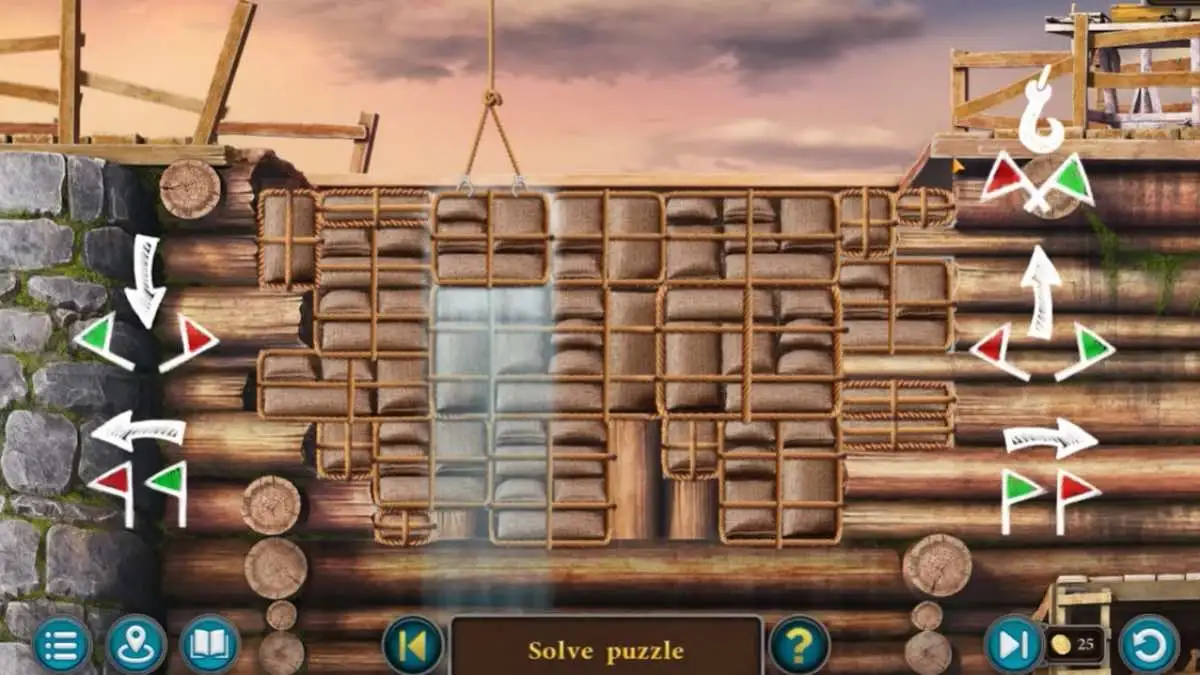
- Go to the dam.
- Place the flags at the top of the dam.
- Solve the puzzle by placing the bags in the paces like a game of Tetris.
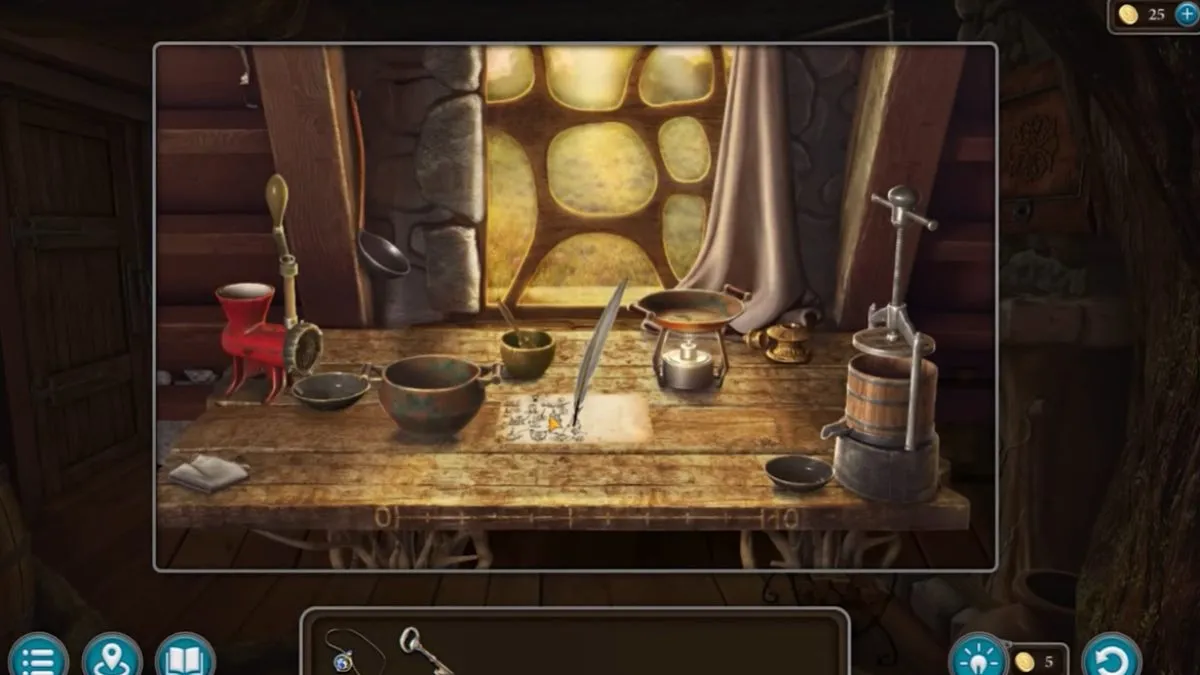
Potion of Underwater Breathing
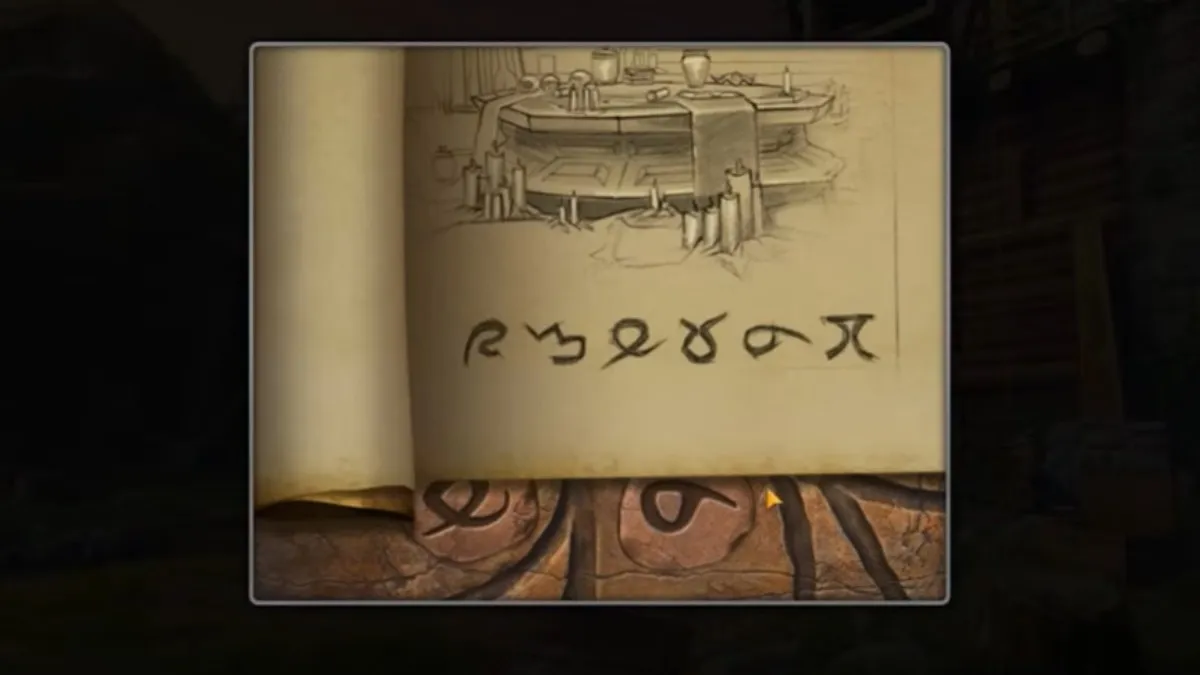
- Remove the boards and stones.
- Solve the puzzle by pressing the symbols in the right order.
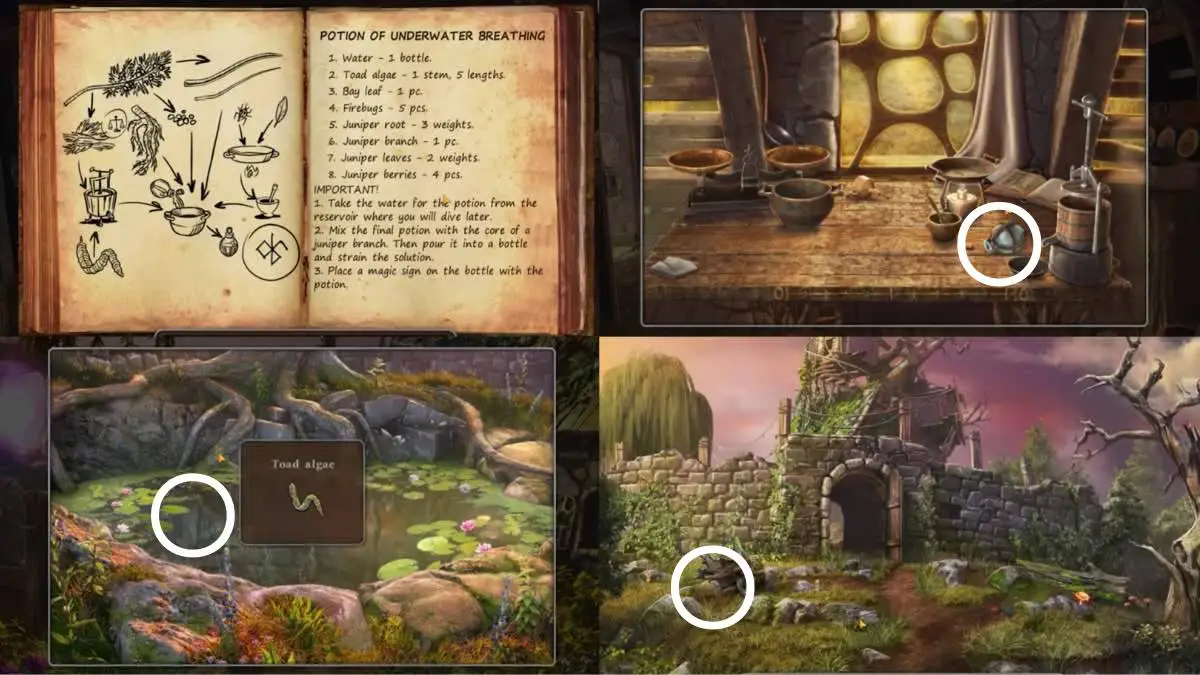
- Go to the cottage.
- Click the table to find the potion recipe.
- Take the empty bottle.
- Go to the pond.
- Get frog seaweed.
- Go outside to find firebugs.
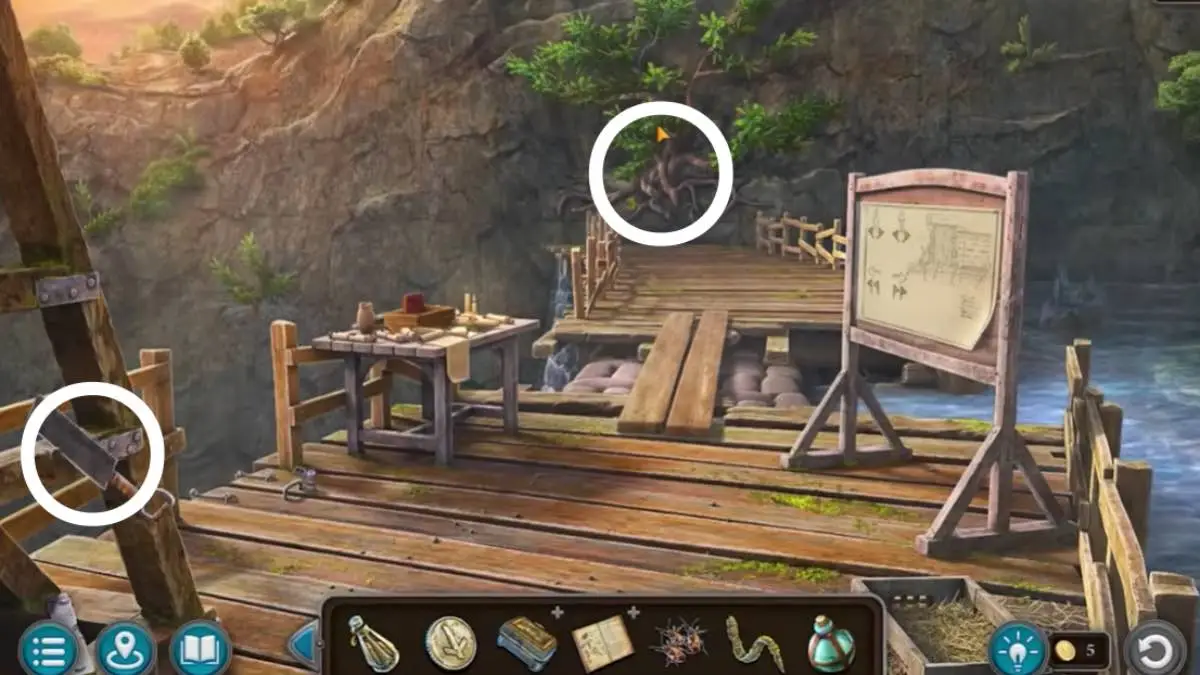
- Go to the dam.
- Use the bottle to get water.
- Go to the beaver bridge.
- Take the saw.
- Use the saw to get juniper.
- Add all ingredients to the book.
- Go to the cottage.
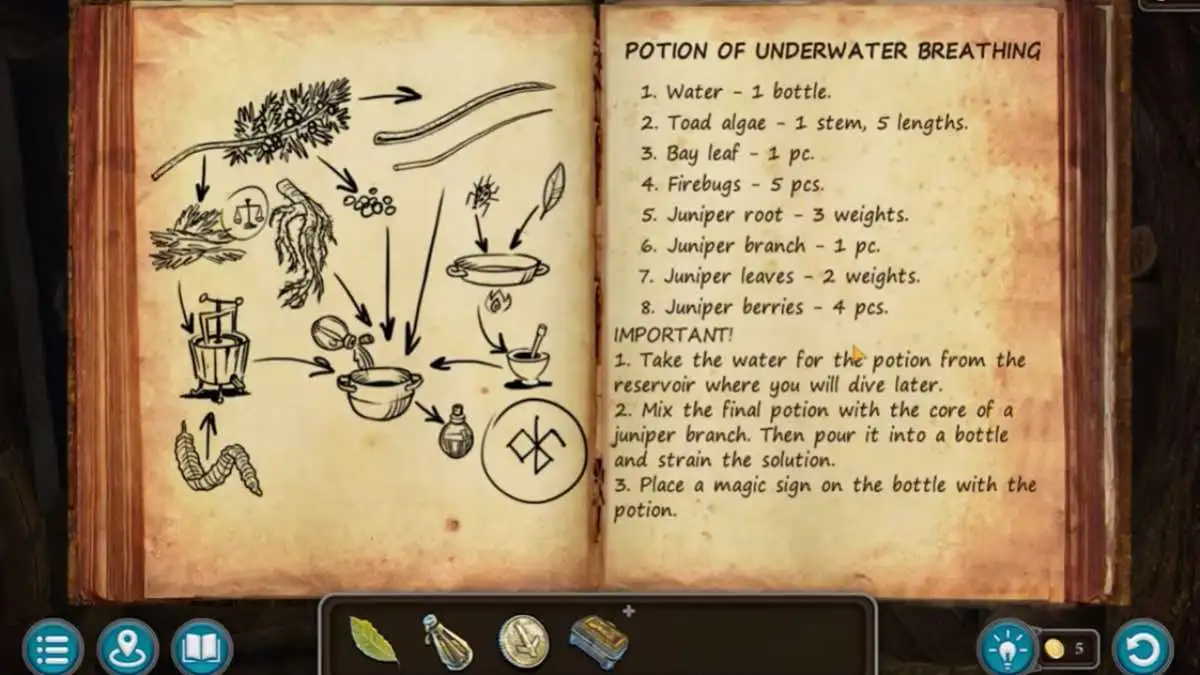
- Add the potion kit to the table.
- Follow the instructions to make the potion.
- Solve the puzzle by connecting the dots using no repeating lines.
- Go to the dam.
- Use the potion.
- Swim forward x 7.
- Look at the table.
- Get the manuscript, mechanism part, and lion head.
- Use the mechanism part.
- Solve the puzzle by matching the symbols until they disappear.
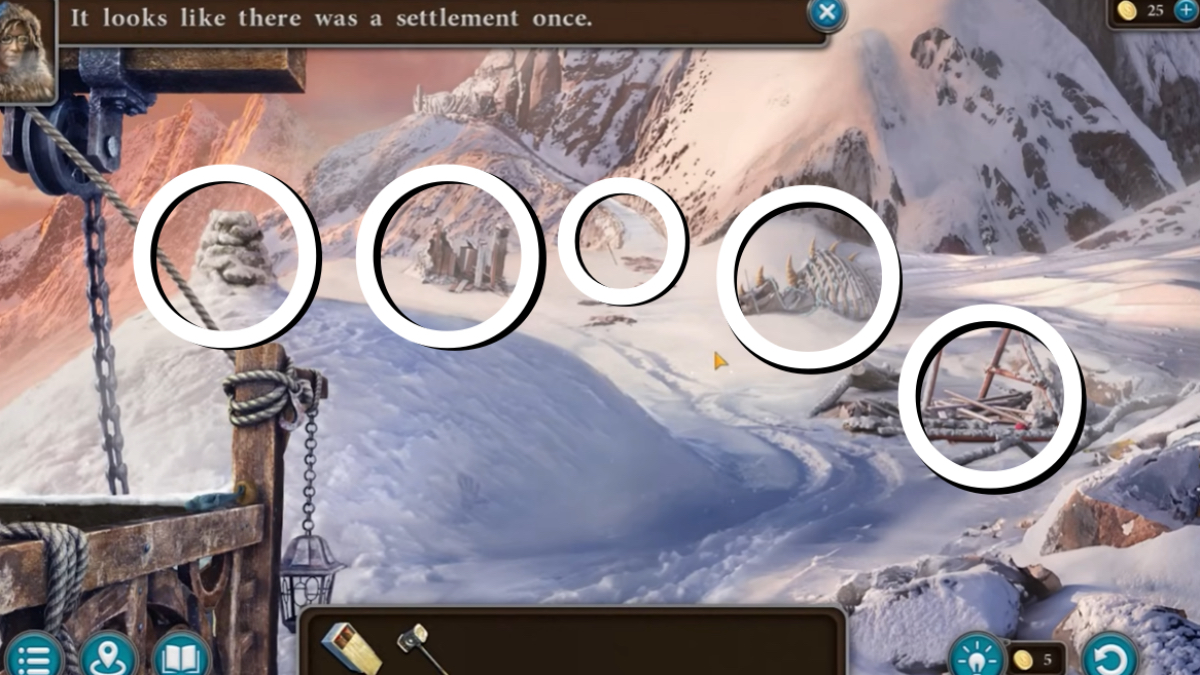
Snowy Peak
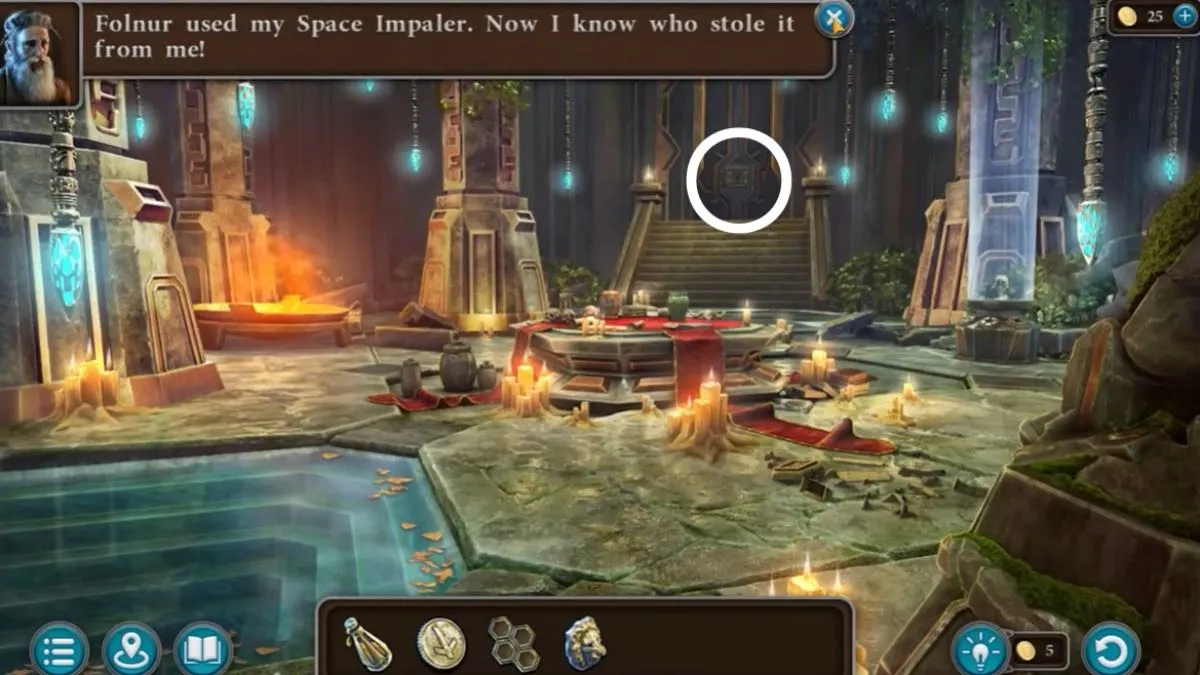
- Look at the portal.
- Go back to the cottage.
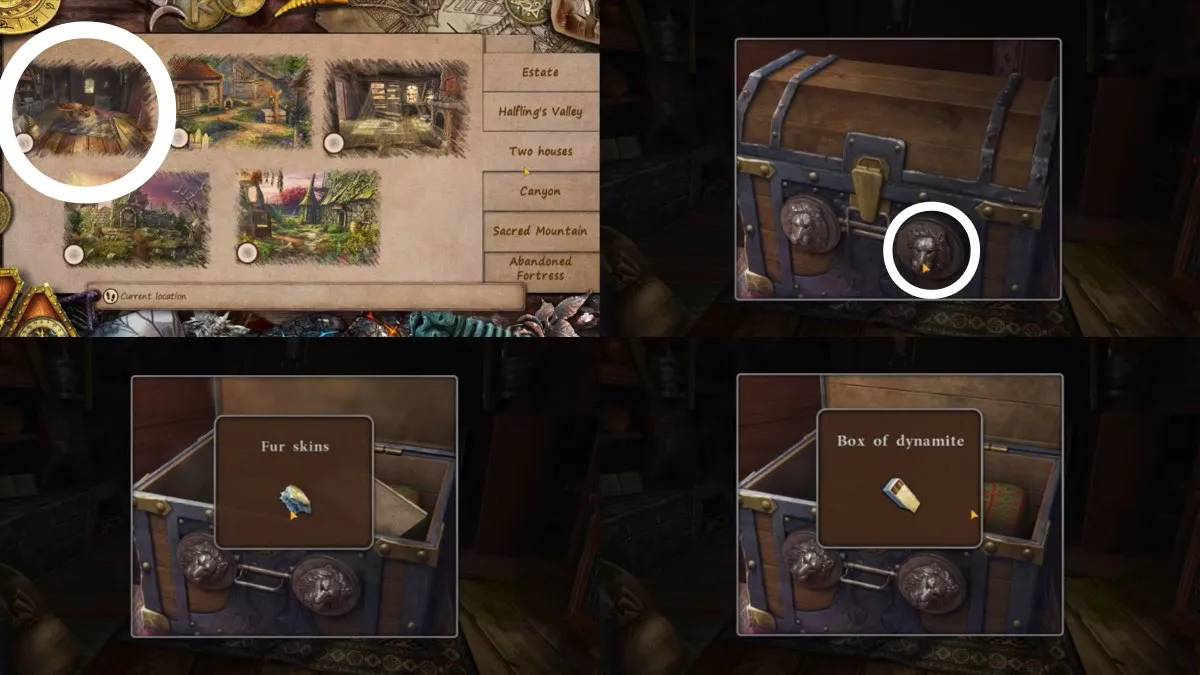
- Click on the chest.
- Add the lion head.
- Take the fur.
- Take the dynamite.
- Go inside the cottage.
- Find a blank stone in the hole.
- Craft the pumpkin rune on the mantlepiece.
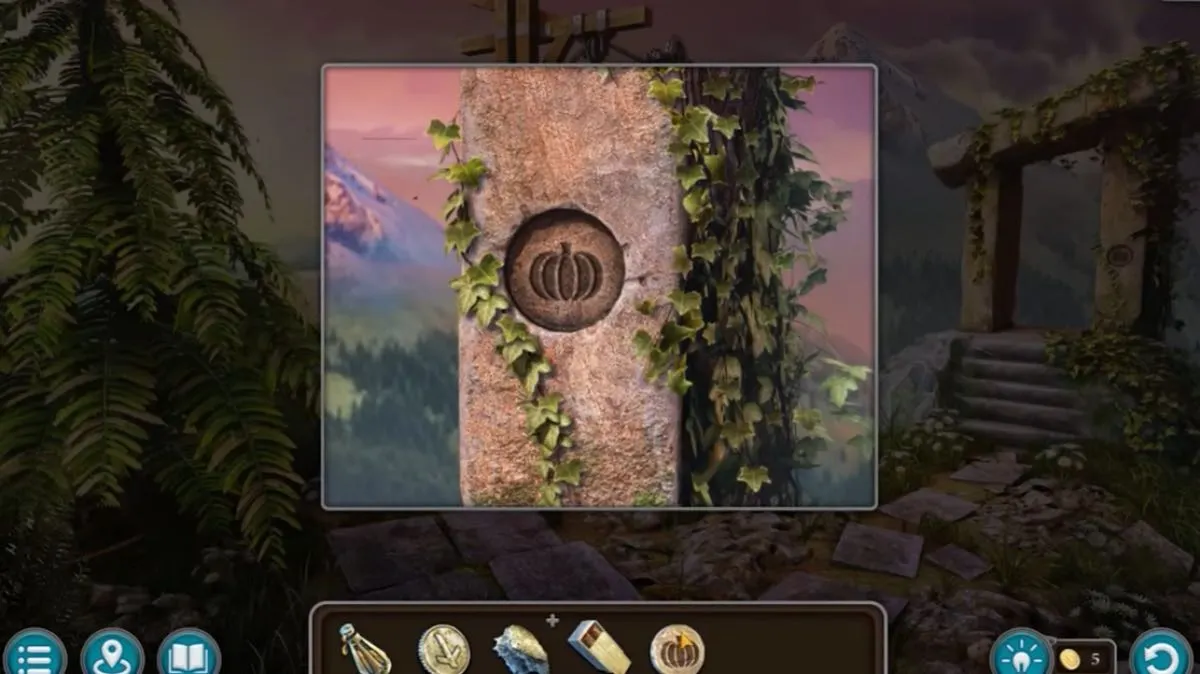
- Take the rune to the portal.
- Go through.
- Go to the mine lift at the back.
- Lower the lift.
- Use the Halfling perfume on the bugs.
- Get the hanging old fabric.
- Wipe the hammer.
- Solve the puzzle by putting the icons in matching space.
- Go to the fair.
- Get the basket from the mirror on the left.
- Go to the stall on the right.
- Use the iron kjoll on the pig.
- Take the sewing kit.
- Combine the furs and the sewing kit to get clothes.
- Go ahead to the pond.
- Use the basket to get grapes.
- Combine grapes and cloth.
- Clean the hammer.
- Take the hammer.
- Go to the portal.
- Use the hammer on the gate.
- Find the gears.
- Open the chest with combination 5, 7, 6 (this may be different in your game – check the manuscript nearby.)
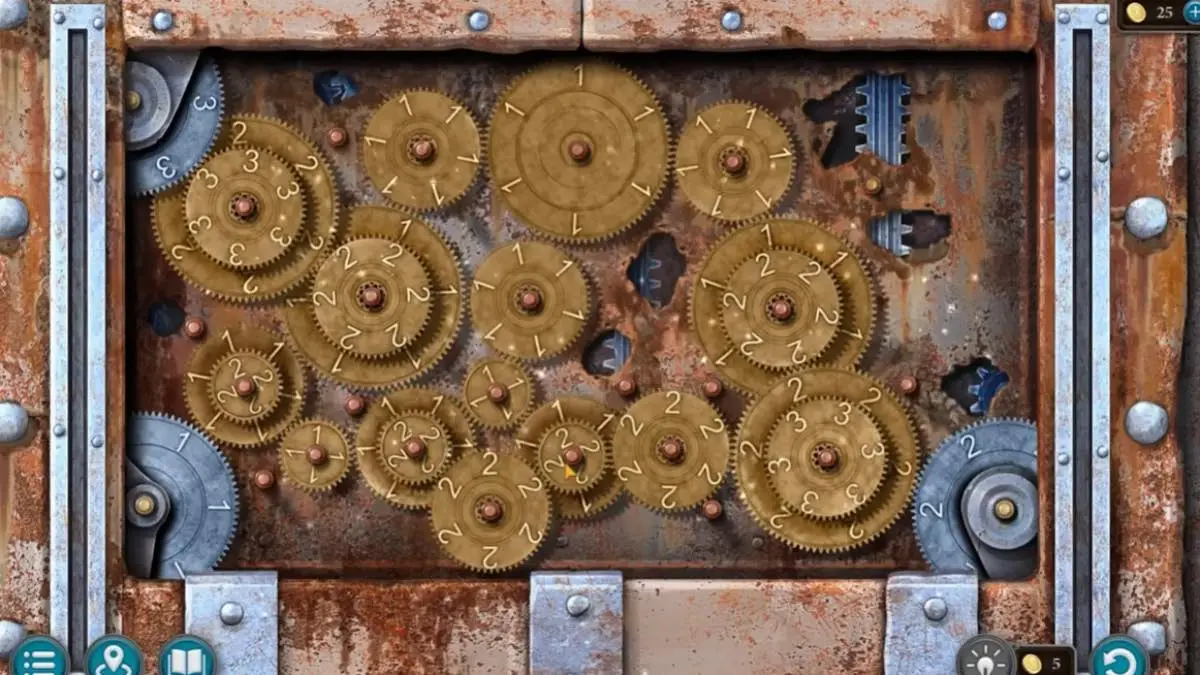
- Place the gears.
- Solve the puzzle by matching the numbers on the gears.
- Use the clothing.
- Get the ice grippers.
- Get the frozen rope.
- Get the stilt canes.
- Get the arrow from the dinosaur.
- Use the hammer on the ice chimney.
- Place the dynamite on the ice chimney.
- Use the arrows to make a spark.
- Pick up the stilt canes.
- Pick up the ice grippers.
- Take the manuscript.
- Go back to the ritual room.
- Melt the frozen rope.
- Go to the snowy mountain.
- Place the stilt canes, grippers and rope on the snowy pathway.
- Look at the ice spikes.
- Use the dynamite and arrows.
- Get the ice shovel from the corpse.
- Unfold the ice shovel.
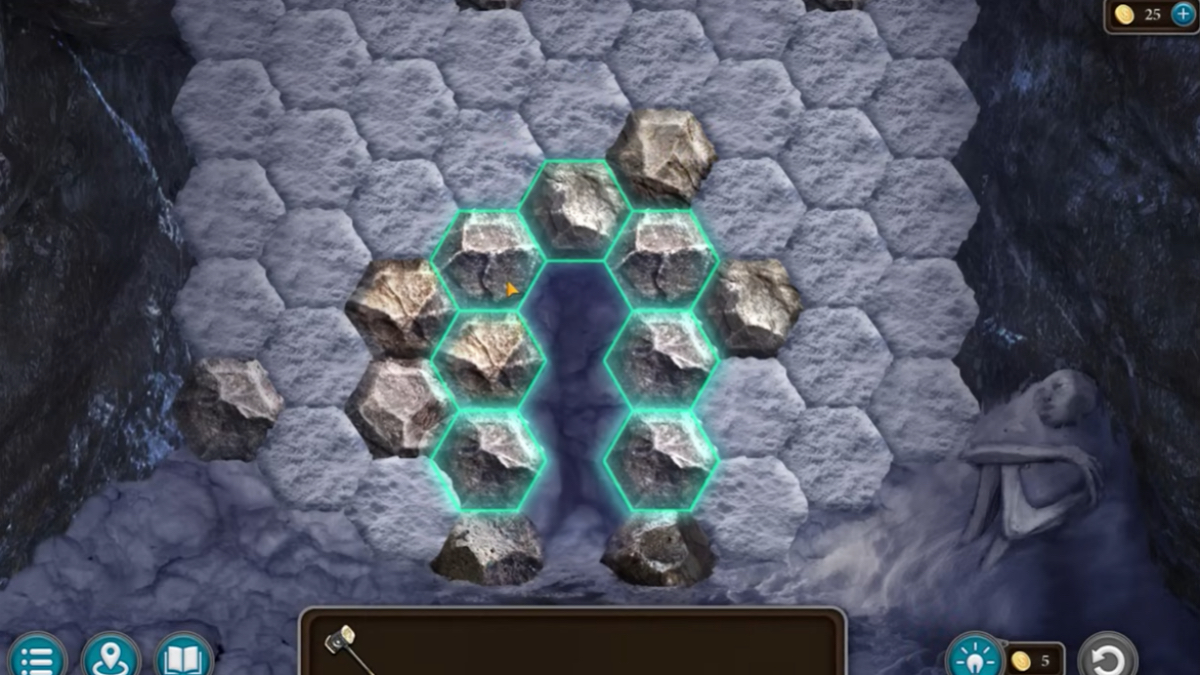
- Solve the puzzle by shovelling snow until the stones line the tunnel.
- Use the hammer on the stone.
- Take the key.
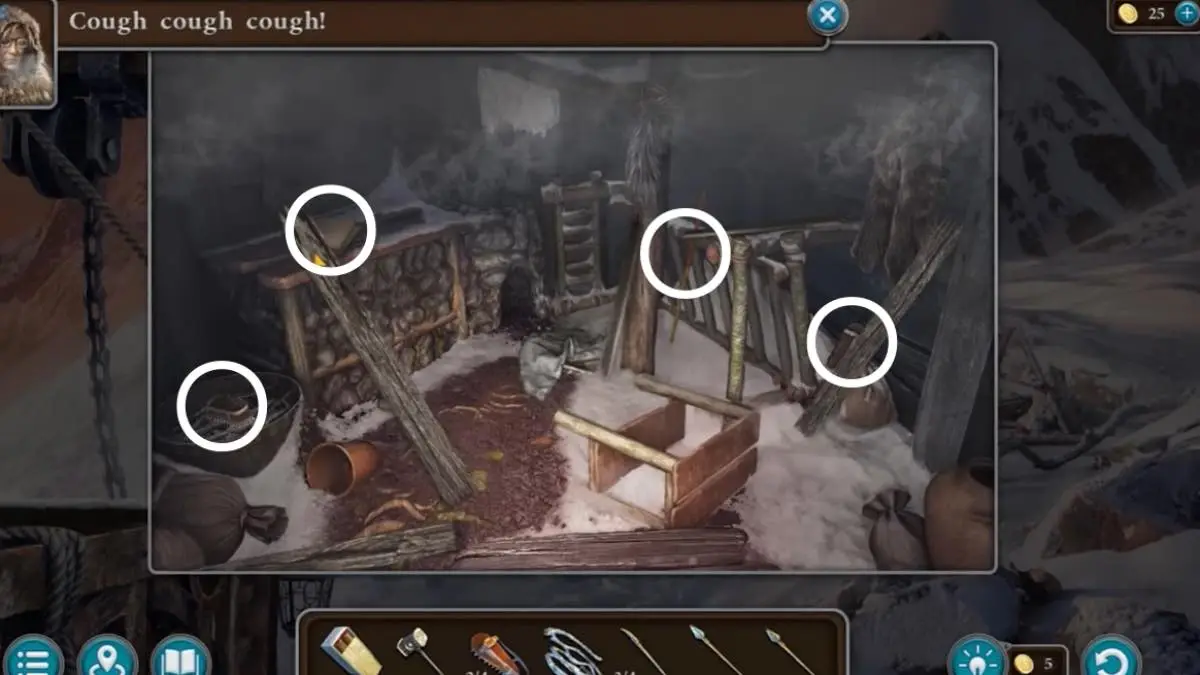
- Unlock the shack.
Suicide Ritual

- Talk to the guy.
- Use the hammer on the floor.
- Take the wooden block.
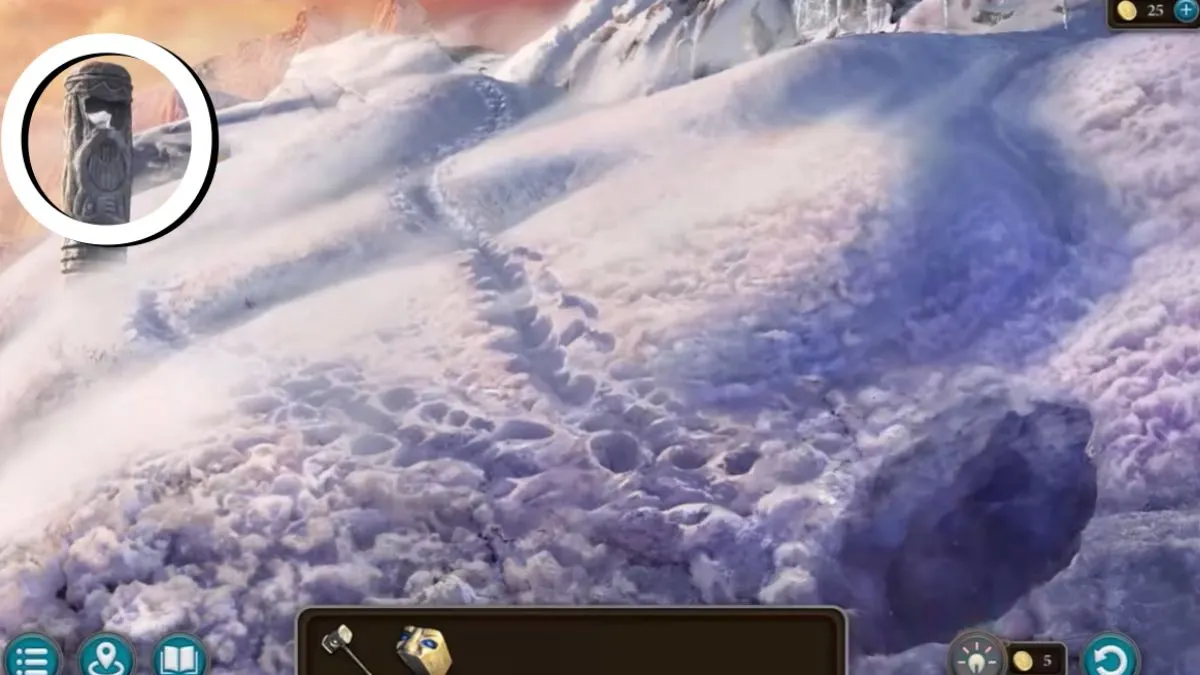
- Go back twice to the snowy hillside with the totem.
- Place the wooden block on the totem.
- Open the mouth.
- Take the cup.
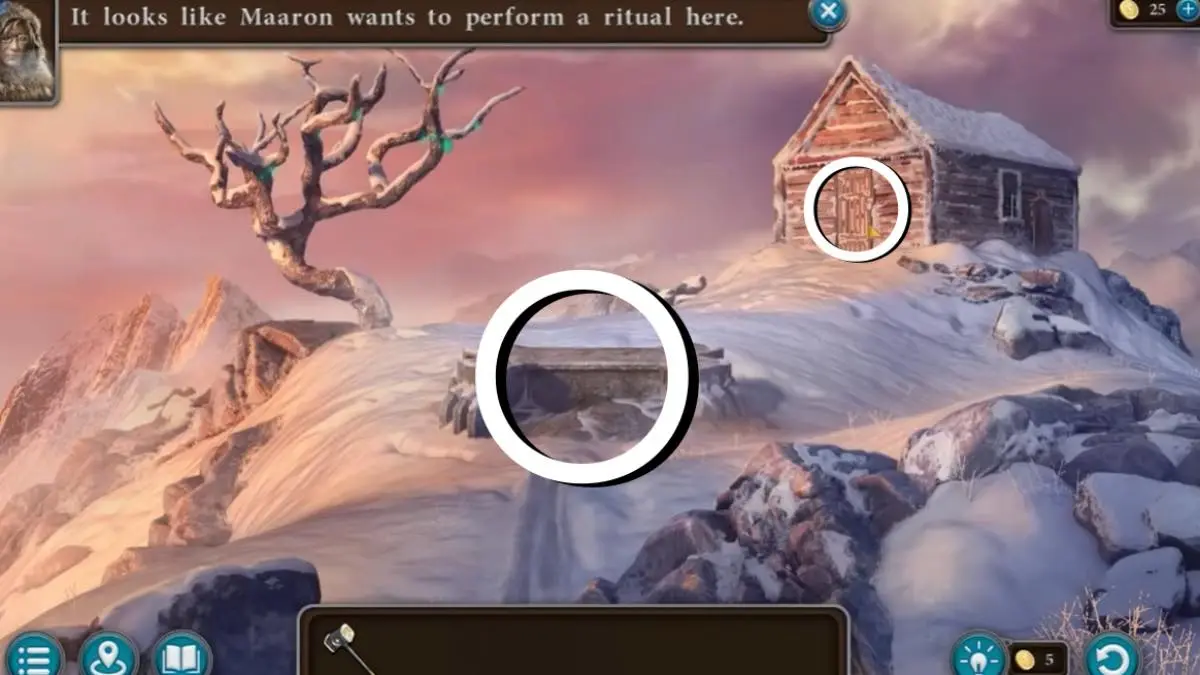
- Go to the ritual room.
- Place the cup in the slot.
- Go to the beaver’s bridge.
- Get the syringes.
- Go to the cottage.
- Use the syringe on the dog to get wolf blood.
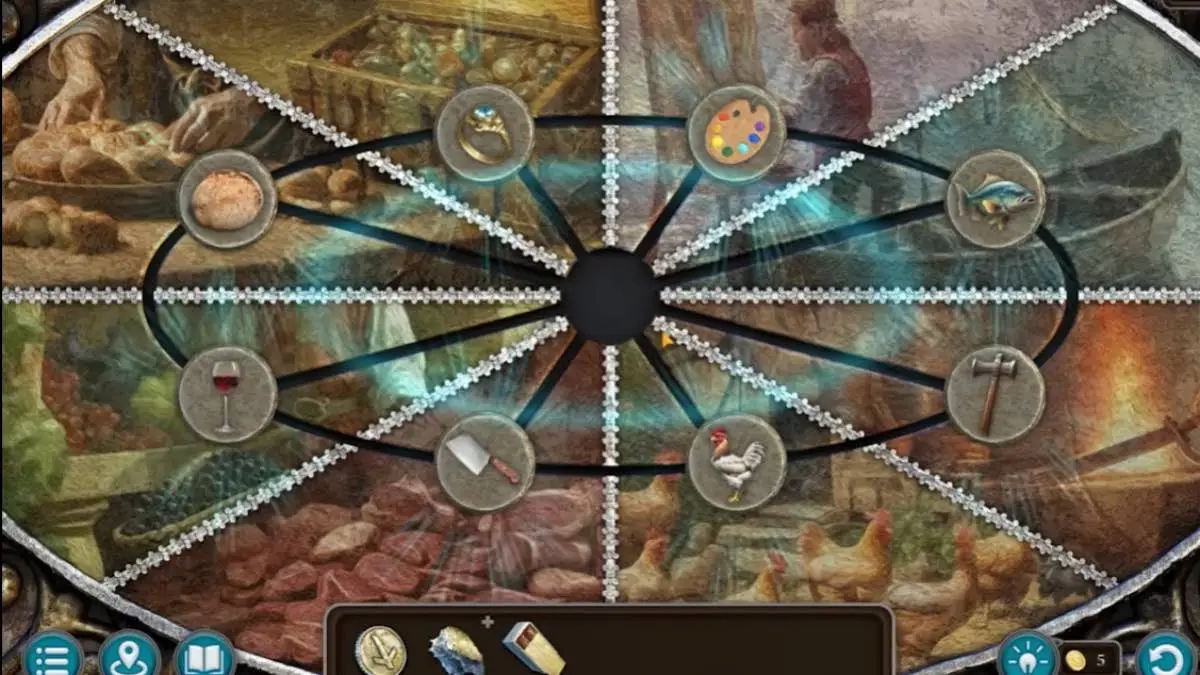
- Solve the puzzle by moving characters. They must end up cornering the chicken.
- Make sure you keep the chicken moving to the left.
- All characters must end up in the corner with the chicken.
- Draw a line with the stick.
- Use the syringe on the chicken.
- Go inside.
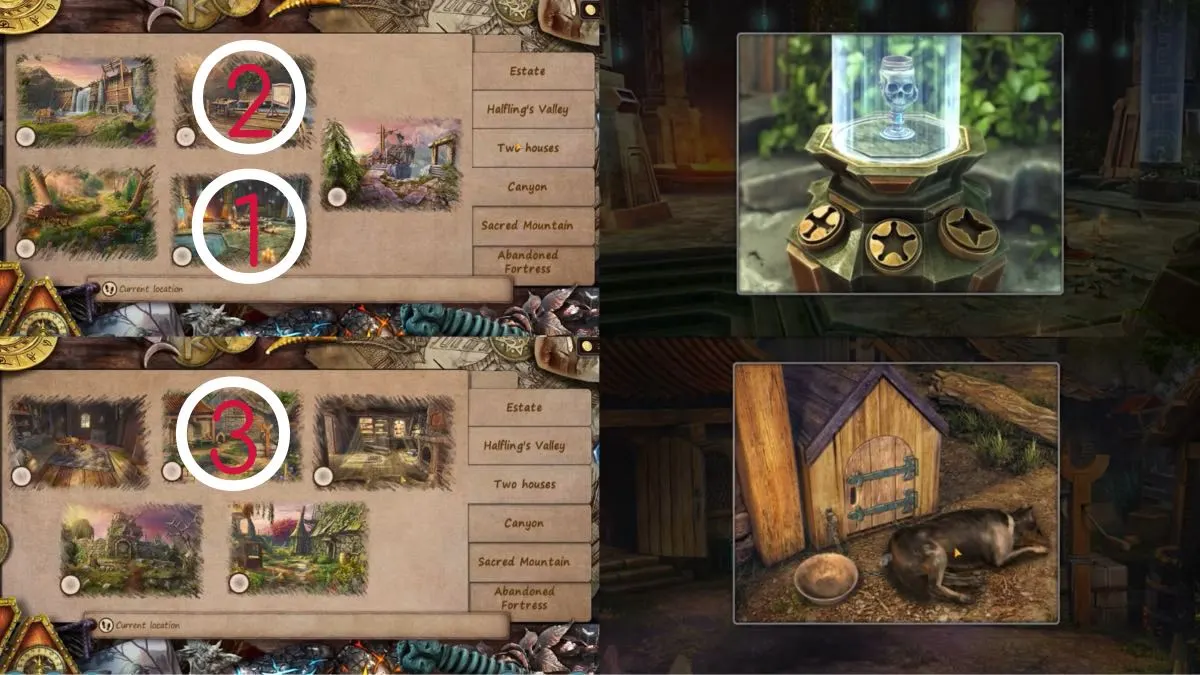
- Get the chalice.
- Go to the ritual room again.
- Place the chalice as before.

- Go to the greenhouse.
- Use the bow and arrow to get the chalice.
- Visit the donkey.
- Use the syringe to get blood.
- Visit the pig at the fruit patch past the fair.
- Get pig blood.
- Go to the ritual room.
- Place the final chalice.
- Take the four chalices.
- Go to the stone on the snowy hill.
- Place the chalices.
- Add blood.
- Take the skull.
- Go to the hut at the top.
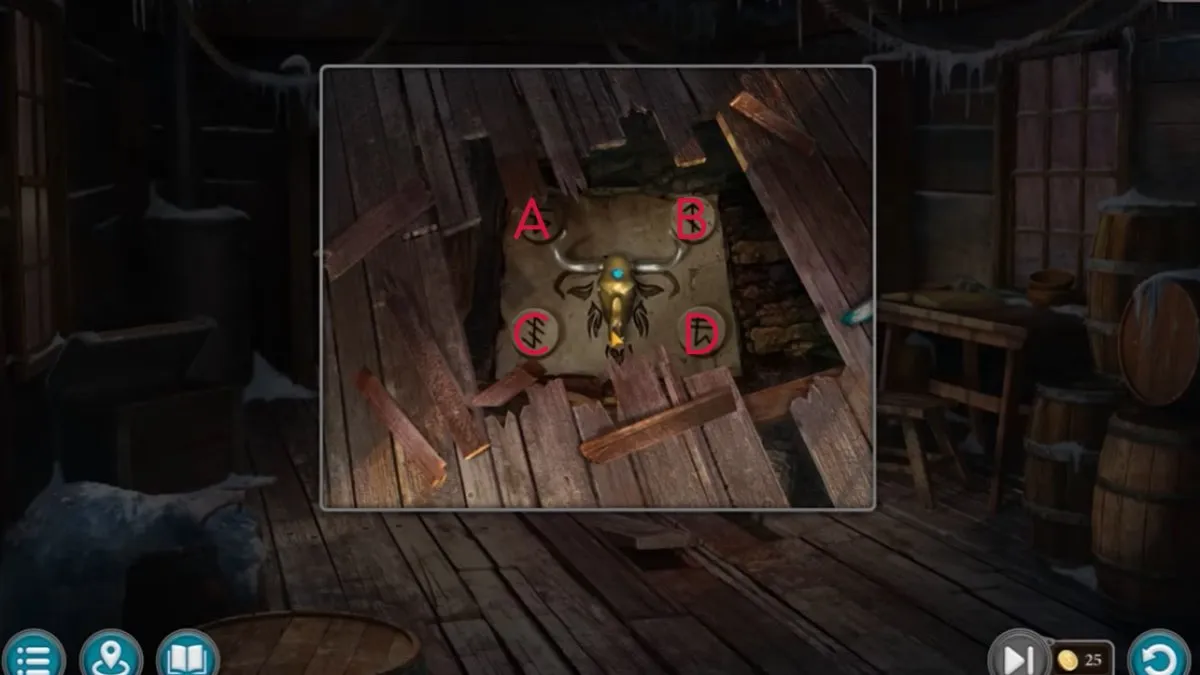
- Place the skull on the puzzle to start.
- Click the symbols: A, B, A, C, D, B, D, C.
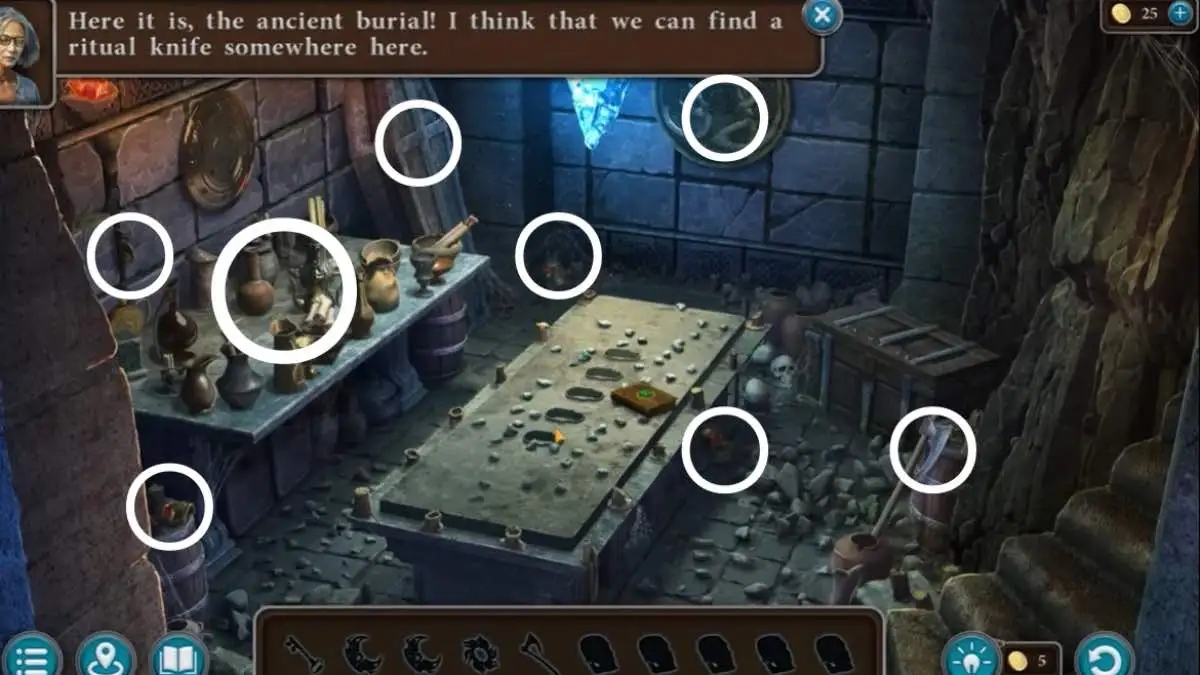
- Solve the hidden object puzzle.
- Move pots to find a key.
- Solve the puzzle box by moving pieces into an H.
- Use the key on the wooden chest.
- Use the hatchet on the sun stuck in the wall.
- Open the coffin to get the second moon.
- Place the gold skulls in the center stone.
- Activate the skulls in order: 5, 4, 2, 1, 3.
- Take the dagger.
- Go outside.
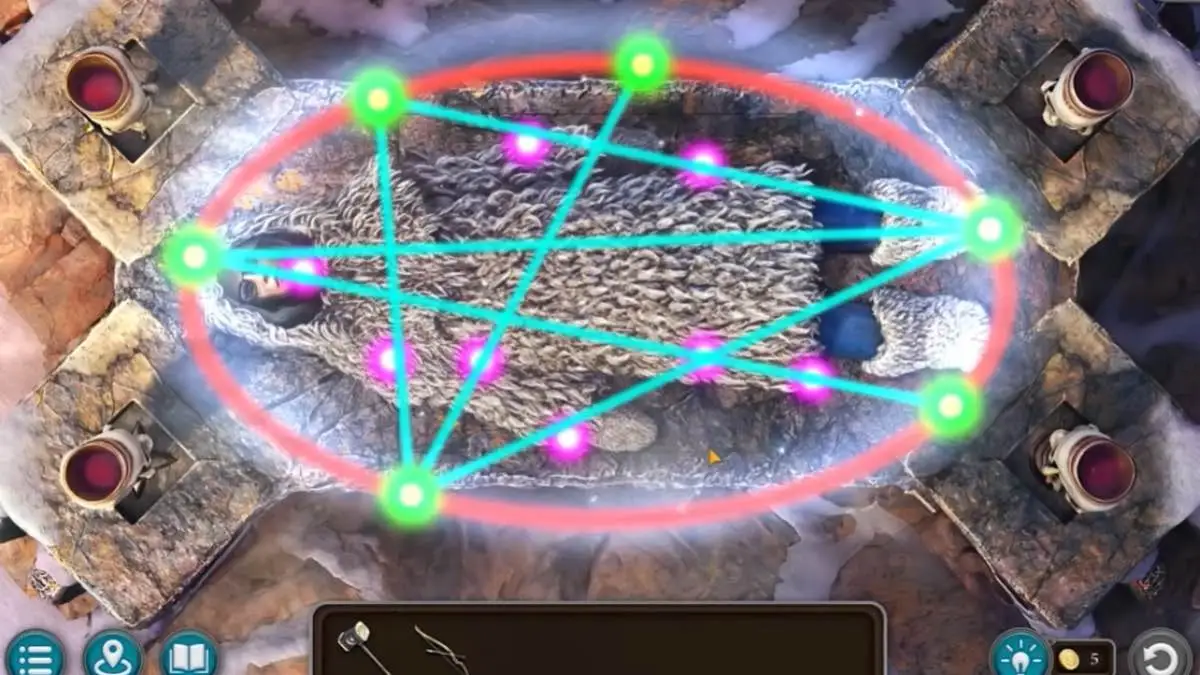
- Use the dagger on the ritual stone.
- Move the green lights so they pass over the purple lights.
- Take the ritual bat.
- Use it on the gong.
- Solve the puzzle.
- Take the amulet.
Amulet with Potion
- Take the key.
- Look at the note.
- Click the desk to start the puzzle.
- Move the blue gem first.
- Move the red gem.
- Take the manuscript and ink.
- Use the inkwell.
- Dip the quill.
- Use the key on the door.
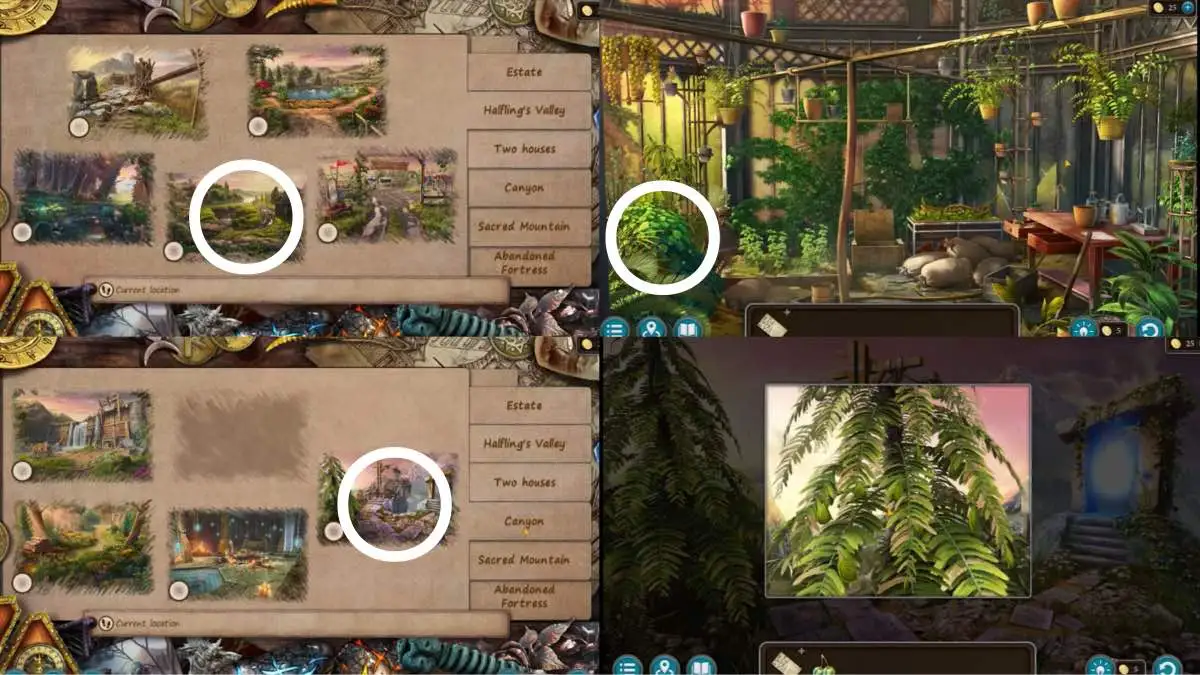
- Go to the greenhouse.
- Get snake-eye berry.
- Go to the canyon.
- Get the tropical spruce leaves.

- Go to the ritual room.
- Take the urn.
- Go to the Two Houses wall.
- Get the mushroom.
- Go to the hut on the snowy hill.
- Get the bow and arrow.
- Go outside.
- Use the bow to get the crystal.
- Open the recipe.
- Put all ingredients inside.
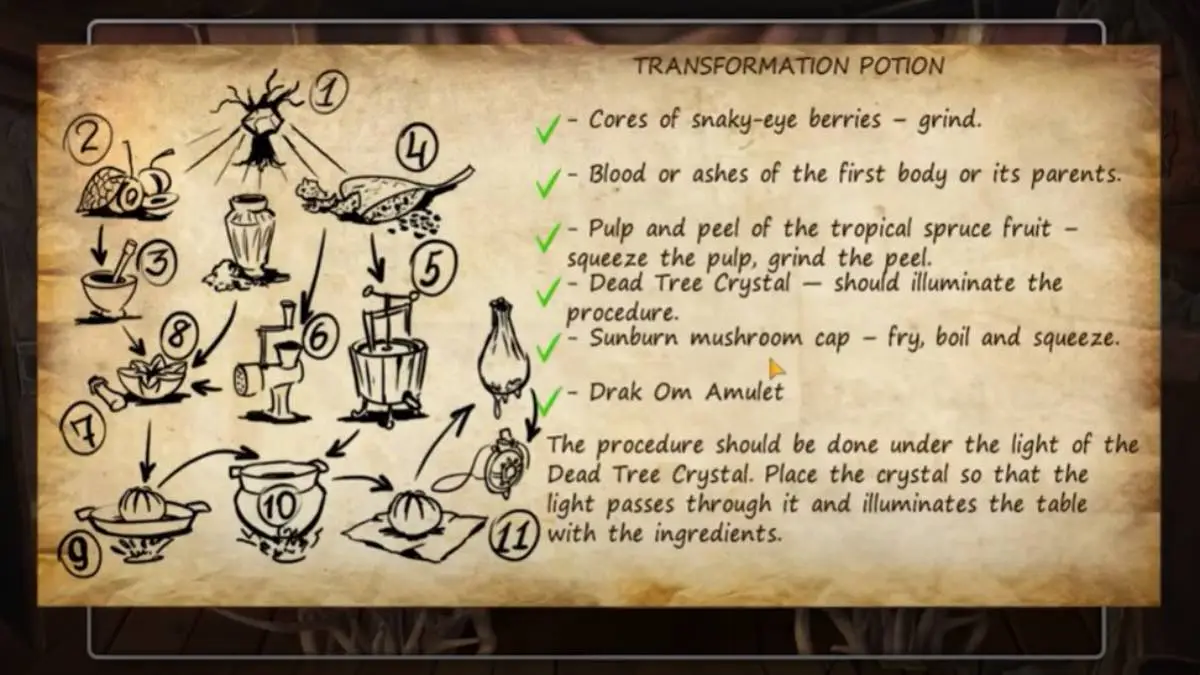
- Go to the recipe table.
- Put the potion on the table.
- Follow the recipe to create the amulet.
- Restore the picture.
Fireball
- Follow the fireball.
- Go forward until you reach a room with a cell.
Preparation
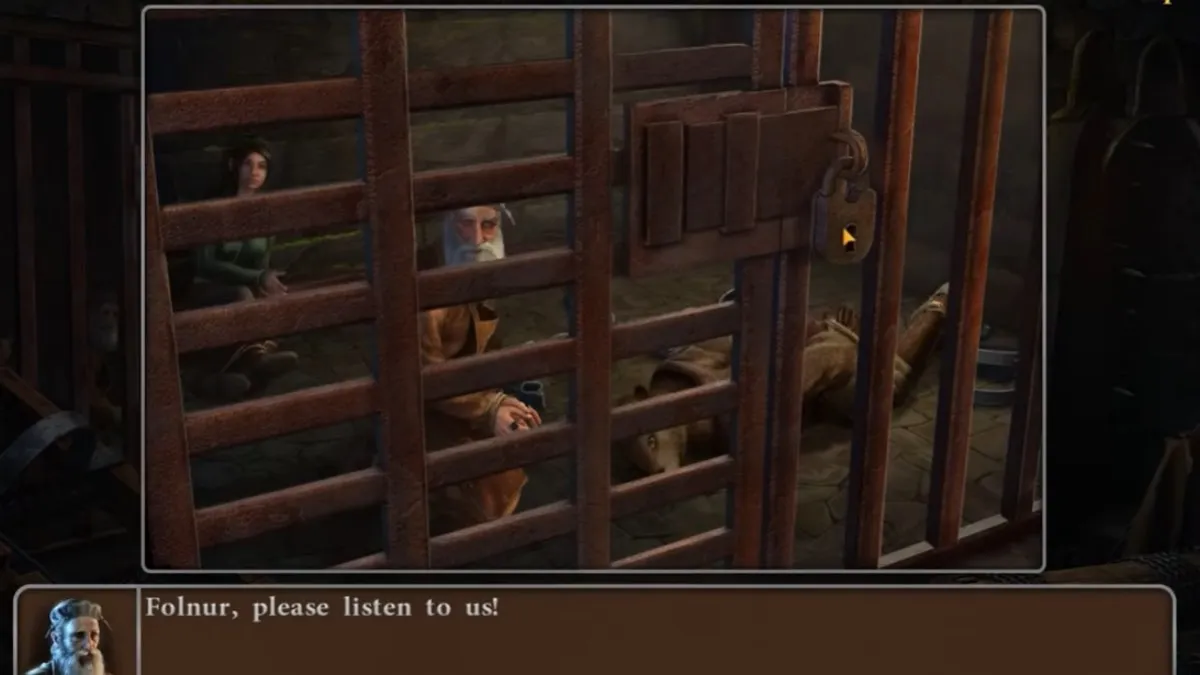
- Talk to the people.
- Get the key.
- Use the key.
- Get the winch lever by the stairs.
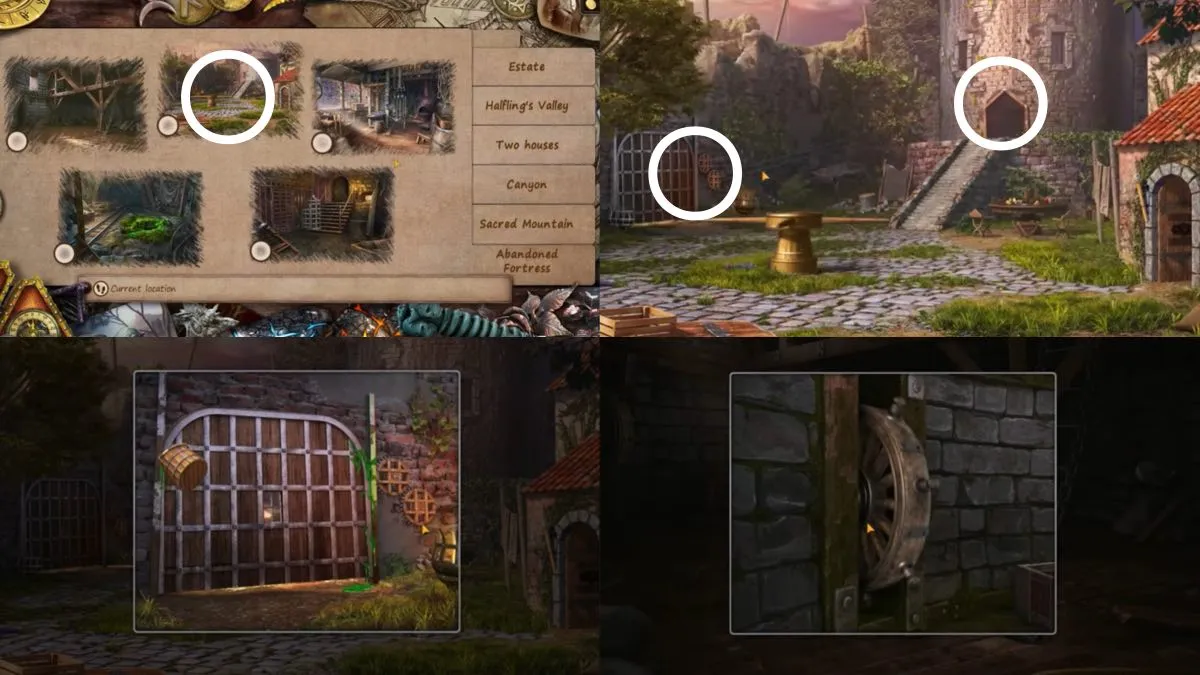
- Go outside.
- Get the winch lever by the gate to the left.
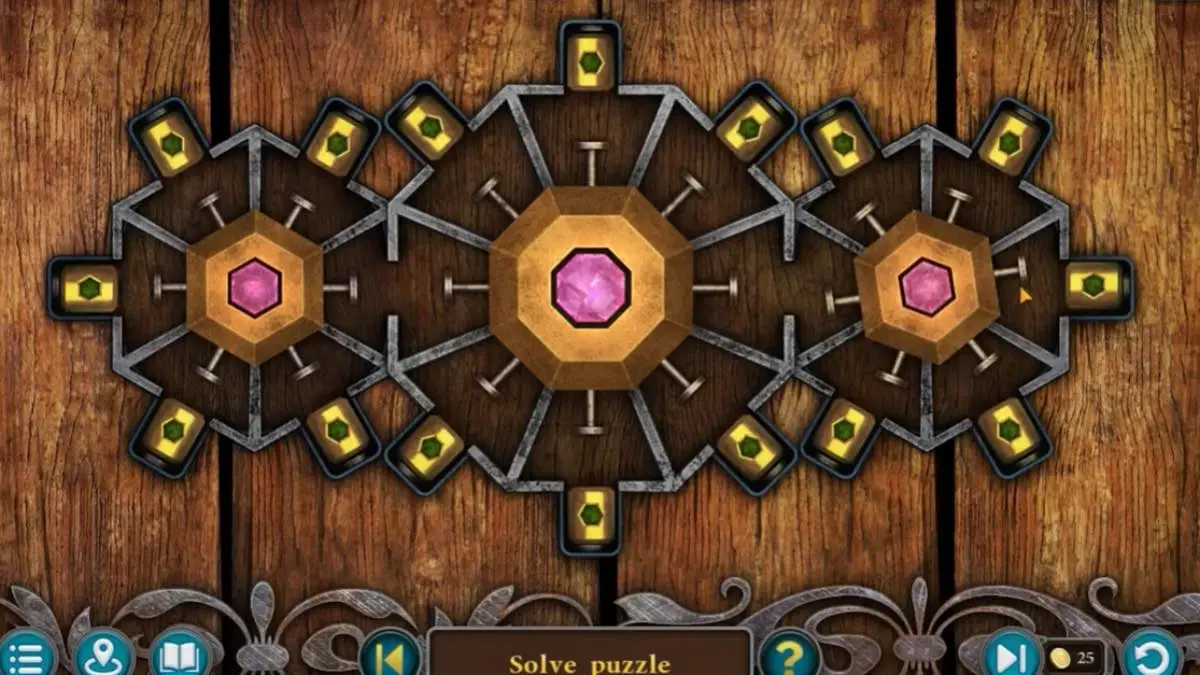
- Take the mechanism detail from the table.
- Solve the puzzle by rotating the mechanism and moving the cylinders to the outside.
- Go inside.
- Take the winch lever.
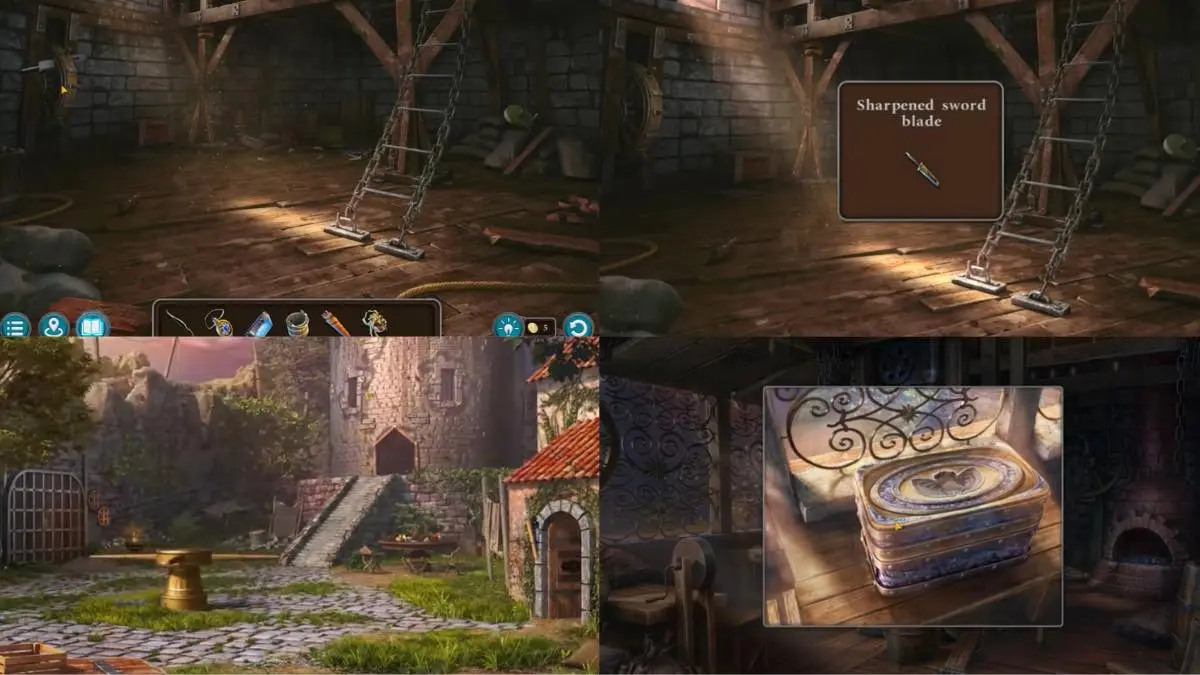
- Get the sword blade blank.
- Place the blank on the spinning wheel.
- Go to the prisoners.
- Use the sword to free them.
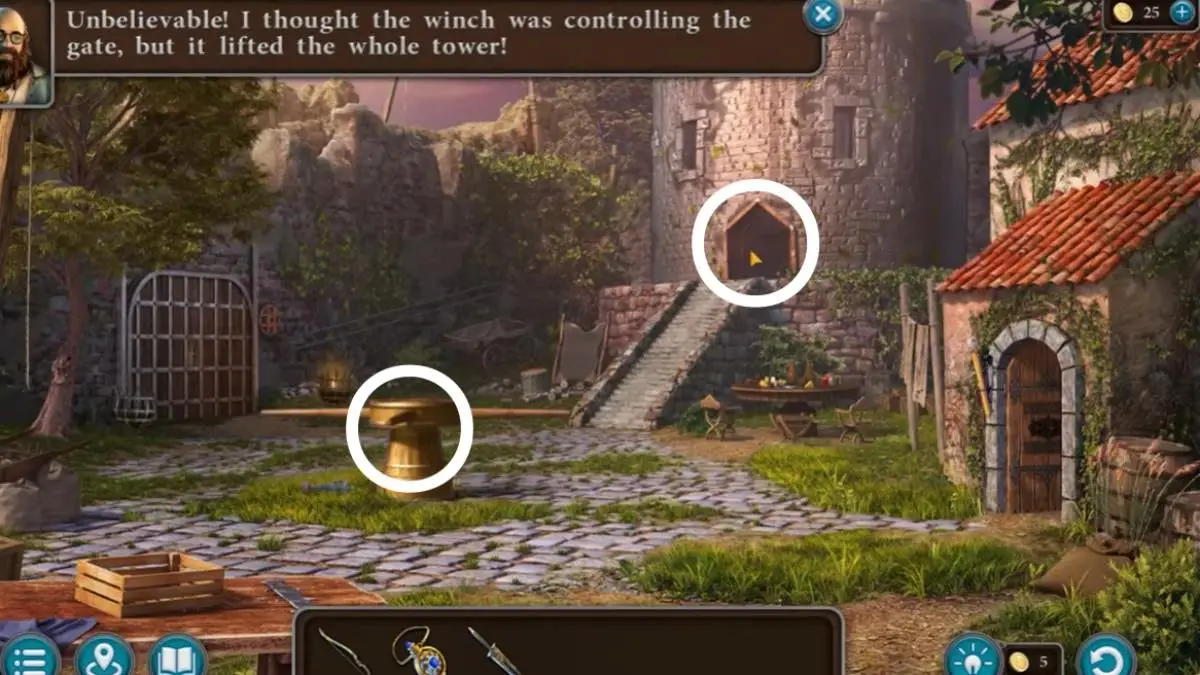
- Go outside.
- Use the winch levers on the center block.
- Go inside.

- Try the wheel on the left.
- Go to the cell room.
- Click the cage and take the S hook.
- Go into the main room.
- Attache the S hook.
- Try the wheel winch again.
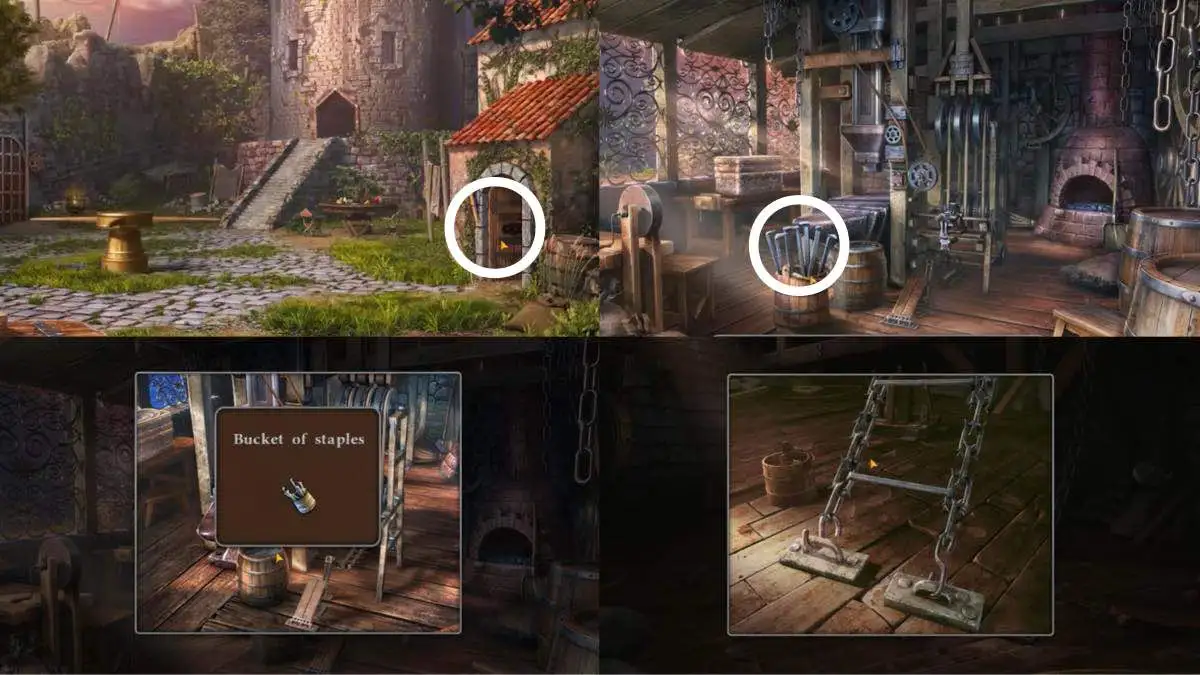
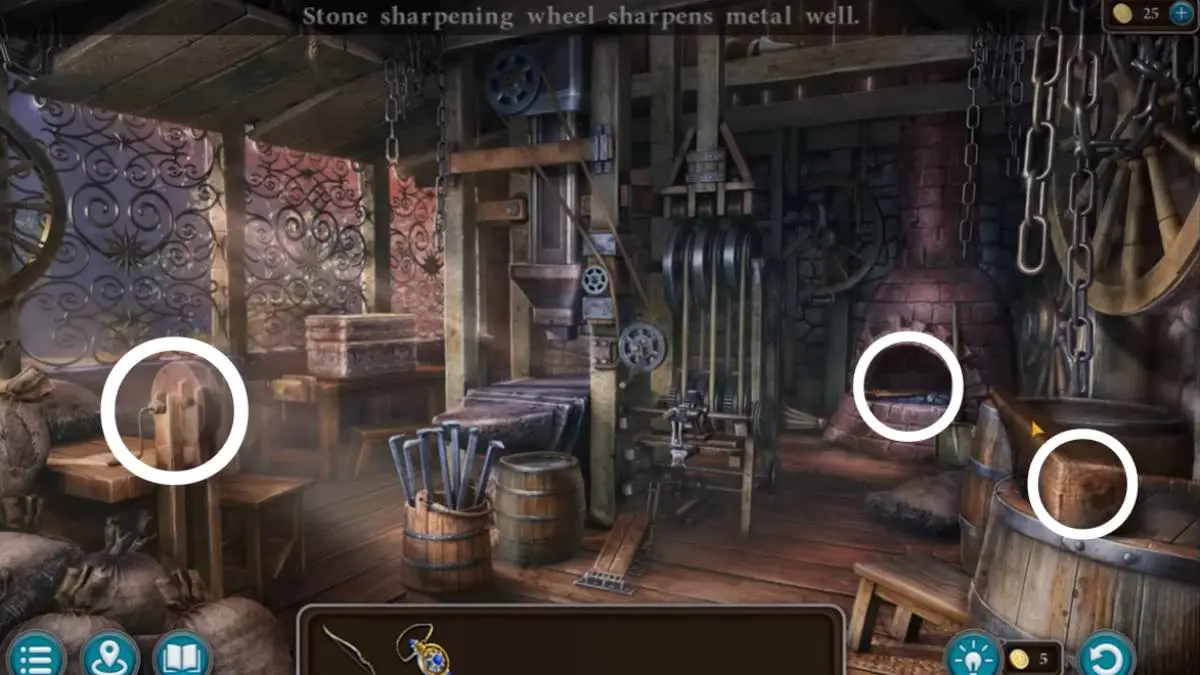
- Go to the tool rom.
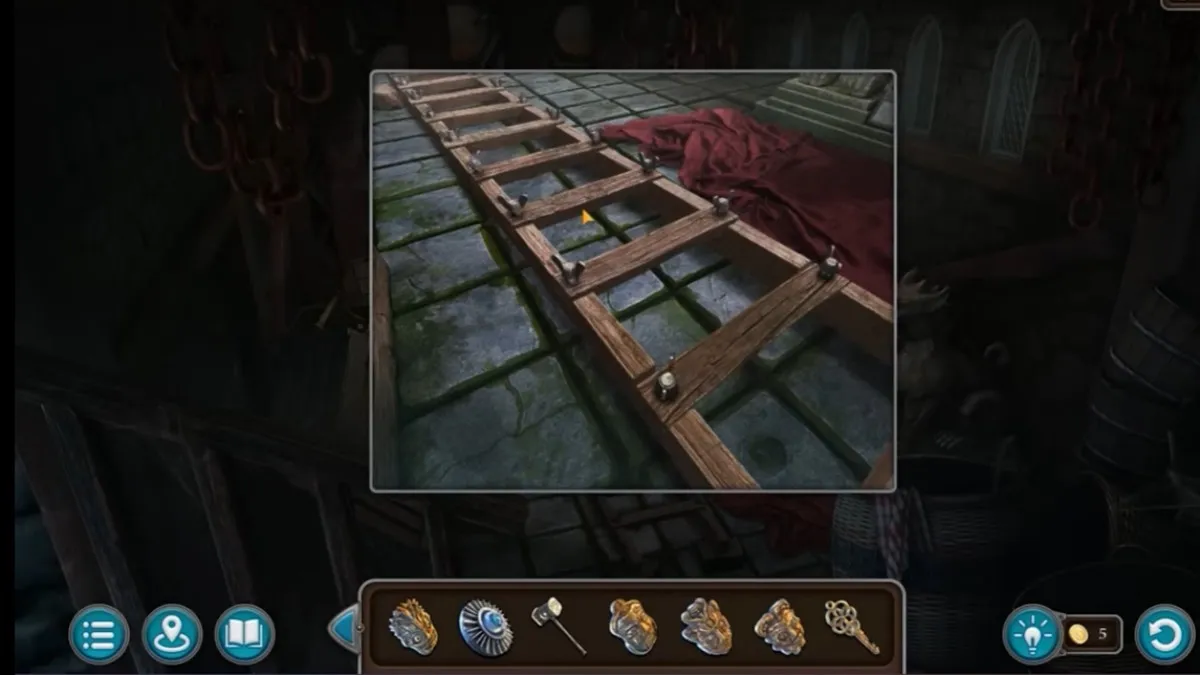
- Get the bucket of staples.
- Go back and place staples on the chains to make a ladder.
- Go up.
- Get the manuscript and cube.
- Go back to the cell room.
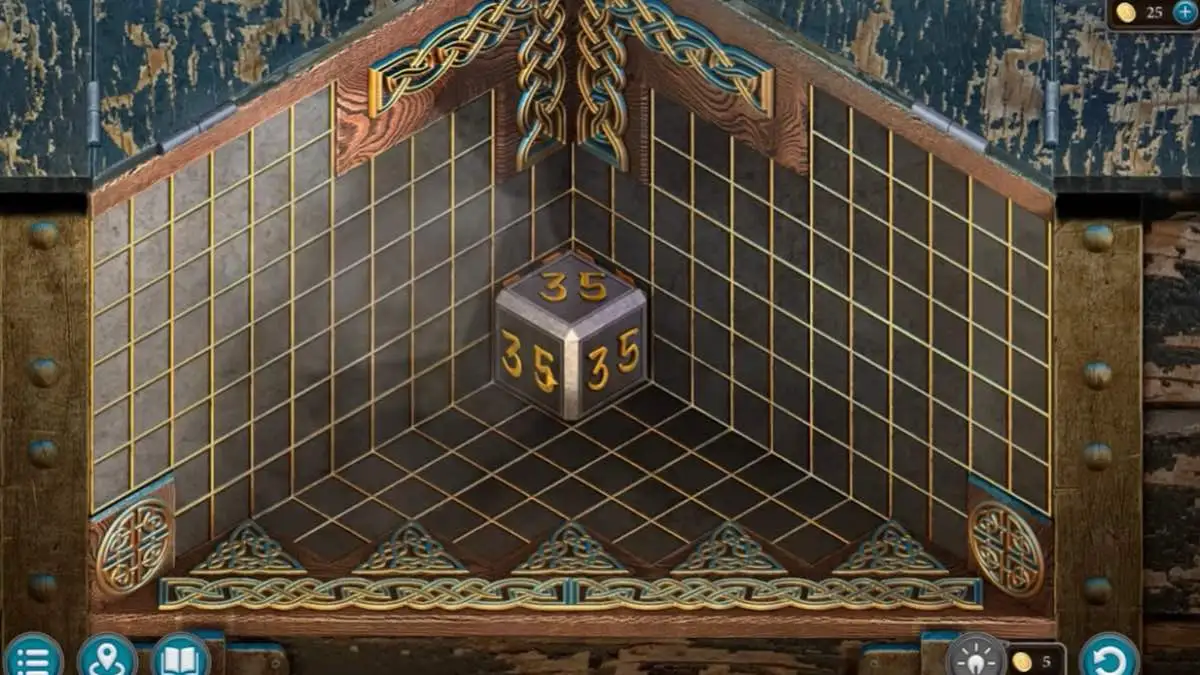
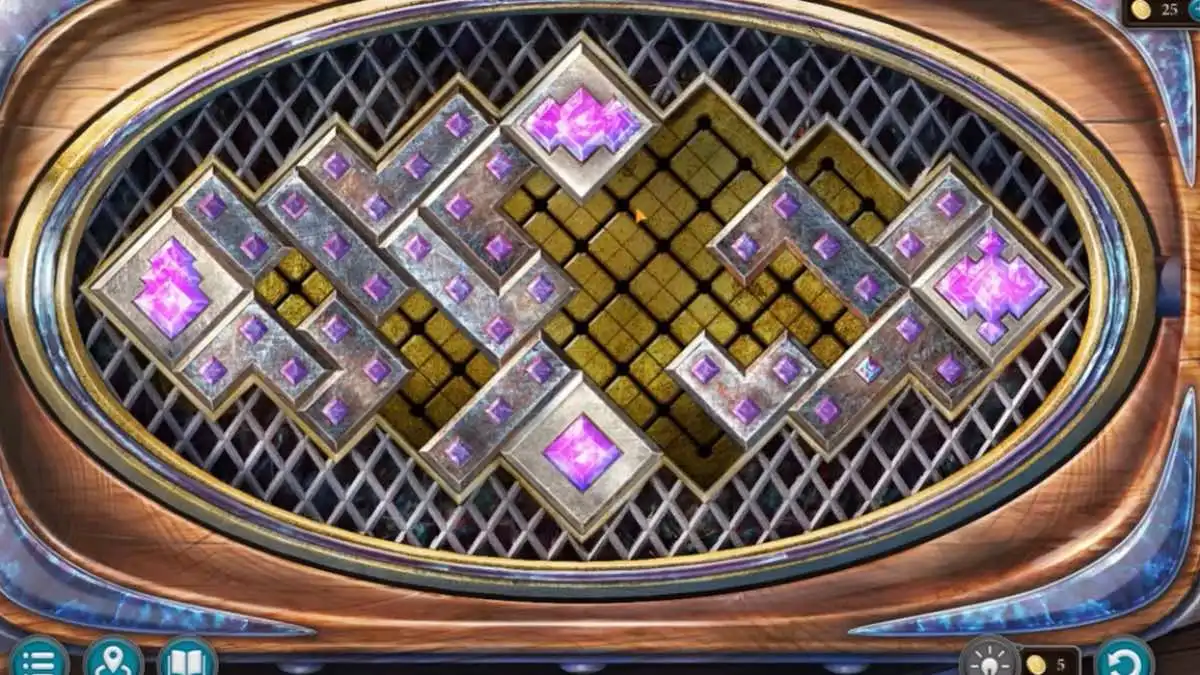
- Open the chest to start the puzzle.
- Place the cube.
- Use the cube to pick up 9, 11, 10, 5.
- Move the cube to the middle.
- Take the magic attachment.
- Take the adjustable spanner.

- Go to the main room and up the ladder.
- Move the loose stair.
- Use the spanner on the bolts.
- Use the spanner on the fallen chandelier.
- Take the wooden gear.
- Go outside.
- Place the wooden gear by the gate.
- Go inside.
- Use the winch.
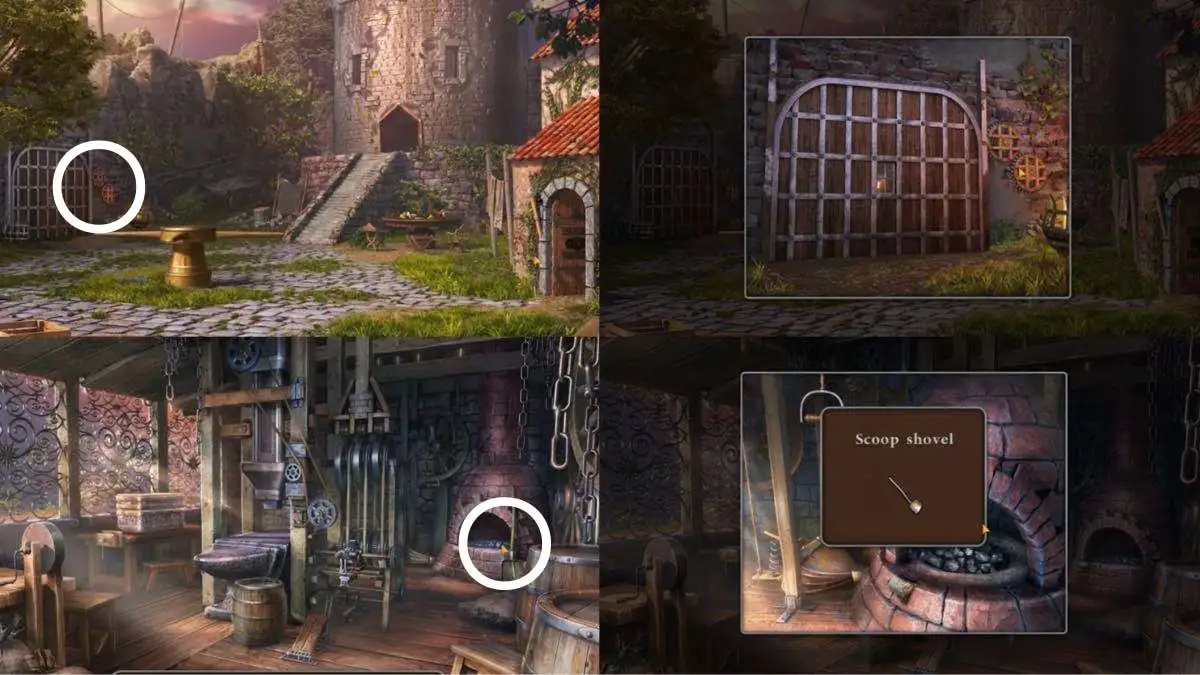
- Go to the tool room.
- Get the shovel.

- Go inside.
- Get the bucket.
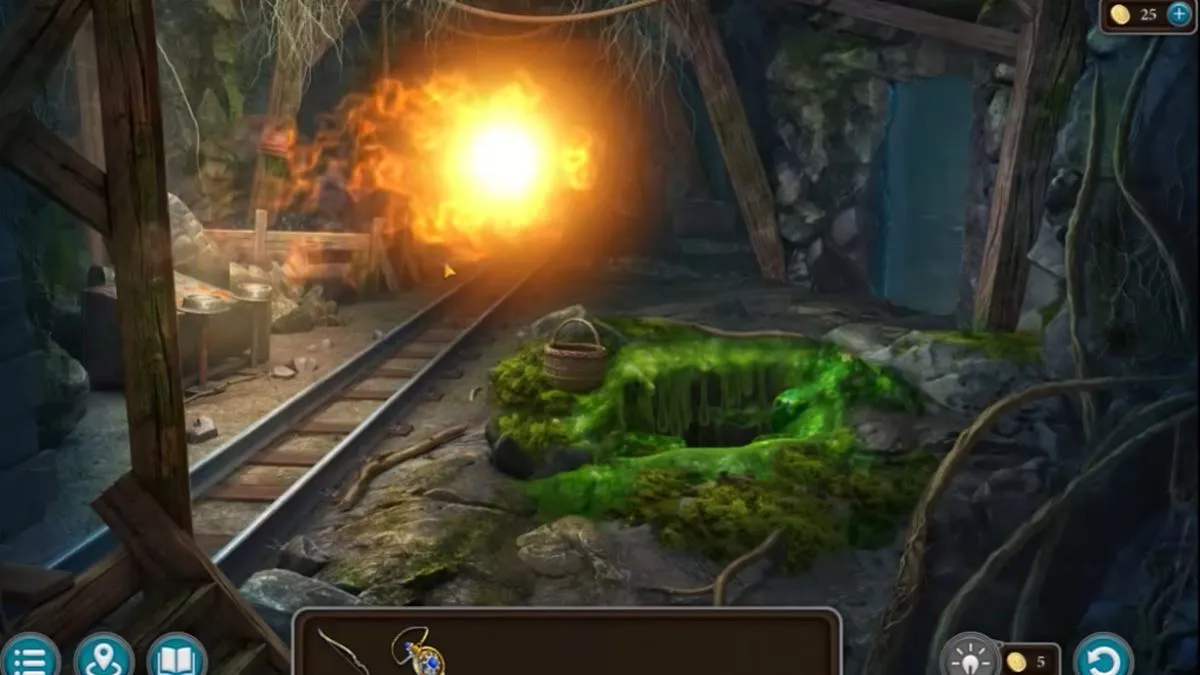
- Go to the slime in the mine.
- Use the bucket and shovel.
- Go back to the fortress.
- Use the slime on the large door.
- Go inside.
- Use the winch.
- Use the blade on the winch.
- Go through.
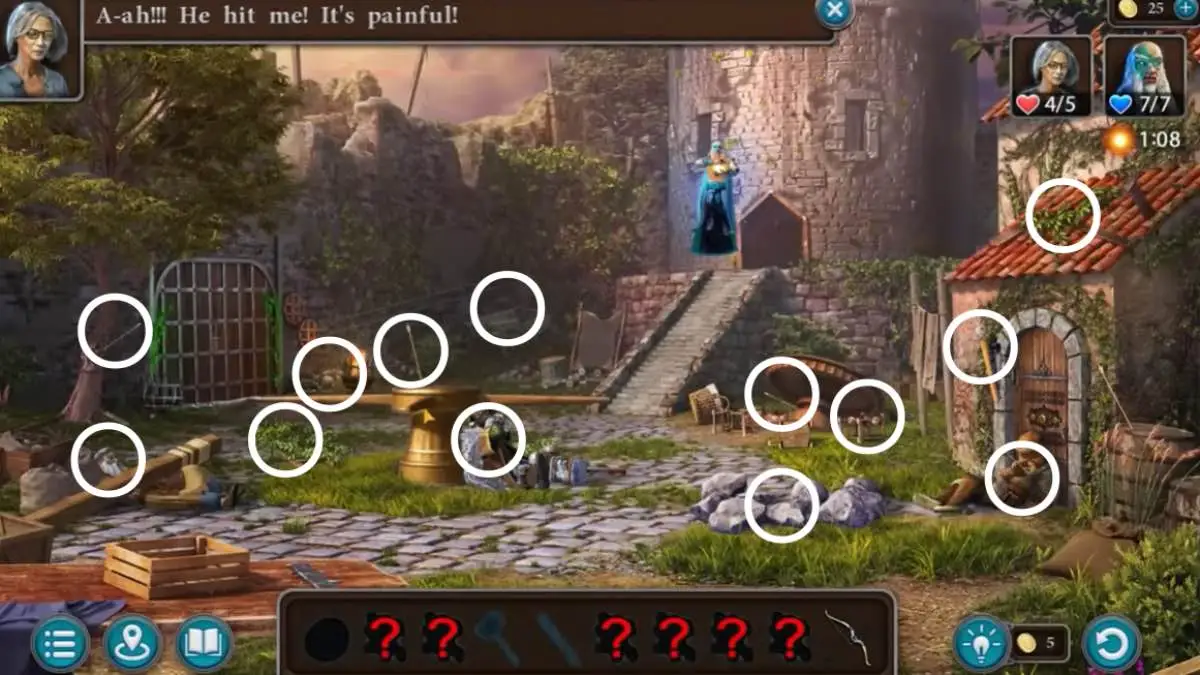
- Collect the arrows.
- Multiple arrows can be in the same area.
- Move shields to look behind them.
- Clean the arrow with the rag.
- Use a brick to break the skull and release the arrow.
- Use the winch to open the gate to the back.
- Lift the cart to find an arrow.
- Talk.
- Get the scarab.
Magical Weapons
- Remove the blade.
- Go to the tool room.
- Place the scarab.
- Solve the puzzle.
- Take the recipe, sword guard, ball and apple.
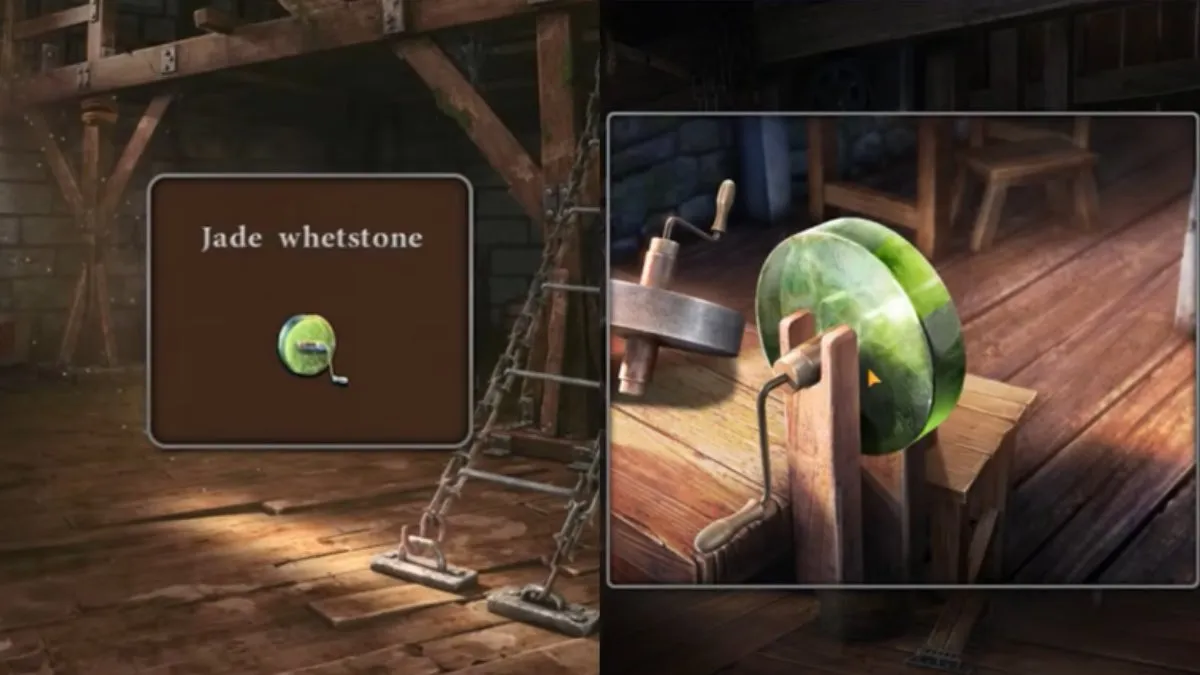
- Get the jade whetstone.
- Place the whetstone.
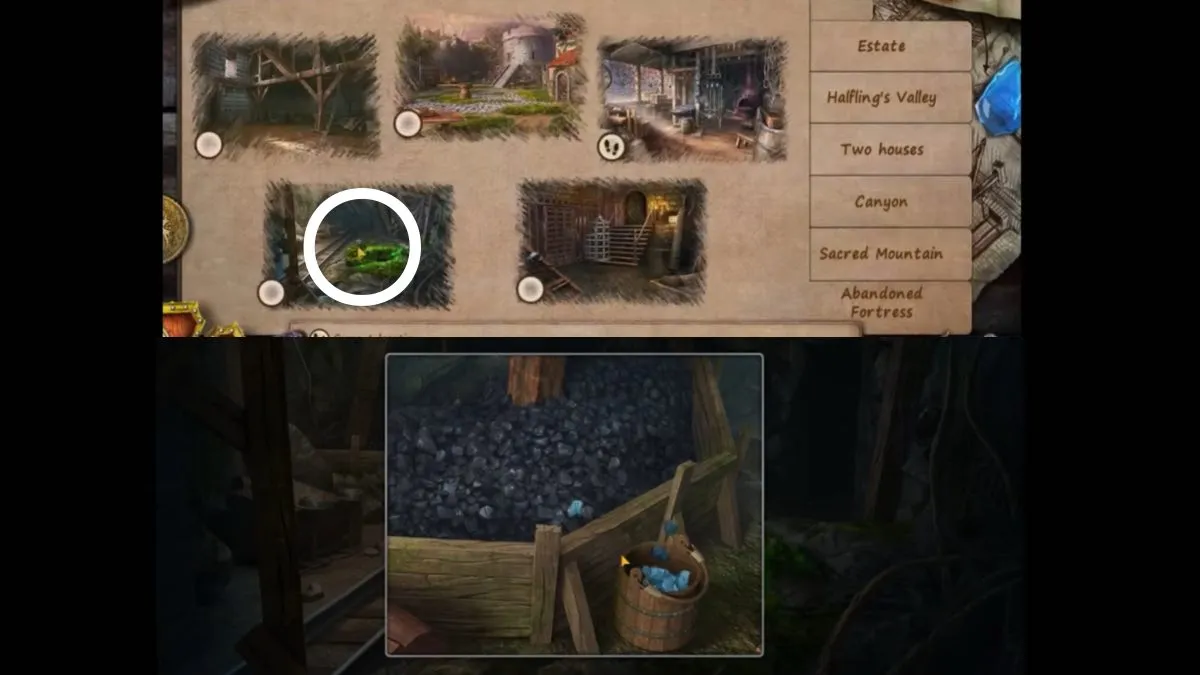
- Go to the mine.
- Place the bucket.
- Get coal.
- Place the coal.
- Complete the pattern.
- Place the sword.
- Remove with the rag.
- Place the magic attachment.
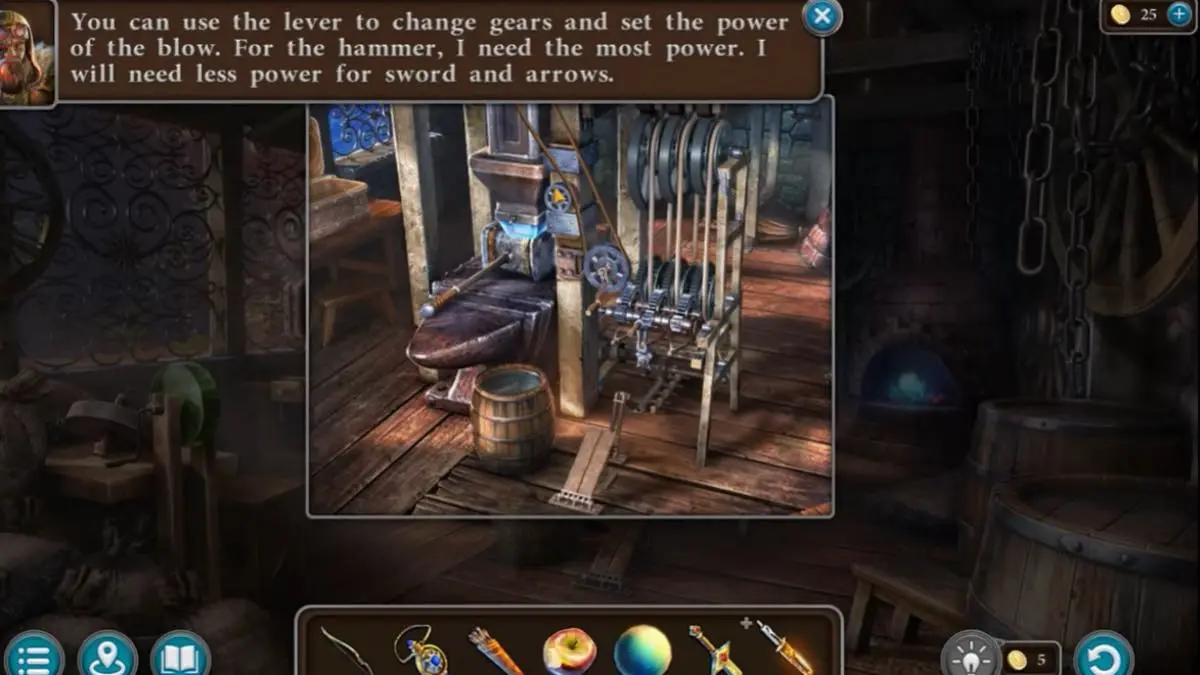
- Follow the instructions for sword and arrows.
- Dip the blade in the barrel.
- Sharpen it on jade whetstone.
- Add the sword guard.
Confrontation
- Use the crystal ball in the courtyard.
- Find all the lost weapons while fighting Buldan.
- Go to the roof.
Dot Esports is supported by our audience. When you purchase through links on our site, we may earn a small affiliate commission. Learn more about our Affiliate Policy


Published: Jun 18, 2025 06:30 am