
Destiny 2‘s Duality dungeon launched alongside Season of the Haunted, granting players another look inside the former Cabal Emperor’s mind. The repressed memories scattered around the dungeon and the dialogue Calus throws at us give us a new perspective on his background and his descent into the arms of the Witness, and to finish the dungeon, we are faced with his greatest shame: the Nightmare of Caiatl, Princess-Imperial of the Cabal.
The fight against Caiatl also uses the bell mechanic that lets players alternate between the normal realm and the nightmare realm, but subverts that logic when it comes to triggering damage phases. Fighting the Nightmare of Caiatl is the most challenging encounter in the dungeon, filled with mechanics and bloodthirsty enemies. It’s not impossible, though, and the rewards you get from it are more than worth the trouble. Here’s what you need to know to defeat the Nightmare of Caiatl in the Duality dungeon.
How to defeat the Nightmare of Caiatl in Destiny 2‘s Duality dungeon
Before the fight starts, take notice of the layout of the room. You’ll find one small bell straight ahead, one small bell on each side of the room, and a colossal Bell of Conquest across from where you land. For the Cabal, ringing an opponent’s Bell of Conquest equates to challenging them in combat, and that’s what you need to do to take down the Nightmare of Caiatl.
Of course, you can’t just walk into the room and ring the Bell of Conquest. Instead, you’ll need to follow the steps you’ve done in the rest of the dungeon. Here’s a quick breakdown of the steps.
- Find and kill the Bellkeepers to open the bell (normal realm)
- Find the balconies where the Standard Bearers will spawn (normal realm)
- Get in position (one guardian on each balcony) and shoot the bell to move into the nightmare realm
- Kill the Standard Bearers and grab their buff (nightmare realm)
- Kill the Bellkeepers to open the bell (nightmare realm)
- Group up by the bell that’s open and go back to the normal realm with the buffs in hand
Though this may sound like a lengthy process, it’s basically the same as what takes place in the Vault encounter, though with a different (and much simpler) layout. Here’s a map of the final boss room, made by Reddit user u/MrsAsphyxia, outlining the locations of everything you need to keep track of for the final encounter.
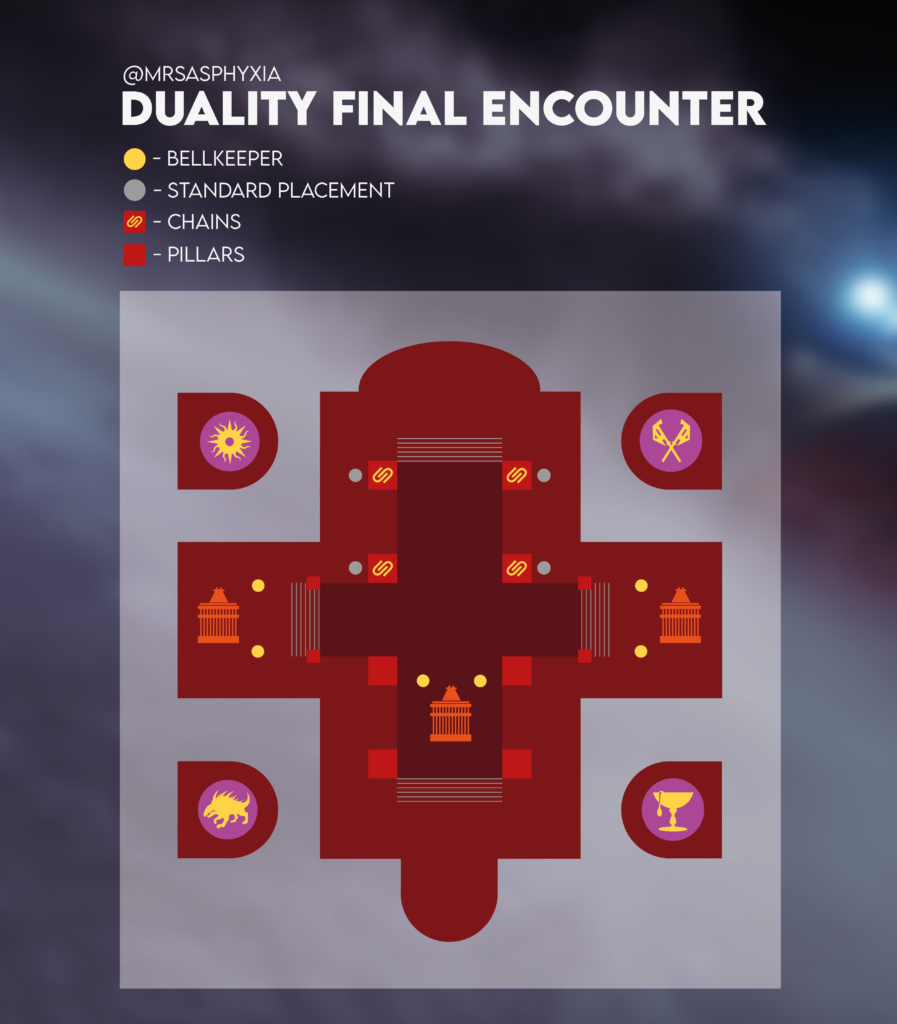
The first element you need to pay attention to is the Bellkeepers. Two of them will spawn by each bell, and players must take them down to make the bell materialize. The chains on the far end of the room also mark where players must deposit the Standards, and that’s where you’ll head off to after coming back from the nightmare realm.
For the Nightmare of Caiatl boss fight, you’ll find the Standard Bearers will spawn on balconies on each corner of the room, and the symbol above them shows which Standard will appear. From the spawn, the closest one on the left is War Beast and the furthest one on that side is Sun. The closest one on the right, however, is Chalice, and Axe is on the far right. The Standard Bearers will spawn on the corresponding balcony when in the nightmare realm, so take them out, grab their buff, and rush back to kill the Bellkeepers as quickly as possible. Killing the wrong Standard Bearer will subtract time from your Collapsing Nightmare debuff, though, so make sure you have the right one and try to avoid their shots instead of killing the wrong one.


The strategy can be the same as the Vault encounter, with two players going for Standards while one takes care of the Bellkeepers. Since there isn’t much to traverse, though, even the standard carriers should help take out the Bellkeepers. After one of the three bells in the arena is open, the team should huddle close to it and activate it to return to reality. Then, the two people with the buffs should deposit them on the matching platform by one of the chains.
After dunking four of the Standards, the chains will begin to glow red. Shoot them to ring the Bell of Conquest, which will send you back into the nightmare realm and trigger the damage phase.
Triggering the damage phase on the Nightmare of Caiatl
After you’ve dunked the four Standards, the chains will glow red. Shooting them will send you into the nightmare realm and spawn in one pair of Bellkeepers in front of each bell, on the same spot as they are in the normal realm. The Nightmare of Caiatl will spawn by the Bell of Conquest and rush towards one of the three bells at random. Don’t try to burst her before she gets to a bell, though, because she has tremendous amounts of damage reduction while not stunned.
Your goal in this part is to stop her from using the bells to teleport you back to reality, and this is where the game subverts the bell mechanic. Instead of the “shooting the bell outside its radius means death” that’s been ingrained in you so far, shooting the correct bell when Caiatl is close is the only way to stop her.
The bells, however, are locked behind the Bellkeepers, so killing them is paramount. While you’re attacking the Bellkeepers, Caiatl will move towards one of the bells. The goal is to have players huddle up by the bell she is heading towards, then shoot it once she is close enough. This will stun Caiatl and give the Waking Resonance buff to anyone who was within the bell’s radius, disabling her damage reduction. Ideally, all three players should get the buff, but try giving it to as many as you can. It’s not the end of the world if only two guardians get it, though, and it’s perfectly possible to one-phase her even in that scenario.
If all goes well, the damage phase will end after Caiatl tries to use all three bells and fails. Not shooting any of the bells in time will send players back to reality early, though, and drastically mitigate their damage output.
How to deal damage to the Nightmare of Caiatl
- Kill the Bellkeepers and make note of where Caiatl is headed.
- Stall Caiatl if needed by baiting her stomp, body-blocking her with a glaive, or even using a Burning Maul on her.
- Group up by whichever bell Caiatl is headed to and shoot it when she is close.
- Deal damage to her. If you don’t have the Waking Resonance buff, obtained from being in the bell’s radius when it was shot, focus on either debuffing or killing any remaining Bellkeepers.
- Continue to follow Caiatl as she moves to the other bells.
- Repeat the process until she has tried to activate all three bells, at which point she will retreat to reality.
The process is fairly straightforward and has to be fast-paced given the duration of the Waking Resonance buff, as well as Caiatl’s movement through the arena. Additionally, you’ll find a series of Psion snipers near you, who will shoot you even if you’re close to the bells. Titan Barricades or Warlock Rifts can help mitigate the fire, but you can also shoot them if you have the time. Either way, keep them in mind since there are a few of them and they can hurt.
There is a tactic to give players a few extra seconds to kill the Bellkeepers, though that spawns more Psion snipers. Shooting one of the smaller bells shortly after the Bell of Conquest is rung and before its animation concludes will send players into the nightmare realm early, giving them a precious few seconds until Caiatl spawns. Doing this spawns more Psion snipers, though, so keep that risk in mind.
Caiatl’s mechanics don’t really vary outside of that loop, so the process remains the same until the boss goes down. That said, the biggest hurdles are managing the sheer volume of add spawns, killing Bellkeepers quickly, and taking care of the Psion spawns during the damage phase.
Loadout suggestions
Because the Nightmare of Caiatl is a bulky target and stands still, players can deal damage on the boss phase with their choice of Heavy. Swords are great for this encounter given their ammo efficiency, but linear fusion rifles will also do well. Rockets can be tricky because of splash damage, but they shouldn’t be ruled out either. If you’re running a sword, don’t forget to use the Lucent Blade Arc-aligned Charged With Light mod, which vastly increases your charge rate.
If you have a free Exotic slot, you can use Lament, though Falling Guillotine will do just fine and free up your Exotic slot for your Primary or Special. For linear fusion rifles, Reed’s Regret, Cataclysmic, and Stormchaser will do fine, especially with the correct perk combination.


We highly recommend running a glaive for the sheer amount of survivability it brings. Its ability to quickly swap between shield and offense makes it invaluable, and protecting yourself from random Bellkeepers explosions, snipers, and Caiatl’s stomps makes it a surefire choice. Glaives bring plenty of offensive potential for clearing enemies, though you likely won’t use them for damage against Caiatl. Outside of that, any weapon that can deal good damage is also a solid choice, though your options will depend on your playstyle and the rest of your loadout. Grenade launchers, fusion rifles, and even snipers all have their merit, depending on what you want to accomplish in the fight, but only glaives give you a free shield.


You should also bring a primary that can clear enemies quickly. If your Exotic slot is free, Huckleberry or Osteo Striga can get you invaluable amounts of add clear thanks to the 40-percent buff to Exotic primary damage. If not, though, you can use any weapon with good add clear. The Vow of the Disciple SMG, Submission, can roll Overflow paired with Demolitionist or Swashbuckler, which can work well depending on your build. If you have room for an Exotic, though, we highly recommend running one. You can also run Witherhoard as a primary to help add clear and to deal even more damage to the Nightmare of Caiatl by inflicting tick damage as you unload your Heavy on her.


Published: Jun 9, 2022 02:32 pm