
Red Dead Redemption 2 is full of mysteries and activities to work through as you spend time hunting down wild animals or solving problems for anyone who crosses your path. One of the more challenging trials is hunting down the Treasure Maps.
There are several Treasure Maps you can learn about as you play Red Dead 2. Each map comes with a series of shaky clues, forcing you to figure out how to decipher their details and allowing you to acquire the loot waiting for you. Here’s what you need to know about how to find all Treasure Map locations in Red Dead 2.
All Red Dead Redemption 2 Treasure Maps and Treasure Locations
There are 13 Treasure Maps to track down in Red Dead Redemption 2. The way you solve each Treasure Map is the same; you’ll need to read the map’s contents to figure out where you need to go, but how you find those maps will be different.
Tracking down these maps can take quite a bit of time. Some of these maps won’t lead you to the exact location of a treasure, and you’ll need to obtain other pieces to complete the puzzle. I recommend trying to figure them out as you go through the game, but if you want to focus on finishing them all at once, we’ll detail where you can find the treasure map and where you need to go to find its treasure.
All High Stakes Treasure Map Locations in Red Dead Redemption 2
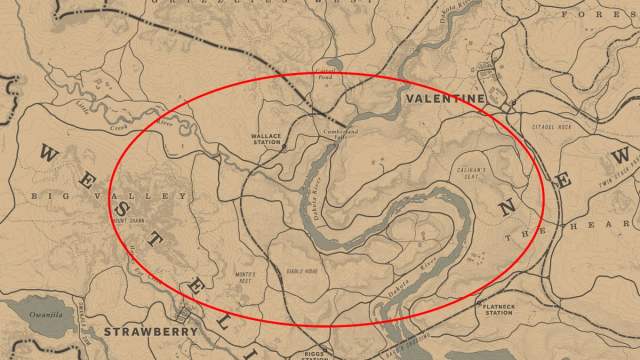
Tracking down the first Treasure Map, the High Stakes Treasure can be challenging in Red Dead 2. A person is holding the Treasure Map who looks like an old prospector. He won’t be willing to give up the map, so you’ll need to get it by force. What’s worse is he does not have a set location, but he does appear between Valentine and Strawberry. You’ll need to scour this entire area to find him for a chance to find the map.
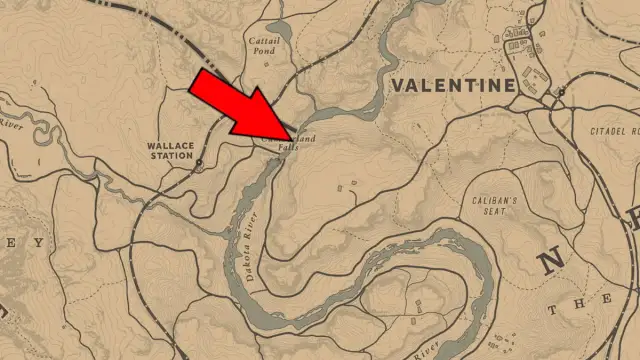
After you have the map, the location you need to visit to track down the treasure will be Cumberland Falls, east of Wallace Station, close to Valentine. You need to make your way to the side of the waterfall, revealing a hollowed-out tree where you can grab the next map.
The location of the second High Stakes Treasure Map is where you discover the first High Stakes Treasure. You won’t have to steal it from another person, making your life much easier, but you will need to figure out a new location to visit after you receive the map, and this time, you’ll be making your way pretty far north. The picture of the map only shows you a small cabin on the side of a mountain, but it does help narrow it down.
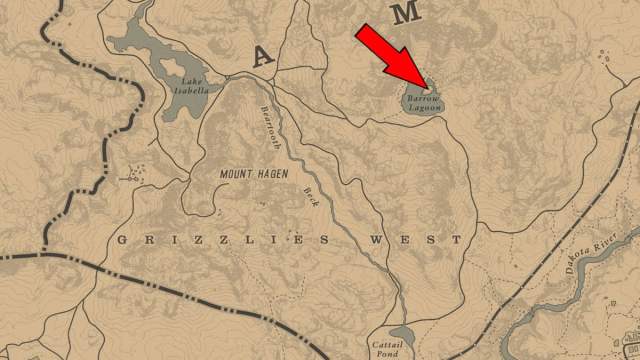
You need to go to the northeast area of the Grizzlies West region, at Barrow Lagoon. Here, you’ll need to cross the frozen lake to the large rock and seek out a hollowed-out tree made into a makeshift bridge. Walk to the center and reach into a hole in the tree to receive the third High Stakes Treasure map, leading you to the final location.
The final High Stakes Treasure Map features another hill alongside a small town. You’ll need to reach this town, then make your way to the hill and take a left.
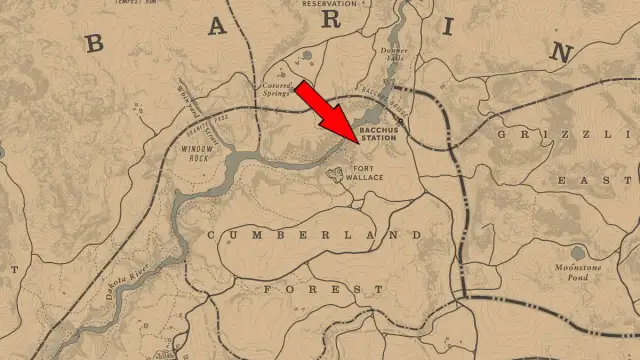
The exact location of where you need to go will take you north of Cumberland Forest, close to Fort Wallace. You need to make your way north of Fort Wallace, and you’ll find a large hillside to the southwest of Bacchus Station with several trees on top. Make your way up the path to the top of the hill, and then take a left when you reach the top. There should be a pathway leading around a large rock and a rock pathway you can follow. At the end, drop down to several rocks, and then you’ll find a small path where three gold bars are placed inside the crack of a rock.
All Jack Hall Gang Treasure Map Locations in Red Dead Redemption 2
The Jack Hall Gang Treasure Map is a much easier map to obtain compared to the High Stakes Treasure. Rather than needing to track down a particular character, this map has a set location. You can purchase it from a treasure hunter who is operating out to the west of Flatneck Station before you reach the Dakota River.

Once you have the treasure map, it’s time to decipher where the treasure could be. Thankfully, you won’t have to go too far from your current position, but it’s still a ride. You need to make your way south of Valentine to a unique rock formation called Caliban’s Seat.
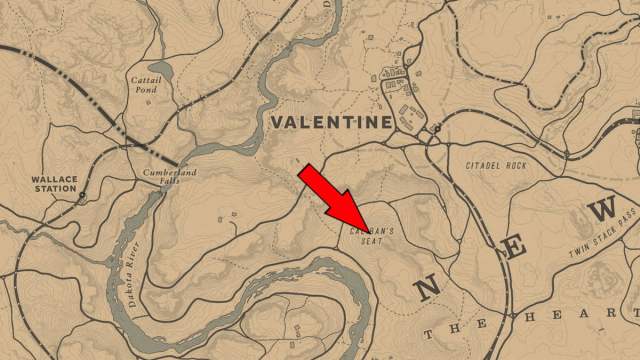
When you want to reach the top of this location, make sure you come from the south of the formation, and climb your way up. There should be a pathway leading you straight to the top. When you’re at the top, look for a pathway on the northeast side of the rock, and it should take you around to an edge that you can follow. Continue down the path until you find a crack in the rocks, where you’ll discover a Pearl Necklace and the second Jack Hall Gang Map.
The second Jack Hall Gang Treasure Map comes from the previous treasure. After you receive it, the hint for the next treasure location points you toward a large location with barren trees and hot air from the ground.
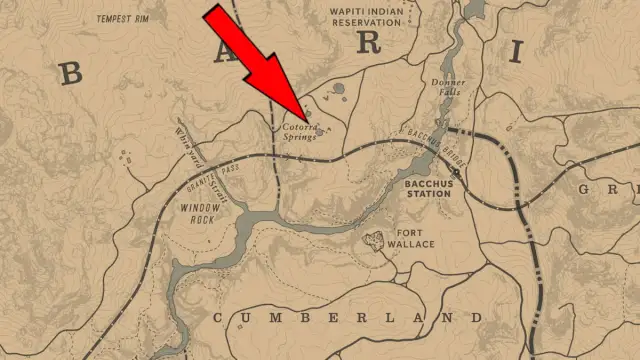
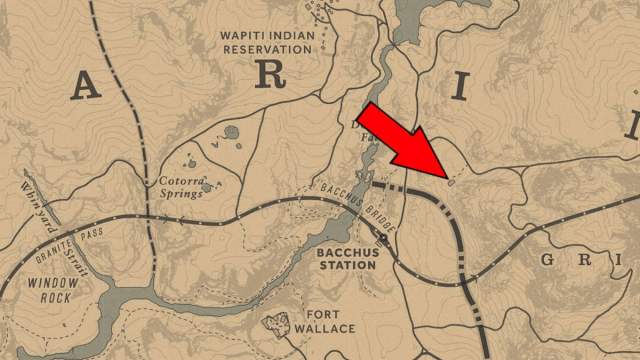
You will need to make your way to Cotorra Springs, northwest of Fort Wallace, Across Bacchus Bridge. You want to make your way to the west side of Cotorra Springs, and you’re hunting for several rocks stacked on each other. Head to the center of this circle, and interact with the rock with a slanted one on top of it. You’ll find $15 inside it and the third and final Jack Hall Gang Treasure Map.
The last Jack Hall Gang Treasure reveals a large hill beside a small pond or lake, with a tree at the center island in the middle of the water. The treasure should be next to the tree.
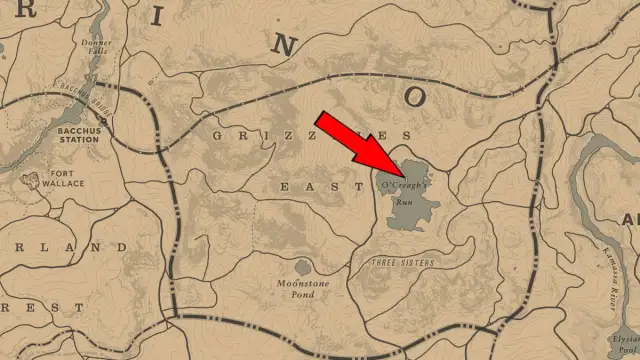
The third Jack Hall Gang Treasure location will take you to O’Creagh’s Run, a small lake at the center of Grizzlies East and to the northeast of Moonstone Pond. When you reach this area, swim over to the island at the lake’s center, and search the large boulder where you flip over a rock. This reveals the final treasure, where you’ll find two gold bars, completing the Jack Hall Gang Treasure adventure.
All Landmarks of Riches Treasure Map Locations in Red Dead Redemption 2
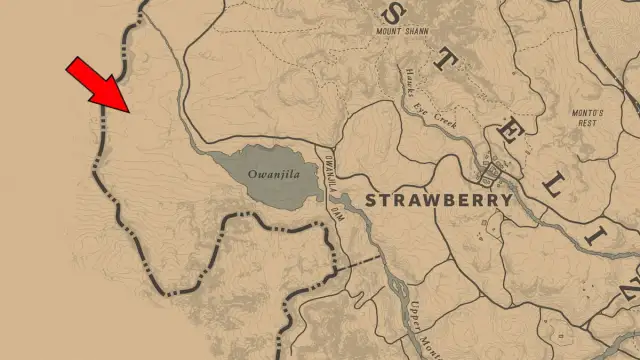
The Landmarks of Riches treasure hunt will have you tracking down notable statues and locations you can find across Red Dead 2. To kick off the Landmarks of Riches, make your way to the northwest of Lake Owanjila, west of Strawberry, where you’ll find an Obelisk on top of a hill. Examine the Obelisk until you can search it, where you’ll find the first treasure map, pointing you to track down a church to find the next treasure map.
The exact location you need to reach next is a church in Bayou Nwa, north of Saint-Denis. You’ll find it immediately east of Lagras. When you reach the church, climb up to the top to get to the bell where you can find the next Landmarks of Riches treasure map.
The second treasure map in the Landmarks of Riches series depicts a small turtle with a broken shell, poorly taped together. Although the image is vague, it depicts the next landmark you need to visit in Red Dead Redemption 2.
You’ll find a home perfect for a Hobbit from the Lord of the Rings when you reach this location. You will need to make your way to the side of the house where there’s a broken window on the side and reach to grab the third Landmarks of Riches treasure map.
For the third map in the Landmarks of Riches adventure, the image shows a broken cannon next to a fence, shooting into a broken tree.
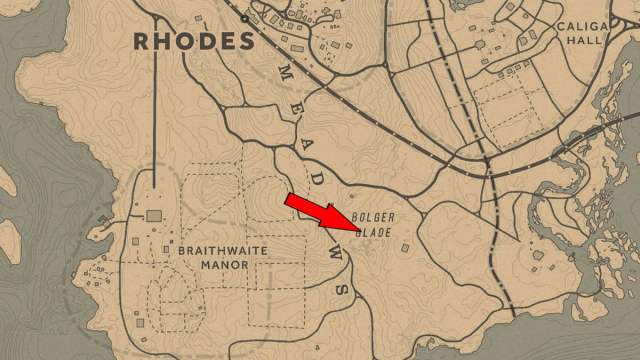
You have to go southwest of Saint-Denis, south of Rhodes, to reach the next landmark. Here, you’ll reach Bolger Glade, where it looks like the remains of a battle took place. Head to the center of this location, and you’ll be able to find a tree overlooking an entrenched position with a cannon nearby. You’ll find a Silver Chain Bracelet and the fourth Landmarks of Riches treasure inside it, the final one you need to find.
The final Landmarks of Riches Map in Red Dead Redemption 2 shows you an image of a clock, striking seven o’clock, with a mountain and a sun behind it. You’ll have to do some climbing to reach this last area.
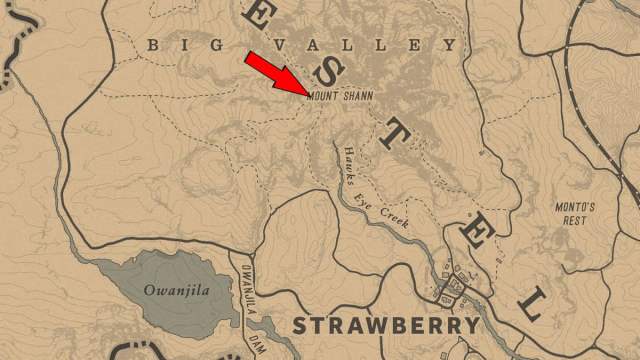
You’ll need to make your way to the west side of the map, toward Mount Shann, to the north of Strawberry. When you reach the top of the mountain, there should be a stone object, which appears to be an old sundial. You’ll need to pivot around this stone object until you stop where you can flip over one of the rocks next to it, revealing the treasure. You’ll receive six Gold Bars for completing the Landmarks of Riches Treasure Hunt.
All Poisonous Trail Treasure Map Locations in Red Dead Redemption 2
The Poisonous Trail Treasure Hunt features three maps for you to track down. The first one to kick off this adventure appears in the West Grizzlies. You’ll need to make your way up toward Spider Gorge, and to the east of it, you’ll find Cairn Lake, where there should be a cabin.
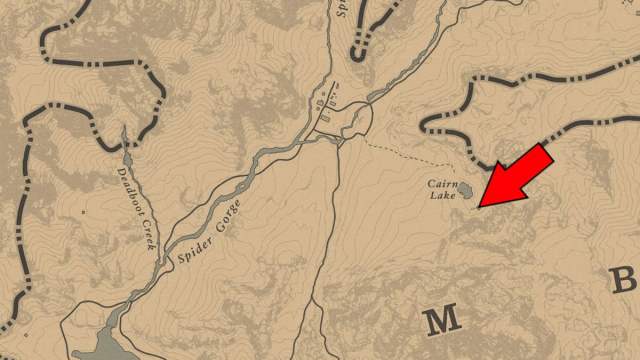
When you reach the cabin, reach into the floorboards of the building, and you’ll find the first map you need to start the Poisonous Trail Treasure Hunt. The image on the treasure map depicts a rock with a face, where you’ll need to find a dead tree and loop around it.
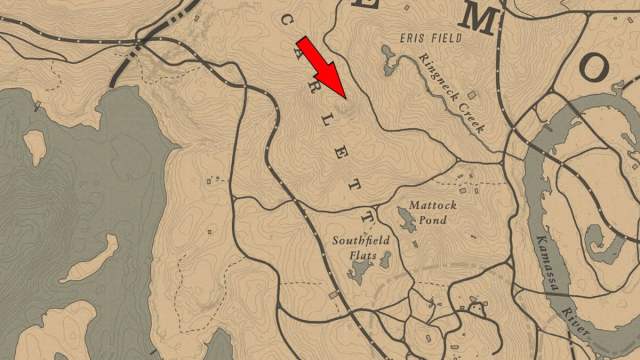
The location shown in the Poisonous Trail Map One takes you to Face Rock, a location on the map that you can find north of Rhodes. When you reach this area, look for a standing, forked tree, and to the north will be a single dead tree you can search to find the next treasure map.
When you find the next treasure map, it depicts a Snack geoglyph you’ll need to track down, leading you to the final piece of this puzzle.

You will need to make your way to the west of Van Horn Trading Post, on the far east side of the map. You’ll need to make your way directly west of this trading post, and you should find the Snake geoglyph depicted on the treasure map, where there will be an area with several stones. At the center is the third Poisonous Trails Treasure Map, leading you to the final location.
For the final location in the Poisonous Trail Treasure, the image shows a small waterfall you need to sneak behind, and you should be inside a cave. When inside the cave, you need to take the right path to find the treasure.
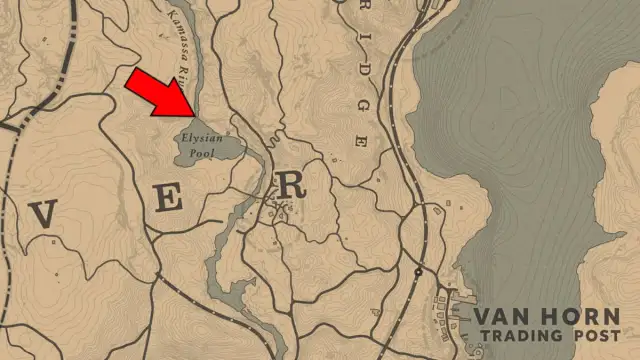
You won’t have to travel too far from the second treasure map. You need to make your way northwest of Van Horn Trading Post, where the Kamassa River connects to the Elysian Pool. Behind the waterfall is a hidden cave that you can explore, and at the end of the cave is a dead end where you can find four Gold Bars, completing the Poisonous Trail Treasure Hunt.
All Elemental Trail Treasure Map Locations in Red Dead Redemption 2
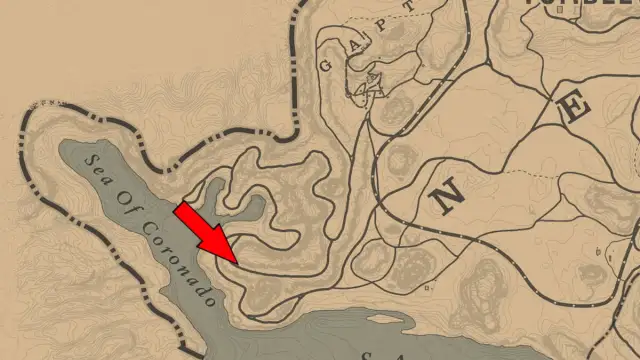
The Elemental Trail Treasure hunt is one you can do later on, as you progress through the main story of Red Dead Redemption 2. You’re required to have completed Chapter Six before this treasure hunt is available. After you reach this point, you can kick it off by making your way to New Austin, to the east of the Sea of Coronado. When you arrive, you need to find a body hanging off a rock and shoot it down. It’s going to have the first treasure map to kick off this adventure.
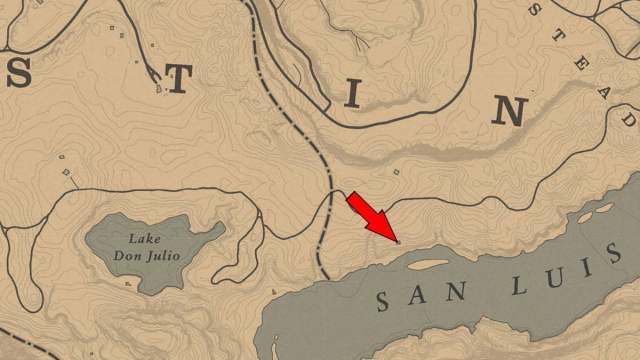
When you read the first map, it’s going to show you the image of a chimney out in the middle of nowhere. You can find this chimney by making your way to the east of Lake Don Julio, on the edge of the San Luis River, close to your current location. You need to find the burned-down building next to the San Luis River. The next treasure map will be inside the chimney.
When you the map for the next location, it will show a pathway, next to a tower. The image you need to find is in New Austin, and it will bring you west of Rio Bravo to Benedict Point.
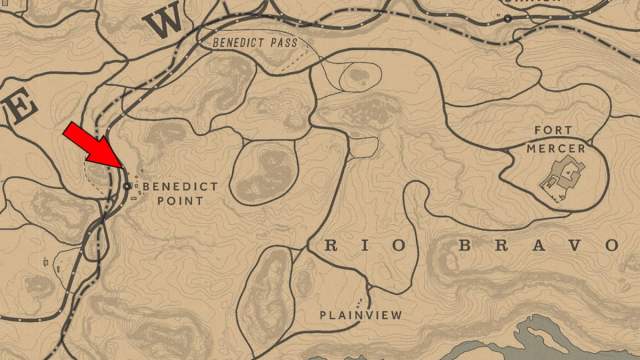
When you reach Benedict Point, look for the water tower, and climb up to the trough. Reach the center of this location, and you’ll find the third and final for The Elemental Trail Treasure Hunt in Red Dead Redemption 2.
The next image on the final treasure map shows the head of a church, with an arrow pointing to the left of it, and there’s a second image showing the outline of a cross pointing down. You need to visit a church to the southeast of Armadillo, another location in New Austin.
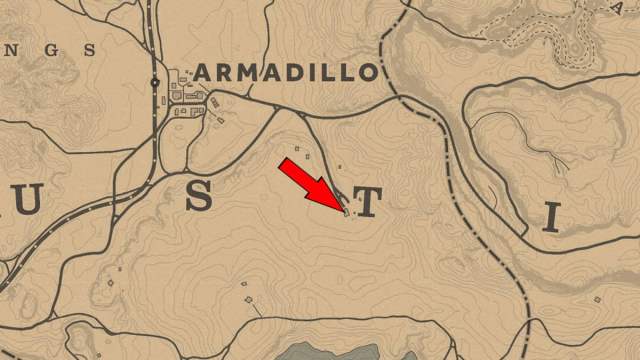
When you reach this church, head to the left of it and look for the only cross that has a body in the ground. You need to search next to the grave, close to the gate of the church. You’ll dig up a Special Horse Stimulant, Special Horse Medicine, a Gold Bar, and a Crow Beak Trinket, completing The Elemental Trail Treasure Hunt.
All Torn Treasure Map Locations in Red Dead Redemption 2
These are a more dangerous series of treasure maps to track down in Red Dead 2. You will need to fight against two hermits who are protecting parts of a complete map, and after you find them, you can make your way to the loot awaiting you. You can take out these hermits in any order you like, based on your preference.
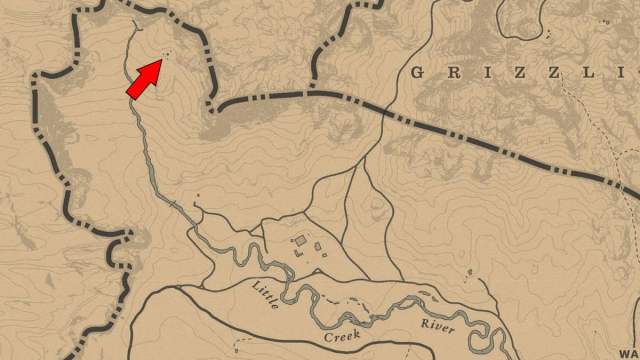
You can find the first hermit in the Grizzlies West, in the far west, to the north of Little Creek River, which you can find next to Wallace Station. The exact location of the treasure map is inside the hermit’s cabin, inside her drawer.
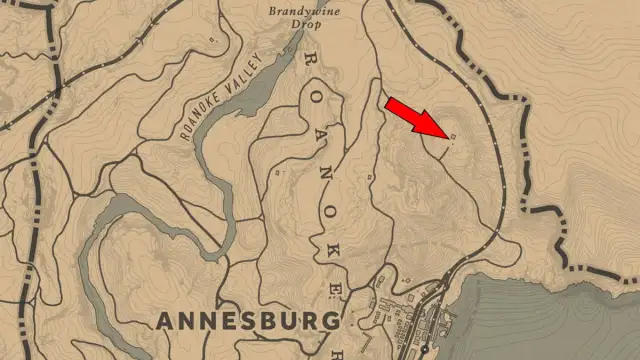
The second half of the treasure map is hidden by another hermit. They’re holed up northeast of Annesburg. Unlike the first hermit, this will shout at you multiple times, warning you if get too close to their home. After you defeat them, head inside their home, and they’re also going to be hiding half of the treasure map inside their drawer.
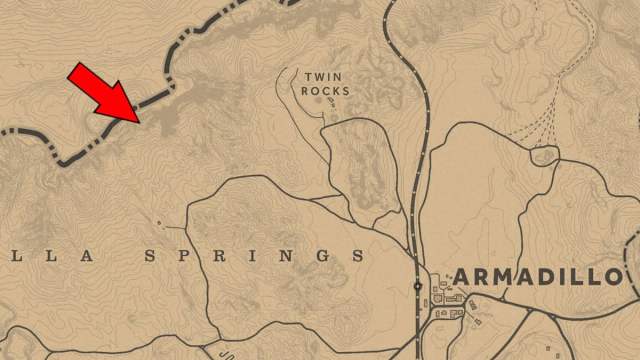
Now you have both halves of the Torn Treasure map, it’s time to track down your price. You’ll need to make your way north of New Austin, northwest of Armadillo, and west of Twin Rocks. When you arrive, head to the north, against the large rock wall. You want to find a small crevice in the rocks where you can crouch down and slip through, and you’ll discover a chest containing several erotic photographs and Otis Millers’ Revolver.


Published: Jan 5, 2024 2:52 AM UTC