In Swarm’s Subterranean Lab, you face off against the most dangerous enemies in the League of Legends mode, all culminating with a final boss fight against Bel’Veth. Due to the caliber of enemies on this level, many consider the lab to be the most difficult map in Swarm.
If you find yourself struggling, here’s a walkthrough showing you exactly how to beat the Subterranean Lab in League‘s Swarm.
How to survive the Subterranean Lab in Swarm
The Subterranean Lab will put all of your skills to the test, spawning hordes of Primordians, Elite enemies, and Bosses all at the same time. If you find yourself struggling against these waves, you can always upgrade your stats with gold in between matches.
These upgrades will make it easier to beat the level, but there are still important gameplay techniques to follow if you want to survive.
1) Position correctly
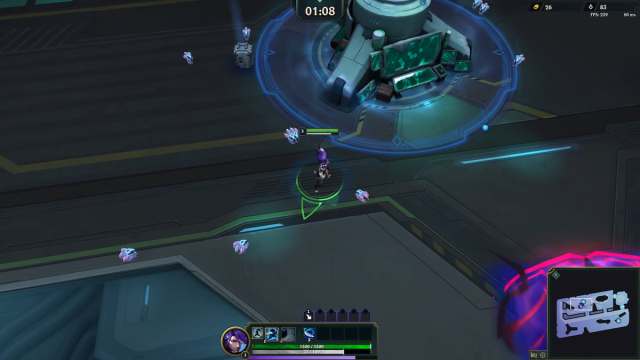
While the first two Swarm maps feature open spaces, the Subterranean Lab has smaller chokepoints. These tight areas become increasingly dangerous as more enemies spawn because you’ll only have a small area available to kite Primordians.
While playing on this map, spend the majority of your time in the central area underneath the upper Ice Blast; this is the most open portion of the lab. This’ll make it easier to lead enemies in circles as you blast them down. If a boss happens to spawn outside of this location, stay calm and let the boss slowly walk into the central area. Furthermore, Yuumi quests will always spawn outside of this portion of the map, so only venture out to complete them when there are no challenging enemies alive.
2) Dodge enemies with Ice Blasts
Every map in Swarm has some type of weapon your team can activate to assist in the fight against Primordians. On the Subterranean Lab, two large Ice Blast Machines spawn diagonally from one another on the right side of the map.
By standing next to these machines for a short period, they will release an AOE explosion of ice that freezes all enemies in their tracks. This is incredibly useful when large swarms of enemies begin to spawn and overwhelm your team, as you can halt the Primoridans and relocate to a safer area. Since the two Ice Blast machines are located diagonally from one another, you can circle this area of the map, using the machines whenever necessary. When you activate the freeze, the machine will go on cooldown for some time, so it’s always useful to keep one available in case of danger.
Keep in mind that while the Primordians are frozen, they can actually still spawn projectiles that damage you from a distance.
3) Bring early-game champions
On more challenging difficulties, the Subterranean Lab’s toughest enemy is an Elite Primordian that spawns after the first minute. This Elite’s spawn coincides with the arrival of the level’s first Yuumi quest, overwhelming you with objectives and enemies at the same time.
During this section of the game, your characters will still be very weak due to the lack of weapon and passive upgrades. This can cause you to activate the Yuumi quest, only to fall victim to the Elite Primordian’s attacks. To better survive this portion, be sure to include early-game characters like Illaoi, Leona, or Briar on your team. These champs excel at taking down enemies early and offer much-needed sustain and protection.
On top of the Yuumi quest, a Battle Bunny Boon will also spawn around the same time as the Elite Primoridan. If you’re lucky enough to get a powerful damage buff from the boon, you should be able to take out this difficult mini-boss in record time.
How to defeat Bel’Veth in Swarm
After 15 minutes, Bel’Veth will spawn in a small chamber in the top right of the map. When she enters, your character will get launched back to the spawn point and you’ll have to rush over to her location or get killed by a shrinking death wave.
1) Bel’Veth’s first stage
The first stage of the Bel’Veth boss only has two attacks you need to look out for. First, she dashes across the battlefield, designating danger zones a few seconds before she moves. These dashes will deal serious damage; building Movement Speed makes dodging easier. Bel’Veth also repeatedly strikes the ground, causing rocks to fall. During this, we recommend running around in a circle to dodge the falling debris.
2) Bel’Veth’s second stage
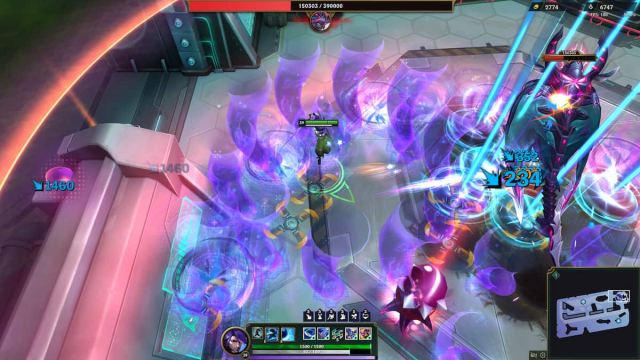
Once you have taken out half of her HP, Bel’Veth will spawn four pods on the battlefield. After she spawns the pods, Bel’veth will dash to each in a random order, creating large explosions that deal damage and knock you back.
As she dashes into these pods, you’ll want to position yourself away from the initial explosion, but it’s impossible to avoid the knockback. Stand away from the edges of the battlefield during this portion of the fight, as you don’t want to get blasted back into the death wave. After these four explosions, Bel’Veth enters her ultimate form, dealing increased damage and buffing her attacks. Her buffed dash is even more dangerous than before, as she’ll now stand still and plan out several dashes at once.
You’ll see quick flashes of her intended movements before she attacks, so try and remember the areas to pick a safe spot on the edge of the battlefield. Getting hit by these attacks can ruin the entire run, as squishy characters can get immediately one-shot by her dashes.
After she completes her dashes, she’ll launch even more debris at you. Luckily, this portion of the Swarm boss fight is significantly less dangerous, so long never stand in one place for too long. If you stay light on your feet and prepare to dodge anything she throws at you, you’ll eventually whittle Bel’Veth down and achieve victory.


Published: Jul 22, 2024 06:48 pm