Collecting them all is not for the faint of heart.
Rachel Samples
and
Nicholas Taifalos
|
Published: Oct 10, 2023 10:46 am
The galaxy is full of hidden collectibles and secrets. Bethesda’s new hit RPG has brought back skill magazines, a feature prominent in the Fallout franchise—and this returning feature is sure to give collectors a run for their money.
Recommended Videos
Skill magazines are scattered around random buildings, abandoned facilities, and key locations in Starfield. They increase players’ skills in various categories for every edition found. There are a ton of magazines to locate, and with the game still in its early days of release, the player base has yet to find them all.
CombaTech Catalog locations
Edition number
Buff
Location
01
Further increases the range and accuracy of CombaTech weapons.
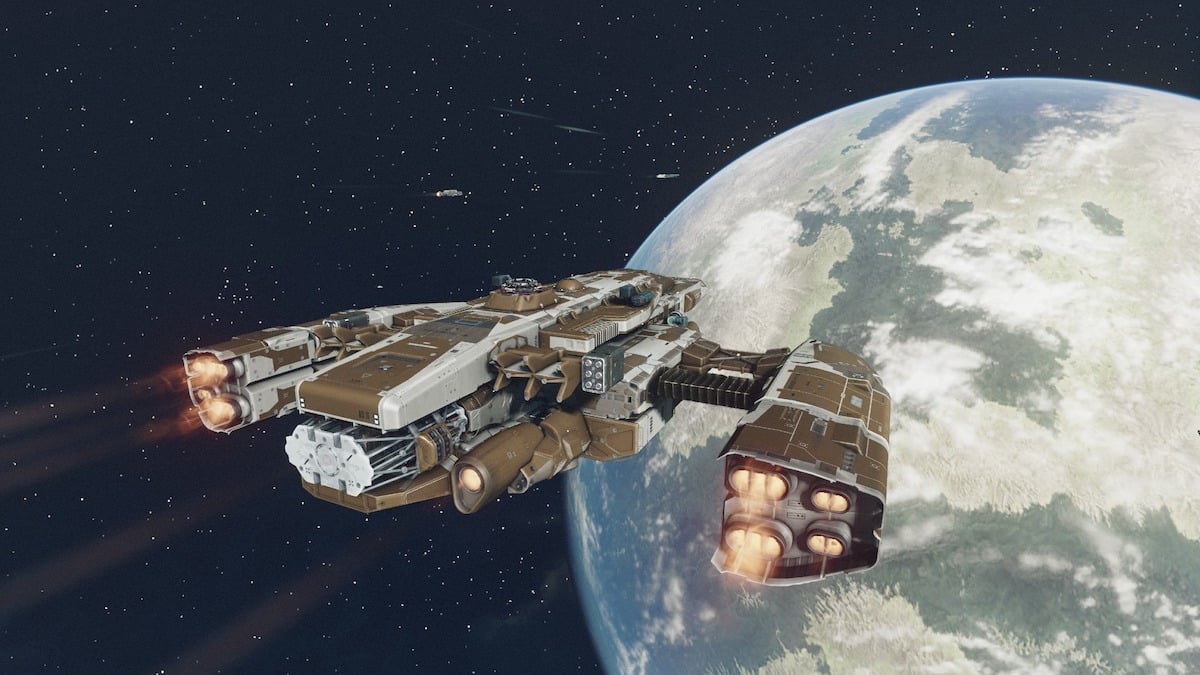
Second floor of the Seokguh Syndicate Hideout in Neon on Volii Alpha. You’ll gain entrance to the hideout during the Guilty Parties quest of the Ryujin faction. After entering the hideout, head through the lobby, past the weapons lab with the workbenches, and up the stairs. Head past the gym equipment to the right of the stairs and continue down the hallway. In the second room of the hallway, you’ll find CombaTech Catalog 01 on a white desk.
02
Slightly increases the range and accuracy of CombaTech weapons.
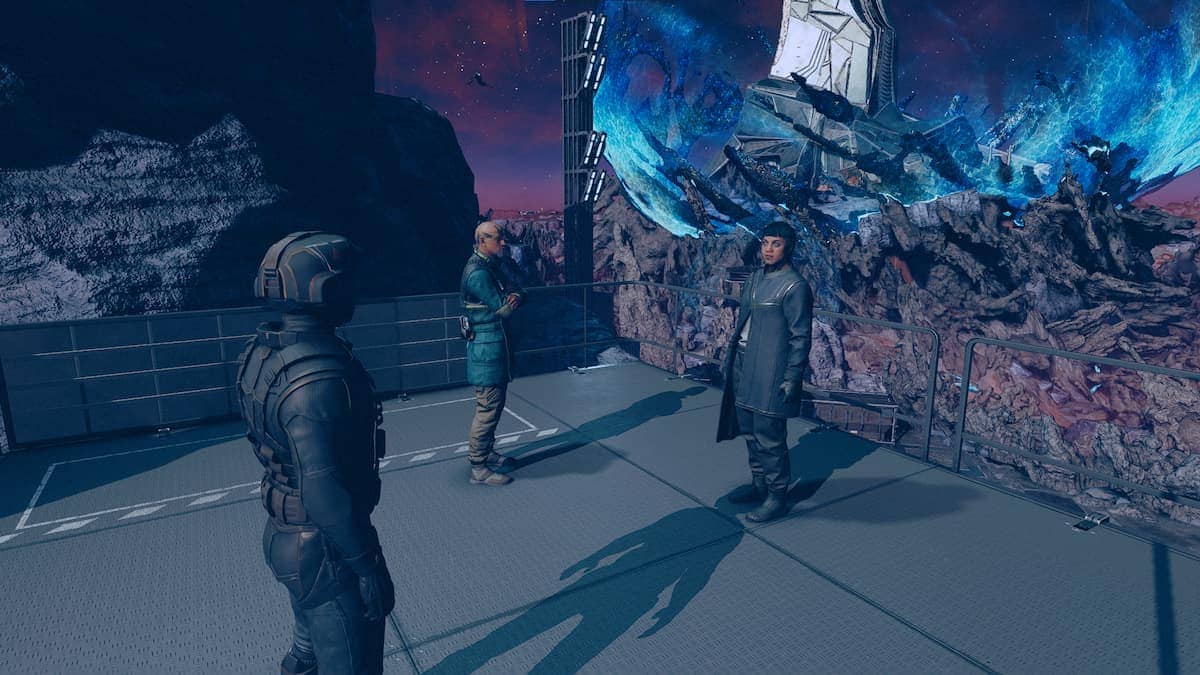
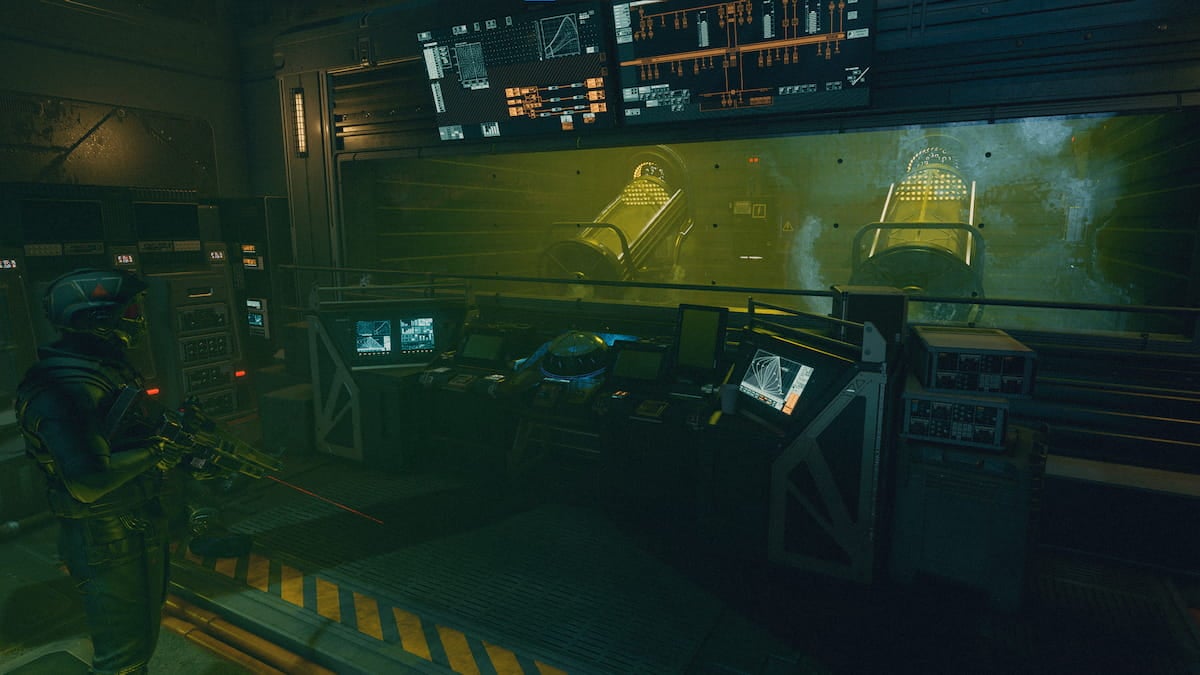
On Phobos, after starting the Deep Cover risk as part of the Crimson Fleet questline, take the elevator to the UC Vigilance Operations Center. Immediately after entering the room, head left. There will be a small office. On a small TV table to the right of the entrance will be the second edition of the CombaTech Catalog.
03
Further increases the range and accuracy of CombaTech weapons.
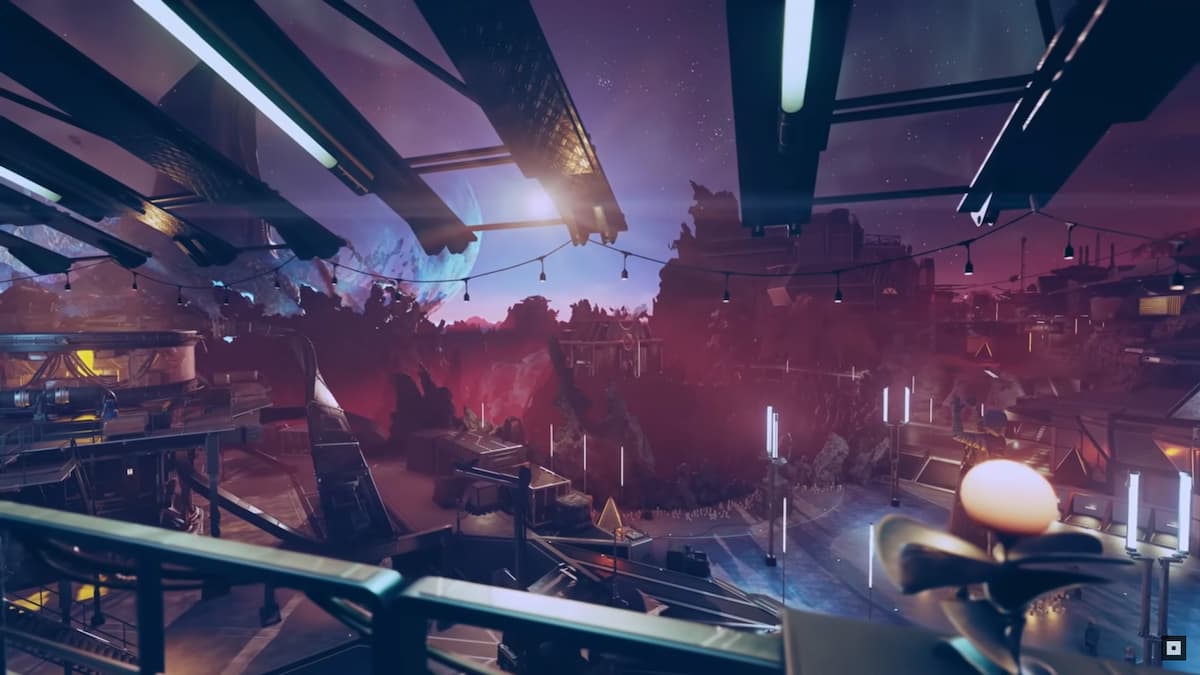
Head to HopeTown on Polvo in the Valo star system. Enter the town center and straight for Best Defense, the weapons store to the right of HopeTech. Enter the store and the catalog will be on a shelf on the right.
04
TBD
TBD
05
TBD
TBD
CombaTech Catalog 01 can be found on the second floor of the Seokguh hideout. Screenshot by Dot Esports
Find the second edition of CombaTech Catalog during the Crimson Fleet questline. Screenshot by Dot Esports
The next edition of CombaTech Catalog can be found in HopeTown. Screenshot by Dot Esports
Constellation Guides locations
Edition number
Buff
Location
01
Permanently reduces fall damage by five percent.
The Lodge, on a counter in front of the artifacts.
02
Outposts produce resources five percent faster.
Any Abandoned Research Tower, which can be found in random instances when exploring planets or moons. You can find this magazine in the second-floor office in one of the buildings.
03
TBD
TBD
04
Permanently use 15 percent less O2 while moving when over-encumbered.
On The Clinic, a space station orbiting Deepala in the Narion system. After docking, move into the entry lobby and turn left. The catalog will be sitting on a small table between two couches.
05
TBD
TBD
Constellation Guide 01 can be found in the Lodge. Screenshot by Dot Esports
Constellation Guide 02 requires an Abandoned Research Tower. Screenshot by Dot Esports
Constellation Guide 04 is easy to find at The Clinic. Screenshot by Dot Esports
Cyber Runner’s Cipher locations
Edition number
Buff
Location
01
Laser weapons permanently do five percent more critical damage.
Slayton Aerospace in the Trade Tower, which you can reach via the elevator in the front of the Astral Lounge. Head to the left of the reception desk. You’ll find Cyber Runner’s Cipher 01 on a small wooden table next to several couches.
02
Laser weapons permanently do five percent more critical damage.
Inside Apex Electronics, a store in The Well beneath New Atlantis on Jemison. Enter The Well from the elevator behind Jemison Mercantile, then walk forward and left to the store. The magazine is on a table on your right as you enter the shop.
03
TBD
TBD
04
Adds a bankable auto-attempt for hacking.
Volii Hotel in Neon City. Rent a room for one day from the receptionist, then head to the second floor via the elevator. Enter the first door on your left. When you walk in, the Cyber Runner’s Cipher 04 will be on a coffee table to your right between two chairs.
05
Adds a bankable auto-attempt for hacking.
In the final room of the Research and Development area in Infinity Limited HQ, where you find the evidence for the Sabotage mission in the Ryujin faction questline. Cyber Runner’s Cipher 05 will be sitting on a white table in the middle of the room.
Cyber Runner’s Cipher 01 can be found on the wooden coffee table to the left of the Slayton Aerospace lobby. Screenshot by Dot Esports
Apex Electronics in The Well holds Cipher 02. Screenshot by Dot Esports
You’ll need to get a room for the night at the Volii Hotel to find Cyber Runner’s Cipher 04. Screenshot by Dot Esports
The Sabotage mission may be long, but you’ll find Cyber Runner’s Cipher 05 at the end of it. Screenshot by Dot Esports
Freestar Captain’s Log locations
Edition number
Buff
Location
01
TBD
TBD
02
Permanently increases carrying capacity by 5kg.
Crew Quarters in any Deserted Mineral Plant. Enter the main building and turn left into the crew quarters. Turn left then right, passing the gym and entering the bedrooms. In the first bedroom on your right will be an open locker with the magazine.
03
Permanently increases carrying capacity by 5kg.
Akila City Consulate, on Akila. Head straight up the stairs after landing past The Rock. The consulate will be on your left, with the catalog on a small table in the room past the lobby.
04
Permanently increases carrying capacity by 5kg.
Deserted Research Outpost, randomly generated on any planet or moon. In one of the buildings, you’ll find a kitchenette. On the table in this room will be the fourth edition of the Freestar Captain’s Log.
Freestar Captain’s Log 02, inside of an Deserted Mineral Plant. Screenshot by Dot Esports
Freestar Captain’s Log 03, in the Akila City Consulate. Screenshot by Dot Esports
Freestar Captain’s Log 04, found on a table at a Deserted Research Outpost. Screenshot by Dot Esports
GRUNT locations
Edition number
Buff
Location
01
Ballistic weapons permanently do five percent more critical damage.
Complete the Red Mile on Porrima III in the Porrima system. Run the Red Mile, and at the end tower, there will be a dead Spacer holding the edition. Grab it off their dead body.
02
Ballistic weapons permanently do an additional five percent more critical damage.
First floor of the Seokguh Syndicate Hideout in Neon on Volii Alpha. Immediately after entering the hideout during Ryujin’s Guilty Parties quest, head to the chairs and coffee table to the right of the glowing red orb in the middle of the room. Grunt Issue 02 can be found on the coffee table.
03
Ballistic weapons permanently do five percent more critical damage.
A canyon east of Waggoner’s Farm, on Montara Luna, a moon orbiting Montara in the Cheyenne system. The “Deputized” Freestar quest takes you to the bandit camp terrorizing the farm, where you can find the magazine after defeating the Ruffian Leader.
04
Ballistic weapons permanently do five percent more critical damage.
The Last Nova bar in The Key, in the Kryx System. Look for a corner booth close to the bar. Grunt Issue 04 will be on top of the table.
05
TBD
TBD
06
Ballistic weapons permanently do five percent more critical damage.
Go to any Deserted Ecliptic Garrison on any planet. Head outside to the landing zone. You’ll find a small building with an open bottom floor and no roof upstairs. Head upstairs and on a table above a safe will be GRUNT 06.
07
TBD
TBD
08
TBD
TBD
09
Ballistic weapons permanently do five percent more critical damage.
Deserted Colony War Barracks on Muphrid IV in the Muphrid System. In one of the two-story buildings (the one with the kitchen), head to the second floor. GRUNT Issue 09 can be found on one of the tables in the middle of the room.
Run the Red Mile and reach the end for GRUNT Issue 01. Screenshot by Dot Esports
As soon as you enter the Seokguh Syndicate Hideoutin Neon, head to the right to find Grunt Issue 01. Screenshot by Dot Esports
The bandit camp just east of Waggoner’s Farm holds GRUNT Issue 03. Screenshot by Dot Esports
Look for Grunt Issue 04 in a booth in the Last Nova bar. Screenshot by Dot Esports
GRUNT Issue 06 can be found in an outdoor room near a Deserted Ecliptic Garrison. Screenshot by Dot Esports
Find GRUNT Issue 09 in a Deserted Colony War Barracks location. Screenshot by Dot Esports
Gunslinger’s Guide locations
Edition number
Buff
Location
01
Permanently reload and draw Laredo weapons five percent faster.
The Rock, Akila City in the Cheyenne System. Head to the highest floor of The Rock. Outside of Marshal Daniel Blake’s office will be two red chairs and a small coffee table. Gunslinger’s Guide 01 can be found on the coffee table.
02
Permanently reload and draw Laredo weapons five percent faster.
Sinclair’s Books, Akila City in the Cheyenne System. From the Akila City Consulate, head south and down a flight of stairs. Sinclair’s Books will be directly in front of you. When you enter the store, Gunslinger’s Guide 02 will be on a square, wooden table to the right in front of book shelves.
03
Permanently reload and draw Laredo weapons an additional five percent faster.
Freestar Rangers building in Hopetown on Polvo in the Valo System. After landing in Hopetown, head to the Freestar Rangers building on your right. Gunslinger’s Guide 03 will be on a small white chair immediately to the right of the building’s entrance.
04
Permanently reload and draw Laredo weapons an additional five percent faster.
Freestar Rangers building in Neon City in the Volii System. After entering the building, head towards the back and up the stairs. On a bedside table will be Gunslinger’s Guide 04.
05
Permanently reload and draw Laredo weapons an additional five percent faster.
Freestar Collective Embassy in New Atlantis on Jemison. After taking the elevator from the lobby, take the stairs up to the second floor. Enter the doorway with the “Employees Only” sign overhead. Gunslinger’s Guide 05 will be sitting on a coffee table close to the room’s entrance.
Gunslinger’s Guide 01 can be found outside of the Marshal’s office. Screenshot by Dot Esports
Sinclair’s Books is home to Gunslinger’s Guide 02. Screenshot by Dot Esports
Gunslinger’s Guide 03 will be on a white chair near the entrance of Hopetown’s Freestar Rangers building. Screenshot by Dot Esports
Head to Neon City to find Gunslinger’s Guide 04. Screenshot by Dot Esports
You’ll need to do a bit of trespassing for Gunslinger’s Guide 05. Screenshot by Dot Esports
Kryx’s Journal Entry locations
Edition number
Buff
Location
01
TBD
TBD
02
Store prices are permanently reduced by 2 percent, and you permanently sell items for 2 percent more (on top of any other bonuses).
Vulture’s Roost on Jaffa IV in the Jaffa System. After landing at this location, head to the tallest building located on the side of the cliff to the right of the landing pad. In this building, you’ll find jail cells. Head to the second floor, and at the top of the stairs on a coffee table, you’ll find Kryx’s Journal Entry 02.
03
Crew and companions permanently do five percent more weapon damage (on top of any other bonuses).
Vlad’s Villa on Syrma VII-a in the Syrma System. You’ll gain access to this location after Vladimir invites you to his house. Head down the stairs to the lower level of Vlad’s Villa. Kryx’s Journal Entry 03 can be found behind the locked door.
04
Your ship’s cargo hold can permanently hold five percent more.
The Lock on Suvorov in the Kryx System. During the Echoes of the Past section of the Crimson Fleet questline, you’ll find yourself in an abandoned prison with Mathis. Look for a room in the D-block labelled “Showers” and find the lockers inside. Kryx’s Journal Entry 04 will be in the second-to-the-left locker.
05
Store prices are permanently reduced by 2 percent, and you permanently sell items for 2 percent more (on top of any other bonuses).
Gagarian, in the furthest northeast location of the city, on a small table. Head directly east from the Liberty Square Memorial, past the Town Hall.
Look for Kryx’s Journal Entry 02 on a coffee table at the top of the stairs. Screenshot by Dot Esports
You’ll need a Digipick and the ability to open advanced locks to find Kryx’s Journal Entry 03. Screenshot by Dot Esports
Kryx’s Journal Entry 04 can be found inside a locker in the showers of The Lock’s D-block. Screenshot by Dot Esports
Head east of the Liberty Square Memorial in Gagarian to find Kryx’s Journal Entry 05. Screenshot by Dot Esports
Mining Monthly locations
Edition number
Buff
Location
01
Permanently increases tool-grip weapon damage by two percent.
In the Abandoned Mine on Piazzi I, the planet you find Andreja on in the Into the Unknown main quest line. There will be a small building to the left of the mine’s entrance, where you will find the first edition of Mining Monthly.
02
Permanently increases tool-grip weapon damage by two percent.
Carinae III-A in the RC-1 Mine, during the Ryujin faction questline, The Key Ingredient. After entering the mine, you’ll find Mining Monthly Issue 02 on a black pushcart in a small room.
03
Permanently increases tool-grip weapon damage by two percent.
Gagarian, on a coffee table in a bar directly north outside of Centauri Mills.
04
Permanently increases tool-grip weapon damage by two percent.
Any Autonomous Dogstar Factory. I found mine on Porrima II-b in the Porrima system. Enter the facility’s main floor and head upstairs to the observation room with the elevator control computer. The catalog is on the main desk near the entry door.
05
Permanently increases tool-grip weapon damage by two percent.
On Erebus in the Olympus System at the Abandoned Mine. Head into the mining complex via the switch-controlled orange door. After entering the facility, take an immediate left and continue past the stairs. Mining Monthly 05 will be on a small white bar-top table.
06
Permanently increases tool-grip weapon damage by two percent.
The Bindi Mining Outpost on Bindi, in the Cheyenne system. Enter the outpost and through the main airlock. Go through the cafeteria and up the stairs to the crew quarters. The catalog is on a small table in front of two single-seat couches.
07
Permanently increases tool-grip weapon damage by two percent.
On Cydonia (Mars). To the right of Jane’s, in the residential district, will be a door with a “Deimos Miner Quarters” label above its entrance. Head through this door and look to your right after you enter. There will be a white table with issue 07 on it.
08
TBD
TBD
09
Permanently increases tool-grip weapon damage by an additional two percent.
In the mining area of New Homestead on Titan (moon of Saturn) in the Sol System. Enter the main building, then head down the stairs. Keep to the right of the museum and hit the switch to enter the red “Secured Access” doors. In the cave, close to the entrance, will be the magazine on top of a giant spool of wire.
10
Permanently increases tool-grip weapon damage by two percent.
In a Science Facility found at a Deserted Robotics Lab. We found this location on Guniibuu III, more specifically. Head into the facility found at this location, and look for a small room off one of the two kitchenettes. This magazine will be sitting on a small coffee table.
The first Mining Monthly edition can be found on Piazzi I, as part of the Into the Unknown main quest line. Screenshot by Dot Esports
Find Mining Monthly 02 during the Ryujin faction questline. Screenshot by Dot Esports
Mining Monthly 03 is found on a coffee table outside of Centauri Mills. Screenshot by Dot Esports
Mining Monthly 04 can be found at an Autonomous Dogstar Factory. Screenshot by Dot Esports
Mining Monthly 05 is located inside an Abandoned Mine on Erebus in the Olympus System. Screenshot by Dot Esports
Head upstairs at the Bindi Mining Outpost for edition 06. Screenshot by Dot Esports
Look to your left when you enter the Deimos Miner Quarters on Cydonia for 07. Screenshot by Dot Esports
You’ll want to pull out your flashlight to find Mining Monthly 09. Screenshot by Dot Esports
Mining Monthly 10 can be found in a Science Facility at the Deserted Robotics Lab on Guniibuu III. Screenshot by Dot Esports
Neon Nights locations
Edition number
Buff
Location
01
Permanently grants the recipe for the chem BattleUp, which increases carry capacity, and physical and energy resistance for a limited time.
In Alexis’s office in the Executives Offices floor of the Ryujin Tower in Neon. During the Top Secrets quest in the Ryujin faction, you’ll gain access to this floor. Take the elevator to the Executive Offices, then head up the stairs past the lobby. Make your way to Alexis’s office in the northeastern-most side of the second floor. Neon Nights 01 will be sitting on a white table in the room’s corner.
02
Permanently grants the recipe for the chem S.T.E.V.E., which slows down time and increases ranged damage for a limited time.
VIP area of the Astral Lounge. Take the elevator in the Astral Lounge in Neon City to the VIP section. Exit the elevator and head to your right. In the first room, Booth 1, you’ll find Neon Nights 02 on a small table.
03
Permanently grants the recipe for the chem 02 Shot, which increases oxygen regeneration for a limited time.
CeltCorp in the Trade Tower, which can be accessed via the elevator in front of the Astral Lounge in Neon City. Head straight towards the white couch. On the armrest, you’ll find Neon Nights 03.
04
TBD
TBD
05
Grants the recipe for AddiJack, which removes addiction penalties and grants a bonus to researching.
Xenofresh Corporate HQ in the Trade Tower, which can be accessed via the elevator in front of the Astral Lounge in Neon City. After exiting the elevator, head to the right of the reception desk. Neon Nights 05 can be found on a side table between two chairs, beneath a blue painting.
You’ll need to progress through the Ryujin faction questline to find the first Neon Nights edition. Screenshot by Dot Esports
Neon Nights 02 can be found in Booth 1 of the VIP section in the Astral Lounge. Screenshot by Dot Esports
Look for Neon Nights 03 on the couch’s armrest. Screenshot by Dot Esports
Neon Nights 05 will be to the right of the Xenofresh lobby. Screenshot by Dot Esports
Nova Galactic Manual locations
Edition number
Buff
Location
01
Permanently reduces fuel needed for a grav jump by one percent.
The Almagest casino that orbits the planet Nesoi in the Olympus star system. Head to the middle of the casino to find an orange room with several closed windows. Enter the side of the room and make your way to the computer. The magazine will be next to the terminal.
02
Permanently reduces fuel needed for a grav jump by one percent.
Nova Galactic Staryard, orbiting Luna in the Sol system. Enter the staryard then proceed forward until you reach the ship construction area. Head to the bow of the ship and upstairs to an office overlooking the ship. The Manual is on a desk.
03
Permanently reduces fuel needed for a grav jump by one percent.
MAST Admin Division, New Atlantis City. Take the elevator to the Cabinet Chambers, then head left. Enter the Office of Interstellar Affairs and head past the cubicles on your right until you reach a small room. On the coffee table will be the third edition of the Nova Galactic Manual.
04
TBD
TBD
05
TBD
TBD
06
Permanently reduces fuel needed for a grav jump by one percent.
In the final room of the Autonomous Staryard orbiting Volii Psi, after you’ve defeated the Mining Turret MK I. The Nova Galactic 06 Manual can be found on a counter next to a vending machine in the final room.
07
Permanently reduces fuel needed for a grav jump by one percent.
Enter the Subsurface Garage of an Abandoned Maintenance Bay on any planet, then proceed downstairs. In the next wide open area, there should be a second level. Head upstairs and into the staff lounge, the magazine should be on a small table between chairs.
Nova Galactic Manual 01 is easy to miss. Screenshot by Dot Esports
Nova Galactic Manual 02, found at the Luna space station. Screenshot by Dot Esports
Take the elevator in the UC building in New Atlantis to find Nova Galactic Manual 03. Screenshot by Dot Esports
Enter the final room of the Autonomous Staryard in the Volii System to find the Nova Galactic Manual 06. Screenshot by Dot Esports
Enter the garage and head upstairs to the lounge for Nova 07. Screenshot by Dot Esports
Peak Performance locations
Edition number
Buff
Location
01
Permanently increases carrying capacity by 5kg.
The Eye, orbiting Jemison. Head to one of the rooms near the entrance of the Eye and look for this magazine by a water cooler.
02
Permanently adds five percent to melee weapon critical damage.
Deserted UC Listening Post, a randomly generated location on any planet. We found this post on Bessel III-A in the Bessel System. Peak Performance 02 can be found in one of the many smaller rooms on a L-shaped desk.
03
TBD
TBD
04
TBD
TBD
05
Permanently adds five percent to unarmed damage.
The Key in the Kryx System. You can find Peak Performance 05 in the gym area to the southwest of Voss’s chair. We recommend starting the Crimson Fleet questline before attempting to find this magazine, so you don’t get attacked while on the Key.
Peak Performance 01, located on The Eye. Screenshot by Dot Esports
Peak Performance 02 can be found on a desk in one of the many rooms of the Deserted UC Listening Post. Screenshot by Dot Esports
Head to the gym in the Key to find Peak Performance 05. Screenshot by Dot Esports
Solomon’s Adventures locations
Edition number
Buff
Location
01
Permanently increases weapon damage at night by five percent.
Coe Estate on Akila City in the Cheyenne System. After entering the estate, enter the room on your far left. On a bedside table will be the magazine.
02
Permanently increases weapon damage at night by five percent.
Waggoner Farm’s farmhouse on Montara Luna, a moon orbiting Montara in the Cheyenne system. Land at the farm, then turn left and enter the farmhouse. Proceed upstairs, then left into the room where you’ll find the catalog on a table next to a bunk bed.
03
TBD
TBD
04
TBD
TBD
05
Permanently increases weapon damage at night by five percent.
In the living quarters of a Helium-3 Extraction Site (randomly generated Abandoned Outpost) on Denebola I-A. After defeating the spacers occupying the extraction facility, grab the Living Quarters Key and open the door. Solomon’s Adventures 05 will be sitting on a table near the entrance.
Find the first edition of Solomon’s Adventures in Sam’s family estate in Akila City. Screenshot by Dot Esports
Solomon’s Adventures 02 can be found at Waggoner’s Farm. Screenshot by Dot Esports
Look for Solomon’s Adventures 05 on a table in an abandoned Helium-3 extractor. Screenshot by Dot Esports
The New Atlantian locations
Edition number
Buff
Location
01
Permanently grants the recipe for The Deep food item.
Tau Ceti II, at the Tau Gourmet Production Center. On a cliff overlooking the factory will be a building with a Common Quarters computer and a Pharmaceutical lab. To the right of the Pharmaceutical Lab, on the other side of the door, will be a table with the New Atlantian 01 on it.
02
Permanently grants the recipe for the Panache food item.
Third floor of the Starstation RE-939, which orbits Voss, a moon of Olivas in the Alpha Centauri System. The New Atlantian 02 can be found on the third floor of the station’s living quarters on a desk next to a Security Computer.
03
Permanently grants the recipe for the Astral Sldiers food item.
Patio table found at the back of the Dawn’s Roost restaurant of the Pioneer Tower in the Residential District of New Atlantis. To get to the restaurant, head right from the tram. The table where this magazine is located is directly in front of the door leading to the patio.
04
Permanently grants the recipe for the Beer Brat Platter food item.
The Eleos Retreat on Ixyll II. After landing your ship, enter the largest building, which will be called The Eleos Retreat. Head past the giant rock in the middle of the room and into the hallway between the stairs and the infirmary. The New Atlantian 04 will be on a bedside table in the first room on your left.
05
Permanently grants the recipe for the Shepherd’s Pie food item.
Kay’s House, found in The Well beneath New Atlantis. Head through the kitchen and up a flight of nearby stairs to the apartment above the restaurant. On a small side table next to the apartment’s entrance will be The New Atlantian 05.
The New Atlantian 01 can be found in the building overlooking the Tau Gourmet Production Center. Screenshot by Dot Esports
The New Atlantian 02 can be found next to the Security Computer on the third floor of Starstation RE-939 in the Alpha Centauri System. Screenshot by Dot Esports
The New Atlantian 03 is located on a table in Dawn’s Roost patio. Screenshot by Dot Esports
Head to the Eleos Retreat in the Ixyll System to find The New Atlantian 04. Screenshot by Dot Esports
The New Atlantian 05 is located above Kay’s House in The Well beneath New Atlantis. Screenshot by Dot Esports
Trackers Primer locations
Edition number
Buff
Location
01
Permanently increases ballistic weapon damage by five percent.
Victor Compound on McClure II in the McClure System. In a small one-room building in the northwest side of the compound, you’ll find Trackers Primer 01 on a large, grey work table. Players will visit this compound during Sam’s personal quest, “Matters of the Heart.”
02
Permanently increases EM weapon damage by five percent.
Pilgrim’s Rest on Indum II. In the locked room, Trackers Primer 02 will be on a shelf to the left of the room’s entrance.
03
Permanently increases EM weapon damage by five percent.
The Red Mile on Porrima III in the Porrima system. Enter The Red Mile and head upstairs to the rooms. One messy room will feature a blood-soaked bed—the Primer is on a table near the window.
04
TBD
TBD
05
Permanently increases EM weapon damage by five percent.
Argos Extractors Mining Outpost, on Vectera in the Narion star system. Land, then walk to the outpost building forward and right. Head into the back rooms where the sleeping quarters lie, and the Primer will be on a small table between bunk beds.
Look for Trackers Primer 01 in the northwest building in the Victor Compound. Screenshot by Dot Esports
Trackers Primer 02 can be found at Pilgrim’s Rest. Screenshot by Dot Esports
The Red Mile’s upstairs bedroom contains Trackers Primer 03. Screenshot by Dot Esports
Head back to where it all began for Trackers Primer 05. Screenshot by Dot Esports
UC Defense Manuals locations
Edition number
Buff
Location
01
Further increases magazine size and weapon bash critical chance for all Allied Armaments guns.
1-of-a-Kind Salvage on Niira in the Narion System. Enter the building guarded by two turrets to your right when you load into the location. After you enter the building, boost-pack your way directly across the open area from the door. The manual will be on the shelf.
02
Slightly increases magazine size and weapon bash critical chance for all Allied Armaments guns.
The Den, in the Wolf system. After entering The Den, head to the right when you see a neon “Open” sign. There will be a small office, with a room full of bunk beds. This magazine is on a nearby table.
03
Further increases magazine size and weapon bash critical chance for all Allied Armaments guns.
Cydonia, in the Sol system orbiting Mars. Land and enter the mining town, then proceed down the stairs and left into the Residential district. Head all the way down until you find the UC Marine Barracks. Enter the barracks and the manual will be on the table directly ahead of you.
04
Further increases magazine size and weapon bash critical chance for all Allied Armaments guns.
Abandoned Weapon Station, any planet or moon. In the second-floor office of one of the warehouses.
05
Further increases magazine size and weapon bash critical chance for all Allied Armaments guns.
Found in the main building at an Abandoned Robotics Facility on Ourea in the Olympus System. The magazine can be found in one of the corner rooms on a white counter next to a storage container.
The first manual will be on a shelf in 1-of-a-Kind Salvage on Niira in the Narion System. Screenshot by Dot Esports
UC Defense Manual 02, located on The Den. Screenshot by Dot Esports
UC Defense Manual 03 can be found in the UC Marine Barracks on Cydonia. Screenshot by Dot Esports
UC Defense Manual 04, located in an Abandoned Weapon Station. Screenshot by Dot Esports
Find UC Defense Manual 05 in one of the corner rooms inside the main building of the facility. Screenshot by Dot Esports
Vanguard Space Tactics locations
Edition number
Buff
Location
01
Ship missiles permanently deal five percent more damage.
UC Vanguard Pilot Simulator area in the MAST District in New Atlantis. After taking the elevator to the Pilot Simulator area, head to the break room on your left. Vanguard Space Tactics 01 will be on a counter next to a med pack.
02
Ship energy weapons permanently do five percent more damage.
In the Mars lab where you find Percival Walker during the “Delivering Devils” UC Vanguard quest. Vanguard Space Tactics 02 can be found beneath the two staircases near the lab’s Spacesuit Workbench.
03
TBD
TBD
04
Ship particle weapons permanently deal five percent more damage.
Deimos Armored Transport orbiting Grissom (moon of Bondar) in the Alpha Centauri System. Dock with the ship, then enter the door directly at the top of the stairs. Vanguard Space Tactics 04 will be on a table next to a computer in the middle of the room.
Vanguard Space Tactics 01 can be found in the break room left of the elevator in the Exam Center. Screenshot by Dot Esports
Vanguard Space Tactics 02 can be found next to the lab’s Spacesuit Workbench. Screenshot by Dot Esports
Vanguard Space Tactics 04 is located on a desk in the second floor of the Deimos Armored Transport that orbits Grissom. Screenshot by Dot Esports
Va’Ruun Scripture locations
Edition number
Buff
Location
01
Permanently increases sneak bonus by one percent, and melee sneak attach damage by five percent.
UC Security Office, New Atlantis spaceport on Jemison. Head to the back of the building where the jail cells are. In one of the far cells, the magazine will be beneath a cot.
02
Permanently increases sneak bonus by an additional one percent, and melee sneak attack damage by five percent.
Starstation UCN-48 orbiting Muphrid IV in the Muphrid System, which you’ll visit during Andreja’s Divided Loyalties quest. Head to the second floor of the station. Turn left after you’ve climbed the stairs and you’ll see a room full of bunk beds. Head to the last bunk bed in this room, and Va’Ruun Scripture 02 will be beneath the bed on the floor.
03
TBD
TBD
04
Permanently increases sneak bonus by an additional one percent, and melee sneak attack damage by five percent.
Eren’s Camp on Hyla II. This location can be access during the Divided Loyalties section of Andreja’s personal quest. Head to the third floor of Eren’s Camp. To the right of the stairs, in a corner on a white desk, will be Va’Ruun Scripture 04.
05
TBD
TBD
06
Permanently increases sneak bonus by an additional one percent, and melee sneak attack damage by five percent.
Va’Ruun Embassy in New Atlantis (Jemison) in the Alpha Centauri System. This location becomes available during the “Friends Like This” section of the UC Vanguard questline. Va’Ruun Scripture 06 will be on a white table in one of the embassy’s break rooms next to two red couches.
07
TBD
TBD
08
Permanently increases sneak bonus by an additional one percent, and melee sneak attack damage by five percent.
Abandoned Hangar on Groombridge II in the Groombridge System. In a red, two-story building in front of the hangar’s landing pad. Look for Va’Ruun Scripture 08 in the lower level of this building.
09
TBD
TBD
10
Permanently increases sneak bonus by one percent, and melee sneak attack damage by five percent.
Miner’s Quarters, Abandoned Mines on Mars. Head south of Cydonia to get to this location, then enter the large building and make your way to the Miner’s Quarters at the bottom of the facility. This “magazine” can be found in one of the elevated buildings towards the back of the room.
The first Va’Ruun Scripture can be found in a jail cell in New Atlantis’s UC Security Office. Screenshot by Dot Esports
Va’Ruun Scripture 02 will be beneath a bed on Starstation UCN-48. Screenshot by Dot Esports
Look for Va’Ruun Scripture 04 in the third floor of Eren’s Camp. Screenshot by Dot Esports
You’ll need to progress in the UC Vanguard questline to find Va’Ruun Scripture 06. Screenshot by Dot Esports
Va’Ruun Scripture 08 will be tucked away in a corner of the room on a desk. Screenshot by Dot Esports
Find the 10th Va’Runn Scripture on Mars. Screenshot by Dot Esports
This guide is being updated as we find more locations of the skill magazines in Starfield.
Dot Esports is supported by our audience. When you purchase through links on our site, we may earn a small affiliate commission. Learn more about our Affiliate Policy
Managing Editor. In 2018, Rachel graduated from the University of Texas with a bachelor’s in Rhetoric and Writing and first entered the esports industry in the same year. Her favorite games include indies, deckbuilders, and the entire Mass Effect franchise. Need any calibrations?
Weekend editor for Dot Esports. Nick, better known as Taffy, began his esports career in commentary, switching to journalism with a focus on Oceanic esports, particularly Counter-Strike and Dota. Email: [email protected]


Published: Oct 10, 2023 10:46 am