The Whispering Depths location in Baldur’s Gate 3 is among the more treacherous and mysterious segments of Act One, especially if you aren’t sure what you’re getting yourself into ahead of time.
The cave system beneath Blighted Village is definitely worth exploring, but you need to first ensure you’re at a high enough level and adequately prepared. Otherwise, you’re in for a short spelunking experience. This guide will walk you through all of the rewards and hazards in Whispering Depths so you can confidently venture forward with certainty that you didn’t miss anything.
How to enter Whispering Depths
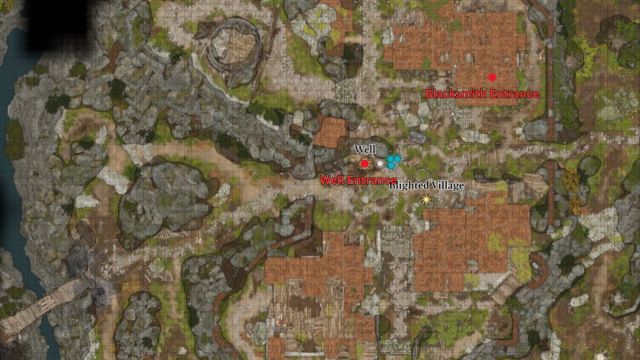
There are two different ways to enter Whispering Depths, and both of the locations are within Blighted Village southwest of the Druid’s Grove.
Primary entrance—down the well in Blighted Village
Smack dab in the center of Blighted Village is a well that leads to the Whispering Depths cave system. This is the most streamlined way to enter Whispering Depths, and it will place you at what seems to be intended as the start of the caverns. As you approach the well, a Perception Check will automatically be rolled by your party members. I’m not certain of the DC due to the nature of how Perception Checks work in BG3, but I’ve never missed it. Even if all of your party members fail the Perception Check, you can still enter the Whispering Caverns by activating the well—it just won’t be highlighted for you.
Secondary entrance—basement of the blacksmith’s house
In the northeast corner of Blighted Village is a multistory home with a blacksmith’s forge in the basement. This is the same house as the one that begins the Masterwork Weapon quest and subsequently starts your hunt for Sussur Bark. Directly to the right of the forge in the basement is a cracked section of the wall. Similar to the well in the center of the village, a successful Perception Check will highlight the cracked wall, but you can attack and destroy the cracked wall regardless of the Check’s outcome. After you destroy the wall, an alternate passageway into Whispering Caverns will be created.
Whispering Depths checklist
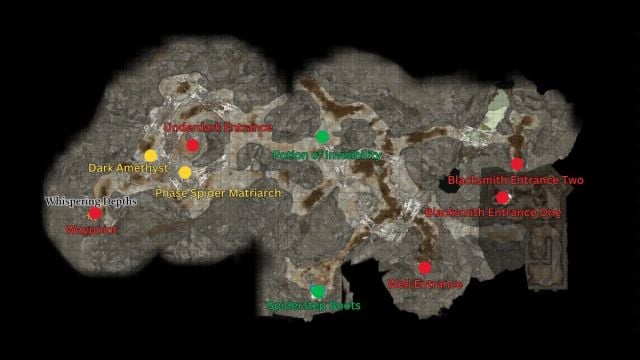
The Whispering Depths contains plenty of things you won’t want to miss, and several of them are obscure enough that simply scouting the entire area won’t ensure that you find everything. There are two “primary” (quotes because it’s all subjective in BG3) objectives you will want to complete in Whispering Depths—defeating the Phase Spider Matriarch and finding the Dark Amethyst.
The Phase Spider Matriarch
Given the giant bridges made of spiderweb, it probably won’t come as a surprise to learn there’s a bit of an infestation problem in the Whispering Depths. In fact, you should definitely be wary of those web bridges as walking across them will almost certainly get you stuck and alert the Phase Spider Matriarch of your presence.
The Matriarch is a giant spider boss baddie that will summon tons of Phase Spider adds from the entire cave system, and she will absolutely demolish your party if you aren’t adequately prepared and starting the fight on your own terms. We have a full guide on how to take out the Phase Spider Matriarch. Our guide gives a specific set of instructions on how to defeat the boss, but you can also just use it as a checklist of the Matriarch’s mechanics and quirks if our method doesn’t fit with your RP flavor.
The Dark Amethyst
If you ask me, this Dark Amethyst is the most important part of the Whispering Depths. This gem is the key to unlocking the Necromancy of Thay, which in turn begins a secondary objective that can continue evolving throughout the course of the entire game if you choose to allow it to. If you’re already in the Whispering Depths and haven’t found the Necromancy of Thay yet, don’t worry. You can get the Dark Amethyst first and then snag the tomb afterward. The specific order of acquisition doesn’t matter in this case.
The Dark Amethyst is located in the perfect opposite end of the cave from the two points that you can enter from, so it seems the design is meant to require you to clear out all of the spiders before you can reach this gem. We have a guide that will tell you exactly how to find the Dark Amethyst.
Secondary objectives in the Whispering Depths
The Phase Spider Matriarch and the Dark Amethyst aren’t the only things that make this cavern worth exploring. In addition to the two main attractions, you can also find some helpful items and points of interest.
Loot
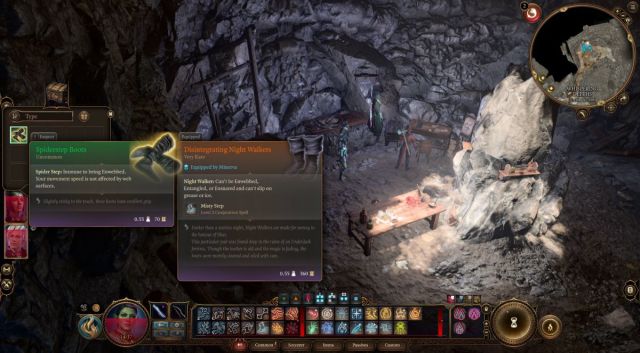
Directly to the left of the well entrance is a little alcove with a makeshift study. In this alcove, there is a chest that contains the Spiderstep Boots. While they aren’t required to defeat the Matriarch, they are extremely helpful to have on hand as they prevent you from being Enwebbed and alerting the Matriarch when crossing web bridges in the Whispering Depths.
In the center of the cave, a Silk Cocoon contains a Potion of Invisibility that you can use now or save for a rainy day. These potions really are invaluable.
Points of Interest
The westernmost corner of Whispering Depths has a Waypoint that can be used to fast travel in and out of the cave system. If you’re having trouble with the Matriarch, this Waypoint can be an absolute lifesaver as you can easily escape from within for some shopping and then return right back into the thick of it.
The Underdark is an optional path (the Mountain Pass is the other option) to reach Act Two of BG3. Even if you want to ultimately take the Mountain Pass, you can enter, explore, and leave The Underdark before doing so. There are a few different entrances to The Underdark, one of which is found in Whispering Depths close to the Dark Amethyst and the Matriarch’s lair.
Finally, the northeast portion of Whispering Depths has an exit-only passageway that leads back into the blacksmith’s house with the Sussur Forge—although I haven’t really found any reason to ever use this method of exiting the Whispering Depths over the other two ways.
Others Asked
What area becomes a major questing location in Act Three of Baldur's Gate 3?
The city of Baldur's Gate becomes a major questing area in Act Three of Baldur's Gate 3.
How does the Dark Urge origin affect gameplay in Baldur's Gate 3?
The Dark Urge origin in Baldur's Gate 3 offers more violent choices and changes how you can play the game, allowing for a unique twist and character development.
How does the "The Daughter of Darkness" quest in Baldur's Gate 3 affect Shadowheart's character development?
The "The Daughter of Darkness" quest affects Shadowheart's character development by allowing her to either embrace her past or reject it for Shar. This choice is made after meeting people from her past in the House of Grief and can lead to different rewards and outcomes based on the player's decisions.





Published: Jan 1, 2024 04:01 pm