Pokémon Scarlet and Violet’s The Teal Mask DLC offers fresh challenges for players with over 100 additions to the Pokédex that need to be collected, including the return of Gliscor.
The Generation Four Ground and Flying-type was introduced as an evolution for Gligar, who first appeared in the second generation of Pokémon, and features a unique evolution method that can require some work.
There are several steps that must be completed to evolve a Gligar into Gliscor, which we have explained below.
Where to find Gligar in The Teal Mask
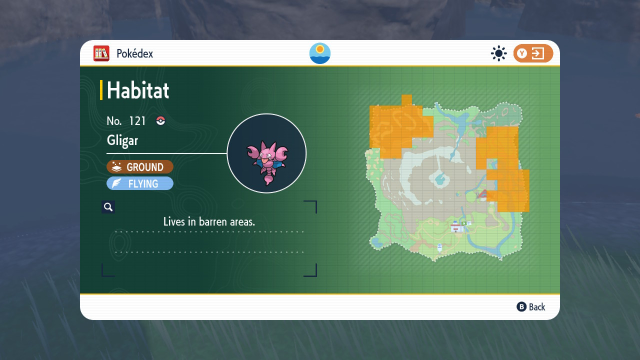
Before you even get to the evolution stage, it’s worth remembering Gligar is a Pokémon Scarlet version-exclusive Pokémon and cannot be obtained in Pokémon Violet without trading. If you have Scarlet, you can find Gligar east of Oni Mountain, in an area called the Kitakami Wilds. You can also find it in the top-left corner of the island’s map, as shown in the image below.

If you don’t have Pokémon Scarlet, you’ll need to trade for it instead. Find a friend with a copy of the game to trade with, or go online and use one of the Pokémon community’s trade codes to get Gligar. You’ll need to first find an Aipom, Violet‘s version exclusive; anyone using Gligar’s code (0207-0190) will be looking to trade their Pokémon for its opposite counterpart in the other game.
How does Gligar evolve into Gliscor in The Teal Mask?
Luckily for longtime trainers of the Pokémon franchise, the evolution method for Gligar is the same in previous generations. To evolve Gligar, you need to give it a Razor Fang to hold and then level it up at night, what is classed in the game as between 8pm and 4am.
If you level up Gligar when holding a Razor Fang during the day, you will not be blocked from the evolution. Instead, it will just happen whenever Gligar levels up again and it is nighttime. The quickest and easiest way to level up Gligar is to use a Rare Candy, which will immediately trigger the evolution.
Where to find a Razor Fang in The Teal Mask
Players will automatically receive a Razor Fang for completing 110 entries in the Katakami Pokédex. To claim your reward, head into your Pokédex by opening your map with “Y” and then hitting “X.” Select the Pokédex, then choose the Kitakami option at the top, as shown in the video below.
From here, press “X” to open up the rewards screen, and the progress you’ve made will automatically be filled in. Any rewards you’ve received will automatically be added to your inventory.


Published: Sep 15, 2023 11:31 am