Popular streamers create memorable moments on a daily basis, and Twitch enables its streamers and viewers to isolate those moments.
Whether it’s on a livestream or a VOD, streamers and viewers can crop short video clips of a channel in just a few short minutes, or even seconds depending on how fast you are.
The process is simple, but there are a few key elements to consider as you’re clipping a video from someone’s stream to share an epic play or hilarious streamer reaction. Here’s what you need to know about how to make a Twitch clip.
Step one: Open the tool
To get started, you’ll want to enable Twitch’s clipping tool. This can be done by either clicking ALT+X or by hovering your mouse over the bottom right corner of the stream.

In the corner, there are a number of options available for viewers but one display represented by the outline of a Hollywood style clapperboard will say “Clip” when you hover over it. Once you click that button, a new tab should come up on your internet browser.
Step two: Cropping
Once you’ve opened up the tool, you’ll immediately notice that Twitch has already done a little bit of the work for you. The past one and a half minutes of the stream you’re watching will be replayable.
Using the yellow bar below the video that looks similar to a ruler, you can adjust where you want the clip to start and end. A clip can be as short as you’d like but can only be 60 seconds at its longest.
Dragging the leftmost vertical blue bar along the yellow ruler will adjust the clip’s start time. Dragging the right vertical blue bar will change the clip’s end time.
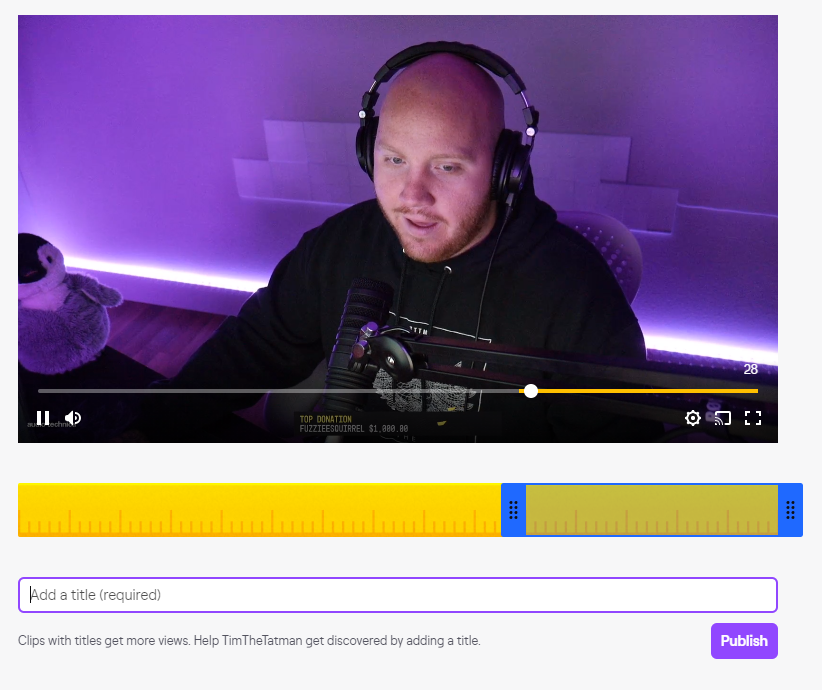
You can spend however long you feel is necessary to make sure that the clip starts and ends exactly where you’d like.
If necessary, you can pause the clip as you’re editing it down or change the volume to make sure that you can focus on precisely where you want the clip to start and end.
Once you have the clip cropped, all that’s left is to add a title to it and click the purple “Publish” button in the bottom right corner of the page.
Step three: Share
After you’ve published your clip, sharing it is made extremely simple. Once Twitch completes its uploading process, a link to the clip is provided front and center on your screen. All you need to do is click the link to have it copied.
If you find yourself making clips regularly and need to re-copy links or see how many views your clips get, all you need to do is go to your creator dashboard on Twitch.
On the left side of the page, there will be a number of drop-down menus including one called “Content.” Clicking that button with show you three options, the last of which is “Clips.”
Once you’ve clicked the “Clips” option, you should be able to see all of the videos you’ve ever clipped on Twitch. You can also filter the page to show clips of your channel exclusively.







Published: Sep 21, 2020 02:05 pm