Keeping central processing unit (CPU) temperature at bay is critical. Operating at high temperatures runs the risk of causing severe damage to your gaming rig. In most cases, when the CPU surpasses its manufacturer-specified thermal limit, the entire system shuts down. If computers didn’t perform this safety measure, critical damage would occur.
In any case, monitoring CPU temperature is essential, and knowing how warm your rig is running, especially during hardware-intensive applications like gaming, is a vital way to keep your PC’s health in check. CPUs are like the brains of computers; if they overheat, the whole system is in jeopardy. If you’re finding your CPU is running hotter than recommended, it’s time to take immediate action. Here are various methods to reduce CPU temperature.
Location of your computer
System location is essential. Setting up a computer in a properly ventilated area makes a world of difference in regulating system temperatures. Also, if users reside in warmer climates, setting up in a room with air conditioning is strongly recommended. If you have the option of relocating to a cooler part of the house, like a basement, it might be worth setting up shop there.
Clean internals
If you can’t remember the last time you popped the hood of your PC, that’s a good indicator it’s time for an inspection. Depending on how often a PC is used, large quantities of dust and debris coat the computer internals, creating the perfect storm for overheating.
Popping off the side panel of the tower will reveal what the condition is in. Spraying out the inside with compressed air is good practice and should be done every few months. Just make sure your PC is completely turned off before you start spraying the compressed air. Additionally, unplugging the power cable from the nearby electrical outlet works as an added safety measure.
Cable management
Poor cable management contributes to inadequate airflow, and this is because all of those endless cables take up large amounts of internal real estate. Taking the time to tidy them up carefully and cleanly is a sure way to improve airflow, lowering overall temperatures. Tidied cables also look much better from an aesthetic point of view, which is a bonus.
Upgraded cooling
While most computers use air coolers, they come with some pitfalls. Firstly, fans are the main contributor to internal dust and particulates. So it’s essential to keep on top of the internal cleaning maintenance that comes along with them. Upgrading to liquid cooling is a solid alternative to combat overheating. Modern all-in-one (AIO) liquid coolers can offer better efficiency than traditional air coolers and are relatively easy to install. They’re also much quieter than fans.
Reapplying thermal paste
In some situations the thermal paste found between the CPU and heat sink was either not correctly applied, has dried out over time, or needs to have a fresh coat reapplied. Either way, reapplying thermal paste might do the trick and lower the processor’s temperature. Applying thermal paste to your CPU is a fairly intermediate remedy, so doing some research beforehand and being very careful is strongly recommended.
Upgraded heat sink
If you’re thinking of reapplying the thermal paste between the CPU and heat sink, you might as well kill two birds with one stone and see if an upgraded CPU cooler is warranted. Stock CPU coolers might get the job done at first, but aftermarket options will surely make a difference, especially if you’re thinking of overclocking your CPU or regularly running CPU-intensive applications, like gaming.
Adjust system power allocation
Allocating how your system uses power in Windows is a simple way to reduce your CPU temperature with a few clicks of the mouse.
- Open Control Panel.
- Click on Hardware and Sound.
- Click on Power Options.
- Select Balanced (recommended) or Power Saver.
- If Power Saver isn’t showing up, click on the drop-down Show additional plans to find it.
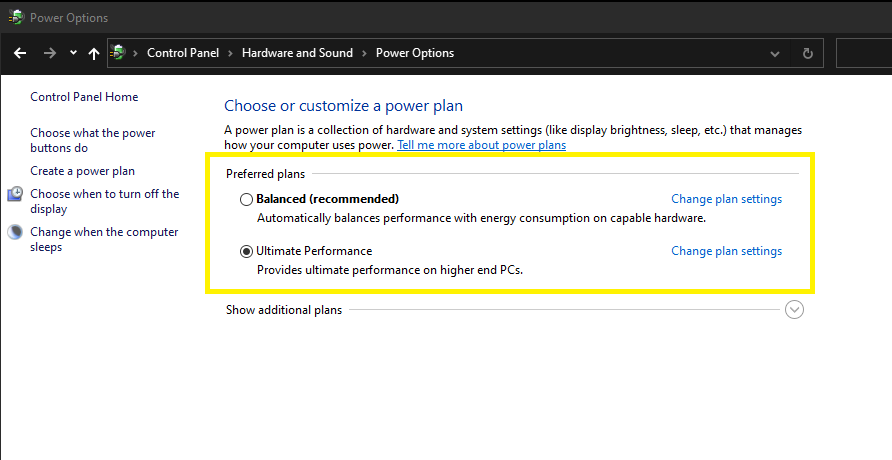
If you’re keen on tinkering around some more within the power settings, locate Change plan settings, found to the direct right of each desired Preferred plan setting.
- Select Change advanced power settings.
- Click on Processor power management.
- Then, hit Maximum processor state.
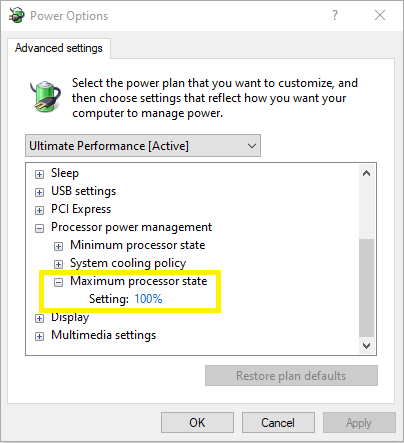
- Change the Setting from 100 percent (Default) to anywhere between 80 to 90 percent.
- Lowering the Setting percentage to any value lower than 80 percent is not recommended. If you enter zero percent, you will encounter a fatal error.
Keeping your CPU, and the entire system, running at ideal temperatures is not only critical, but it supports better performance, responsiveness, and overall computer longevity. It’s important to keep an eye on temperatures, especially during intensive applications like gaming. Facing the risk of internals running too hot can open up a whole plethora of issues down on the road, so preventative maintenance is key.


Published: Oct 21, 2021 04:40 pm