If you’re looking for a new way to show off your PC building skills, a wall-mounted PC can be one of the best ways to display your build. Wall mounting a PC can be challenging, and depending on your style, it can range from somewhat tough to overly complicated.
Building and wall mounting a PC are not recommended for first-time builders or those who are uncomfortable with power tools. It’s recommended to read the entire article before starting so you can plan out your build ahead of time.
Advice before starting
Plan out everything
Before you purchase a single item, you should pre-plan out your build, not just in a normal PC building sense of making sure hardware is compatible, but also design and style.
Draw out your PC build. You don’t need to be an artist or a Blender master. All you need is a way to visualize your PC. This helps you plan out your build and see any possible problems you may run into.
Plan out hardware locations. Even with an open-air case, you need to cool off your motherboard. If you also want to use the same fan for your graphics card, you can keep them closer together.
Strengthen your baseboard. If your baseboard seems weak, don’t be afraid to reinforce it. Use metal rods or some two-by-fours along the back to help, but don’t place it anywhere you plan on cutting holes or drilling.
Powering your PC
If you are using a case, powering on your PC is a simple press of a button. However, when wall mounting, you need to be a bit more creative. If your motherboard board doesn’t come with a power button on it, you can always jumpstart it. Those who feel a little less daring, or don’t feel like standing every time, can purchase a power switch online. Builders feeling extra creative can wire up their own.

USB ports
With the PC mounted on the wall, you may not want to run additional cables through the wall just to plug in a mouse. You may want to place your USB ports down lower or on your desk.
Pre-drill your holes
Before you start installing your hardware, you need to pre-drill the holes in your base.
- Layout your hardware on construction paper.
- Mark where the holes are on the paper using a pen or Sharpie.
- Place the paper to the board.
- Drill the holes where you have marked them on the paper.

Screw sizes
Make sure you have the correct size screws. You do not want to try to force a large screw into a smaller hole or use too small a screw size and have your graphics card fall off the wall to its death.
Cables
To keep your PC looking clean as possible, you want to make sure your cables are well-managed or hidden entirely. There are several ways to do this.
Behind or inside the baseboard
When building your baseboard, you can have a section to place all your cables hidden behind your PC. This can be an open section between the base and the wall or even a second baseboard for your cables.
Hidden in plain sight
You can hide your cables in pipes for a steampunk build, make unique pathways for cables to run, or even use RGB cables to give them a unique glow for a futuristic aesthetic.
Recessed in a wall
This is the most complex and permanent solution. You’ll need to make a space inside the wall for your cables to run. Doing so lets you mount your PC flush to the wall while also allowing airflow behind the PC. Use plywood to build a cabinet to prevent losing cables.
This is best done on drywall. Do not cut into the studs. Instead, drill holes to pass cables through them.
Design tips
Set a style guide
When choosing your design, it’s best to pick a style. Styles can include Steampunk, futuristic, cyberpunk, or anything else that matches your creative vision. From there, you can pick materials and any extra designs you want to add. Choose a color pallet that fits your goal.
Base
Backboard
The first thing to do is to figure out where and how you’re mounting your PC. Make sure you have enough wall space to fit your entire rig, as well as a solid enough wall to anchor everything on. If you’re mounting your PC to concrete or brick, there isn’t much to worry about here.
If you’re mounting to standard drywall, you will need to attach your rig to wall studs. Studs are normally spaced 16 to 24 inches apart. You can use a cheap stud-finder or just knock on the wall and listen for the lack of reverb to locate a stud.
Case
If you’re using a case and a wall mount, make sure your mount can hold all of the weight of the case and the hardware inside of it. If you’re using a TV mount, remember that TVs are back weighted, while most PCs are top-weighted and can cause uneven weight distribution.
Materials
If you’re going caseless, you don’t have to worry about buying one, but you will need to figure out what you’re going to attach everything to. What material you choose doesn’t really matter and is more of an aesthetic choice, but it can affect things like grounding while building a metal case.
The thickness of your baseboard is going to depend on the material you use. Whatever you use should be thick enough for your screws to hold. Just remember, the heavier the backboard, the more weight hanging from the wall.
Metal is easily the strongest material you can use, but also the heaviest. Depending on what type of metal you use, something softer like copper or aluminum will be easier to drill through. A metal bit will still work for something harder like steel but might take some more work to drill through.
Plastic is the lightest material, so you’ll want to make sure it’s strong enough for everything to be mounted to. Acrylic may be the best bet. It’s durable enough to be drilled through without fraying.
Wood is the simplest, easiest, and cheapest to get. It needs to be thick enough for your screws to hold down your hardware, but even an inch or two of plywood or boards will be fine.
Hardware layout
Once you’ve set up your baseboard, you can lay out your hardware. While there are a few recommended ways of laying out your open-air PC, you’re free to do a lot more than you would with a normal case.
More freedom doesn’t mean you can place things anywhere, though. A motherboard will still heat up if you place your GPU above it using a riser cable. You’ll need to cool them both down with a fan or liquid cooling unit.
Don’t forget that it doesn’t need to be one big board. You can have multiple bases, make shelves to hold equipment on, or make an extension of your computer desk. Just remember, the more you add to a single baseboard, the thicker your base should be and the more anchored to the wall it needs to be.
Cutting holes and attaching hardware
Once you know where your hardware is going, you can start drilling holes for screws and cutting passageways for your cables. If you have a sturdy enough material, you can even cut an air vent behind the motherboard or anything else that might generate heat.
You want to make sure you have enough room for your cables to pass through without bending too much and that they all fit without being too tight. Be careful not to cut so much room that you weaken your board.
Once your holes are drilled and your measurements are made, you can start the install. Screw your hardware down, and make sure it stays. You may need to buy additional mounts for things like your graphics card, but this will depend on what hardware you use.
Running cables
Once you’ve got your baseboard arranged, you can run your cables. Cables can be run directly up the wall out in the open or up through a conduit pipe to hide them. You can even hide them inside the wall with a passthrough plate or behind your PC with a built-in cabinet.
Since you aren’t using a normal case, your normal cables may not reach between hardware, and if you’re using multiple boards, you will definitely need longer cables. Once you layout your hardware, measure the distance for the cables. Be sure to add a little extra length for slack.
You can always hide excess cables, but you don’t want to buy new cables because you’re just an inch too short. Planning out your build ahead of time will prevent this.
You can try to squeeze your hardware closer, but you may not be able to do so, depending on your anchoring situation. If you need to, you can build smaller boards and place them over top of your motherboard. However, if you haven’t prepared for this, it can add excess weight and heat.
If you’re using multiple boards, you will want to connect any cables that go between the boards after you’ve mounted them to the wall.
Now is a good time to plug in your PC and make sure it all works. Troubleshooting while attached to the wall is a very challenging task. If the system comes on, you’re clear to start mounting.
Additional attachments
Before you mount your PC, you will want to add any additional designs you have or attachments. Now is the time to position headphone rests or shelves for additional storage. This is also an ideal time to run your RGB lights or set up your steampunk cable pipes.
If you’re worried about dust or damage to the base, plexiglass can be attached over the top of your baseboard. This works just like a normal case. Place several supports long enough so that the plexiglass doesn’t touch your hardware, then attach the glass. It’s recommended to place a bolt to remove the glass easily if there is an issue.
Mounting your PC
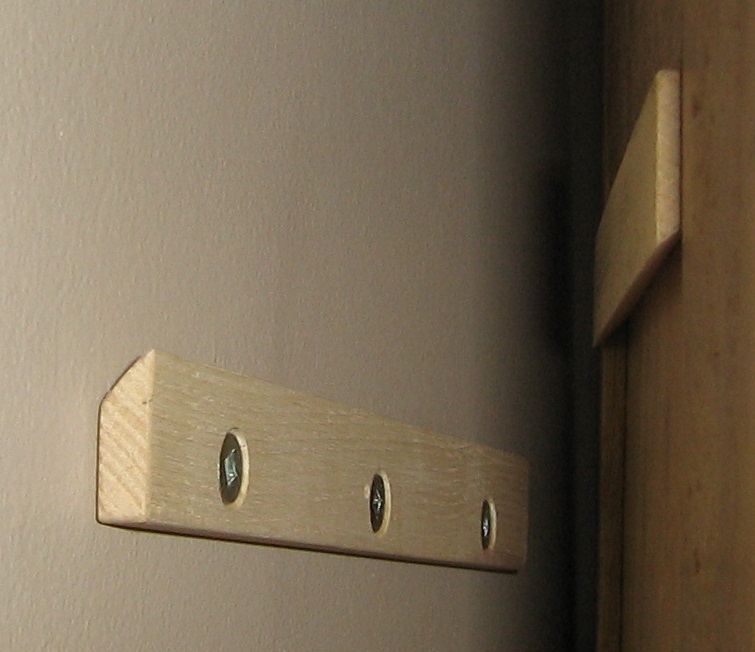
With the PC baseboard built, now it’s time to mount it. There are several ways to mount the PC, depending on your wall and how well you want it anchored.
Directly screwing your baseboard to the wall is a secure way to mount your PC, but you may want to use spacers to give your PC more airflow. If you’re worried about support, something as simple as placing plywood on the wall allows you to place screws anywhere you need.
You can build a cleat out of whatever material you need. Make one cleat for the wall with a matching edge to the one attached to the PC, allowing it to slide into place and hold it. This allows you to quickly remove your board at any time. Make sure your cleat is placed in a supported area, like a stud or brick, because this will hold all of the PC’s weight.
Final touches
Once your PC is on the wall, now is the time for any finishing touches. Run any final cables, attach your monitors and other accessories. Make sure everything turns on correctly.


Published: Sep 14, 2021 11:54 PM UTC