The “Breaking The Bunker” mission is one of DMZ season four’s most badass tasks, offering an exhilarating combat challenge for you to take on with your Warzone squad. It’s a Tier 5 mission set under the Black Mous faction, so be ready to engage in a deadly fight to complete it.
Besides the action-packed experience, you get a contraband weapon and tons of XP for finishing the mission—definitely worth the effort if you’re wondering.
Breaking The Bunker Tier 5 mission in Warzone 2 DMZ season four, explained
The Breaking The Bunker mission in Warzone 2 DMZ starts at Vondel’s University location, where you’ve to pick up and exfill a designated custom weapon to complete the challenge. Then, you’ll need to face two of the game’s most powerful bosses in a difficult fight and defeat them.
To be precise, the mission has two stages you’ll need to keep track of:
- Pick up the weapon from the Phalanx dead drop.
- Kill the Rhino with the weapon.
- Kill the Sniper with the weapon.
Pick up the weapon from the Phalanx dead drop near the University in Vondel
The first phase of the mission is pretty simple; all you’ve to do is visit the Phalanx dead drop near the University—behind a gas station in Vondel—and extract the kitted-out Kastov 762 encased in it. Now, you’ll have to safely exfiltrate with the weapon.
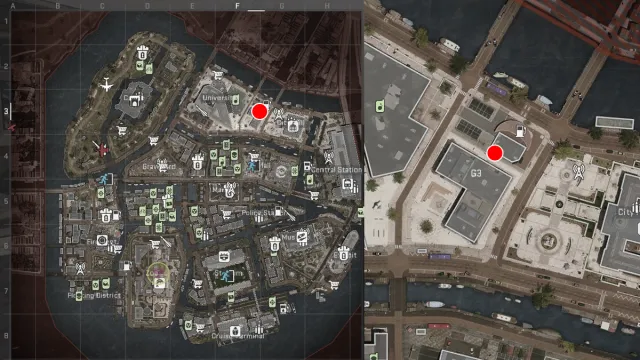
Note that if you lose the weapon before extracting it safely, you’ll have to return to the dead drop to collect it again.
The Kastov 762 you just extracted may not seem powerful enough, but it’s the only weapon you should use to kill the Rhino (and the Sniper in the next stage) if you want to complete the Breaking The Bunker mission in Warzone 2 DMZ successfully.
That said, you can use any other weapon to lower the bosses’ health and then use the Kastov 762 to get the kill.
Kill the Rhino with the Kastov 762 you just extracted
Now, with the weapon equipped in your loadout, head over to Al Mazrah’s cutthroat Koschei Complex, where the heart of the mission awaits you.
Now, before you head into the building, we definitely recommend gearing yourself up—it’s going to be an exhausting battle. Do visit a Buy Station to equip armor plates and grab some supporting equipment like shock sticks, grenades, and self-revives.
Also, we recommend not choosing the solo route, as it can get devastatingly difficult to defeat the Sniper and the Rhino alone. Bring some friends over!
When ready, enter the complex through any entrance of your choice, although the Oasis route will lead you to bosses faster. Enter the Chemical Plant, and here, you’ll need to collect the Factory Admin Key. You can equip Night Vision Goggles for better vision in the dark. The key should be in one of the vents at the center of the room.
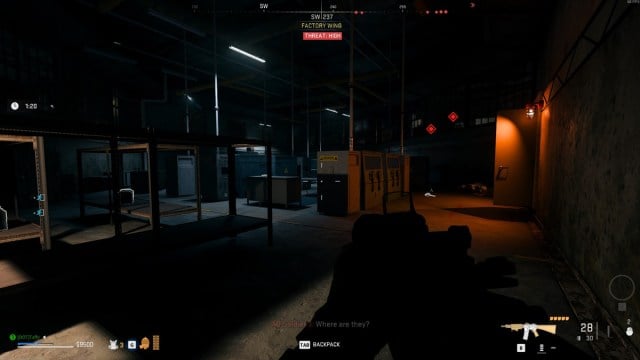
Next, proceed to the Factory Wing of the complex and use the key to access it. Inside the Factory Wing, you’ll have to make it through groups of AI enemies to reach the area where the Rhino is.
To defeat the Rhino, aim for their head with the Kastov 762. Ask your teammates to use Shock Sticks on them while you continue firing. You should be able to take the Rhino down after emptying a few magazines.
Make sure that YOU kill the Sniper with the custom Kastov 762 you collected from the Phalanz dead drop only.
Kill the Sniper with the same Kastov 762
After defeating the Rhino, head to the second floor, where you’ll find the Sniper. But they’ll be protected with plenty of traps, so make sure to be wary. You can ask your teammates to take care of the traps and throw Shock Sticks or grenades at the Sniper, while you rain bullets on them.
Make sure that YOU kill the Sniper and with the custom Kastov 762 you collected from the Phalanz dead drop only. If one of your teammates accidentally grabs the kill, you’d have to redo the entire mission again for it to count for you.
Once you defeat both bosses, the Breaking The Bunker mission in Warzone 2 DMZ will be complete, and you’ll be rewarded with the Dual Kodachis (contraband) and 20,000 XP.


Published: Sep 13, 2023 10:13 am