Indiana Jones and the Great Circle has plenty of mysteries to solve, and one of the first is finding Strange Inscriptions around Vatican City. If you’ve got your camera but don’t know where to look, we have the details you need.
The camera in Indiana Jones and the Great Circle is one of the key tools you earn early in the story, providing a quick and easy way to earn Adventure Points to upgrade your skills and abilities. In some situations, it’s also vital to progressing the story.
In Vatican City, the quest orientating around the Stolen Cat Mummy is the first instance where the camera is necessary to complete the puzzles in front of you and we’re here to help.
How to take Photographs in Indiana Jones and the Great Circle
After receiving the camera from the Post Office inside Vatican City, the camera is one of the quick-select options in your satchel. By pressing left on the D-Pad and selecting the camera, you can equip it at any time—but the game makes it clear when there’s something you should take a snap of.
When approaching a point of interest where the camera is used, a camera icon appears on the top-left of the screen, and you can quickly equip the camera by holding left on the D-Pad. Then, use the left trigger to use the camera and the right trigger to take a photo.
Some photograph spots, including the Strange Inscription, need to be taken at the correct angle. While this can seem fiddly at first, the key is to take a photograph when small lines appear at either side of the viewfinder and at the top and bottom. This is the game’s indication that you’re looking at the correct spot.
Before you head off to find the Strange Inscriptions, take a photo of Ernesto to complete a quick and easy achievement.
All Strange Inscription locations in Indiana Jones and the Great Circle

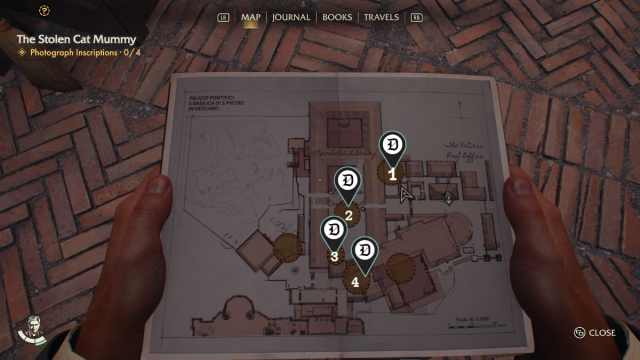
Each of the four Strange Inscriptions around Vatican City in Indiana Jones and the Great Circle are found on fountains, making them much easier to identify. However, some are harder to find than others and require traversing. You can see the marked locations in the image above.
To make it easier, we’ve also listed each of the Strange Inscription locations below with further details on how to reach each point.
Strange Inscription 1
Leave the Post Office and head right, passing through the large doors into a courtyard. Then, take the second door on the right and push the gate open. You are entering a garden area, which is clear to see from the giant green bushes.
Head right to the back of the area to find the first fountain, whip out your camera, and take a quick snap.
Strange Inscription 2
Exit the garden area and turn right, passing through the doors to return to the Belvedere Courtyard—the area right outside the Library, where Antonio began your quest. Head towards the big fountain in the middle for the next spot.
The right side of the fountain nearest the Library is where the next Strange Inscription is found, so take another quick snap. You’re halfway there.
Strange Inscription 3

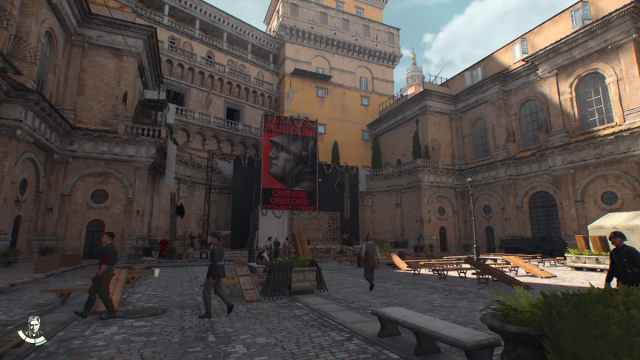
Stay in Belvedere Courtyard and head to the furthest side from the Library. You should see a giant, red Mussolini poster, so head towards it—but be careful of arousing suspicion from nearby fascists. I found hugging the left side to be the safest route.
Behind the Mussolini poster, climb the scaffolding until you reach a balcony. On the right side, there’s another fountain with the third Inscription. Take a snap, and you’re nearly there.
Strange Inscription 4
From the third fountain, turn around and find the scaffolding on the left side of the balcony. Climb this and head across the roof at the top to find the final fountain with a Strange Inscription, then take a photo.
Head back to the scaffolding you climbed up to reach this section and use the handy zipline for a quick return to Belvedere Courtyard, then head back to the Library to show Antonio what you found.


Published: Dec 9, 2024 08:16 am