The Hacker’s Den is level four in Ghostrunner 2, and it has a new level structure that makes finding collectibles a little more difficult. Don’t worry, that didn’t stop us from swiping all 13 (15 if you count the Level Challenge, which the game doesn’t for whatever reason).
This guide will walk you through locating and (more importantly) actually reaching all eight Memory Shards (10 including the Level Challenge), three Artifacts, and one Audio Log hidden throughout The Hacker’s Den.
Ghostrunner 2: All hidden collectible locations in level four—The Hacker’s Den
This level doesn’t have a linear starting and ending point like the first three did. There are three terminals you need to hack, and it is up to you which order you do so in. The level isn’t quite an open world, but there are tons of different paths you can take.
What does this mean for collectibles? Reaching them is much more confusing, at least in my opinion. In this level, there are:
| Memory Shards | 10 (eight on the map, two from the Level Challenge |
| Artifacts | Three |
| Audio Logs | One |
| Swords/Glove Skins | NA |
Remember, all hidden collectibles show up on your minimap. It is crucial you take advantage of this to know when you’re in the right area, especially on a level like The Hacker’s Den where you can traverse a huge area in any path you.
Primarily, this guide is to help you figure out how to reach collectibles, not to tell you what part of the map they’re hidden in. Your minimap does that second part better than anyone could.
Ghostrunner 2: All Memory Shard locations in The Hacker’s Den
Memory Shards tend to be the least “hidden” of all collectibles, probably because they actually make Jack stronger. Artifacts might sometimes need some unhinged parkour and problem-solving to reach, but Memory Shards usually require minimum effort.
Use your minimap, keep referring to this guide, and be aware that you are looking for eight Memory Shards hidden throughout the level—plus two earned in the Level Challenge Terminal for a total of 10 Memory Shards.
Memory Shard one
This is a nice and easy one. A few minutes (20 minutes if you die as often as I do, two minutes if you’re good) into the level, there’s a ground-pound shockwave guy waiting at the end of a bridge.
Cross the bridge towards the Cornucopia billboard, then turn right. You can see the first Shard at the other end of a gap. Some lightweight wall running will get you across that gap.
Memory Shard two
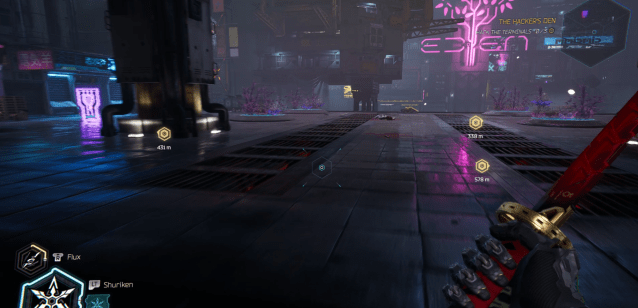
This one only gets a screenshot instead of a video, because it would be genuinely impressive if a player was able to miss it.
One of the first times the level really opens up into a large outdoor area, there is a huge violet neon Eden advertisement with a tree. When you’re entering this area, you can see the second Memory Shard about 20 feet past the doorway on the left.
Memory Shard three
There’s a segment where you jump through a small alleyway into a new area. As you enter this new area, your minimap will pop off with new collectible icons. Try not to get overwhelmed and take it one at a time.
The first one you can snag in this new area is actually right behind where you landed from the alleyway, just turn around and you can see it nestled in on the right.
Memory Shard four
This one is very close to several other collectibles, which I will be referring to as the catwalk area. It’s an outdoor corner between two buildings that has a railing leading to a new area with a long perpendicular catwalk above it. Perhaps the easiest way to know you’re in the “catwalk area” is to look out for that overwhelmed feeling about how many mini-map icons you have.
In this area, an air vent seems like it wants you to continue forward by landing on the catwalk. If you bounce in place on the air vent instead, you can turn right and see the fourth Memory Shard on a platform you can grapple to.
Memory Shard five
Past the catwalk area, there is a spot where the minimap shows two Memory Shards pretty much right on top of one another. One requires a bit of finessing to access a building, the other is just on top of that building tucked away behind some crates.
Memory Shard six
This is one of the most intensive Memory Shards I have encountered in Ghostrunner 2. Before you get to the catwalk area, you exit a building by flipping a switch and lowering a red laser barrier. Then, to reach the catwalk area, you slide down a big cement slide. The sixth Memory Shard is back in that building with the lasers but requires the catwalk to reach.
From the catwalk, take that air vent we bounced on earlier, only this time, air dash to a pole on the left to swing safely across. From there, dash through the cracked vent on the catwalk, and follow the path around to the sixth Memory Shard.
Memory Shard seven
Another unmissable Shard, unless you actively go out of your way to do so. As you’re closing in on one of the three terminals you need to hack in this level, there is a section where you jump back and forth between railings to avoid lasers.
The seventh Memory Shard is at the end of the railing on the right.
Memory Shard eight
The last Memory Shard can technically be missed, but it actually requires ignoring your minimap completely. There is a warehouse room just before one of the hacking terminals in this level—the last Memory Shard is in the corner of this warehouse room and requires no parkour or cleverness to snag.
Memory Shards 9-10: The Level Challenge
In the Level Challenge during The Hacker’s Den, you can earn two additional Memory Shards by getting Silver and Gold medals respectively.
The challenge is called The Run, and it is one of those challenges where you just have to complete a parkour course as quickly as possible. There aren’t any gamechanging shortcuts or anything—you will most likely just need a couple of tries to become crisp and clean.
Here are some tips to help expedite your journey to Gold and two Memory Shards:
- Dash often—Getting on railings, getting off railings, etc.
- Keep momentum moving forward—Stay close to the ground and try not to allow grappling hooks to lob you into the air.
- Memorize the course—You need to know what’s coming. Don’t get discouraged if your first three tries have awful times. Mine did. The more you try, the faster you get.
Ghostrunner 2: All Artifact locations in The Hacker’s Den
There are only three Artifacts you can find in The Hacker’s Den, but doing so is a bit of a doozy. This level had me needing much more time to figure out a few of the puzzles than any of the previous levels did.
The Artifacts found in level four are:
- Video Tape
- DIY Toy
- Ghostrunner Miniature
Artifact one: Video Tape
The first Artifact I found is Video Tape, but because of the layout of this level, you can get them in any order.
There is a segment where you move between two rooftops by using a grappling hook followed by a curved billboard. As soon as you land on the second rooftop, you can find a hidden vent passageway on the right. The entrance is tucked away behind some wooden pallets.
You can see this Artifact earlier inside this same building—only it is locked behind a laser barrier. I spent a good 10 minutes looking for a way to get past, but the answer was not inside the building. You see the Artifact here, but the only way to get it is to move on and trust the process.
Artifact two: DIY Toy
This one is easy to spot, but tricky to grab. When you’re nearing one of the hack terminals, there is a section where you bounce across three wall-running platforms and land on a railing. From the platforms, you can see the Artifact on the left, but the railing leads to the right.
Here’s the trick—don’t try to jump left from the last platform; you won’t make it. Instead, jump right to land on the railing, and then jump 180 to switch directions on the railing so you are brought straight to the Artifact.
Artifact three: Ghostrunner Miniature
This one is pretty easy to nab. You need reflexes and timing, not creativity. Towards the end of the level, you can clearly see this Artifact behind a laser barrier. If you look left, there is a cracked wall that you can break.
Past the wall is a fast-moving laser field in a hallway, with one spot for cover halfway through. You just have to time it right to use the cover and evade the laser. Once you’re past, you will find Artifact Three—Ghostrunner Miniature.
Ghostrunner 2: All Audio Log locations in The Hacker’s Den
There is one lone Audio Log in The Hacker’s Den, and it is found in the “catwalk section” (that spot with two catwalks above a vent that has tons of collectibles right around it).
From the catwalk that was reached using the air vent, turn around and take the two poles to reach the other one directly above the area you started at before using the air vent. From there, a curved railing leads to the rooftop of a higher building.
While you’re on the railing, you can jump off and air dash through a section of the building about halfway up. The Audio Log is inside.
Ghostrunner 2: The Hacker’s Den Collectible summary
All said and done, you should have found:
10 Memory Shards:
- Eight hidden on the map
- 2 from the Level Challenge
Three Artifacts:
- Video Tape
- DIY Toy
- Ghostrunner Miniature
One Audio Log
- “Proposal”
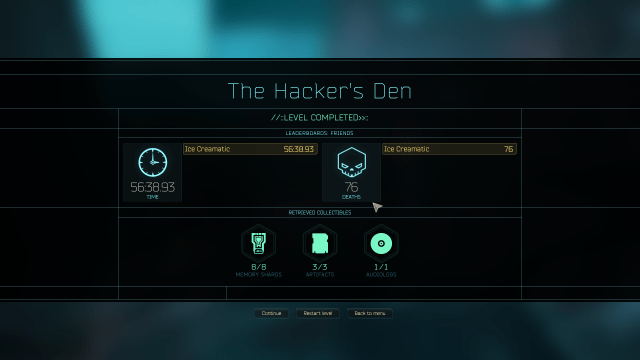
Remember to check your level summary to see what you’re missing, which can be done in the Level Select menu at any time. Also, remember Memory Shards from Level Challenges aren’t included in this summary, so it will only show eight when there are 10.







Published: Oct 23, 2023 07:14 pm