Even 10 years after launch, DayZ doesn’t make anything easy. Learning to play the game is hard enough, but hosting your own server is a whole different story. Thankfully, once you learn how, it’s fun to mess around with your very own server, so I’ll show you the way.
Before you can host your own DayZ server
First things first, you need to own the game. So, if you haven’t already, buy DayZ on Steam. While you don’t technically need the actual game to host a server, you do need official server files for DayZ, and wouldn’t you know it, you get them when you purchase the game.
With the game in your collection, open Steam, search for DayZ in your library, then look for the “DayZ Server” option. Download this—it’s just under 3 GB. You should also download the actual DayZ game so you can test if everything works.
Once that’s done, move on to the next step.
How to set up your DayZ server

You’d think that all you have to do is run your server from Steam, but that couldn’t be further from the truth. You’ll have to go through folders, edit files, and create a file yourself. It’s not difficult, but can be annoying.
So, the first thing you need to do is navigate to your DayZ Server folder. Get there by right-clicking the DayZ Server on Steam, then select Manage, then choose Browse Local Files. Clicking this will take you to your DayZ folder. If you want, you can move this folder to an easier location (such as the root of your C drive, for example), to make the next step easier.
Next, back in the DayZ Server folder, you need to create a start.bat file. This is essentially the “start button” for your server (yeah, the start button doesn’t come included, if you can believe that).
Creating a start.bat file for your DayZ server
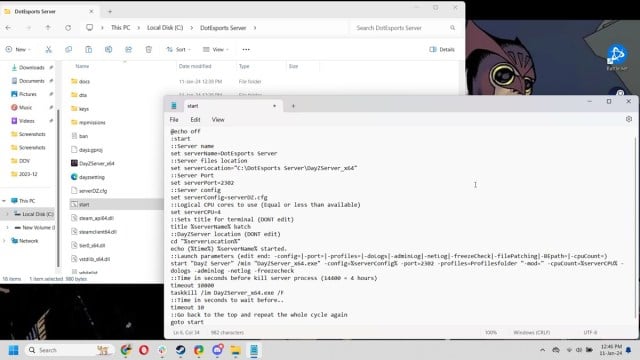
Make a new text document file in the root of the DayZ Server folder and rename it to start.bat (.bat needs to be the extension). Then, right-click on the start.bat file and edit it. This will open a text document. Copy and paste the following text into the document. Thanks to Legendary Server Development Discord for the .bat file (you can also download the entire bat file from this link if you don’t want to create it yourself):
@echo off
:start
::Server name
set serverName=yourname
::Server files location
set serverLocation=”C:\yourname\DayZServer_x64″
::Server Port
set serverPort=2302
::Server config
set serverConfig=serverDZ.cfg
::Logical CPU cores to use (Equal or less than available)
set serverCPU=4
::Sets title for terminal (DONT edit)
title %serverName% batch
::DayZServer location (DONT edit)
cd “%serverLocation%”
echo (%time%) %serverName% started.
::Launch parameters (edit end: -config=|-port=|-profiles=|-doLogs|-adminLog|-netLog|-freezeCheck|-filePatching|-BEpath=|-cpuCount=)
start “DayZ Server” /min “DayZServer_x64.exe” -config=%serverConfig% -port=2302 -profiles=Profilesfolder “-mod=” -cpuCount=%serverCPU% -dologs -adminlog -netlog -freezecheck
::Time in seconds before kill server process (14400 = 4 hours)
timeout 10800
taskkill /im DayZServer_x64.exe /F
::Time in seconds to wait before..
timeout 10
::Go back to the top and repeat the whole cycle again
goto start
Now that you’ve copied and pasted the .bat file, you still need to tweak a few things. First, you need the server name. In the fourth line, where it says “yourname,” create a name for your server. You also need to specify the location of your server folder (this is why I recommend you move it to an easier location than the default Steam folder). You can fiddle around with some other settings here, but I don’t recommend you do. For now, save the changes, and you can move on to the next file.
Configuring the serverDZ.cfg file for your DayZ server
In your DayZ Server folder, find the serverDZ.cfg file and open it as a text document (works with notepad). What you need to do here is make sure the serverName matches the same one you put in your start.bat file. You can fiddle around with the rest of the settings, like setting up a password for your server or enabling certain game settings. The only thing that really matters is that the server names match.
Port forwarding for your DayZ server
The next thing you need to do is open up ports for both your router and your PC. This looks more difficult than it is. Essentially, you just need to open your browser and type 192.168.0.1 or 192.168.1.1 and enter your router settings. Now, there are a ton of routers out there, and each one has different settings, so if you aren’t sure how to open ports for your router, just google the router name. The ports you need to open are TCP/UDP 2602 – 2605.
Make sure you open these ports for the IP address of the PC that’s hosting the server.
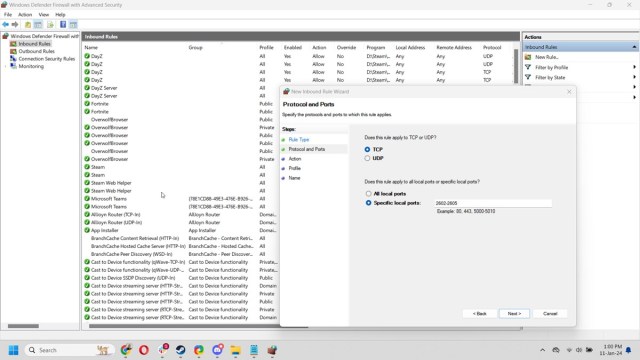
Now, you just need to open ports from the PC, and we should be good to go. Open Windows Defender Firewall with Advanced Security. Select Inbound Rules and type out the ports you want to forward (2602-2605). Create four rules like this. Two Inbound rules (one for TCP and one for UDP) and another two Outbound rules, again TCP and UDP. Make sure all the rules allow these ports.
Believe it or not, we’re done now! All you have to do is click on the start.bat file, and your server should start running. Open DayZ, and you should be able to see your new server on the launch screen under Community Servers.
If your server isn’t running or isn’t showing up, you probably didn’t configure your router ports correctly.
Hopefully, after all that trouble, you now have your own private server where only you and your friends can play. Have fun!


Published: Jan 11, 2024 10:45 am