
Setting the Stage is technically the third level in Ghostrunner 2, but that’s only because the boss fight at the end of level one counts as one level. In any event, this is the level that introduces the game’s most important collectible item Memory Shards.
Memory Shards upgrade the level of Jack’s Motherboard, which in turn allows for more Upgrade Chips to be equipped, and also automatically unlocks new Ultimates. Finding hidden items is no longer just for collectors and completionists—now, the secrets will actually make you stronger.
Read on for a walkthrough of how to find every Memory Shard and hidden collectible in Setting the Stage.
Ghostrunner 2: All hidden collectibles in level three—Setting the Stage
This level introduces Memory Shards, and it wastes no time in sprinkling them around for players to find.
There are nine Memory Shards in Setting the Stage, in addition to two Audio Logs and one Sword.
The first Memory Shard is given to you for free at the start of the level—you quite literally are not allowed to miss it, and two Memory Shards are acquired by earning Silver and Gold respectively on the Level Challenge Terminal.
| Memory Shards | Nine (seven hidden on the map, two from the Level Challenge) |
| Audio Logs | Two |
| Swords | One |
| Artifacts/Gloves/Motorcycles | NA |
In total, there are 12 collectibles to be found or earned in Setting the Stage. Be aware—the level summary screen does not include the two Memory Shards from the Level Challenge, so it shows seven as the number of Memory Shards in this level. In reality, there are nine.
Ghostrunner 2: All Memory Shard locations in Setting the Stage
Again, I want to warn you not to be confused by the way Memory Shards are tracked in this level. The game tells you seven, but there are nine. The reason it says there are only seven is because that is how many are hidden on the map—the other two are earned in the Level Challenge.
When finding these Memory Shards, it is very important you make use of your minimap. Shards and all other collectibles have distinct icons on the minimap, and taking advantage of this is far and away the best way to know you’re in the right place.
This guide is mostly to help you actually reach the Memory Shards once you’re in the right general area—as that is the hard part.
Memory Shard one
The first Memory Shard is quite literally unavoidable because it is introduced as a tutorial item at the start of the level. The reason I am including it here is because it does count towards the total in the level summary screen. Once you’ve completed the tutorial at the beginning of Setting the Stage, you’re at one out of seven Memory Shards.
Memory Shard two
Once you’ve drained the water and got your first look at the massive haunting space leading towards the cathedral entrance, you can actually see the second Memory Shard on a ledge against a pillar.
There are two ways you can reach it—you can either follow a secret path around the right side of the pillar to circle around, or you can finesse some wall running and dashing like I did in the video below. The wall-running method is faster, but much riskier.
- Follow the secret path on the right
- Or save time by wall-running, but risk death
Memory Shard three
This one is in the same room as the second, and almost set up in the exact same way. In fact, it’s even easier to reach. This room is so long and repetitive that it’s tricky to try to explain the exact location, so you should use your minimap for that part. The Memory Shard is marked by a purple icon on your minimap.
Here is a video of it’s location, just so you know you have in fact found the one I’m talking about and didn’t miss something.
- Just past the previous Memory Shard
- Totally out in the open
Memory Shard four
The fourth Memory Shard is actually also in the same long corridor as the first few, only it’s hidden slightly better. But, only slightly.
Use your minimap to reach the Shard’s general area, and you should notice the icon is saying the Shard is below you. If you slowly approach the ledge, you can drop down to its location safely. Just don’t try it with speed, or you will likely fall to your death.
Memory Shard five and six
I’m putting these two together in one section because they are so close to each other that it would be pointless to separate them.
At the end of the long corridor towards the cathedral, there is an area with several floating platforms, railings, and air lifts. This is also the location of the Level Challenge for Setting the Stage, so keep that in mind for after.
Once you’re on the main platform where the Level Challenge Terminal is, look up and to the right. You should see a button that can be hit with a shuriken to power up the air lift. Throw a shuriken at the button, and quickly hop into the lift, making sure you land on the rail.
One Shard is at the left end of the rail, the other is at the right end.
- Above the Level Challenge Terminal
- Throw a shuriken to activate the lift
- One is on the left, one is on the right
Memory Shard seven and eight
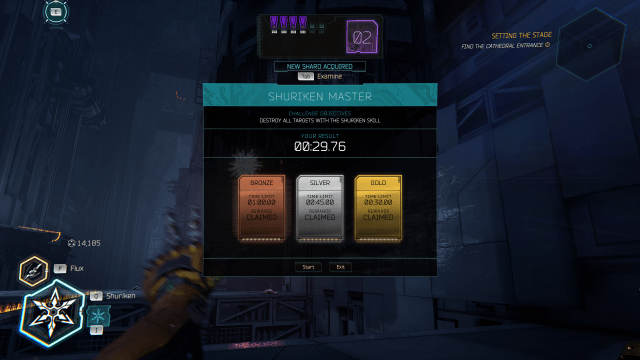
My two personal favorites—the Level Challenge Memory Shards! The challenge on this level is called Shuriken Madness, and all you have to do is hit 15 targets in under 30 seconds to obtain both Memory Shards.
Chances are, you’ll need a couple of tries before you are able to get all 15 targets in less than 30 seconds, but once you get the hang of it, it shouldn’t be too difficult. Here are some tips to help you out:
- Targets spawn in three sets of five
- Targets are in the same place every time. Play the challenge a few times, and memorize their locations
- You have unlimited shurikens during the challenge
- Don’t move too much—all targets can be reached from the area around the Challenge Terminal
- Focus Mode does NOT slow down the timer, you’re better off spamming three shurikens at a target than taking the time to meticulously aim
Using these tips and five or 10 minutes, you should be able to earn gold and get two Memory Shards from this challenge.
Memory Shard nine
Last one and it’s an easy find. One of the last rooms in this level has a platform reachable by swinging from grappling points and enemies posted up like they’re in a weird formation waiting for you. Instead of swinging across, turn left. It’s right there.
- Before the last room in the level
- Turn left instead of swinging across the gap
Ghostrunner 2: All Audio Log locations in Setting the Stage
There are only two Audio Logs hidden in this level—one comes very early on during the water draining portion, and the other is about halfway through the path to the cathedral.
Like all collectibles in Ghostrunner 2, your minimap will give you the location of the logs—the tricky part is supposed to be reaching them, not knowing where they are. Make sure you check your minimap constantly while hunting for collectibles.
Audio Log one: “Mystery”
This Audio Log is found at the very end of the water-draining section. Once you’re able to go through the green door at the bottom of the well, turn right. There is a wall running platform leading to a vent, leading to the Audio Log.
- At the bottom of the water-draining section
- Turn right at the exit and wall run
Audio Log two: “Address”
This one is about half way through the path to the cathedral and doesn’t really have super distinctive landmarks nearby, so it’s very important you use your minimap.
There is a part of the cathedral approach where you are presented with an air lift leading to a handful of enemies. Instead of jumping in the lift, turn right and you can circle around the wall you just came passed. The second Audio Log is right here.
- Halfway through the cathedral approach
- Use your minimap to know when to turn
Ghostrunner 2: All Sword locations in Setting the Stage
There is only one Sword hidden in Setting the Stage, and it isn’t too difficult to reach. Keep in mind that Memory Shards are the only discernible mini map icon—the other collectibles are all marker with the same blue question mark.
Sword one: The Limb of Metal
This is a wicked and almost creepy sword that is totally worth picking up even outside of the desire to 100 percent levels.
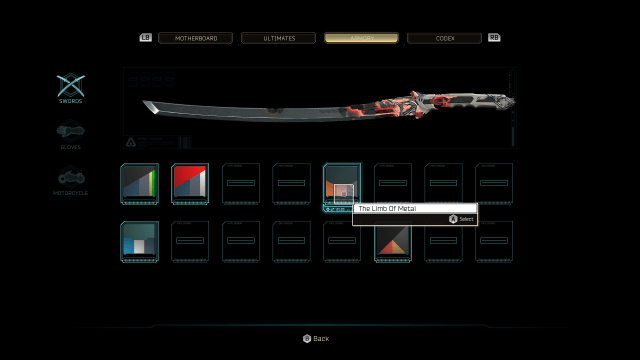
In the long journey to the cathedral, there is a spot with two parallel railings leading to the next platform. After going across, turn around—you’ll see that one of the railings can be jumped from to reach a wall run platform when taken back the direction you can from. This platform leads to Limb of Metal.
Ghostrunner 2: Setting the Stage Collectible summary
All in all, you should have found nine Memory Shards:
- One for free at the start of the level
- Six hidden through the level
- Two from the Level Challenge
Two Audio Logs:
- “Mystery”
- “Address”
One Sword:
- Limb of Metal
If you missed anything, you can replay levels at any time, so there is no need to panic. Make sure to also check your progress in the levels’ collectibles, which can be done from the level select menu or at the end of levels.
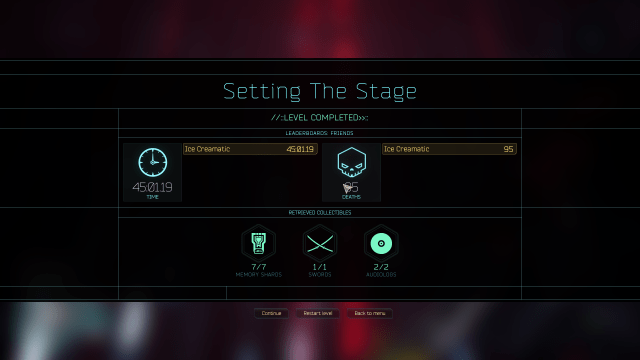
Remember, the summary will only show seven Memory Shards because it isn’t counting the two from the Level Challenge. In reality, there are nine.


Published: Oct 23, 2023 09:11 pm