
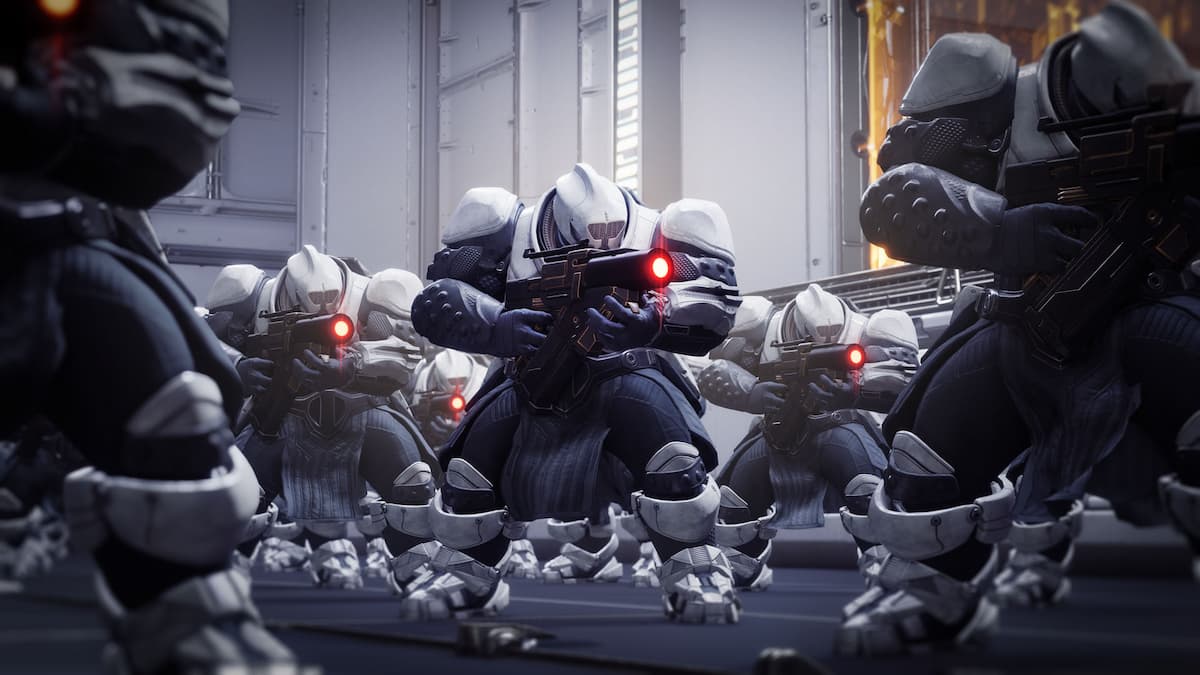
The Caretaker was one of the banes of day one Vow of the Disciple raid attempts in Destiny 2, and for good reason. There is a lot that can go wrong in this boss fight, even without contest mode enabled, and players can expect some trial and error before they beat this section.
The Caretaker fight takes some mechanics from the first part of the raid and also employs the Vow of the Disciple symbols, which are part of all encounters and even of bonus mechanics. The fireteam has to stop the Caretaker’s advances and prevent it from touching the obelisk on each floor—the same one that displays symbols throughout the first encounter. If he does get too close to the obelisk, the fireteam will wipe.
The boss will slowly continue to climb up the stairs in the arena on his way to the obelisk, but guardians can delay its advance by stunning the Caretaker using specific mechanics. Doing so should give the rest of the fireteam enough time to do the rest of the steps and set up for a damage phase.

Each successful damage phase will bring the fight one floor up through the Pyramid. There are three floors in the fight, plus a final stand. This means players have to do the mechanics three times, then whittle down the remainder of the boss’ health.
There are three roles involved in taking down the Caretaker: stunning, running/obelisk, and add clear. There are no hard-and-fast rules about how many people should be on each team, but having more than one runner is almost essential and more than one person should help stun the boss. Here are the mechanics you need to know for the Caretaker encounter.
Team one: runners
The first team (usually two people) will go through the doors behind the totem and physically collect up to three symbols from the area inside. They’ll return to the obelisk with the symbols in tow and shoot the same glyphs they collected, lighting them up on the obelisk until the game registers all of them.
Exercise caution when going inside, because the area is dark and there are several Major enemies on the other side of the doors. Staying inside will gradually give you a debuff that will kill you after reaching 10 stacks, so quickness is essential. Additionally, the doors close automatically after some time and will require an outside player to shoot the Resonant Splinters outside each door to open them.
The first runner should collect up to three symbols and memorize them based on their callouts. Players can target specific symbols or grab whichever ones are available, and the latter will likely be a more common choice in the later rounds of the encounter due to the increasingly complex design of those rooms. Guardians don’t necessarily have to pick up three glyphs, though this means the fireteam will require additional runs.
After the first runner has picked up their symbols, they will call out and shoot those symbols in the obelisk, just like in the first encounter. If the first runner picked up Grief, Knowledge, and Savathûn, for instance, the team should take out these three symbols on the obelisk. The second runner can (and should) help shoot the glyphs on the obelisk to save time because failing will require having to pick the glyphs again.
After shooting the first round of symbols, the second runner will go inside, pick up another set of symbols, and head back. Runners will alternate until they’ve shot all nine symbols in the obelisk. This should prompt a message in the chat saying “the ritual is complete; power awaits you,” indicating the damage phase will begin once the Caretaker reaches the platform.
The rooms get more complex further into the encounter, so communicate symbol locations with your other runner and make sure they have their eyes on the door to open it quickly.
Team two: stuns
Stunning the Caretaker is another essential mechanic to the fight, giving the runners enough time to collect and shoot all the symbols. At least one designated stunner is needed, though having two can make the strategy more clear-cut.
The Caretaker has two weak spots: its face and its back. Shooting its back will make it flinch and kneel for a few seconds, buying enough time for the rest of the fireteam. Players can only shoot the back after shooting the Caretaker in the face with a specific buff, however, and that’s the core of the stun team’s mechanics.
One player must get up close and personal to the Caretaker and bait one of its stomp attacks (It’s fairly easy to survive them outside of contest mode). If you get close enough, you’ll receive a buff after being slammed. This buff will let you shoot the Caretaker’s face and open up the crit spot in its back. Another guardian should shoot the weak spot on its back to put the Caretaker on its knees. Sometimes, pillars and scenery (especially in the first encounter) can block the line of sight to its weak spot on the back, so be careful.
Players can usually have two guardians or stun duty (one for shooting the face and another for the back weak spot) or have one designated stunner and three guardians dedicated to add clear and whoever has a line of sight can shoot the back. The strategies can vary and each has its pros and cons, so pick whatever works best for your fireteam.
Team three: add clear
The third role is clearing adds, but just because it’s not flashy, doesn’t mean it’s not essential. Several waves of Taken enemies will spawn throughout the fight, including snipers that can pick off or at least damage the rest of the team. Additionally, Scorn units called Abated Adherents will try to destroy the obelisks, just like in the first encounter, and clearing them is essential.
Lastly, the boss will also shoot some projectiles up in the air during stun phases. The add clear team can take them out when possible since these can pile up and hit other guardians. For add clear, we recommend running Witherhoard and a damaging Heavy weapon such as a linear fusion rifle or a rocket launcher.
Damage phase
After the runners shoot all the symbols in the obelisk, the damage phase will begin shortly after the boss reaches the platform with the obelisk. There will be three circles spread out around each floor, and players must stand within them to damage the Caretaker. Each circle will glow and give players a buff called Resonant Fury, signaling the boss will no longer be immune to damage. After a few seconds, a notification will pop up, and players can prepare to move to the next circle. As a rule of thumb, the damage phase will always begin from the side the Caretaker first appeared on the platform. So if he’s going up the stairs on the right side of the obelisk, set up for damage on the circle on the right.
Divinity may not be necessary, especially outside of contest mode, thanks to the Caretaker’s fairly large crit spot and the possibility of debuffing from other sources. That said, the Divinity bubble can help players land crits more consistently, especially when taking into account the visual clutter from other abilities. Well of Radiance doesn’t work too well since players will move out of each circle, but a well-placed Ward of Dawn can let players refresh the Weapons of Light buff after each circle for more damage. Lastly, if you’re using damaging supers such as Shadowshot or Nova Bomb, don’t jump when casting or you’ll stray too far from the plate and lose the buff.
If you’ve done too much damage to the Caretaker in a single phase, it can teleport out before the remaining plates activate. This is by design to ensure players will go through all the necessary floors.
Final stand
Players need to repeat the mechanics three times, shooting a total of three obelisks before reaching the final stand area. Shooting each obelisk will summon a set of stairs, bringing the fight further up and to rooms with more complex layouts. Doing enough damage to the Caretaker throughout the fight will bring it to the final stand, a top level that’s not entirely different from the rest of the fight. The circles will be spread out on a straight hallway, and guardians will stand closer and closer to the boss until its health goes down to zero.
After wrapping up the final stand, a chest should appear with your reward and set up the next stage of the raid: a jumping puzzle leading to the mechanic-heavy third encounter.
Recommended loadouts
Loadouts will generally vary on the seasonal meta, so if Particle Deconstruction or Breach and Clear ever return, players can expect to see linear fusion rifles or grenade launchers to carve themselves a spot in the damage meta. That said, Izanagi’s Burden paired with a rocket launcher with Auto-Loading Holster is a common strategy that doesn’t rely on Artifact mods and should be solid if balancing updates aren’t involved. Lasting Impression rockets can deal more damage, but the finicky delay between the hit and the detonation can cause some rockets to proc when the Caretaker is immune. Explosive Light can work as well if there’s enough generation of Orbs of Power.
Despite the removal of Particle Deconstruction, linear fusion rifles are also a decent choice for the Caretaker. And, of course, Gjallarhorn isn’t really a bad choice, especially since other players will likely be using rocket launchers of their own. Add clear players can also pair an add-clearing Exotic like Witherhoard or Trinity Ghoul with a high-damage Heavy and another Special or Primary (depending on what they have at hand). That said, players can pick whatever loadouts and weapons they’re comfortable with.


Published: Mar 10, 2022 11:54 am