Mastering recruitment in College Football 25 Dynasty mode is crucial to success, but a lot has changed in the decade since the last game in the series was released, so we’ve got an explainer of how the process works.
Recruiting in College Football 25 has many different layers and takes plenty of practice to perfect, but we’ll outline how to get started on building your perfect class.
How to recruit in College Football 25 Dynasty
Recruiting in College Football 25 has several steps, and it’s not just about picking a player you want and signing them for your team. Instead, it’s a process that will take a while and requires attention every week.
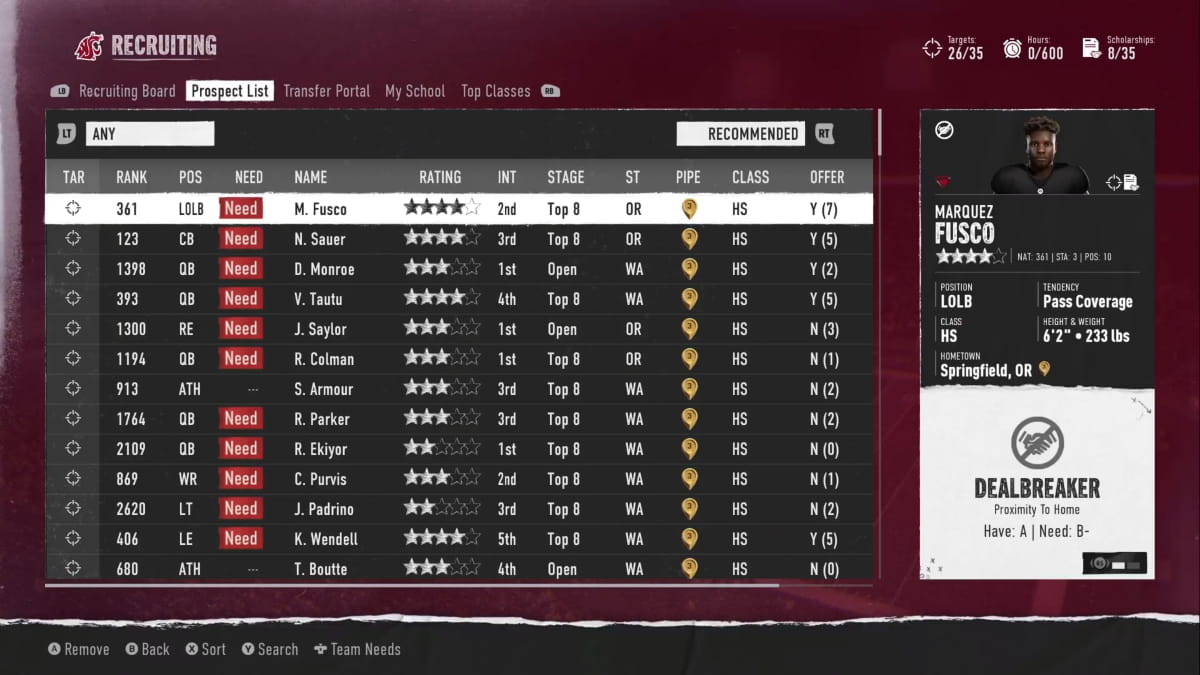
The first step is to add Prospects to your Recruiting Board. When you enter the Recruiting menu in Dynasty, the board is the first thing you see, but when you start, it will be empty. Navigate to the Prospect List menu to find potential players to recruit.
A complete list of players will be shown, with many different options to look at. To add a player to your Recruiting Board, hit A on Xbox or X on PlayStation to make them a target.
Each of the columns in the table is vital and can be a real asset when looking for Recruits, so we’ve outlined what each of them are here:
- TAR: Whether the player has been added to your Recruiting Board or not.
- RANK: The player’s ranking in their recruiting class.
- POS: The player’s position.
- NEED: Whether the player plays in a position where you need recruits to fill your roster.
- NAME: The player’s name.
- RATING: A star rating showing the quality of the player, with Five-Star Recruits being the most desired and hardest to secure.
- INT: The player’s interest level in your team. If the field is blank, you are not on their list of potential colleges.
- STAGE: The stage they are at in their decision-making process. Open means you can approach any player, while those with Top 8, Top 5, Top 3, etc., can only be approached if you rank in their top schools.
- ST: The player’s home state.
- PIPE: The player’s Pipeline, showing the area of the country where they are recruited from.
- CLASS: The player’s current class and year.
- OFFER: How many Scholarship offers the player has received.
You can sort the Prospect List by any of the columns above to narrow down your search, and you can also set custom filters, like identifying only four-star recruits or players from your college’s state.
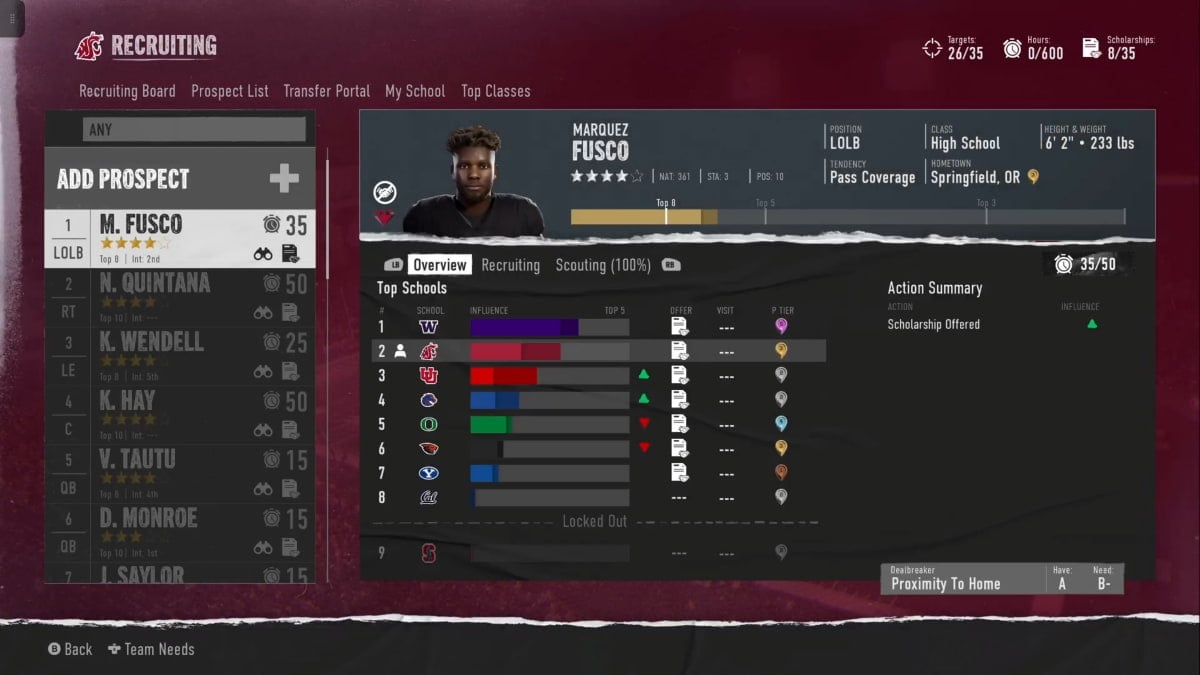
Once a player has been added to your Recruiting Board, the real work begins. Several actions can be taken to learn more about a player and influence their decision, all of which take hours, and the amount of hours available to you each week is shown in the top-right corner of the screen.
The Overview screen for each player on your Recruiting Board shows detailed insight into key aspects about the player, such as their top schools and Dealbreakers—if you can’t match a player’s Dealbreaker, then you are extremely unlikely to land them.
The first step for any target is to fully Scout them to uncover more of their attributes. Then, to influence their decision, you can use the ‘Add Action’ option to select an approach, including sending a DM to the player on social media and contacting friends and family. Each action adds influence to the player and has a different cost in hours.
You can also offer a Scholarship to a player, but you only have 35 offers available over the course of the season, so use them wisely. Though you can offer Scholarships to any player, it’s worth focusing only on those you have a decent chance of landing—don’t waste offers on five-star recruits if you don’t meet any of their needs.
Recruiting is a long process and requires attention every week, so do what you can to remain in the running. Players will narrow down their options regularly, and the goal is to stay above the cutoff line and in contention.
You should also manage your Recruiting Board every week to remove players who are no longer options and make room for more targets, as you can only have a maximum of 35 targets on your Recruiting Board.













Published: Jul 17, 2024 04:23 am