
Alone in the Dark holds back absolutely nothing when it comes to mind-bending puzzles, and unlike many games, they aren’t optional. In chapter one of the game, you will need to solve a puzzle centered around a mysterious Talisman, some journals, and a sequence of numbers.
Funnily enough, figuring out the correct code to put into this Talisman isn’t the hardest part of this puzzle—figuring out how to read the damn thing is. Alone in the Dark will make you repeat similar Talisman puzzles with different numbers in each chapter of the game, so taking the time to figure out the Talisman’s quirks is critical.
Here is how to solve the first Talisman puzzle in Alone in the Dark.
Alone in the Dark: How to get the code for the Talisman puzzle
Figuring out what numbers you need to input into the Talisman is the easy part of this puzzle. When you first find Jeremy’s Talisman in the French Quarter in chapter one, your character (Emily or Edward) will make a little comment about how Jeremy might have taken some notes that could be helpful.
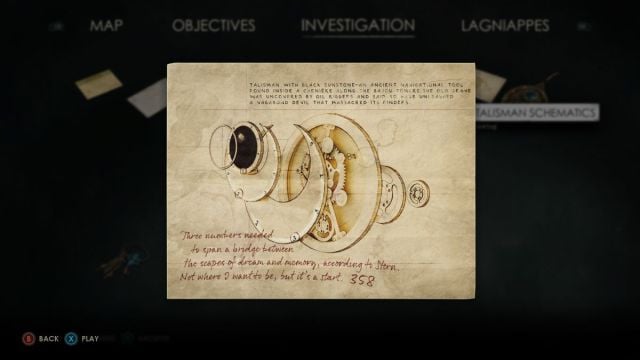
Great instincts, Emily or Edward! If you open your Investigation menu, you can get the code for the Talisman from the bottom of the Talisman Schematics clue that was picked up alongside the Talisman, or from the last page of Jeremy’s Notebook. The Schematics have the code written clearly, whereas the journal requires a bit of sleuthing with the drawings on the last page.
That said, while you should get the code from the Schematics this time, you will want to make a mental note of these drawings in Jeremy’s book and be ready to reference them down the line for other puzzles.
Like the Schematics clue says, the code you need to solve the Talisman puzzle is 358. Simply input this code into your Talisman and…wait, what? Don’t worry, I got lost here too. Figuring out how you’re supposed to use the Talisman’s rotating discs to input codes is far and away the hardest part of this puzzle. The next section will explain exactly how to properly input codes into the Talisman. Take notes, because you will be doing this time and time again throughout the game.
Alone in the Dark: How to use the Talisman to input codes

When you place the Talisman into the table slot in the French Quarter, you will quickly see that there are three separate moving parts; an outer ring, a middle ring, and an inner ring. Each ring is also numbered one to 10 like a rotary phone, and each ring can be rotated individually. It’s readily apparent that you’re supposed to use these three discs to input 358, but it’s not clear which rotational positions count as inputting a number.
They’re difficult to see, but three arrows along the Talisman show you which number is currently being input. The first arrow is at the very bottom of the Talisman, where South would be on a compass, and doesn’t move no matter which disc is rotated. The second arrow replaces the number five on the outer ring and indicates which number from the middle ring is being input. The final arrow replaces five on the middle ring and indicates a number on the inner ring.
The correct order to input a code is from the outside in, so to input 358, you want the outer ring rotated to where three is lined up with the bottom arrow, the middle ring rotated to where five lines up with the outer ring arrow, and the inner ring rotated so that eight lines up with the arrow replacing five in the middle ring.
The number five is replaced by arrows in the outer and middle rings, but the Talisman acts as if the number is there instead. It sounds a little complicated when written out, but a picture with the arrows highlighted should be very helpful as a visual reference.
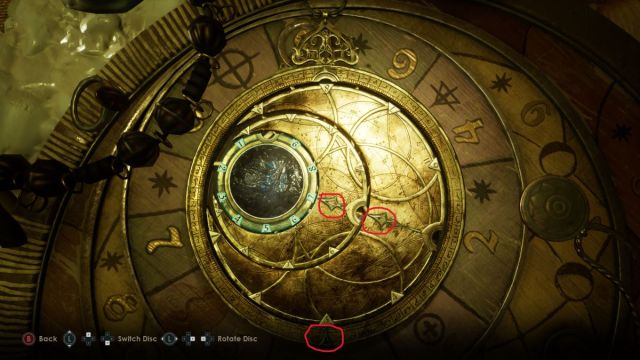
In the picture, the three arrows used to input codes are circled in red. Because the second two arrows are parts of rings, they move whenever a ring is rotated. For that reason, you always want to get the outside rings aligned first and work your way in. The Talisman shown above is set to 357, so the inner ring would need to be rotated one more time clockwise to reach 358.


Published: Mar 20, 2024 06:23 am