
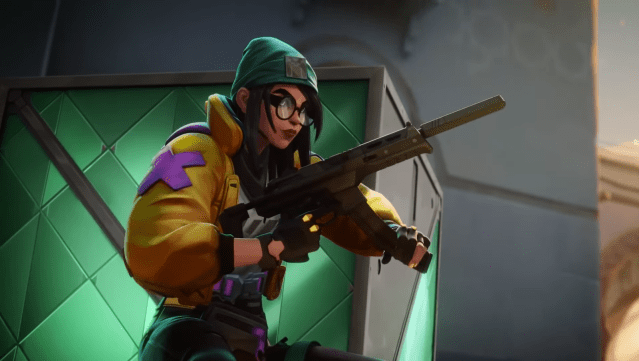
Bind is one of VALORANT’s most diverse maps with opportunities for many agents to excel. Having a sentinel like Killjoy will ensure that your team is able to protect all of the space around you, from the farthest flank to the spike itself.
Killjoy’s setups take time to master, not to mention time to position in the first place. She is also limited in range by her utility, constantly tethered to the radius in which she places it down. Yet this drawback is just one small factor for an agent that when mastered, can change the course of a match.
The combination of some of her abilities will help you reach the top of the leaderboard with ease and help out your teammates in the process. Here are our recommendations for the best Killjoy Bind setups.
The best Killjoy setups on Bind in VALORANT
Like in most of our map guides for VALORANT, we first want to emphasize the importance of understanding the nature of the map itself before we get into any crafty setups.
Bind is a staple in VALORANT due to its unique gimmick, its teleporters. Though Killjoy is relatively strong on this map, the teleporters actually present her with a huge weakness, since her opponents can rotate around her with ease as she is tethered to her own utility on a site. Therefore, when playing Killjoy on this map it’s important to make two observations.
Firstly, never react too quickly to the information you get from your utility. Even if your Turret sees someone in one area, their teammates could be spread across the entirety of the map. Selling fake executes on either site is a common play on Bind.
Our second tip is to never rotate too fast. Setting up any Killjoy utility takes a while, and for these setups, you’ll want to prepare them at the beginning of a round during the buy phase. Don’t put your hard work to waste by recalling your bots too early—you might not have time to set them up again.
With that in mind, here are some recommended setups for each site on Bind for Killjoy in VALORANT.
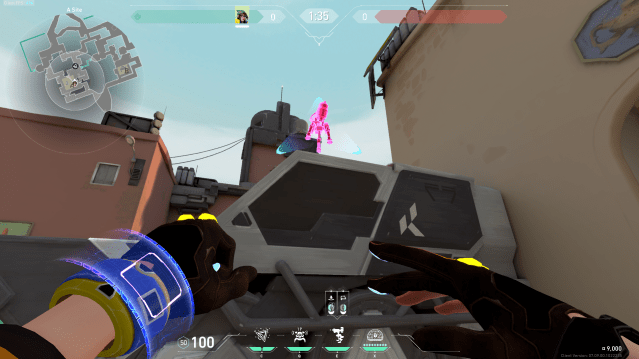
Killjoy Bind A-site setup in VALORANT

The Killjoy setups we suggest for A-site on Bind focus on watching A Short while also delaying a spike plant on the site’s most common areas. First, we will take a look at recommended turret placements
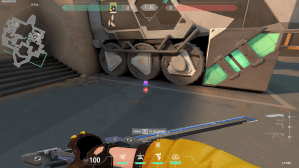
The first spot you can place your turret, Killjoy’s signature ability, is on top of the crate of boxes in the middle of A Site. Usually, Killjoy will benefit from having her turret placed in an elevated spot, since it will cause enemies to have to break their line of sight to any targets in order to shoot the turret first.
Mix up your turret placements by right-clicking after you pull out the ability in order to place the turret facing toward Killjoy.
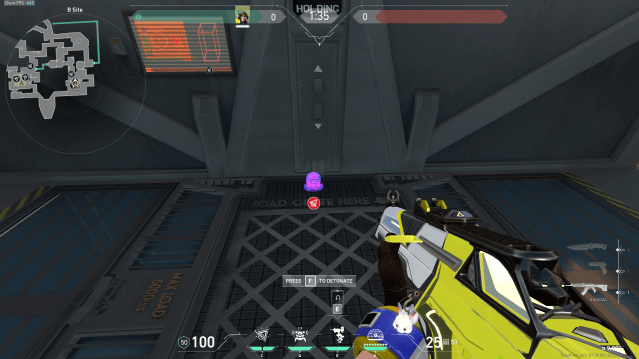
Make sure that when you place this turret, you right-click after pulling out the ability so that the turret faces toward the teleporter. If you forget this crucial step, your turret will just be staring at a wall. This turret will catch enemies executing out of A short, as well as any players exiting Lamps.
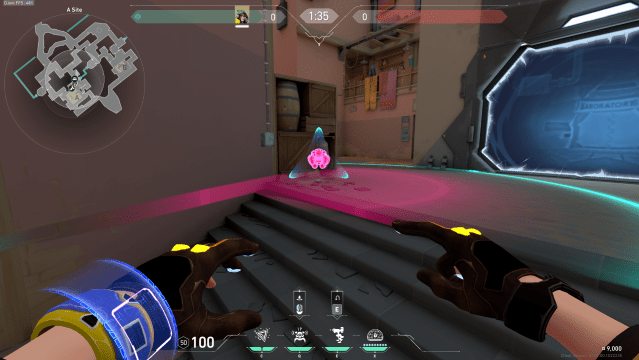
The second option for turret placement is on the large truck right next to the usual spike plant location if the enemies enter the site through A Short.
This turret placement also makes use of an elevated position while also serving as an indicator of enemies coming through either of the site’s entry points. The advantage of this turret is that it can watch both A short and catch enemies peeking through A Showers. The disadvantage here is that the turret can be easily shot down from long range, so combine it with a Viper or Omen smoke on A Short after the turret detects an enemy.
The two best spots for Killjoy’s Alarmbot are both around A Short. The first spot will catch enemies off guard as they execute onto the A site or attempt to go through the teleporter towards B.
This placement also ensures that enemies sitting far back in A Short can’t destroy the bot before it goes off. While someone may be able to hit it standing in the corner closest to the teleporter entrance or with another ability like a Raze grenade or Sova Shock Dart, it’s better to bait utility or bad positioning than to have the boy destroyed for free.
To maximize the potential of this Alarmbot netting a kill, try placing a Swarm Grenade right on top of it. Wait about half a second for the Alarmbot to detect an enemy, and activate the grenade.
If you’re looking for another effective Alarmbot placement for A Site, try putting one just inside Lamps, sometimes also referred to as “U-Hall.” This is a prime area for attackers to try and control, so you’ll want to know when someone has gained that space.
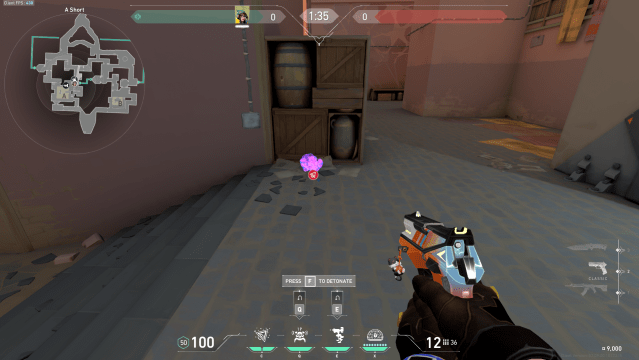
As far as Swarm Grenades go, the other two best places to put them on A Site are at the two most common spike plant locations. One right below Truck outside of A Short, and one in the corner of the triple box structure outside of the Showers.

Killjoy Bind B-site setup in VALORANT
Once again, our recommended Killjoy setups for the B-site on Bind focus on controlling site entry points and delaying spike plants.
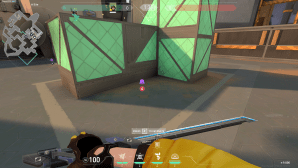
There is one perfect spot for Killjoy’s turret on this site, so perfect that it feels like it was made for her. If you set up your turret on the smaller box just behind the tunnel or tube-like structure in the middle of the site, the top of the turret will peek out just enough to see enemies in Hookah without sticking out too much.

As you can see, the very top of the turret is barely noticeable from Hookah, which will make your enemies distracted by the precise shots they’ll need to hit to take it down.
For Alarmbot placement, our favorite cheeky spot is just outside of Hookah on the ground, right up against the wall. This will catch enemies jumping down from the safety of Hookah onto the site, just to be caught in a trap. Place a grenade right on top of the Alarmbot or in that same “landing” area for maximum damage.

The other few Swarm Grenades that work excellently on Bind are also in the typical spike plant locations, which are right around the metal tube structure. You can be cheeky with your grenade placements here since the walls of the tube will prevent your enemies from immediately shooting them down or spotting them at all.
This grenade setup inside of the tube will also cover the plant locations outside of the Tube closer to Hookah and Garden. This placement is great, but you can try out a variety of other grenade spots, as the actual planting area on this site is relatively small.
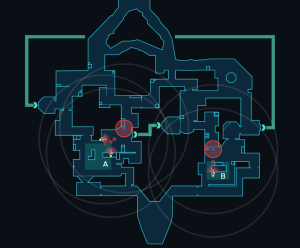
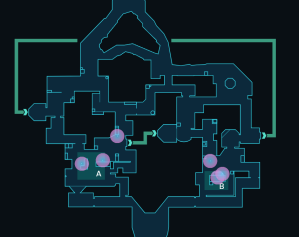
Here are our Valoplant.gg diagrams for the best defensive Killjoy setups on Bind, so you can see an overhead view of all the ideal utility spots.

These setups should have you dominating on Bind as Killjoy in no time. Remember to not rotate too quickly and trust in your utility placement. Armed with the best Killjoy Bind setups, you’ve got this in the bag!


Published: Nov 3, 2023 07:41 pm