Black Myth: Wukong is full of challenging boss encounters, but the final boss of Chapter Two, the Yellow Wind Sage, really takes the cake. He’s aggressive and agile, with a whole host of melee swings, projectile attacks, gap-closers, and more—and to make matters worse, a sandstorm limits your visibility.
If you’re struggling, you can complete an optional side-quest to get the Wind Tamer, which makes the fight against the Yellow Wind Sage much easier. Keep scrolling to find out how to get the Wind Tamer and read our comprehensive boss guide, complete with a video.
How to get the Wind Tamer in Black Myth Wukong
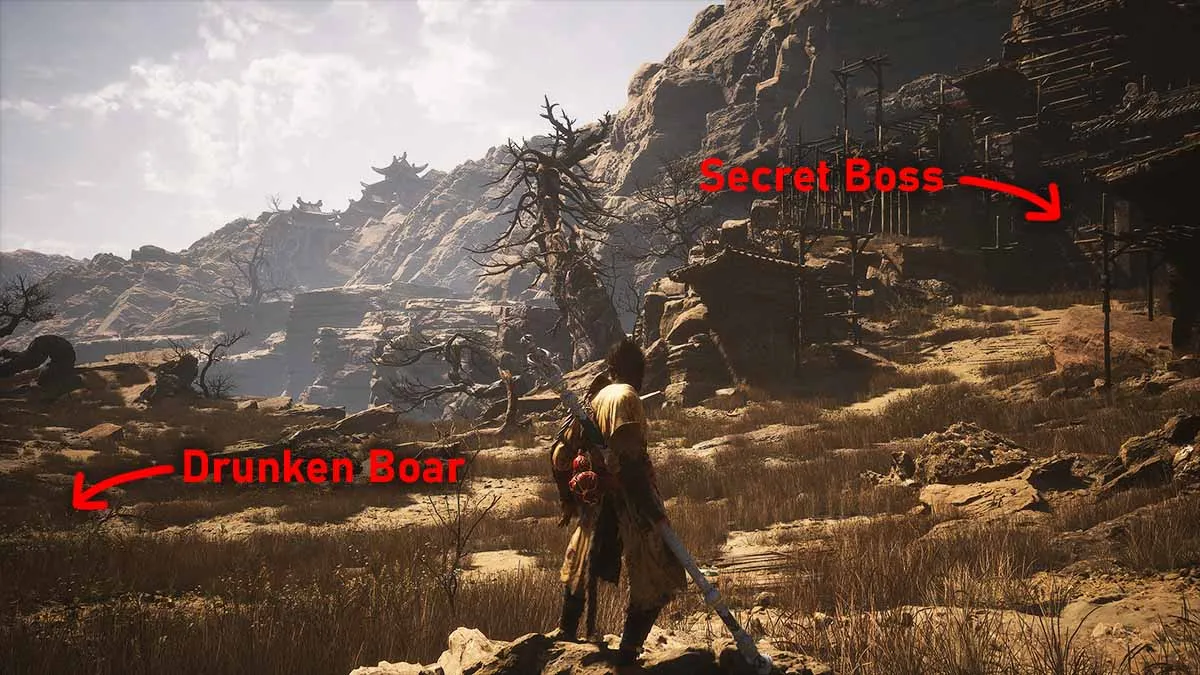
In Black Myth: Wukong, the Wind Tamer is a hidden item that interrupts the Yellow Wind Sage’s attacks, briefly stuns him, and dispels the sandy whirlwinds in the boss arena. It’s kind of like Margit or Mohg’s Shackle in Elden Ring.
You get the Wind Tamer by completing the drunken boar NPC’s optional questline in Chapter Two. You first encounter the boar after the Rockrest Flat Shrine in Fright Cliff. He’s intoxicated and asks you to get something to sober him up. Free the Man-in-Stone in Squall Hideout by defeating the Stone Mother boss, then return and buy the Sobering Stone.
Give the Sobering Stone to the drunken boar, then kill the First Prince of Flowing Sands in the cave in Sandgate Village, shortly after the Valley of Despair Shrine. He drops the Arhat Gold Piece. Return to where you met the boar—he challenges you to a fight, but isn’t too hard. After you beat him, he opens the door to a new optional area: the Kingdom of Sāhāli.

Here, you fight the Tiger Vanguard again. Afterward, you emerge in a wide, open, sandy region with a boss at the center—Fuban. This giant beetle monster is no walk in the park, but after you kill it, you get the Wind Tamer, which makes your fight against the Yellow Wind Sage far easier.
Having said that, the Wind Tamer isn’t strictly necessary to beat the Yellow Wind Sage. I didn’t even realize the Wind Tamer existed on my first playthrough, and beat the Sage without it. You can see my full boss kill in the video below. I recommend you watch it and mimic my moves, and if you have the Wind Tamer, use it when you’re feeling overwhelmed or when you have a straight-shot to victory.
Black Myth Wukong: Yellow Wind Sage boss guide
Phase one
The Yellow Wind Sage’s first phase is fairly straightforward. He only has a few attacks you need to worry about; a sweeping staff combo, a downward stab that releases a line of spears, and a jumping stomp attack.
You’ll quickly get used to avoiding the Sage’s sweeping staff combo (00:24 in the video) because he uses it very often. Fortunately for you, it’s quite easy to avoid; dodge to avoid the first (well-telegraphed) hit, then try to stay behind him while he finishes the combo. You can even dodge between the boss’s legs, and if you manage to stay at his rear, you’re free to attack until the combo ends. If you’re in the right position, his attacks won’t hit you and you won’t need to dodge.
The Yellow Wind Sage’s downward stab should be almost as easy to avoid—he jumps up into the air before slamming into the ground with his spear, so it’s very well-telegraphed. You can see it at 00:28 in the video. When he lands, he releases a line of erupting spears, so as soon as you see him go airborne, prepare to dodge to the side just as he lands. The spears can hit you even if you’re far away, and they track your character, so it’s better to stay up-close and personal and dodge at the right moment.
Avoiding the boss’s stomp attack is straightforward, too—he jumps in the air (although without as much altitude as the downward stab attack) before slamming his paw on the ground. It’s easy to dodge, but the tricky part is when he uses it right after another ability. Simply dodging to the side is usually enough to avoid this attack, and it doesn’t do a huge amount of damage, so don’t worry too much.
Above all, in phase one, the important thing is to not get cocky and don’t use your Light Attack Finisher unless you’re absolutely certain the boss won’t attack you. The Yellow Wind Sage is much quicker than you are, and your Light Attack Finisher locks you into an animation. Even if you start your combo when the boss is staggered, he’ll usually recover in time to hit you out of your Light Attack Finisher. Be prepared to end your combo early to avoid damage.
Phase two
Phase two kicks things up a notch. When you get the boss down to around 70 percent health, you trigger the phase transition (1:06 in the video). The Yellow Wind Sage starts whirling his spear around him, releasing a sandstorm that slows your movement speed. As soon as you spot the boss whirling his spear into a sandstorm, run away and stay away. You can’t damage the boss during this transition, and he launches several specters at you that are incredibly tough to dodge at close range. If you’re far enough away, you can even outrange his first strike entirely.
After the whirlwind, the Sage disappears, then starts summoning specters. The first specter (1:17) launches a trail of spears, then sweeps his spear three times. You can easily outrange this attack if you’re far enough away. The second specter (1:20) leaps at you, then leaps back with a vertical sweep. These attacks are easy to avoid if you dodge at the last second. Then, the boss reappears and immediately tries to hit you with a stomp attack (1:25). I get hit by the attack in the video above, but if you don’t fumble the timing like I did, it’s just as easy to dodge as it was in phase one.
In phase two, the whole arena gets enveloped by a big sandstorm, severely hindering your visibility, and constricting your movement to a smaller space. The sandstorm acts as a wall around the boss arena that you aren’t able to pass through, but the boss is. Sometimes, he’ll stand outside the wall and launch attacks at you. If that happens, back up and kite the boss back to the center of the arena.
In phase two, the Yellow Wind Sage also gains several new abilities. They’re all harder to dodge than phase one. His ground stab now releases an area-of-effect shockwave after a short delay (1:30)—dodge once to avoid the stab, wait around a second and a half, then dodge again to avoid the shockwave.
The Sage also gains a grab attack (starting with a kick) that’s incredibly dangerous. He can use it immediately after other abilities, so always be on the lookout (1:34 in the video). When the boss is about to grab you, he swaggers backwards momentarily, then lunges for a kick. If it lands, it knocks you up into the air and triggers a long chain of unavoidable attacks that deal a ton of damage. Get used to watching for this ability—most notably, the brief swagger he does before kicking you—and dodge the kick at the last second. It looks similar to the stomp attack in phase one, but if he’s about to stomp you, he doesn’t swagger first.
The Yellow Wind Sage often uses his specter’s somersault sweep (1:42) in phase two, but it’s one of the easier abilities to avoid. Dodge once to avoid the initial sweep, back up, then wait for the Sage to somersault toward you, and dodge again.
Lastly, the boss also gains a powerful roar attack (1:56) where he summons a Fuban, the beetle boss you fight to get the Wind Tamer, who erupts out of the sand before crashing down onto you. Make sure to dodge this attack at the last possible second because the hitbox lingers. It deals a ton of damage, and it’s easy to get caught out by dodging too soon. Make sure you’re looking up at the summoned Fuban (your camera angle changes automatically) and don’t re-lock-on to the Yellow Wind Sage until you’re clear of the beetle’s crash-landing.
Save your Spells until the boss is around 33 percent health, then rush him down. The second phase is vastly more difficult than the first, so it’s best to save all your firepower until victory is in sight. I used A Pluck of Many, Cloud Step, and Immobilize to push me to victory, as well as the Tiger’s Acolyte Spirit and the Azure Dust Transformation—although I don’t recommend the latter unless you have the Wind Tamer. Otherwise, it’s easy to get caught in the whirlwinds like I did.




Published: Aug 20, 2024 11:52 am